Dodge & Fuski's Rob Talbott explains how he creates the band's dubstep drum beats in Cubase.
In this column, I'll explain how I go about putting together the core drum parts for Dodge & Fuski's dubstep tracks — but don't worry if our tunes aren't your thing, as the practices and theories are applicable to many other styles! I've used Cubase 6 for the examples (you can hear these at http://sosm.ag/jan14/cubase-audio), but all my tips apply to pretty much any version of Cubase, and to other DAWs too. Also, note that the method I'll describe is by no means the be-all and end-all of drum production — but it has worked very well for me so far.
Audio Or MIDI?
For dance drum hits, most people will either use a sampler (Cubase's Groove Agent One will do the job well enough: see http://sosm.ag/dec09-grooveagentone), which they trigger via MIDI, or work with audio clips placed and manipulated directly in the Project arrangement page. There are good reasons to choose either approach. For example, using a sampler enables you to hot-swap one kick sample for another while auditioning your track, whereas working with audio provides a lot of useful flexibility, as well as instant visual feedback via the waveforms. The choice is yours, but I prefer working with audio, my key reasons being: it allows quick and easy visual editing of individual drum hits (you can make one kick hit shorter than another with a single click); the ability to see each hit's transient in relation to those on other tracks and the grid; and the ability to reverse, mangle or otherwise process audio in a way that would often be a lot more fiddly with MIDI sequencing alone.
The Beat
Let's start getting a simple dubstep beat together, using a separate audio channel for each drum sound so that each can be processed individually. I've taken some drum hits from our Prime Loops sample library, The Sound Of Dodge & Fuski (not to plug the library, but because it neatly skips any copyright issues) for my examples. Dubstep is, rather oddly, usually made at 140bpm with a half-step rhythm. I suppose that's technically 70bpm, but everyone seems to work at 140, so I'll continue that tradition.
First, pick a nice, punchy kick sample. You want something with a decent amount of low-frequency weight somewhere around 100Hz, but also with some high-frequency content around 5kHz that you can boost to get a nice 'click'. That will help you to give the kick some presence in a mix.
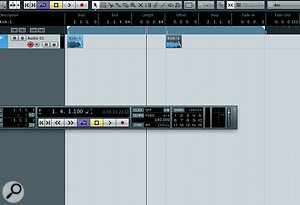
Next, lay out a simple pattern.  Place the kick drums at the beginning of each bar at 140bpm.Notice in the example how I've drawn in a short fade-out envelope on the hit, which is to avoid the kick sounding too 'flabby'. Dubstep being a very busy, noisy genre, having overlapping LF drum hits will cause problems with getting the track to sound powerful later on. You want everything to feel nice and tight.
You'll often find that you want to emphasise the kick sound by exaggerating frequencies around 100Hz and 5kHz, and to roll-off anything below 50Hz. Those frequencies hog headroom and are just not needed. Obviously the precise settings vary hugely and depend on your source material, but as a general rule these are good frequencies to reach for first when cutting or boosting to change a kick sound. If in doubt, listen to some well-produced tracks to get an idea of the kind of sound you want your drums to have, and try and base both your sample choice and any EQ'ing decisions on that. I've used Cubase's bundled Studio EQ for this tutorial, as you'll be familiar with that, but there are lots of other quality options out there (my current favourite being Fabfilter's Pro-Q).
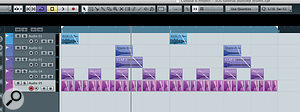
Next up is a punchy snare. You want a sample with plenty of weight around 200Hz (either as it comes, or courtesy of your EQ'ing) that has a nice 'whack' tone to it. Place copies of this between the kicks  Place the snares between the kick drums to form the basis of the half-step rhythm.to get a fairly standard pattern. Again, in the example, I've shortened and faded out the snare to leave just the initial punch. Although you're going to layer the snare with a more 'toppy' clap layer, you don't want the LF punch to have too slow a release, which could make your mix sound vague and muddy. If you like, you could even go in and add a transient shaper (Cubase's Enveloper works well enough for this) to give a bit more bite to the attack of the kick and snare, but be careful not to go overboard with this as it can cause quite an unpleasant and harsh effect when overused.
Now to layer a clap/HF-snare layer on top of the punchy snare. I've chosen a nice, sharp-sounding 909-style clap and placed clips so that their transients are aligned with those of the punchy snares. EQ out anything below about 500Hz to stop it sounding ugly and muddy when you add a reverb later, and to avoid ugly phase cancellations that compromise the punch of the first snare. The two samples should sit nicely together, giving both a pleasing punch and a nice HF slap. You may at this point want to play around with different combinations of punch/HF sample layers; sample selection is one of the most important aspects of dance-drum production and is probably the most frequent problem area in the demos I get sent from inexperienced producers. There isn't a magic way of picking the right samples — it's something you just learn to hear with time. But you can train yourself by listening to as much high-quality music in your chosen genre as possible, and try to identify the characteristics in the drums they use.
Filling In The Gaps
With these basic pillars in place, it's time to start fleshing out the groove. First, place a reverb on the clap/HF snare layer. This will help the beat feel less dry and will fill the gaps in nicely. In the example, I've set the reverb up as an insert effect (nothing else will be sharing the same reverb), set to about 40 percent wet. I've also tweaked it to remove any content below around 500Hz  Insert a reverb onto the clap/HF snare channel. It's important to remove excess LF content from the reverb to avoid a muddy sound that will cause problems with the mix., just to avoid nasty muddy reverb tails that will clash with other elements when you start adding your bass line and other elements.
Now for some hats. There's no real rule as to number of layers and how complicated to make your beat; it depends on the style of the track and how much space you have to play with in the mix. I opted for a fairly standard pattern, shortened the hits until they sounded snappy and again rolled off anything below around 500Hz; there's just no need for any LF content with cymbals and hats in this genre, and it pays to clean out the clutter.
Next, I chose two similar-sounding tambourine samples, the idea being that they should play alternately, to help things groove a bit more. Add in a tambourine pattern. Using two alternate samples and slightly shuffled quantisation settings helps to give a bit of groove. I also applied a moderate swing feel using Cubase's quantisation, to make things shuffle a bit. You should notice a huge difference to the feel of the track after adding in this layer, including a bit of a lift in its apparent energy. As with a lot of dance music, the feel of the track is often in the small details, and adding or removing a layer like this from the track can change its character entirely.
To finish off this basic dubstep drum loop, duplicate what you've made so far to double its length, add a crash cymbal at the beginning of the phrase, again roll off anything below around 500Hz.
Compression?
You might have noticed I haven't discussed compression, and that might surprise you for a dubstep tutorial. But there's a good reason for this: most sample libraries will supply you with suitably compressed drum samples, which are ready to drop into your track. If you're recording the hits live yourself, you'll almost certainly want to compress them to get a more meaty tone. That said, I very rarely use compression when making my tracks, other than on live sources such as vocals or guitars; don't assume you have to compress everything for the sake of it!
I'd consider my basic example a perfectly usable starting point for a dubstep beat, and having followed it step by step, you should now be more than capable of rolling your own and play with timing, length and timbre. It's totally up to you how much more you want to do to give it your own spin!
