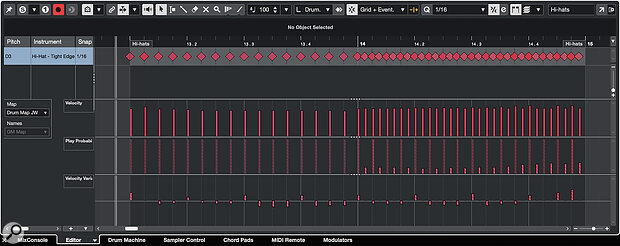
 The new Velocity Variance and Play Probability lanes let you easily experiment with performance variations to keep your MIDI loops from feeling static.
Cubase’s Play Probability and Velocity Variance tools can bring your MIDI patterns to life.
Unless you’re intentionally making music with a robotic and repetitive feel, it’s always useful to spice up your MIDI parts to make them feel more ‘human’. Abandoning quantise and playing complete parts in live from start to finish are obviously options, but not everyone has those performance chops, and if you happen to be working with short MIDI loops for things like drum, bass or piano parts, you might want to look to alternative strategies in any case. Cubase has plenty of options on this front, and if you have either the Pro or Artist editions of Cubase 14 there are two new options you can exploit: Play Probability and Velocity Variance. Below, I’ll consider a couple of examples, one a humble MIDI drum loop and the other a simple MIDI bass groove, to see whether we can give these MIDI performances a little extra life. I’ve created a few audio examples to accompany what’s written below, and you can find these on the SOS website at https://sosm.ag/cubase-0825.
Let The Lane Take The Strain
The new Play Probability and Velocity Variance lanes are available in both the Drum Editor and Key Editor windows. In both windows, you can toggle the display of these lanes via the pop‑open menu from the ‘+’ button located towards the bottom right. As for the note velocity lane, the Key Editor shows data for all notes in the MIDI clip, while in the Drum Editor, if you select a specific drum element (kick, snare, hi‑hat...) then you can see data just for that element.
In the Probability Lane, the probability that any given note will trigger on playback is determined by the value (height) of a vertical bar for that note, and this can be set between 100 (full height) and 0 percent. Each time the clip is played, these probabilities are applied. So, for any note with a probability less than 100, you’re essentially choosing a degree of randomisation. In the Velocity Variance lane, the values are initially set to zero (centred upon the line within the lane) and you can apply either positive or negative bias away from this on a per‑note basis. On playback, this then applies a degree of randomisation to the note’s velocity up to the maximum positive or negative bias you’ve set.
Used very subtly, both options can just add a degree of seemingly random variation as your MIDI clip loops during playback. However, if pushed too far and applied to every note, the coherence of the part can be lost. So, let’s consider some useful strategies to ensure that our efforts to inject a human feel also remain musical.
Changing Hats
Let’s start with one of the more obvious candidates: adding some character to a hi‑hat pattern. For example, the screenshot shows a two‑bar hi‑hat pattern in the Drum Editor. In the first bar, this is a simple 16th‑note pattern, while in the second bar the hits follow a 32nd‑note pattern. Some small amounts of positive or negative Velocity Variance have been applied throughout (so that the loop doesn’t sound too robotic on playback), but the hits placed on the 16th‑note grid are all set to 100 percent Play Probability. They will, therefore, always play, and thus ensure the pattern benefits from a consistent ‘core performance’.
That’s not the case with the 32nd notes in the second bar, though. These have Velocity Variance applied but they also have low Play Probability values. These start at around 10 at the beginning of the bar and reach about 35 at the end. On playback, therefore, each of these 32nd‑note hi‑hat hits have a relatively low probability of being triggered, but they’re more likely to be triggered towards the very end of the bar. The end result (which you can hear in the audio examples that accompany this workshop on the SOS website) is a variable degree of 32nd‑note syncopation that’s somewhat stronger at the very end of the two‑bar phrase. This can be really effective: a solid core to the part, but with some variations superimposed upon it each time playback cycles through the loop.
Don’t apply Play Probability to the core hits that give the drum part its foundation — instead, use it on ‘extra’ notes.
There are two general Play Probability strategies being combined in this example that make it more likely you’ll end up with a musically useful result, and they provide a useful starting point for your own experimentation. First, don’t apply Play Probability to the core hits that give the drum part its foundation — instead, use it on ‘extra’ notes. Second, don’t apply it everywhere. Focus on just a part of the overall pattern to give the variations themselves a sense of regularity. In this case, that’s achieved by the two‑bar structure (one bar played straight, the other with variations).
We can obviously apply these strategies to other elements of a drum part, and snare ghost notes (additional snare hits played softly and usually syncopated) are a case in point. Again, the core heartbeat of the kick/snare groove might be left intact, but additional snare hits, set initially with a lower MIDI velocity, can be placed within the pattern. These can then have some Velocity Variation applied. However, the key element is the Play Probability, and with suitable values you can control where these additional ghost hits are most likely to appear within the overall pattern. Again, I’ve provided an audio example (with some additional commentary) that demonstrates this in practice.
Accidental Bass
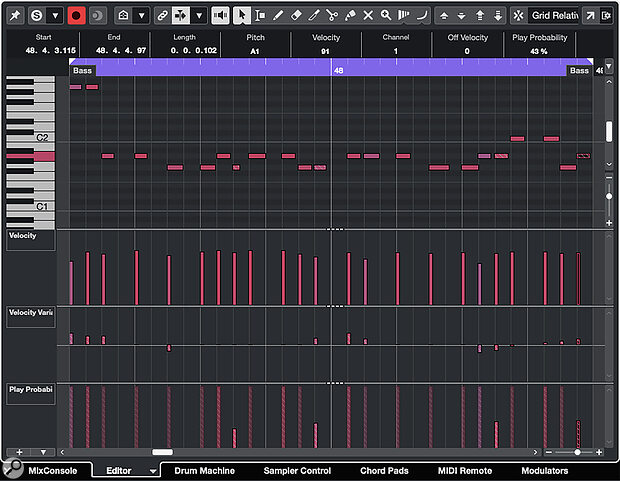
These same principles can be applied to instruments other than drums, and a good candidate is bass grooves. Again, a two‑bar looping pattern makes a good starting point and the screenshot shows the ‘after’ version. All the core notes of the performance have Play probability set to 100 percent. However, four additional ‘accent’ notes, placed in the second half of each bar, have been added to the part (you can hear both the ‘before’ and ‘after’ versions in the audio examples) and these have been given Play Probability values in the 30‑40‑percent range.
 Play Probability can also be used to add accent notes to melodic instruments such as bass.
Again, the core notes of the pattern play every time, but these accent notes pop in and out as the pattern is looped to add some performance variety in the second half of each bar. You can obviously adjust when/where these notes might appear (for example, only in the final bar of a four‑bar loop) and how busy the effect might be (more added notes). Of course, exactly the same principles can be applied to other melodic instruments.
Rein In The Randomness
Both Velocity Variance and Play Probability are, essentially, randomisation processes, and although you can steer those processes with the settings you use, it’s kind of the point that some unpredictable details will appear within the performance. You create your core loop, add some randomisation elements, and then copy that loop multiple times to occupy suitable sections of your overall arrangement (a verse or chorus, for example) along the project’s timeline.
Of course, while the results can be great, and very musical, they’ll also be different every time you hit the playback button. There might be occasions when you are fine with this but you might not get what’s desired when you hit Export to generate your final mix. So, is there a way to ‘lock in’ the best results from your randomisation experiments? Yes! The Merge MIDI In Loop function (from the MIDI menu) lets you do just that. You can use different combinations of steps to achieve this, but a sensible approach is as follows...
 The Merge MIDI In Loop command lets you lock in the performance variations, as shown here using multiple copies of the two‑bar bass loop from the earlier screenshot.
First, duplicate the required MIDI/virtual instrument track (the ‘sensible’ bit; you can always go back to the original if required) and then solo that track. Second, place the left/right locators around the copies of the MIDI loop where you want to lock in the Velocity Variance and Play Probability settings. Third, from the MIDI menu, select Merge MIDI In Loop, and in the dialogue box that appears make sure to tick the Erase Destination button. When you then click OK, a single new MIDI clip replaces all of the MIDI loop clips.
If you then open that clip in the Drum or Key Editor, you’ll see that your randomisation elements have been applied, and the Velocity Variance and Play Probability values reset. You can then audition sections of this new MIDI clip to find the best performance variations your randomisation efforts have created and simply copy/paste these as required along the timeline to create your final performance, complete with all of its interesting human‑esque variations. Ta‑da! Your super‑cool performance additions and accents will now appear at the same points every time you play through your project.
