Simon Millward demonstrates how to use the tools for extracting groove templates from audio recordings within most MIDI + Audio sequencers and offers his tips and techniques for using them to achieve more feel in your tracks. This is the last article in a two‑part series.
Last month I explored the basics of improving the live feel of your MIDI tracks using the various groove manipulation tools available, with reference to the real‑world example of James Brown's classic song 'I Got You (I Feel Good)'. As I've already demonstrated, there are many ways in which to create your own grooves. However, there are times when it is much more useful to fit the groove of your MIDI parts around that of an existing audio recording — for example, if you're building a track around a sampled loop. In such cases, you need to extract a groove template of some sort from the audio recording.
Though many hardware units now offer simple groove manipulation tools, dedicated facilities for extracting groove templates from audio are currently the preserve of software systems. However, these systems can be tricky to get the best out of, so I'm going to walk you through the process of generating a groove template from a loop of James Brown's 'I Feel Good' within Steinberg's Cubase VST in order to show you not only how to go about the process in general, but also to demonstrate the extent of VST's capabilities in this area for those of you unfamiliar with this sequencer.
For information on other software packages which offer groove extraction, take a glance at the boxes throughout this article.
Choosing Your Groove
 Careful selection and editing of audio is vital if tempo matching and groove extraction are to be successful.
The first thing you need to decide is which bit of audio you're going to use for the groove‑extraction process. If you're wanting to match your MIDI programming to a sampled loop then this choice won't tax the grey cells, but if you're wanting to impart the groove of a well‑known song to your own track then it's worth taking some time to consider which bits of the source material are likely to be most useful. Ask yourself which sections have a particularly pleasing groove, bearing in mind that live musicians sometimes get more settled into a groove the further they get into a track — as we found, in fact, when looking at the tempo changes of 'I Feel Good' last month.
You may find that there are a number of equally pleasing sections of the groove, in which case you should try to whittle down your list of sections in terms of the practicalities of extracting groove information from them. In which of the sections is the definition of the rhythmic instruments particularly clear? If attack transients aren't well defined, of if players aren't tight enough with each other, this can confuse the groove extraction algorithm as to where each beat and division of the audio is meant to be. Another thing to consider is how much the tempo is fluctuating through your chosen sections — if it changes too much, this could make the resulting extracted groove unconvincing.
If you find that you still have several sections of audio which are both satisfying and clearly defined, then it's worth using a number of them for generating groove templates. As I made clear last month, the key to a successful live feel is a constantly changing groove, and this can be achieved quite easily if you have a number of similar groove templates which you can alternate and combine. Finally, on a practical note, it is a good idea to copy the segments of audio you have chosen to separate audio files, allowing a little extra audio on either side of each to keep your options open for the next stage of the extraction process.
Trimming & Tempo‑matching
Taking the first of your audio sections, the first thing to do when extracting a groove is to trim the boundaries of the audio so that it loops correctly. Doing this allows you to use the automatic tempo‑matching function within many sequencers to superimpose your song's regular metric grid correctly on the audio. In Cubase VST, you do this from the non‑destructive Audio editor.
First set up by eye an approximate playback loop and then, with the loop playing, tweak it until you get the best‑sounding result. Obviously, you needn't pay any attention to any current bar and beat positions given in the editor window at this point, as these will be unrelated to the positions of the bars and beats in the audio at present. It may also help to switch off any snap‑to‑grid function in order to get the required editing resolution.
Don't be afraid to spend a bit of time getting the loop exactly right, as the precision of the loop is extremely important. Innaccuracies here will result in subtle innaccuracies in the eventual groove, and we have already seen last month how important subtleties are to a great groove. It is also vital to establish a good downbeat at the start of the loop, to make sure that your groove is not 'out of phase' with the sequencer's metric grid later. When you are satisfied that the loop is as good as you can get it, make sure the audio is highlighted and trim the section at the loop start and end points, deleting the unwanted audio outside these points. In Cubase, you can use the Snip Loop option within the Audio editor's Do menu.
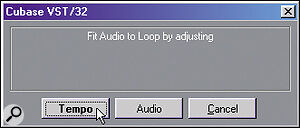
Next, you mark a time period corresponding to the number of bars you wish the newly trimmed audio segment to fill once tempo‑matching is complete. Often, the sequencer's loop markers are used for this. In Cubase you select Fit Event To Loop Range in the Do menu, which brings up a dialogue box where you can choose to change the tempo of the Song to fit its metric grid correctly over the audio. Once the tempo has been changed, double‑check that the tempo is matched by playing back the audio against the sequencer's internal click.
Extracting The Groove
 The algorithm which assigns Match Points in Cubase needs to be carefully set up to produce useful results. However, the points can be tweaked manually if required.
It is now time to establish where the main beats and their divisions occur in the audio material. These are usually the most strongly accented points in the audio waveform, and are referred to as Match Points in Cubase. They can be found automatically using the Get M‑points option in the Audio editor's Do menu. The dialogue this leads to includes settings for Sensitivity and Attack, which regulate how the analysis software finds the Match Points — when the process is done, you are able to view the Match Points under the audio waveform. Some experimentation is required to find the best settings for the particular audio being processed, and you should aim to get at least one point every eighth or sixteenth note, depending on the smallest beat division in the audio. Even when you've experimented with the settings, you may still find you're not getting the correct number of Match Points, in which case you may need to add or delete some of them manually, which Cubase lets you do with its pencil tool.
Bear in mind that each of Cubase's Match Points has a velocity value, indicated vertically, and that this velocity setting can be used to create a more natural groove. Consider tweaking the velocity values if comparatively unstressed beats have high velocity values assigned to them, or if accented beats aren't registering a high velocity setting.
Once you are satisfied with the number, placement and velocity of the Match Points, it's time to extract the groove from them. Open the Match Audio & Tempo editor from the Do menu. The audio waveform and Match Points are shown in the lower half of the display. In this window's Audio menu is the M‑Points To Groove option. This extracts the groove and saves it in the default grooves folder, whereupon it is immediately available within the Cubase Groove Control window. This raw groove will often only be usable on selected material, as was the case with my initially extracted groove. After all, as we gleaned from our analysis of the James Brown track last month, grooves tend to be intricately connected to the actual parts within a track's arrangement. However, you can create a more generally usable template by toning down a little of the raw groove's individuality.
To begin with, it can help to manually adjust any notes which are particularly 'out of time' to bring them just a little more into line with the metric grid — it is the most extreme timing variations which most tie a groove to a specific track. However, be careful not to overdo this, or you could upset the flow of the groove as a whole. Once this has been done, you can make the groove even more general‑purpose by applying a subtle iterative quantise — I suggest no more than a 25 percent strength to start with — to slightly tighten up the feel.
If the track you've analysed is based around eighth‑note divisions, and you want to apply it to parts with 16ths, then you're going to have to generate suitable new quantisation points in between the existing ones. Cubase allows you to do this easily, because it lets you open up your groove templates in a piano roll‑style editor from a button in the Groove Control window. What I do is duplicate the main eighth notes of the groove, drag them all a 16th note later, and then iteratively quantise them to be locked a little more tightly to the beat.
It can be worth saving a number of different versions of your new groove, in which the 16th notes get successively tighter. Not only does this allow you to experiment to find the most applicable groove for a given part, but it also allows you to make a part's timing tighter as the track progresses — a phenomenon which we saw demonstrated in 'I Feel Good'. Another thing to consider is dipping the velocity values associated with 16th‑note quantise points, in order to make them lighter and more natural‑sounding. As a matter of habit, try to remember to name your grooves according their resolution and character. Therefore the raw 'I Feel Good' groove could be named 'feelgoodraw8', while the 16th‑note groove might be labelled 'feelgoodraw16'.
More Grooves For Your Money
![]() If you have a groove template file which contains only one quantisation point per 8th note (top), you can copy, move and iteratively quantise these points, adding them to the original template to generate a new one with 16th‑note resolution (bottom).
If you have a groove template file which contains only one quantisation point per 8th note (top), you can copy, move and iteratively quantise these points, adding them to the original template to generate a new one with 16th‑note resolution (bottom).
You ought now to have a range of natural‑sounding grooves which will be good for humanising a wide range of material. However, there is more mileage to be got out of our extracted groove yet! The first way you can adapt this groove for different uses is to push the main quarter‑note down beats slightly early, while delaying all the up beats a little. This produces a very subtle shuffle feel which can help enliven uninteresting drum programming. It is best applied to the hi‑hat and snare and tends to make the rhythm sound tighter and snappier.
If your groove covers a number of bars, another nice trick is to push the groove's main beats a little early towards its beginning and end, while delaying them a little towards its middle. This cyclic pattern can work well, especially when applied selectively. Using it on just your bass drum and hi‑hat parts, for example, can produce pleasant flamming effects between them and the snare. The amount of push and delay you need to use will vary depending on the material to processed — obviously, a tight feel will only be able to cope with a little such tweaking before starting to sound messy.
Another fertile place for experimentation is in the field of velocity and duration. If your sequencer allows you to program these into the groove, then take the time to try it out, as this can make a great deal of difference to the feel. While Cubase and other sequencers do tend to be pretty good at extracting natural velocity characteristics, you still shouldn't necessarily take it for granted that the extracted velocity settings are the best for your track. If an extracted groove feels lumpy then it may well require attention in this area.
The first thing to realise is that velocity and duration are both responsible for accentuation. Heavily accented notes will usually tend to have a longer duration, for example, and short notes which require accentuation will need especially high velocity values to compensate for their brevity. Manipulating velocity values is a common practice in drum programming when creating variety and realism, and many hardware and software sequencers make this easy to do. However, because considerations of note length are often considered irrelevant when processing drums, it is tempting also to forget about duration when processing more melodic material. This is a shame, as many instrumental grooves are heavily dependent on duration characteristics — take staccato slap bass, for example. And even drums can benefit from subtle duration tweaking, so don't completely reject it out of hand.
A few experiments are worth doing and could produce exactly the effect you're looking for. Try the simple technique of accenting every other 16th note within a groove or, alternatively, try something more unusual, such as accenting the second of every three 1/16th notes to give a kind of continuous off‑the‑beat feel. Another angle to try is to increase the difference between the accented and unaccented notes in your groove — this usually only requires a single MIDI process and can make MIDI parts more lively and natural. Other options include randomisation of velocities and durations, or the use of undulating patterns of these values.
Testing The Grooves
Most readers will already be familiar with how to apply standard quantise functions within their chosen sequencer, and the use of groove templates is often very similar. In Cubase VST, the groove templates you create are available in the Groove Control window, alongside any other grooves you may have in the default grooves folder on the hard disk. From this window you can apply the groove's timing, velocity and duration scaling to any MIDI part in varying degrees, depending on the positions of three sliders. An invaluable element of this is that you get a chance to regulate and test the groove processing in real time before you apply it, and this is something which is excellent for experimentation. Other sequencers are even more flexible, carrying out all their groove processing in real time, which allows even easier tweaking.
I would recommend hard‑quantised bass‑drum, snare and hi‑hat parts for the initial testing of any grooves you extract. A four‑on‑the‑floor bass drum with a standard snare on the second and fourth beats of the bar is a good starting point, with hi‑hats at eighth or 16th‑note intervals. This allows clearly defined comparisons to be made between straight and grooved versions. It may also be appropriate to test the grooves on other drum and percussion parts you find yourself using frequently. The more characteristic the groove, the fewer types of material it's likely to work with. On the other hand, if you can find which type of part a particular groove does work with, then the pay off can be well worth the effort of finding it.
It is important to remember that the effects of groove quantising are often subtle enough that they can only be picked out consciously by very careful listening. The process of creating and testing grooves requires patience and the willingness to spend time developing an instinct for which kinds of combinations and relationships of groove templates work best. This means doing lots of comparisons and lots of trial‑and‑error processing. However, with a little practice, the results can be magical.
Groovy Train
The difference between monotonously programmed machine music and subtle performance is like the difference between painting by numbers and great works of art. Fortunately, music software is now beginning to become advanced enough to digitally approach our human analogue reality. Functions such as groove quantising are the cutting edge, which is why the creation and use of groove templates can be so exciting, and why they can teach us so much about what makes musical performances special.
| Here are a number of MIDI file groove templates which Simon Millward generated from James Brown's 'I Got You (I Feel Good)' for this article: • https://web.archive.org/web/2015... is the groove as initially extracted. • https://web.archive.org/web/2015... is a more general‑purpose version of rawfeelgood.mid. • https://web.archive.org/web/2015... has been quantised to make its effects more subtle. • https://web.archive.org/web/2015... is a more general‑purpose version of rawfeelgood.mid, and has also been adapted for processing 16th‑note material. • https://web.archive.org/web/2015... shows how the 'I Feel Good' groove can be adapted for a shuffle feel. |
Groove In MOTU Digital Performer
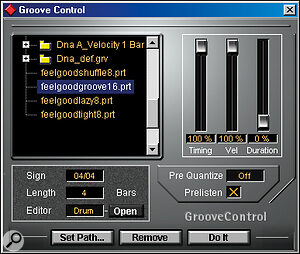 Groove templates within Cubase VST can be applied from the Groove Control window, with sliders showing the degree of timing, velocity and duration change.
Digital Performer doesn't have any dedicated features for extracting grooves from audio files, but there is a workaround possible, providing you're willing to put in a bit of effort. It may not be pretty, but it does work...
You have to make sure, to start with, that the audio from which you want to extract the groove is playing in time with DP's metronome. If it's not, you'll need to use the Adjust Beats function to get the time ruler to line up with main beats in the audio. What you then have to do is cut the audio into little bits corresponding with main rhythmic events. You need to be sure that the edits occur in exactly the right places if the groove extraction procedure is going to work successfully.
From the resulting snippets of audio you can now extract a groove, with a choice of which basic beat division to use. The timing and duration of the sections of audio are translated into timings and durations within the groove file. You can then go in and edit the groove file directly if you wish, and velocity values can also be entered. You can even set the sequencer up so that you can hear the results of any changes you make to the template in real time — a very powerful feature.
The implementation of groove quantising within the application is as advanced as one might expect from a leading MIDI + Audio sequencer, with both off‑line and real‑time processing available. Multiple real‑time groove templates can be used within one song, allowing the flexibility to implement many of the techniques described last month. Robin Bigwood
Groove In Cakewalk Pro Audio & Sonar
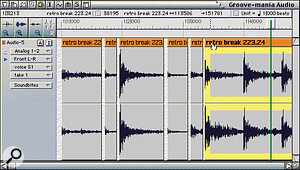 While there's no dedicated audio groove‑extraction in Digital Performer, its editing provides a workaround.
The groove quantise facilities within Cakewalk Pro Audio 9 and Sonar are a little more limited than those available in some of the other sequencers, in that groove quantising has to be applied as an off‑line process. That said, the groove templates are capable of modifying note timing, duration and velocity, and to a degree set by sliders within the off‑line processing window, so there's still plenty of flexibility. However, there is no way to directly edit the templates, which is a little limiting.
Groove extraction from audio is currently only included within Cakewalk Pro Audio 9 and Pro Suite, but not within Sonar. It is handled by analysing and musically interpreting peaks in an audio track. As you can imagine, this can be a slightly inaccurate operation, and this is apparently the reason for its omission from the current versions of Sonar. There are two stages to the process — the first is where you get Cakewalk to analyse the pulses or peaks in a chosen section of audio, not surprisingly called Pulse Analysis, and the second is called Timing Synthesis, where you tell Cakewalk what to do with the data it has retrieved.
In Pulse Analysis, you set a threshold in decibels, below which pulses are ignored. You also have an option to set a minimum length of pulses recognised, in case you're trying to extract the timing from a track with clusters of pulses that may hinder the process. A further option allows the analysis to ignore confusing syncopations. Once the analysis parameters are set, markers in the window show where the beats are detected, and you can evaluate whether it has been successful. Once analysis has been done to your satisfaction, you then proceed to the Timing Synthesis, where you are allowed to create and save a groove from the analysis data. Andrew Lewis & Mike Senior
Groove In Emagic Logic Audio
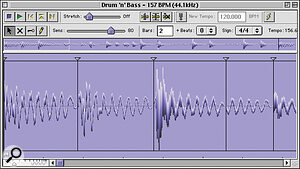 Propellerheads' Recycle can be used to extract groove timing data for use with hardware sequencers.
The groove extraction and manipulation facilities available within Emagic's Logic Audio are among the most advanced in any sequencing package. Groove templates contain timing, duration and velocity scaling, and can applied as flexibly as any other type of quantisation — in other words, each individual segment of MIDI can have its own quantisation template and in‑depth parameters, all of which are interpreted in real time, allowing you to tweak settings during playback.
Groove templates can be generated directly from any section of MIDI, and one of the most powerful aspects of Logic's quantisation facilities is that the connection between the MIDI part and the groove template remains, even after the groove template has been added to the list. What this means is that you can edit the source MIDI part during playback and the groove template's parameters will follow these edits. So if you're not quite happy with a quantisation point in your template, you can tweak it to perfection by ear just by adjusting that note's attributes in the source MIDI data.
Extracting a groove from audio is actually a two‑stage process in Logic, although it is presented as an integrated function. In the first stage it analyses a selection of audio in order to work out where the transients are which will define the quantisation points. The algorithm it uses is quite complex, with a number of obscure parameters which send you scuttling to the manual for explanation — there are presets provided for common applications, but I've never found these much use myself. I also find that analysis of complex material (not just a dry drum pattern) has a habit of producing slews of quantisation points you don't need alongside those that you do. It's usually best to keep the length of such sections to a minimum, for the sake of sanity!
Once you've got the best results you can, Logic produces a MIDI section according to the analysis of the audio material, and then uses this to automatically generate a quantisation template. Because the MIDI source data corresponding to the groove template is therefore available for editing, it makes it comparatively easy to sort out any excessive zeal shown by the analysis algorithm in the generation of data... Mike Senior
Groove Extraction With Hardware?
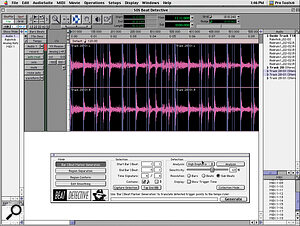 The Beat Detector within Pro Tools allows a degree of groove quantising by altering the overall metric grid.
If you make your music with a hardware sequencer, or with a basic software application which supports no groove facilities, there are still ways in which you can usefully extract timing information from audio recordings for use in your own music. The most basic way is to use a sampler to edit the required audio section into individual beats, then reassembling the audio by programming a sequence to trigger the individual audio slices in the correct order and timing. If the audio is reconstituted as naturally as possible, the positions of the resultant MIDI trigger notes will represent those of the audio beats, and this information can either be used to trigger new sounds alongside the audio loop, or to enable other sequenced parts to be edited into sync. The final part of Oli Bell's recent article on phrase sampling (SOS June 2000) covers this groove extraction technique in detail. Though this approach is rather more time‑consuming than the software approach, it might be the only option for the hardware‑only studio.
However, there are musicians who use hardware for music out of preference, but who are happy to use a lower‑spec computer for off‑line editing. In such cases, Propellerheads' Recycle can make the above process much less of a chore. Recycle chops up an audio loop with only a little help from you, piping the segments to your sampler over SCSI or MIDI, and also generates a MIDI file which represents the timing of these segments. Mike Senior
Information
A variety of groove templates generated from 'I Feel Good' are available on the SOS web site, at the following URL:
https://web.archive.org/web/2015..." target="_self
For more information on the software mentioned in this article, check out the following web sites:
Groove In Digidesign Pro Tools
Groove extraction is one of the things that shows up that Digidesign's Pro Tools has only recently acquired MIDI functionality. Unlike some of the dedicated Audio + MIDI sequencing packages, MIDI is aligned with audio by altering the Pro Tools project's tempo map and metric grid. This means that only timing information is extracted, and that only one groove is therefore available at any one time.
The groove extraction facilities use the new Beat Detective Tool, which is available within the Pro Tools 5.1 TDM version. First you select a section of the audio waveform which accurately corresponds to a whole number of bars and beats. Beat Detective is opened up and told the meter of the recording and which bars and beats it corresponds to. Once this is done, the audio can be analysed to find out how far the actual transients deviate from the idealised metric grid — a Sensitivity control lets you help Beat Detective to determine which audio transients are important. Once all this is done to your satisfaction, you generate the new metric grid. Then all quantising done within that time selection references this new metric grid. The system works well as far as it goes, but may require that you process small sections of audio individually if there are changes in tempo and meter, or if the detection has trouble distinguishing beat transients from background ambience. Simon Price
Successful Groove Extraction: Key Factors
Groove extraction from audio can be a delicate process, but if you keep the following key factors in mind, you ought to be able to get good results most of the time:
- Choose the target audio segment carefully, making sure that its rhythmic elements are clearly defined.
- Make sure that the chosen section is edited to begin precisely on the down beat of the first bar, and that it is the correct length so that it loops smoothly and in time.
- Take time to experiment with the settings for the groove extraction algorithm in your chosen MIDI + Audio sequencer, and aim to get at least one quantise point per division of the beat.
- Manually edit the groove data after extraction to delete any unwanted quantisation points, and correct any errors.
- If you need more beat divisions in the groove data, generate them from the existing data using a copy procedure, and consider further quantising them if necessary.
- Experiment with editing your groove data in different ways, and create several variations of the same groove to allow for flexibility in use.
- For a general‑purpose template, consider applying a mild iterative quantise to the groove data, to even it out slightly.
- Test your groove template on target MIDI parts to make sure that it produces the desired results. Remember that the groove can be applied selectively to different parts of the arrangement — each groove template will not necessarily work well with all types of material.
- Name your groove template meaningfully, according to its resolution and purpose. This makes it easier to use at a later date when you may have forgotten where it came from.
Simon Millward is the author of the successful Fast Guide To Cubase VST book, now in its third edition and available through SOS Mail Order at https://web.archive.org/web/2015..." target="_top


