Easily re-use elements of older projects with Logic's powerful import capabilities.
How many times have you found yourself wanting to quickly add elements from older projects, such as a killer drum beat or a huge plug‑in chain that you created for lead vocals, to a new project? One of the fantastic new features of Logic Pro 9 is its ability to import many different types of data and settings from other Logic projects. The following types of data can be imported into a new project:
- Track region or folder content.
- Plug‑ins (including settings).
- Sends (including level, routing and destination channel strips).
- Input/Output assignments.
- Automation data.
- Track notes.
Though the techniques we're going to look at hold true for all manner of projects, you will find it very helpful to copy the Lily Allen project 'The Fear' that comes with Logic 9 on the Demo Content DVD, if you want to follow the workshop step by step.
We're going to have a go at importing some different types of data from the list above. First of all, create a new project.
Mixer & Instrument Settings
In your new project, go to the Media area and click on the Browser tab. In the Browser, navigate to an old Logic project that contains lots of software instruments and insert effects. Click on the song file, then, at the bottom right of the Browser, click Import.
The Browser displays all the audio, MIDI and software instrument tracks used in your project, along with the entire mixer content, such as the bus and aux objects, in a table format. At the top of the Browser is a series of filter buttons, and Option‑clicking one of those buttons filters the view to display only that category. The table contains the following columns:
- Content: to import the audio and MIDI regions contained in your previous projects.
- Plug‑ins: to import the plug‑ins contained in a track's channel strip.
- Sends: to import the send settings from the track, including amount and destination.
- I/Os: to import the I/O settings of a channel strip.
- Auto: to import track automation data.
- Notes: to import any session notes you may have added to tracks.
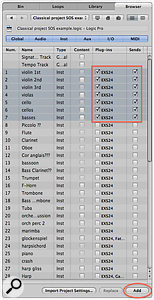
Let's try importing some mixer and instrument settings via the Browser. Highlight the relevant instrument tracks and auxiliary objects (Shift‑clicking allows you to select multiple tracks), then put a tick in their Plug‑in and Send columns. In the example shown in the screen on the far left, I am adding a string section from a previous project.
 In this example, an entire string section is being added from a previous project. To finish the operation, go to the bottom of the browser and click the Add button.
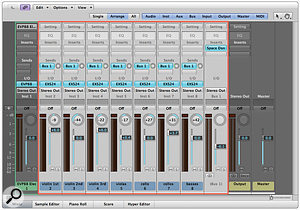
  Logic has imported the send settings and also the corresponding bus objects and settings (in this case, bus 1 with an instance of Space Designer added).
Ace Replace
Logic's Track Import function can be used to import track content, such as MIDI regions, from a previous project into one of your existing instrument tracks. To do this, first select the destination track on the arrange page, then go back to the Browser and, this time, only put a tick in the Content column of the track that you want to import from. Hit the Replace button at the bottom of the Browser. By selecting the track you wish to import to, and putting a tick in the Content column that you wish to import from, you can import a track's content, including MIDI regions.
The Replace function can also be very powerful when used in the context of mixing, because it allows you to import and replace your current insert effects chains with those from an old project. For example, you could navigate to the Lily Allen project 'The Fear' (supplied with Logic 9) and import Greg Kurtin's vocal channel plug‑in chain to try out on the vocal track in your mix.
In the Browser, navigate to the Lily Allen project, click Import, go to the lead vocal track and put a tick in the Plug‑in column. Highlight your vocal track on the arrange page and hit Replace. The new signal processing chain will now be loaded onto your lead vocal track, replacing whatever was there before. This is a great way to try out mixing ideas, as you can always undo the Replace operation to take you back to your original settings. You can also replace the content of the Global Tracks with that from another song: for example, a tempo track. Go to the top of the Browser and option‑click the Global tab. The table should now only display the Global Tracks information, so you can now tick the tempo track's Content column and hit Replace.
Importing Audio
Let's now turn our attention to importing audio content. Importing audio regions is a little trickier than MIDI regions because you may need to use Logic's Flex Time or off‑line time stretching to compensate for any tempo differences between the audio regions you are importing and the new project tempo. When importing audio from another project, it's important that the audio file has already been analysed, by invoking Flex Time in the original project. If this hasn't been done beforehand, the following stages won't work. With that in mind, we will use a project where we know the audio content has already been analysed.
Go to the Browser and navigate to the Lily Allen project. We will now import from it some of the drum tracks. In the Browser, tick the Content and Plug‑in columns next to the 'Snare' and 'Drums Live' tracks, then click the Add button. This will import the audio content, along with the plug‑ins used to process those tracks. This track was originally recorded at 134bpm so, unless your song is at that tempo, it will be out of time with the imported drums. To put the drums in time with your project tempo, go to View / Flex View and, then, in each of the drum track headers, choose 'Slicing' from the Flex Mode menu. The drum tracks will now snap magically to the tempo of your song.
At this point you may be asking yourself "What happens if my audio hasn't undergone the Flex Time process and I don't know the tempo?” Logic can be used to calculate the audio's tempo, and then the Follow Tempo function can manipulate the audio, elastically, to match the project tempo. Go to the Browser, navigate to a different project and import an audio track (that hasn't undergone the Flex Time process), with its content and plug‑in settings.
 Once Logic has detected a range of tempos, select the one you feel is most accurate and tick 'Enable Follow Tempo', as shown here.To calculate the original tempo of that audio, highlight a region within it and, from the Audio menu, select 'Detect Tempo'. Logic automatically detects a series of tempo suggestions, rating them according to reliability. If the rhythmic content is well defined, with strong transients, the detection can be quite accurate. However, I have always found it a little hit and miss. Choose the suggestion you feel happy with, select 'Enable Follow Tempo' and press OK. Your audio region should now play in time with the project tempo. Note that the Follow Tempo option can also be found in the Region Parameter box in the Inspector, should you wish to turn it off.
