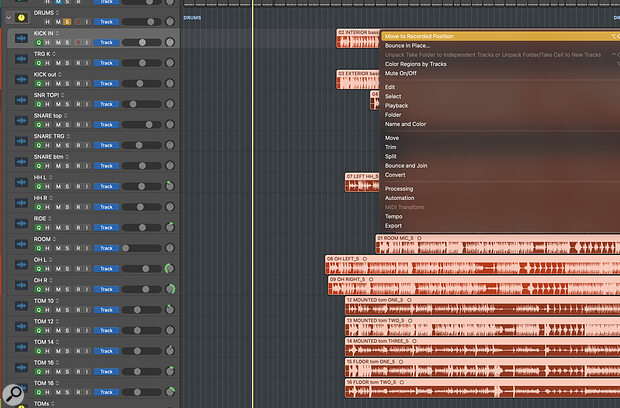
 Time‑stamped files can easily be lined up at their correct position by using the Move To Recorded Position command.
Logic Pro has all the tools you need to make multitracked drums sound their best.
Mixing multitracked drums presents a unique set of challenges, but thankfully Logic can help you along your way. In this column, we’ll explain how to prepare your drum files for mixing, before moving on to the mixing process itself next month.
The first concept to start familiarising yourself with is Groups. Groups are invaluable when it comes to editing and mixing multi‑miked recordings of a single instrument. They let you assign a selection of tracks to a set (Group), which gives you the option of choosing which actions will apply to this Group when any of the tracks or regions in the group are selected.
Groups are not an all‑or‑nothing setting. Once you begin using them, you’ll often toggle Groups on and off (Shift+G) depending on what action is required. This minor adjustment to your workflow quickly becomes second nature.
Groups are invaluable when it comes to mixing multi‑miked recordings...
Importing Your Drums
If the multitrack drum recordings aren’t already in Logic, import them into your session by dragging them from the Finder, or by using the Import dialogue. Whether you drag the drum files in one at a time or import them, they probably won’t line up at the correct starting point. A cool trick here is to select all of the drum regions, Right/Control‑click on one of them, and select Move / Move To Recorded Position. If the files have been time‑stamped, the regions will all move to their correct starting point!
Now select all of the drum tracks (click the topmost track and Shift‑click the bottom one), open the Mixer, and look for the slot marked Group above the faders. If you don’t see it, Go to View / Channel Strip Components, and tick Groups. When you click in the Group slot, you’ll have a few options. Choose the one labelled ‘(new)’.
Logic does something here that’s extremely intuitive and efficient, and which I wish it did in more scenarios. When you select a new Group, the Group panel appears in the inspector and the name field is selected. That means that when you choose ‘(new)’, you can begin typing the name of your new Group (Drums in this case) without having to go through any additional menus or steps.
If the Group Settings panel isn’t opened automatically, click the arrow next to Settings. Here you can tell Logic which actions you want included in your Group. For live drums, select Editing (Selection), Quantize‑Locked, Track Alternatives and Record as a starting point. You can even save these as the default so you don’t need to add them each time.
Now when you click on any of your drum regions, all of them are selected. This is what you want, since most of your major edits would include all of the drums. But suppose there’s a hi‑hat track that you don’t need to use; if you want to mute the hi‑hat region (you could of course mute the track), simply toggle Groups off and you’re good to go.
Quantize‑Locking will be essential once we get into Flex edits, but basic editing is also streamlined with groups enabled.
Track Alternatives
If your drummer recorded multiple takes, it will be up to you to either choose which one you like best, or build a composite (comp) from the sections of the different takes. Logic gives you a fantastic way to address this with its Track Alternatives feature.
Once you’ve loaded in or recorded one set of drum tracks, make sure that Track Alternatives are visible (Right‑click on a track and go to Track Header Components / Track Alternatives). Since we’ve included these in our Group Settings, you only need to select any one of the drum tracks. Click on the little up/down arrows and choose New. All of your drum regions vanish and you can now load in or track your next take.
Use the key commands for Next/Previous Track Alternative to jump between the takes. You can even audition the takes on the fly. If you create a new Track Alternative at the edit stage, you can paste sections from the different performances into it to create your comp.
Make sure to name the Track Alternatives as you create them, to stay organised. After I have a comp that I’m happy with, I duplicate it and start more detailed edits. If I make a mess of things, I can switch back to my clean comp at any moment.
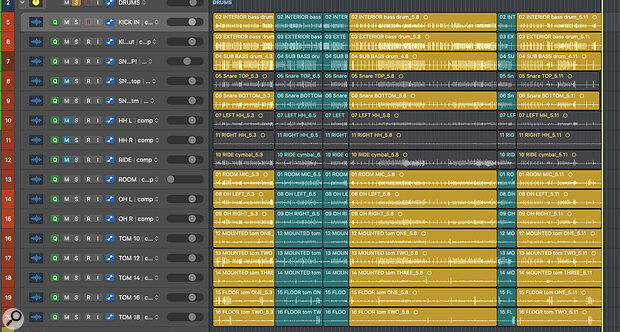
 A completed drum comp, using Logic’s Track Alternatives. I’ve colour‑coded the Alternatives so I can easily see which section of the song comes from which take.
Gain Staging
In the older days of digital recording, the prevailing wisdom was to record everything at the hottest level possible without clipping. This approach is outdated for today’s 24‑bit (and higher) digital converters. Still, it can feel strange to many old‑school musicians to record with levels that are only peaking at two‑thirds of the way up the meter, so they record as hot as they can and let you deal with it!
When you load in tracks that are close to clipping, your drum or master bus can end up overloaded. Rather than pulling the faders down, though, I select all of the drum tracks (if Groups are enabled, you only need to select one of them) and adjust their gain by ‑10dB or so in the Region Parameter box. Now the drums are sitting comfortably in the mix, the faders are at zero, and I’m at a more sane place to begin mixing.
If you take this approach, make sure to adjust the gain on each set of drum takes!
Poles Apart
When a drum kit is recorded with multiple microphones, polarity can become an issue. When any two microphones are picking up the same sound from different locations or angles — top and bottom snare mics, say, or inside/outside kick mics — there’s the potential for them to cancel out when mixed together: your tracks can end up sounding thin, losing vital punch and depth. Often, the problem can be remedied by simply flipping the polarity of one track relative to the other, so here’s a simple method for deciding which tracks need this treatment in Logic Pro.
Let’s start by configuring the mixer for this task. Go to one of your drum tracks and add the Gain plug‑in from the Utility menu. Option‑click on the Gain knob to set it to zero, and engage the Phase Invert button [This button is misnamed; it in fact inverts the polarity, and doesn’t affect phase. Apple are not alone in making this mistake — Ed.]. Close the plug‑in and turn it off in the mixer by Option‑clicking its insert slot, or clicking the on/off button that appears when you hover over it.
Now Option‑drag the disabled Gain plug‑in to every track of your drums. There’s no way to copy it to all the tracks at once but if you anticipate recording or mixing live drums again, you could create a track like this and then duplicate it as many times as needed before importing the drum files.
We need to determine which tracks require their polarity to be inverted, and when we do, we only need to turn on (without actually opening) the plug‑in on those tracks.
My method for checking polarity is a little clunky, so it’s best to take care of it before you’ve done any mixing, balancing, or routing.
If you haven’t already, select all of the drum tracks in the Main window and create a Track Stack (Summing) by Control‑clicking on any of the selected tracks and choosing Create Track Stack. Now all of your drum tracks are routed to the drum bus that the stack created.
Select all of the drum tracks in the mixer and turn the pan knob on any of them all the way to the right. Then hit the mute button.
 Check for cancellation using Logic’s Correlation Meter plug‑in.
On the drum bus, add the Correlation Meter plug‑in (it’s in the Metering section). If you don’t see it, it’s possible that your drum bus is mono. Change it to stereo by clicking the left side of the input slot.
Unselect the drum tracks and unmute the inside kick and outside kick mics, then turn the pan knob of the inside mic all the way to the left. Play your song at a section where both kick tracks are active and look at the meter. If the activity is to the right of zero (in the positive area), the two tracks are reinforcing one another. If the activity drops into the left side, they are cancelling out. If that’s the case, enable the Gain plug‑in on the second track. It should send the meter into the positive region.
Now you can do the same with any other pair of mics that’s picking up the same kit element: top and bottom snare or hi‑hat, say. It’s also worth checking that the overhead mics aren’t cancelling out any of your close mics, or that tom hits that sound great on their own don’t start to cancel when mixed in with the snare mics. Again, you can check whether this is the case using the Correlation Meter.
The outside kick mic and the bottom snare mic almost always need to have their polarity flipped at some point, but many drummers/engineers will have done that when they record or export the tracks, so it’s always worth checking. And, actually, flipping the polarity on tracks that are working well to start with is a great way to hear and learn what this kind of cancellation sounds like.
