, Kelly Orr (vocals), both shown above, and Chris Lawson (bass). They also engaged the services of online sessioneer Jim McCarty to add live drum parts.") This month’s Mix Rescue candidates are the band Nerve 9, based in the Canadian city of Victoria. The group comprises Thomas Stevenson (guitars), Kelly Orr (vocals), both shown above, and Chris Lawson (bass). They also engaged the services of online sessioneer Jim McCarty to add live drum parts.
This month’s Mix Rescue candidates are the band Nerve 9, based in the Canadian city of Victoria. The group comprises Thomas Stevenson (guitars), Kelly Orr (vocals), both shown above, and Chris Lawson (bass). They also engaged the services of online sessioneer Jim McCarty to add live drum parts.
Nerve 9: we show you how to add depth and body to a basic mix.
Back in SOS December 2014, I wrote a ‘Session Notes’ column about working with the band Nerve 9 on the lead-vocal production on their classic-rock power ballad ‘Pray For The Rain’. Following those sessions the band were keen for advice on how to improve their mix, so I decided to mix the project for them too, working in Steinberg’s Cubase (their own DAW of choice).
The guitar and bass parts had been recorded by band members Thomas Stevenson and Chris Lawson respectively, and they’d added live drums using one of those remote online overdubbing services. Although the performances were uniformly fine, the timbre was a touch stodgy overall, so I immediately inserted an instance of Softube’s Summit Audio EQF100 equaliser plug-in on my master bus to tackle this, using a broad shelving boost above 10kHz and some peaking cut around 180Hz.
Vocal Tone & Sibilance
With that master EQ in place,lead singer Kelly Orr’s tone was nice and airy, which was great, but it occasionally crossed the line to ‘abrasive’, so I took a little time to experiment with finessing the timbre. Whenever I’m after tonal coloration, my instinct is usually to try emulations of analogue gear, so I first tried running the vocal through a few different compressors, blending their outputs to taste — an approach which has the advantage that it’s often good at pinning down a consistent vocal level in the mix. Having set up channels for seven different compressors, I ended up using mainly EAReckon’s FR-Limit 87 and Stillwell Audio’s Major Tom, supported with a bit of Softube’s FET Compressor.
Staying in a similar vein, I auditioned a few other timbre-enhancing plug-ins. LSR’s Tubenhance delivered a hardness that wasn’t what I was looking for, while ToneBooster’s TB-Ferox tape emulation (a perennial favourite of mine) also drew a blank — the airiness vanished whenever the virtual tape started doing any useful smoothing. Third time lucky, I achieved something more promising from the Exciter section of iZotope’s Alloy 2 The Exciter module in iZotope’s Alloy 2 helped reduce an element of HF harshness in the lead-vocal tone., using its Retro flavour to thicken up the mid-range and remove a bit of edginess. Of course, vocal-tone decisions like this are inherently very subjective, so the main practical tip I can give is to allow yourself enough time to experiment, and approach it with an open-minded attitude, because you often need to explore (and eliminate!) several dodgy-sounding dead-ends before you happen upon a tactic that makes a real sonic improvement.
A side-effect of the HF lift and compression was that sibilance became a problem, which led me to apply a couple of layers of de-essing: Fabfilter’s Pro DS before the compression, just to tackle the strongest of the esses, and ToneBoosters’ TB-De-esser later in the plug-in chain to do the bulk of the work. In addition, I also applied a touch of attack reduction using Alloy 2’s transient-processing algorithm. This might seem a bit of an odd move on vocals, but I find it sometimes helps tame over-sharp ‘c’ and ‘t’ consonants, as well as making any lip noises a little less audible.
Backing Balance & Blend
The drums had been respectably captured, although I felt that, in context, the cymbals were too ‘forward’. This turned out to be a fairly narrow-band issue, though, which I was able to mitigate with a couple of stiff EQ notches at 4-5kHz on the overhead mics. I also wanted to give myself more flexibility to balance the snare, so I scotched some unhelpful spill on its close mic using Cubase’s built-in Gate plug-in — being careful, however, not to truncate the snare tail itself, given how much this style tends to trade on its snare sustain. Both kick and bass guitar seemed lacking in warmth, as well as rather too strident in the upper mid-range — in other words better suited to faster-paced rock numbers. ToneBoosters’ TB-Equalizer provided a fix here, adding sub-100Hz low shelving boost (2.5dB for kick, 6dB for bass) and hollowing out the 1-4kHz zone (7-8dB for both instruments). In place of traditional close-mic signals on the toms, three spill-free tracks of triggered toms had been provided. Listening to the toms in the overheads, they already seemed to have a good upper-spectrum balance, so I cut 10dB above 1kHz from the triggered toms so that their contribution to the mix was mostly just adding gravitas to the lower mid-range. to avoid conflicts with the low end of the bass guitar, and upper spectrum cuts (here a low-pass filter with additional notch) to minimise masking of vocal intelligibility and ‘air’.") Many of the guitars in this month’s remix were processed roughly along the lines shown here, featuring low cuts (in this case a high-pass filter) to avoid conflicts with the low end of the bass guitar, and upper spectrum cuts (here a low-pass filter with additional notch) to minimise masking of vocal intelligibility and ‘air’.
Many of the guitars in this month’s remix were processed roughly along the lines shown here, featuring low cuts (in this case a high-pass filter) to avoid conflicts with the low end of the bass guitar, and upper spectrum cuts (here a low-pass filter with additional notch) to minimise masking of vocal intelligibility and ‘air’.
Although all the guitar parts had different EQ settings, the thinking behind them was pretty similar. The first consideration was how to contour the low end of each part. Broadly speaking, the more mainstream-friendly a guitar-based production, the more it tends to rely on the bass guitar rather than the electric guitars for low end, so I deliberately pulled back the lower mid-range of all the guitar parts to some extent. The second issue was trying to make sure that each guitar’s upper mid-range and high end (especially the distortion components) didn’t unduly mask the lead vocal.
Part of the difficulty Thomas had had with his own mix, I think, was that he’d been unable to fade up his guitars loud enough without clouding the low end or masking the vocal. For my part, I ended up using both high-pass and low-pass filters on many of the tracks, often with additional peaking/shelving cuts of 6dB or more, before I felt the jigsaw puzzle was beginning to fit together.
If you find it tricky to work out exactly which frequencies need to be cut when working with lots of guitar parts, here’s a tip: turn up each guitar in turn a couple of decibels too loud, and then use EQ cuts to try to sit it back into the mix. Somehow this always seems to make offending frequency ranges more apparent. In some cases, this trick also alerted me to specific notes or resonances in a guitar track that needed cutting too. For example there were 870Hz and 3.9kHz peaks causing the main verse guitar to jostle in front of the lead vocal, whereas once I’d dipped those out (with 8dB and 12dB cuts respectively) I was able to keep the guitar comfortably audible without it distracting from the melody and lyrics.
Beyond Balancing
While these kinds of ‘everyday’ mix-balancing activities were as important to this mix as to any other, my main complaint with Thomas’s original mix was that it lacked expansiveness, depth, and sustain, so that was where I directed my most concerted efforts. For the drums, some of this work was carried out using fast-attack, fast-release compression (from either EAReckon’s SD-Comp 87 or Sonalksis’s SV315Mk2) on the individual snare and tom channels to duck their attack transients, thereby emphasising the decay tail of each ofthem. In some cases I also inserted LSR’s Dynamics Detail transient-processing algorithm to exaggerate the effect (a plug-in which proved handy for smoothing out the picking transients of the verse guitars too) and further overall sustain enhancement came from an instance of Cytomic’s The Glue on the drums group bus, again using fairly fast time settings.
 A variety of methods were used to thicken the snare drum’s decay, including fast-attack, fast-release compression from Sonalksis SV315Mk2, Sustain enhancement from LSR Audio’s Dynamics Detail, and a short, narrow, mid-range-heavy reverb effect from Overloud’s Breverb.
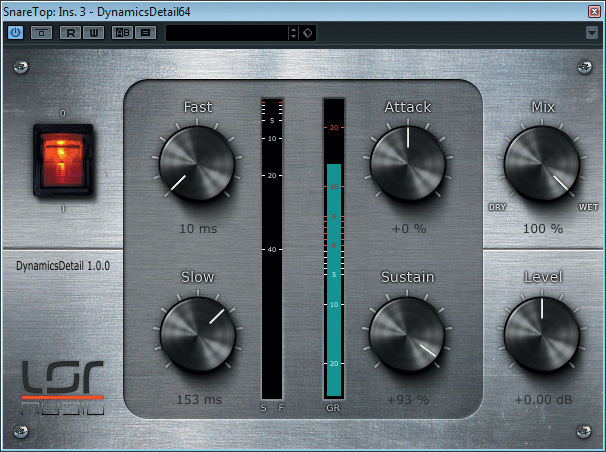
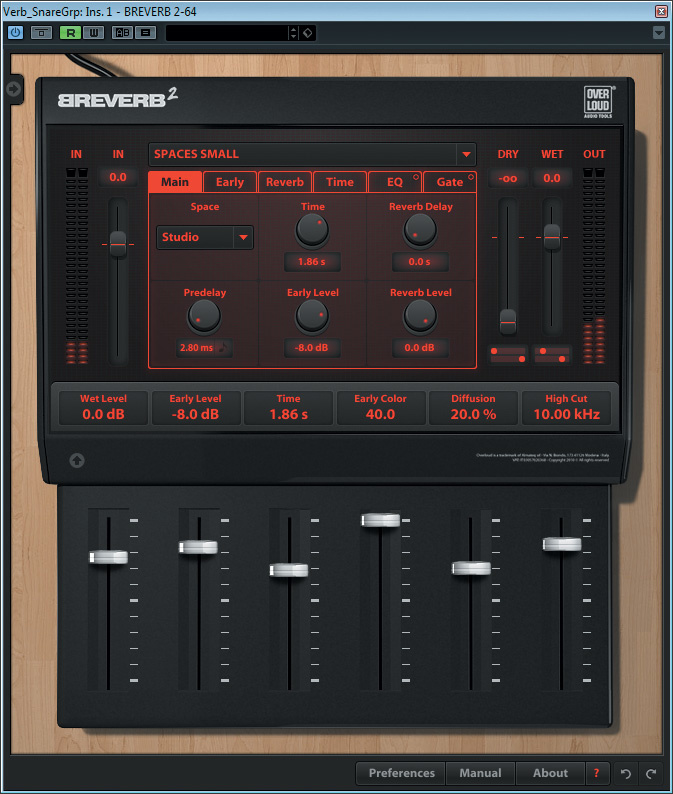 I supplemented these processing manoeuvres with a few dedicated send effects, most obviously a 3.3 second patch from Overloud’s Breverb algorithmic reverb plug-in, primarily applied to the drums and deliberately kept quite bright to extend the cymbal and snare tails. Although I liked the overall spatial character of this effect, I still hankered for more sustain, so added an eighth-note feedback delay into the return-channel effects chain. Couldn’t I just have increased the reverb’s decay time? Well, one of the big problems with a long reverb is that the complexity of its decay tail can tend to clutter up the mix, whereas a similar-length combination of delay and reverb is typically less dense — and therefore easier to fit in. Another instance of Breverb thickened up the snare with a shorter, narrower, and more mid-range-heavy patch.
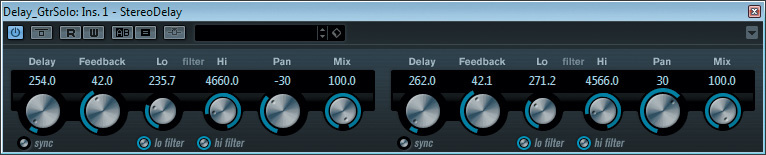
Effects were crucial to the guitar textures too, although here I worked more with delays and modulation treatments than reverbs, to enhance width and sustain without submerging the whole mix in reverb. Moreover, I deliberately gave each delay effect its own unique character to improve the subjective depth and variety of the production as a whole. So, for example, although the delay applied to the guitar solo is based around a simple eighth-note feedback loop, I used Cubase’s Stereo Delay plug-in to offset the left- and right-channel delays 8ms apart, effectively generating a Haas-style stereo widening effect in the repeats, and also layered in some stereo chorusing from Fabfilter’s Timeless 2. Another Fabfilter chorus treatment can be heard on the main verse guitar, although this time using an envelope-triggered modulation and combined with a half-note feedback echo and a polyrhythmic ping-pong delay. A single-tap phased delay provides the ghostly sense of stereo width for the introductory guitar riff. Many different delays were used in this month’s remix to add depth and variety to the soundscape: Cubase’s Ping Pong Delay added stereo rhythmic interest to the main verse guitar; Lexicon’s Dual Delay provided an opposition-panned slapback for the chorus guitars; Cubase’s Stereo Delay gave the guitar solo its own stereo-widened, tempo-sync’ed echoes; and Fabfilter’s Timeless 2 generated a softly modulated panning tempo-delay for the lead vocals.
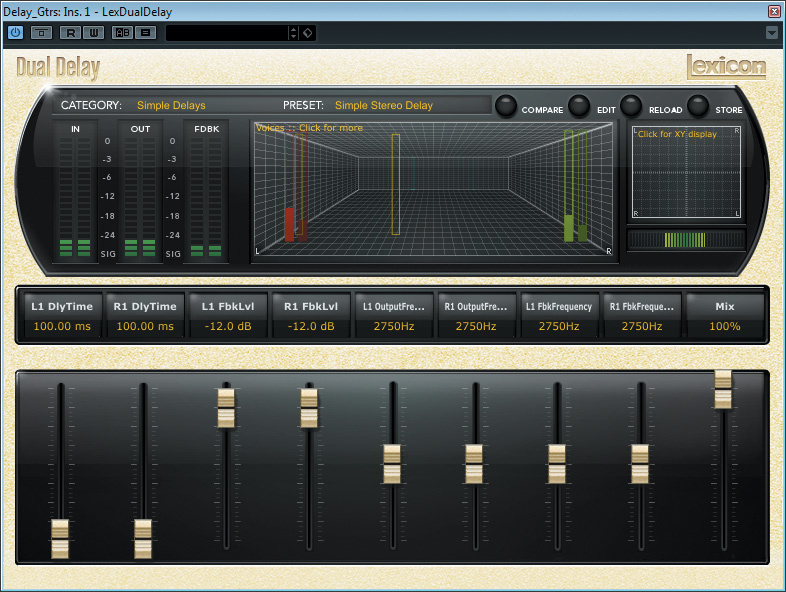

 and channel 61 (a long delay), the latter sending some of its delay repeats back to the reverb.") This screenshot of the Cubase mixer window shows the send routing for the remix’s two long-decay vocal effects. Channel 52 carries the processed dry vocal signal and a send from that feeds channel 58, which is heavily de-essed. The de-essed channel then feeds channel 60 (a long reverb) and channel 61 (a long delay), the latter sending some of its delay repeats back to the reverb.
This screenshot of the Cubase mixer window shows the send routing for the remix’s two long-decay vocal effects. Channel 52 carries the processed dry vocal signal and a send from that feeds channel 58, which is heavily de-essed. The de-essed channel then feeds channel 60 (a long reverb) and channel 61 (a long delay), the latter sending some of its delay repeats back to the reverb.
The only delay that’s used on more than one guitar layer is a 100ms slapback patch, which helps open out the stereo picture in the choruses by returning all the echoes to the opposite side of the panorama from the dry signals. This is quite easy to set up now in most DAW systems, and in Cubase I implemented it using a simple one-tap setup from Lexicon’s Dual Delay plug-in, panning each individual guitar-channel’s send appropriately.
It’s as well to point out that there’s one guitar part without any delay at all: the one during the song’s middle section. Not only does this serve as a useful contrast in a general sense, but it also performs a structural role, helping to bring the listener into a much more intimate environment so that the arrival of the final choruses creates a bigger musical statement. It’s not completely without effects, though, because it’s being treated to a phaser setting from Overloud’s Vintage Keyboard FX suite and some tremolo from one of Cubase’s bundled plug-ins.
Bass & Vocal Effects
Few genres tolerate long reverbs or delays on bass, but I did use a couple of bass send effects here: some parallel distortion from Overloud’s Mark Studio 2 plug-in to thicken the bass’s mid-range tone, and some super-short stereo pitch-shifted delay from Lexicon’s Multivoice Pitch plug-in, to provide stereo width and a little blend. The latter comprised 25ms left-channel and 14ms right-channel echoes shifted nine cents flat and sharp respectively. (I often use this kind of patch for widening lead vocals, but it can occasionally work well on other instruments.)
 EAReckon’s EAReverb provided the lead-vocal’s main reverb tail, with the help of some additional EQ contouring from the effect-return’s built-in EQ.The vocal effects were more involved, part of the complication being that I wanted to luxuriate in some long-decay effects without vocal sibilance sizzling on endlessly, so I’d resolved to de-ess the reverb send. One solution would have been to place a de-esser in the plug-in chain before the reverb plug-in, but this doesn’t work too well if you subsequently try to automate the effect send level (a common requirement in mainstream mixes). De-essing is a threshold-based effect, so won’t detect the sibilance reliably if you keep changing the level of the vocal signal it sees. A better implementation in this case is first to send the dry signal to a separate de-essed channel, from which you subsequently feed the long-tail effects. That way, the de-esser sees a consistent level, and the effects send levels can be automated from the de-esser channel without sibilance-related problems.

 As well as layering in many different send effects, Mike also used the Cubase Mystic and Schwa Olga soft synths to add some variation in the song’s synth textures.The two long-decay effects I used in this case were an algorithmic reverb from EAReckon’s EAReverb plug-in, based around its XXL room-size model. Plug-ins like this have a blizzard of parameters, and I wouldn’t honestly recommend trying to set them all up from scratch during normal mixing — unless you fancy growing a Dumbledore-grade beard during the mixing process! The most efficient working method, in my opinion, is to find a promising preset and work from there. In this case I found a good one called ‘Vocal Hall’ (although I don’t normally set much store by patch names), and then tweaked its four most important knobs: Decay, Early Refections Level, Predelay, and Lo Cut. The first control made the tail a little longer to suit the song’s slow tempo, while reducing the Early Reflections Level and adding more Predelay helped keep the vocal’s direct sound fairly upfront.
In scenarios like this where reverb is a clearly audible production element, you’ll generally get a clearer-sounding mix if you try to cut away reverb frequencies that aren’t absolutely essential to the final effect. This was my thinking when increasing the reverb plug-in’s Lo Cut frequency to 455Hz, and I followed that up with further frequency-contouring from the return channel’s built-in EQ, cutting more low end, dipping the mid-range around 1.5kHz, and shelving off high end from 7.5kHz up. Again, balancing the reverb return a little too loud while EQ’ing was a big help in deciding on these settings.
The other long-tail effect I used was a subtly modulated eighth-note cross-feedback delay from Fabfilter’s Timeless 2. As with the reverb, this was fed from the de-esser channel, but I also set up a send back into the reverb from the delay, extending the effect tail in the same kind of way I did with the drumkit’s Breverb treatment. The only other lead-vocal effect was a much shorter small-space reverb which I used just to glue the vocal a little better to the backing track, and which I brightened to enhance the sense of ‘air’ around the dry signal.
Artificial Additives
Not wanting to overload the mix with send effects, I explored some other ways of introducing extra textural detail and fullness. The most obvious addition was the backing-vocal arrangement during the song’s choruses, which I worked out in collaboration with the band (see the ‘Call & Response’ box for details) and treated to the glossy Chorus and Random Hall plug-ins from Lexicon’s PCM Native bundle. However, I also re-amped a couple of the rhythm-guitar parts (through the Fender and Vox amp models in Softube’s Vintage Amp Room plug-in), as well as editing together some additional layers (primarily the ‘fake’ double-track which balances the guitar texture’s stereo image during the solo sections and a few sustained chords copied from the verse guitar part as subtle musical accents).

 Here’s the Cubase arrange-window view of the remix’s backing-vocal arrangement, which illustrates how the number and complexity of the vocal layers increases from chorus to chorus.The original multitrack offered only a single keyboard pad, so that was another area in which I took a few liberties, adding five new background synth parts using Cubase’s Mystic and Schwa’s Olga. In particular, I tried to bring in parts which had some motion within them, because the original part felt rather static and uninvolving. In some cases that just meant choosing a patch with internal modulation, but I added movement to other parts by trowelling on heavy modulation effects from Cubase’s bundled Flanger, Phaser, Tranceformer, and ModMachine plug-ins. Programming some quasi-arpeggiated note patterns for a couple of the parts helped too.
The problem with using wackier modulated synth sounds for backing parts is that they often respond differently every time you play back the song. That’s not helpful from a mixing perspective, so I usually like to bounce down their audio output before mixing them in earnest: that way I don’t have to hit a moving target! Sometimes, where the synth’s really unpredictable, I might even bounce the part several times, so that I can comp together the most engaging ‘performance’.
Long-term Dynamics
A final concern was what I call the ‘long-term dynamics’ of the production: in other words, creating a sense of momentum through the song’s duration; maintaining the listener’s interest from section to section; and maximising the impact of any musical climaxes. A big part of this is down to the musical arrangement, so I ended up doing a fair chunk of editing work. The biggest change I made was halving the length of the introduction so that the vocal lyrics arrived earlier, and stripping away some of the arrangement layers to give more scope for build-up (for example by starting the song with solo guitar and by leaving the keyboard pads out of the first verse).
 In order to get the bass fills to balance properly on different playback systems, Mike automated not only the bass channel’s fader, but also a mid-range EQ peak.The new backing vocals played an important part, because we made a point of progressively increasing their arrangement complexity while developing the parts. So the first chorus features only one line of the lyrics against an understated three-part male-voice backing chord; the second echoes five lines of the lyrics in mixed male/female harmony; and the third embellishes the second verse’s melodic fragments, adds a new low male-voice countermelody, and thickens the texture with some extra layers. There were more subtle arrangement additions, though. For example, I supported the cymbals with covert cymbal mallet-rolls on more than a dozen occasions, and carefully edited and balanced the added keyboard layers to give certain parts of the song structure (second verse, solos, middle section) their own distinct atmospheres.
The final piece in the puzzle was some fairly extensive automation. Not only was there the usual blizzard of lead-vocal level riding, but also some adjustment of both the long-tail effects levels to suit different sections of the arrangement — and indeed individual words and phrases, such as when the word “babe” is emphasised by a wash of reverb at the start of verse two. The solo guitars received a certain amount of detailed work too, in recognition of their lead role in the arrangement
 I spent some time riding the bass part, as well, to draw out its most appealing melodic fragments. The complication here is that the majority of the public hear the bass line via its low-mid-range harmonics, not its note fundamentals (most small listening systems can’t generate low frequencies very effectively). As such, if any bass note doesn’t cut through well enough in the mid-range, you can’t just fade the bass channel up to please mass-market listeners without overloading the low end of your mix on more hi-fi playback systems. For this reason, I combined my bass fader moves with automation of the aforementioned ToneBoosters mid-range EQ peak, reducing its cut whenever I felt the instrument required more presence.
For most other backing parts, the automation was less intensive, and mostly just a question of highlighting interesting details and fills. However, I did create some longer automation ramp-ups on some of the keyboard and guitar tracks, to provide a little extra momentum at certain points (for example during the run-up into the second chorus, or just before the harmony part arrives mid-way through the main guitar solo).
Fullness With Clarity
If you’ve got an anaemic mix that needs filling out, you’ll usually be best served by a multi-pronged approach which combines mix effects with additional arrangement layers, as demonstrated in this month’s remix. Just make sure you give enough attention to effects design, subtractive EQ, and automation so that you don’t sacrifice clarity to overcrowding.
Call & Response
The simplest kind of backing-vocal arrangement is arguably ‘homophony’. In other words, adding new parts which follow the rhythm and lyrics of the lead line but use different note pitches. Almost as straightforward is the ‘call and response’ idea showcased in this month’s remix, whereby new harmony vocal parts are created by mimicking the lead line’s rhythm and lyrics after a short delay. This approach has the advantage that it tends to place backing-vocal lyrics into gaps between lead-line phrases, where they not only avoid confusing the lead singer’s lyric delivery, but also act as entertaining little fills. In addition, call-and-response backing vocals allow you to keep the lead vocal itself unadorned by homophonic layers, and this helps improve its emotional immediacy, in my view — a big reason why I favoured it for this particular ballad.
Audio: Examples, Multitracks & Session Files
Head over to this article’s media page on the SOS web site for a truckload of additional resources related to this month’s remix: ‘before’ and ‘after’ mix versions; audio demonstrations of vocal/snare processing, drum/guitar effects, and synth additions; the full Cubase project file of my remix, so you can investigate my settings in more detail; and raw WAV files of the entire project so you can have a bash at remixing it for yourself!
Remix Reaction
Thomas Stevenson: “After the lead vocal recording collaboration we did with Mike for the Session Notes article, the static mix of the song was already sounding great. When Kelly and I heard the remix, we were both thrilled with the result. The elements that immediately stood out were the vocals, which now have a wonderful presence, the various creative effects and automation which made the song landscape feel larger, and the low end of the mix, which really shines now thanks to the better frequency balancing of the bass and various guitar parts. It was really informative to read in detail about the various creative ideas and techniques Mike employed on the mix to achieve this. Overall, we are thrilled with the outcome of this project and we will take the advice we were given forward to our next projects. Thanks Mike and SOS for this wonderful experience!”