 This Cockos Reaper mix window shows all the processing used on this month's Mix Rescue remix.
Our tame engineer shows that you can craft a great mix even using compression in moderation, and that a little editing up front can make the job of mixing a whole lot easier.
It happens to every mix engineer on the planet sooner or later: you bash your head against the wall mixing a song for the umpteenth time, but still feel underwhelmed by the end results. We've all been there! For SOS reader Tom McKenzie, it was his song 'Directions' that had thwarted him ever since he'd recorded it back in 2010, and the biggest bone of contention was the DI'd bass guitar: how could he get that full, yet well-blended sound he'd heard on hits by Jason Mraz or Sting? Listening to his latest stereo bounce-out, some of the individual instrument timbres also felt rather 'slender' to me and the arrangement a little under-developed.
 Here you can see a couple of different 'snare plus hi-hat' composite hits, which caused some difficulties when trying to quantise the drums. Quantising whichever spoke first seemed to achieve the smoothest result in this case, but it's something you can never tell without using your ears.
Timely Decisions
But before worrying about any of that, the first thing I did on receiving the multitracks was to give some close attention to the production's timing, because this was one important area where it seemed to undershoot the quality threshold set by Tom's chosen references.
I do some timing edits in most of my Mix Rescue remixes, but I'm usually rather reluctant to start quantising lots of individual drum hits, because of the risk of 'robotic drummer' syndrome. However, this song proved to be a rare exception, so it's probably as well to explain my reasoning. To start with, the simplicity of the part (effectively just two repeating one-bar patterns) gave the drummer little opportunity for musical expression, and this had been compounded by the use of a click track during recording, removing any natural tempo fluctuations from the equation. In essence, then, the part functioned much more like a drum loop than a live drum part, with the result that it was extraordinarily unforgiving of timing irregularities and had little musicality to lose by being quantised.
 Although Variety Of Sound's freeware Nasty VCS did a great job of containing the vocal dynamic range with very few side-effects, the recorded sibilants were a little over-emphasised, so ToneBoosters' TB_DeEsser was brought in to rebalance them.
One important musical parameter had been left untouched, however: hit-to-hit variations in the kit's timbre. Any live drummer inevitably strikes each drum and cymbal slightly differently every time, which is a powerful 'naturalness' cue for the listener. But that's not all, because there's also scope for the player to introduce longer-term timbral variations in support of the musical arrangement, even within the constraints of a completely static drum pattern. It was because this multitrack boasted both of these desirable characteristics that I decided to beat-slice the whole performance, rather than cutting corners by simply copying a couple of loops across the whole track.
Drum Quantisation For Earthlings

Lots of software programs can now chop up drums into hits and quantise them automatically, and that can work quite well if each drum/cymbal hit is clean and distinct. Back on planet earth, however, most performances include lots of 'composite' hits, where two or three of the kit instruments play at once, and because the instrument onsets within a given composite hit are never precisely simultaneous, you have to decide which onset you attempt to quantise — something you can only do by ear.
In this example, the choice seemed fairly straightforward wherever the kick drum was involved, because lining up the kick onsets with the grid seemed to sound most solid rhythmically. However, quantising all the rimshots left the drummer sounding like he'd been at the bevvies, due to the variable timing offset between the rimshot and the hi-hat in each case. Usually, the hi-hat lagged slightly, in which case the timing sounded fine, but whenever the hi-hat preceded the rimshot, it made that whole beat of the pattern feel rushed. Shifting those 'hi-hat early' composites to line up the hi-hat to the grid seemed to give a smoother result.
From time to time, though, the timing 'spread' within a composite hit still undermined the rhythmic flow, in particular where a rimshot significantly anticipated the kick on a downbeat, so I did a little copying and pasting to patch over the worst offenders, trying to take my copies from fairly close together in the timeline to avoid unduly upsetting any section-to-section timbral nuances.
In order to commence editing, I'd had to set up a basic drums balance, and had already noticed while doing so that it was difficult to decide on a position for the snare faders — something that had also vexed Tom during his mix. However, once the edits were complete, balancing the rimshots suddenly became much more straightforward. I've been struck by this phenomenon before, and although it might initially seem counter-intuitive that timing edits should help you balance your mix, it actually makes a lot of sense. Any drum hit that's out of time with its surroundings will invariably stick out of the mix more because it's less masked by other sounds. Therefore, in-time hits will blend into the mix better than out-of-time hits — much as in-tempo delay effects are usually less audible at a given level than unsynchronised echoes.
Off The Grid
 These three screenshots show the EQ curves Mike arrived at for the lead vocal, acoustic guitar, and bass parts during the initial stages of balancing, while attempting to maintain a clear-sounding LF spectrum for these important parts.

All but turning the live performance into a drum loop inevitably has knock-on effects, exposing timing vagaries in other parts more clearly. However, I resisted the urge to line everything else up with the DAW's visual grid as well, in order to avoid a regimented feel. Instead, all subsequent timing edits on other tracks were judged by ear in relation to the drums — rather than by eye in relation to the bar lines!
That's not to say that some parts weren't quite closely edited. For example, I wanted to keep the bass part pretty closely connected with the drums, to reinforce the groove, but I nonetheless tried not to edit every single note. So, for example, there were a number of slurred bass figures that weren't metronomic by any means, and I held off slicing those up because I felt the musicality of the phrasing suffered if I did. Similarly, with the song's acoustic and electric guitar parts I was happy to let several bars run by unedited if they felt natural, even though I didn't shy away from nudging individual strums where necessary.
Building a basic balance proved pretty straightforward once the editing was out of the way. The lead-vocal tone seemed recessed in the mid-range, so I hardened it with a broad 2dB boost at 700Hz, but this gave too much 'small radio' flavour until I'd also cut 3dB with a narrower bandwidth at 1kHz. Compression from Variety Of Sound's freeware Nasty VCS channel strip did a commendable job of containing the dynamic range without undesirable side-effects, although I did take care to experiment with all the Attack and Release presets, given that the gain-reduction meter was registering more than 20dB at times. A robustly driven instance of Variety Of Sound's freeware Tessla Pro transformer simulator then added a little 'hair' to the sound, while Toneboosters' TB_DeEsser shaved 3-5dB off the sibilants.
When I added in the main acoustic guitar part, the basic tone didn't seem to complement the vocal that well: it was rather pudgy by comparison with the vocal's focus and presence. Fortunately, Stillwell Audio's gutsy Vibe EQ plug-in sorted this out, with peaks of 2dB at 1.2kHz and 6dB at 2.5kHz, in conjunction with a low shelving cut of 3.5dB below 220Hz.
A Puzzle At The Low End
Bringing up the bass now, it quickly became clear that space in the low end would be at a premium, so I experimented with EQ cuts on three tracks, to try to maintain each one's apparent 'warmth' while steering clear of a muddy overall mix tonality. High-pass filtering the vocal at 100Hz and the guitar at 90Hz was a no-brainer, because neither affected the tone significantly in context, but the main conflict zone was around 100-200Hz, because this was a range in which the bass was very strong, but which was also important for imparting 'size' to both the guitar and vocal timbres in the balance.
 Having decided to supplement the low end of the bass part with a synthesizer part, Mike imported the recorded audio into the stand-alone version of Celemony Melodyne Editor, to generate MIDI trigger notes semi-automatically.It didn't help that the guitar recording had prominent resonances in that region, which caused some notes to leap out unnaturally, so some surgical EQ was required to tackle those: super-narrow notches (-3dB at 165Hz and -4.5dB at 176Hz) to rebalance two specific frequencies, and an additional half-octave, 5dB peaking cut at 130Hz, to de-emphasise the instrument's main soundhole resonance. That took the guitar EQ about as far as I felt it could go without thinning the tone too much, while 3dB of low shelving cut on the vocal channel represented a similar line in the sand, yet the mix still felt rather bloated whenever I turned the bass up to a suitable-sounding level in the balance, which suggested to me that it was still trading too heavily on the 100-200Hz zone.
As an experiment, I tried taking a good chunk out of the bass channel at 150Hz (an octave-wide EQ cut of 5dB) and then compensated by strengthening the instrument's low end with a wide 5dB boost at 40Hz. This worked well enough for me, but when I later sent a first draft of the mix to Tom, he felt it didn't go far enough in separating the bass and guitar lines in the mix, so in the end I cut a further 4dB from the bass at 145Hz and tried to push more energy into its lower octaves instead. However, because the raw bass recording didn't have very strong note fundamentals, this limited the effectiveness of a simple EQ fix, so I opted instead to filter out those frequencies and resynthesise them in a purer and more controllable form, using a sine-wave tone from Reaper's built-in ReaSynth plug-in.
To generate the part with minimum fuss, I decided to use the stand-alone version of Celemony's Melodyne Editor. Although most people know this software for its pitch/time-manipulation options, it also has the facility to generate a set of MIDI notes based on the pitches it detects in any audio file. The automatic analysis routine isn't perfect, but it doesn't take more than a couple of minutes to clean up the results manually when the source timbre is clean.
Introducing The Drums
 These two screenshots show some of the arrangment enhancements Mike made during the remix process. The acoustic guitars, for example, were expanded with edited-together double-tracks, the level and panning of which were adjusted to suit each song section. A similar approach was taken with the additional REX Shekere loop, which was faded up and widened as the timeline progressed.
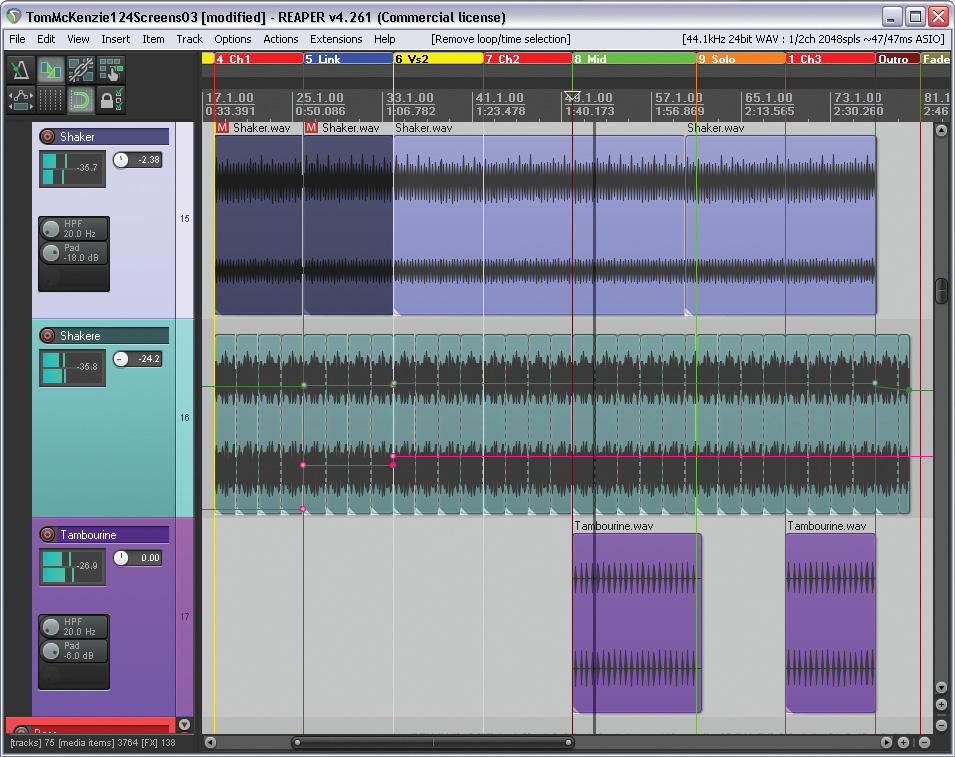
For me, the heart of the music was now fitting together pretty snugly, so I figured it was time to get the drums involved. However, before moving on, I'd like to draw attention to the fact that most of the work in mixing those core parts was just careful EQ. Only the vocal had any dynamics processing at all, which underlines the point that compression isn't something you have to apply to every track as standard — if any instrument holds its balance fine as it is, don't be afraid to leave its dynamic range in peace.
The multi-miked drum kit seemed to fit together pretty well on its own terms, although I did add about 9dB at 80Hz before the kick close-mic's channel began delivering a proper 'thud'. (A 33Hz high-pass filter blocked any useless subsonics from being boosted at the same time.) Fitting this kit balance around the other sounds, however, demanded further EQ. The main battle zone was, once again, the low mid-range, and 4-5dB of medium-narrow cuts were required on the kick-drum channel at 150Hz, the snare-drum at 280Hz, and the overheads at 380Hz before I could fade in the drums without a sense that they were clouding the overall mix tone. In addition, there was a whistling harmonic to the hi-hat that irritated me after a while, so I applied another narrow cut at 11kHz to soften it, once I'd managed to trace it to the overhead mics.
My dynamics processing was fairly minimal, again: one instance of Focusrite's Scarlett Compressor on the kick-drum channel to fix it more confidently into its mix position, and a second to soften the transients of the undersnare channel, so I could have more of the mic's nice noisy character. (However, just before I eventually signed off the mix, I also applied 2-3dB of kick-triggered gain reduction on the bass guitar, using the side-chain facilities of DDMF's NYCompressor, to clear some extra LF headroom for the kick.)
More Guitars!
, which feeds both the left and right channels of a stereo router plug-in. The router is used to invert the polarity of the right channel of this delayed signal. Finally, a high-pass filter is applied to reduce the tonal side-effects when listening in mono.") These screens show in detail the configuration that Mike used to create a 'Sides-signal delay' stereo widening effect for the lead vocal. To create this effect — which Mike frequently uses in his mixes — requires three separate plug-ins. First, there's a mono delay (10ms in this instance), which feeds both the left and right channels of a stereo router plug-in. The router is used to invert the polarity of the right channel of this delayed signal. Finally, a high-pass filter is applied to reduce the tonal side-effects when listening in mono.
These screens show in detail the configuration that Mike used to create a 'Sides-signal delay' stereo widening effect for the lead vocal. To create this effect — which Mike frequently uses in his mixes — requires three separate plug-ins. First, there's a mono delay (10ms in this instance), which feeds both the left and right channels of a stereo router plug-in. The router is used to invert the polarity of the right channel of this delayed signal. Finally, a high-pass filter is applied to reduce the tonal side-effects when listening in mono.

The track's remaining guitars presented few additional difficulties. A double-track of the main part was only used at a fairly low level, to avoid homogenising the texture too much, and EQ'ed more astringently so that it wouldn't interfere with my hard-won low-end clarity. The solo guitars were also thinned out slightly with a 3dB shelving cut at 325Hz, but I also low-pass filtered those at 14.5kHz, because they seemed a little too up-front otherwise. I had a slight harmonic concern about one of these parts, where a sustained note clashed with a change of harmony, but Melodyne Editor's polyphonic pitch-correction mode was able to correct this with minimal alteration to the instrument's timbre. (I'm still gobsmacked that it's possible to do things like that nowadays!)
As with the acoustic guitars, the four electrics were all fairly spongy, so I resorted to 'virtual reamping' to give each more substance and bite. In other words, I ran them through various freeware amp-simulation plug-ins from the likes of Simulanalog, Aradaz and AcmeBarGig, messing about with the amplifier models' tone controls to get something that seemed to fit the mix better. As a result, I needed very little mix EQ (three bands, in total, over four tracks of guitar) just to take up the 'slack' — for example, using a low-pass filter to take some fizz out of the output of Aradaz Amp's Crunch.
Compression, on the other hand, was more of a necessity for these parts, because they all had strong transients which leapt out of the mix rather harshly. I wasn't driving the amp simulators hard enough to round off those peaks much, so I reached for Focusrite's Scarlett Compressor and gave each a fast-attack, fast-release treatment at a ratio of 2:1 to smooth things out. I didn't set all the compressors exactly the same, though. The Threshold setting had to be made according to the levels of each channel, for instance, and the Attack setting was also critical in shaping the character of the note onsets — settings varied across the four tracks between 2ms and 15ms, as a result.
The remaining parts slotted in very quickly. High-pass filtering and HF shelving-cut kept the handful of backing vocals more understated than the lead, while a touch of slow artificial vibrato kept the higher harmony double-tracks from turning all 'R&B', especially given their tightened timing. (I set the modulation rate of the two plug-ins to 1.4Hz and 2Hz respectively, to keep them out of sync.) The supplied stereo shaker and tambourine loops also felt a bit forward in the mix, but it was nothing that a bit of high cut from ReaEQ couldn't solve.
Dry Steering
This is usually the point in the mix where I start getting global send effects involved, but I couldn't shake the feeling that this arrangement wasn't yet supporting the music enough, so I first made some additional efforts in that direction. The acoustic guitar double-track was my first port of call. Tom had already decided to delay its entry so that it thickened the texture for the beginning of the first chorus, but I decided to extrapolate from this and add an extra double-track layer when the acoustic guitar solo arrived. I created this layer by copying sections of the first double-track to different locations in the timeline, and once it was there, I panned the two double-tracks to opposite sides to expand the stereo image. Automating the levels of this double-track pair enhanced the song's long-term dynamics further; for example, by giving higher levels to the second and third choruses. Tom had supplied an optional electric guitar part doubling the bass as well, so that added further chorus-section 'gravy', too.
The backing vocals were ripe for reinvention, because there were 10 tracks of them and all those tracks were filled up with layered double-tracks and harmonies at each occurrence — during both later choruses, and also during the two refrains in the middle section. In general, 10 tracks seemed like overkill for this song, so I thinned those out to a single lead double-track, and one double-tracked harmony line. I started by introducing a single harmony track for the first chorus, then adding the lead's double-track to that for the middle section and, finally, doubling the harmony line for chorus three — again, panning the parts off-centre for some image spread.
The more I listened to the balance, the less I liked the rather wispy-sounding shaker part. It sounded like one of those little plastic 'egg' things that seem to loiter around the till in most guitar shops! Suspecting that something more substantial might drive the groove along better, especially during the more stripped-back opening sections, I reached for Nine Volt Audio's Shimmer & Shake REX loop library. An African instrument called a Shekere fitted the bill, although I didn't just replace the original part: the loop enters the arrangement on its own to start with, but it's joined by the original shaker part from the beginning of verse two. If you listen closely, you'll also notice that the stereo image of the Shekere loop starts off quite narrow at the beginning of the first chorus, but that it slowly broadens out over the next two song sections — a trick accomplished by automating the Sides level on a Voxengo MSED plug-in.
Reverbs, Wideners & Delays
 The processing Mike employed on the master bus for this mix was actually quite simple: there was a wide 6dB 'air' EQ boost at 20kHz, courtesy of URS's Console Strip Pro plug-in, and 2:1 compression from Cytomic's The Glue was used to add... yep, you guessed it, a little mix glue.
I was now happy to begin adding in some send effects. In the first instance, this involved some very short reverb from 112dB's Redline Reverb to blend the ensemble together and give it a sense of shared acoustic, combined with a one-second plate reverb from Universal Audio's EMT140 plug-in to fill out the vocal/guitar sustains. The latter, however, didn't really go far enough for me unless I turned up the reverb rather too high in the mix, so I supplemented it with a simple stereo quarter-note delay, some of which I returned to the plate channel. This extended the note tails much more without washing out all the mix details and cluttering the stereo picture in the way reverb can.
I applied a few different stereo widening effects in this remix, because 'point-source' overdubs often seem a bit anaemic to me in comparatively sparse arrangements like this. The bass, for example, had a dusting with Voxengo's Analogflux Chorus, while the electric-guitar solo prior to the third chorus was treated with the pitch-shifted delay patch I so often use on lead vocals for Mix Rescue. For Tom's singing, however, I didn't like the pitch-shifted delay's chorus-like tonal side-effects, so I replaced it with a more subtle widening effect: a Sides-signal delay.
This effect involves feeding a very short mono echo of the vocal signal (I chose a delay time of 10ms) to the left and right channels of the mix, with different signal polarity settings. The out-of-polarity delay signal then acts as a widener in stereo, but cancels itself out completely in mono. The main side-effect you have to look out for, in my experience, is that the short delay can affect the apparent frequency balance of the vocal, an effect that tends to be most noticeable in the lower mid-range. For this reason I deliberately high-pass filtered the delay return channel at around 450Hz to weaken the widening effect (and its side-effects) in that frequency zone.
Where the electric guitars were concerned, my delays were primarily agents for contrast. So the first part had a simple eighth-note echo, with the dry and wet signals panned to opposite sides of the stereo image. The following part had already gained some stereo width by virtue of its panned double-tracks, so I gave that a quarter-note delay instead, to increase the fullness of the sound and emphasise the rhythm. (One of the part's licks, however, sounded odd when it came back echoed, so I ducked the send just for that bit.) For the third part, I decided to leave the dry sound in the centre of the field, but pan eighth-note and dotted-eighth-note echoes to the left and right channels respectively. Settings like these aren't exactly revolutionary, but they did give each part its own subtle personality, which helped to highlight the musical interplay between them.
Finishing Touches
The send effects brought me to within spitting distance of the finishing line, but I still had a few little tricks up my sleeve. Firstly, I applied 2-3dB of mix-bus compression from Cytomic's The Glue, using a 2:1 ratio and fairly fast time-constants (0.3ms Attack and 100ms Release), to give the mix some dynamic 'movement' that helps instruments to sound more as if they belong together. A track of 'room tone' from a sound-effects library enhanced this illusion further, implying a communal space around the ensemble without adding any further reverb. Comparing the mix against the reference tracks led me to give the master channel a firm 6dB EQ push at 20kHz, too (using URS Console Strip Pro), because otherwise everything lacked the required HF gloss.
Of course, automation was a big part of this mix, with the vocals, in particular, benefiting from a good deal of level tweaking in real time. When it came to riding the bass guitar fader, however, I found I couldn't really bring out some of the interesting melodic fragments without unbalancing the whole low-end presentation. What I did there was ride the gain control of a 450Hz high shelving filter instead, using just the sound's upper frequencies to direct the listener's attention. I took the time to ride a couple of my reverb returns as well, especially the warmth-enhancing plate patch.
Lessons Learned
This month's remix provides good illustrations of a number of mixing and production principles of relevance to project-studio owners. Firstly, it's vital to realise that editing timing relationships between your musical parts doesn't just affect your track's groove; it may also change your ability to balance your channels. Editing assertively prior to mixdown can also pay dividends by reducing your reliance on mix processing when it comes to generating contrast and build-up. Finally, only nine of the 53 channels/buses I used for this remix had any compression whatsoever, so don't assume you have to squash everything just because you can.
Rescued This Month...
 Tom McKenzie, tracking acoustic guitar for one of his tunes.
Tom McKenzie is in his fourth year of a Music, Multimedia and Electronics degree at Leeds University, and has been writing and producing his own solo projects from his home studio (a converted shed) for five years. He and his brother Alex play all the instruments, and his dad's hobby of building home-made replicas of vintage recording equipment also helps!
Audio Online
In addition to the 'before' and 'after' mixdown versions, the SOS web site's accompanying Mix Rescue media page has a number of processing demonstrations with detailed captions, including a step-by-step 'audio walkthrough' of my initial balancing process for vocals, acoustic guitar, bass, and drums. If you'd like to investigate my edits and plug-in settings in more detail, you'll also find a download link there for the remix's full Cockos Reaper project file and the song's raw multitrack recordings.
Remix Reactions

Tom McKenzie: "The new 'stripped down' production suits the genre of the song and I really like the subtlety of the backing vocals. Everything is much improved rhythmically, too, especially the guitar solo, drums and shaker. The main issue I had originally was with the bass — no matter what I did, it either sounded too loud and resonant on certain notes, or completely flat and too quiet. But it's definitely been fixed now, so that it sits much better in the mix, working well with the kick drum to provide a solid rhythm for the song. Overall, I couldn't be happier with the result. Mike, you've done it again!”