There's little use spending money on fancy mics, processors and plug-ins if your speakers are badly placed and your room's frequency response has more peaks than the Himalayas! So here we'll be looking at practical ways to improve your recording and listening environments.

One of the thorniest issues when installing a studio is that of room construction and acoustics. Why thorny? Well, in my experience, if you ask any number of 'acoustics experts' to design a room or solve a room problem, you will get any amount of conflicting advice. I should say that I have no formal qualifications in acoustics. I have, however, designed a number of high-profile, Dolby-licensed rooms and also debugged acoustics for some major clients in my role as a studio installer. In fact, I got into acoustic design as a result of lessons learnt debugging other people's designs.
Even if you are able to afford the services of professionals, my advice would be to check their work at every step of the installation. I once saw a monitoring system in a room that had been designed, installed and commissioned by a well-known acoustics company, where one of the front loudspeakers was operating out of phase. I assumed that the fault would be traced to crossed wires somewhere in the audio jackfield, but it was actually caused by the left soffit-mounted loudspeaker being connected incorrectly. This major fault had gone unnoticed, and the room was signed off with the fault in place!
We're going to look at a number of different acoustics scenarios, from correcting simple problems in home studios, to a ground-up design for a small project studio. We shall also look at a very important and much overlooked subject, which as a loudspeaker designer is close to my heart: loudspeaker mounting, placement and orientation.
Room Acoustics Problems
Why should we worry about acoustics or look for problems? When you mix music (or anything else for that matter) in a room with acoustics problems, the material may sound fine in that location, but when the mix is subsequently played back somewhere else, it may sound quite different -- and often not good at all! If the mix environment has minor problems, the effects may be quite innocuous, such as a small changes in bass or treble content. In extreme cases, the balance may fall apart, or may contain elements that weren't heard during the mix -- a more common problem than you may think.
Imagine, for a moment, that your room is bass light. While you mix, to get what sounds like a good result, you will instinctively dial in more bass on bass instruments and kick drums. When played back in a 'normal' listening environment, the mix will sound very bass-heavy and uncontrolled. This situation is certainly not confined to small or amateur studios. Anyone listening at home with a system that includes a subwoofer will often come across commercial recordings with all manner of strange problems in the bottom end. Also, the level of very low bass varies tremendously between recordings. The reason for this will be that the mix and/or mastering engineers simply couldn't hear that low in the studios they used. I also find that there are great benefits in being able to see the woofer cones in the mix room. This is one of the reasons I do not recommend using speaker grilles -- try playing Steely Dan's Two Against Nature while watching your monitors to see what I mean!
The major problems afflicting domestic or semi-professional mix rooms and studios will include the following:
- Low-frequency problems: too little bass, or bass hot and cold spots throughout the room.
- High-frequency problems: too much reverberation in the room, or poor imaging.
- Isolation problems: Extraneous noise and leakage between rooms/buildings.
Choosing & Installing Monitors
Before we look into solving these acoustics problems, I would first like to discuss loudspeaker choice and mounting. It is important to look at this area first, as it will be impossible to make accurate acoustic judgements without sensible speaker mounting and positioning. The positioning, orientation and mounting of loudspeakers can have a huge influence on the final sound of a room, so it is wise to examine this from the outset. A number of pitfalls await the novice studio installer, the most problematic being the choice of speaker and positioning. You may think it strange to group these two topics under the same heading, but they are critically related.
 Figure 1. The optimum monitoring position.In many home studios, by necessity, the speakers will be placed against a wall, whereas in larger rooms they may be used free-standing and well away from any boundaries. To get good results with speakers against a wall, it is vital that they are not rear ported, as the proximity of the wall to the rear of the speakers will stop the ports working correctly and will result in uneven bass. Also, when positioned in this way, the apparent bass output of any speaker will increase. Therefore it is important that you don't choose bass-heavy speakers that were not intended for this usage. When buying speakers for your studio, try to audition them with a placement similar to how you will use them. If they will be used against a wall, try them this way at the dealer. Conversely, if they will be used well away from walls, don't be tempted to judge a speaker which is grouped together with many others in the showroom. Insist that they are moved into a sensible room position -- any good dealer will expect to do this as a matter of course.
As I discussed in my article on subwoofers (SOS July 2002), try to avoid placing your speakers in the corners of the room. Again, this will boost the bass end and result in inaccurate results. The ideal speaker position will place the listener and speakers at points on an equilateral triangle, as shown in Figure 1. If your room will not allow this, it is better to have the speakers too close together than too far apart. If the speakers are spaced too widely, you will get a 'hole' in the middle of the image, making accurate panning and acoustic placement impossible.
Having made your choice, the next step is to devise a secure mounting arrangement. The sound of many speakers will be disappointing and unpredictable if they are not mounted securely. This is easy to understand if you consider the tiny distances that the woofer cone and tweeter dome move in normal use. If the bass energy of the speaker is able to move its box (remember, every action will have an equal and opposite reaction), the movement will subtract from the bass output and may well be greater than the tweeter excursion, leading to a reduction in definition. This is the reason why spiked loudspeaker stands have become the norm. Whether you are mounting your speakers on a shelf or a stand, placing a small blob of Blu-Tac under each speaker corner will stop them moving. If they are floor-standing types, use a dedicated spike kit, especially if the stands are placed on carpet.
 Figure 2a. Incorrect positioning. When placed flat on a shelf, the sound from the tweeter arrives at the listener's ear later than the sound from the woofer.It is vital that the speakers are used in the orientation that they were designed for and also that you are on-axis to them vertically, and normally horizontally, in your normal listening position. If a speaker is used in the wrong orientation, the frequency response will suffer badly. Do not be tempted to lay the speakers on their sides for convenience. Listening off the normal vertical axis will not only cause response errors, but also notches in the response around the crossover frequency. This occurs because of phase cancellation between the loudspeaker drivers in the off-axis vertical plane.
Figure 2 shows a typical situation where the speakers are placed on a shelf above the mixing console. In this example, there is a 6cm distance difference between the tweeter and woofer at the mix position. This difference means that the high frequencies from the tweeter arrive around 174µs behind those of the woofer. If we assume that the speaker has a crossover frequency of 2.8kHz, which is typical, this will mean a dip of approximately 3dB in the response level at this frequency. If the distance were greater, a total cancellation would occur. Clearly, this is not what we want.
 Figure 2b. Tilting the monitors ensures the same distance to the ear from the tweeter and woofer.The simplest solution here would be to tilt the speaker towards the mix position to eliminate the time difference and even out the frequency response.
Treating High-frequency Acoustics
Now that we have our speakers well organised, we can move on to sorting out the room acoustics. Let's start by finding a way to identify problems in an existing room. High-frequency problems are most common in home and project studios, although, fortunately, they are easy to diagnose and treat using inexpensive methods. Sit at your mix position and clap your hands together sharply once. Listen carefully to the 'crack' and, more importantly, what happens after the 'crack'. In an ideal world, you would hear nothing after the initial crack. What you will probably hear, however, is a short period of sharp 'flutter' echoes, which combine to make a 'boing' sound.
A very quick, if unscientific fix, is to hold a blanket across one of the hard walls. It helps to have an assistant whilst playing this game! With the blanket held an inch or two from the wall, so that the wave is attenuated both on the way to and away from the wall, clap again. If you identified the most troublesome wall, the 'crack' should sound much cleaner and shorter. If not, try another wall.
 A number of permanent solutions exist. If you are on a tight budget, hanging blankets or heavy curtains on the wall is fine, although, for safety, only use fabric that is fire retardant. Beyond this, there are a large number of acoustic tiles available for this type of problem. A small number fixed to the wall with heavy double-sided tape or adhesive will work wonders. Acoustic tiles or Rockwool ceiling tiles will also be of benefit on the ceiling. A major benefit of reducing high-frequency standing waves is much better detail and imaging from your monitors. This area is perhaps the most overlooked in home studios, and indeed, domestic hi-fi listening areas.
Dealing With Excess Low End
Without extensive test equipment, the home studio owner must make judgements about bass levels subjectively. Remember, our goal is to avoid a situation where we reach for EQ controls in error. In many home or small studios, you can avoid the majority of bass problems by using sensibly placed nearfield monitoring. In this situation, you will mainly hear the sound directly from the monitors and therefore room effects will be less problematic and may often be ignored. In larger rooms where the distance between you and the monitors is greater, anomalies in the room will become more important.
Start by listening very carefully in your mix position. Play a range of commercial recordings that you know well. Again, as I suggested in my article about subwoofers in SOS July 2002, listen for a smooth progression of bass notes from bass guitars and so forth. You should hear all the notes with a consistent level. Depending upon the size and quality of your monitors, the extreme notes may roll off, but this is to be expected. Try to assess the quality of your monitors in a selection of rooms. This will give you a flavour for the performance of the speakers separately from the room. If you have areas where the bass comes and goes, and you have sited your monitors sensibly, then you probably have bottom-end problems in the room. The acid test of this problem is if you 'need' to alter the bass setting constantly while playing a range of test material. If you do, then you will instinctively do the same whilst mixing.
Next, try moving around the room. Do you hear large peaks and troughs in the bass end? If so, you probably have 'standing wave' problems. If the walls in a room are parallel to each other, as they are in all standard rooms, standing waves are set up when the distance between the walls equals a half wavelength, or multiple thereof, of a frequency in the audio spectrum. When the distance is equal to half the wavelength, the frequency is termed the fundamental. The relationship is described by the formula: f1=v/2L, where f1 is the fundamental frequency, v is the velocity of sound in air (approximately 345 metres per second in normal conditions) and L is the distance between the walls. For example, if a room has parallel walls four metres apart, a fundamental standing wave will occur at 43.125Hz, as well as some integer multiples -- 86.25Hz, 129.375Hz and so forth. To quantify the problems, I find it useful to audition the same material in a variety of rooms. A good place to start is on your or a friend's hi-fi. Does the material sound similar or are there major differences? I also find it useful to have a pair of good-quality headphones as a reference. You may be able to reach a workable compromise by resiting the speakers or your mix position.
Bass Traps
The next problem is bass peaks and troughs. There are two main methods for fixing this. The best solution is not normally domestically acceptable, in that it involves making sure that no walls in the room are parallel with each other. This is an important concept and should be applied to any new construction. Making the opposing walls non-parallel stops the waves being trapped and combining. This can be achieved with an out-of-square wooden frame, double-tacked with plasterboard (see 'Boosting The Bass' box for an explanation of double-tacking), on two of the walls and, ideally, on the ceiling.
A less drastic and often complimentary solution is to add a certain amount of absorption in strategic places. This works by attenuating problem frequencies, therefore reducing their summation. By absorption, I do not mean sound-absorbing wall tiles -- whilst these are great for high-frequency problems, none of them work low enough for true bass problems. Bass absorbers, or bass traps as they are also known, are available ready-made in a range of domestically friendly styles and colours, although they tend to be expensive. There is a DIY alternative, however. With either of these solutions, the absorbers should be located at some point along a convenient wall. Room corners are also good, and the key to placing them successfully is, as always, lots of trial and error.
 Figure 3.The absorbers will work over a range of frequencies, rather than at one specific frequency, so it's therefore quite difficult to predict the exact placement and quantity required. Start with the absorbers around a third of the way along the wall, then move them and listen some more. Add more if required. Remember, we are not necessarily after a total removal of problems, just enough to stop you reaching for that EQ knob! If you work with clients or producers, you will need more than one listening position. In this situation, you must listen carefully in a number of positions and add absorbers until you reach a good result.
Bass absorbers work by letting the sound energy in and then converting it to movement and ultimately heat. The DIY type shown (Figure 3), behave in a similar way to the overly flexible plasterboard wall. Sound waves enter the box through holes in the pegboard and also directly through the skin. The energy then excites the cardboard membranes inside the box. In the process of moving the membranes, energy is lost and bass is therefore reduced. These units are simple and cheap to make and may be covered in fabric to disguise them. There is a down side however, because this type is not as efficient as some ready-made models, so a moderate size room may need ten or more to correct problems, which would take up a lot of space. This is often a problem, even with professional absorbers. I once witnessed a large room reduced in size by a third in order to accommodate enough absorption.
|
Extraneous Noise & Sound Leakage
In most home studios, extraneous noise is not normally too much of a problem. On the other hand, sound leakage can be -- it's bad enough if your studio activities annoy other members of your household, but it's another matter entirely if you annoy your neighbours! Because these two acoustic problems are somewhat related, improving one will often improve the other. To reduce sound leakage, it is important to realise how it happens. Broadly speaking, there are two mechanisms involved in sound leakage. The first is airborne sound waves simply travelling between two locations. The second is structure-borne vibration carried between locations, which is the main problem affecting adjoining rooms or houses.
We'll look at reducing airborne problems first. The most obvious problem areas are door frames and windows. Ensure a good seal around doors by using a rubber-edged draft excluder. It's a little awkward to seal the bottom of a door, but if you can tolerate a small strip of wood fixed to the floor across the door threshold, you can seal to it. Dedicated door base seals having a central rubber strip are also available. Block up any old lock holes and so forth -- if air can get through it then sound can get through it!
There is, of course, a caveat here. A truly soundproof room will be airtight, which means it won't be a nice place to work for any amount of time! The solution is to ventilate the room via a route that will not cause acoustic leakage problems. In larger facilities, air conditioning with sound-reducing baffles is used. With windows, ensure the frames and opening sections are well sealed and, if the window is not double glazed, secondary glazing will help greatly. Any method you use for this should be easily removable for cleaning and, more importantly, for safety. Windows can be an important emergency exit.
Leakage through floors and ceilings is a major problem. As mentioned previously, double-tacking the ceiling will help, but it's often impractical. The best solution is to lift the floorboards in the room above, and fill the void with fibreglass insulation or preferably Rockwool. Floors must be sealed, because, if the floor uses conventional boards, all of the gaps will leak air and therefore sound. Once again, practicality often limits what is possible. The best solution is to lay an additional sealed skin over the existing floor. Hardwood flooring with its foam underlay is a great way of achieving this, but bear in mind that you may need to cover a large part of the floor with carpet to reduce hard surface reflections. Cheaper solutions could use chipboard, MDF or plywood sheeting. Whatever method you use, remember to seal all the joints well, particularly around the room perimeter. In order to allow for expansion and contraction of the wood, I normally use silicone sealant for this.
Tackling Structure-borne Vibrations
Structure-borne problems are the most difficult to overcome. A particular challenge is presented by speakers mounted on an adjoining wall. If they are coupled to their mounts, as I suggested earlier, energy will be transferred to the wall very efficiently.
 Figure 4.The most obvious way to avoid this sort of problem is by choosing an isolated or internal wall if possible. If your room layout does not allow this, you will have to compromise your mounting arrangements and allow the speakers a degree of movement. This may be achieved by using using Neoprene rubber strips underneath the speakers or by standing them on a dense foam pad. A better, although more complicated solution, is to mount the speakers in a high-mass sleeve which is itself isolated using foam or rubber, as shown in Figure 4. Adding mass in this way reduces the magnitude of the box movement by making the effective box mass high in relationship to the moving driver inertia.
Another major problem area is transmission via the floor and ceiling. The sound waves from the monitors excite these surfaces and cause them in turn to radiate into the building. The only practical solution for the ceiling is, once again, double-tacking. The floor may be improved by making a sub-floor which is isolated from the main floor by Neoprene strips, as shown in Figure 5. If a sub-floor is used, thought must be given to door thresholds. The raised height of the floor will require doors to be shortened and a step may be required. This construction method is at the heart of my dedicated studio designs and will be discussed next.
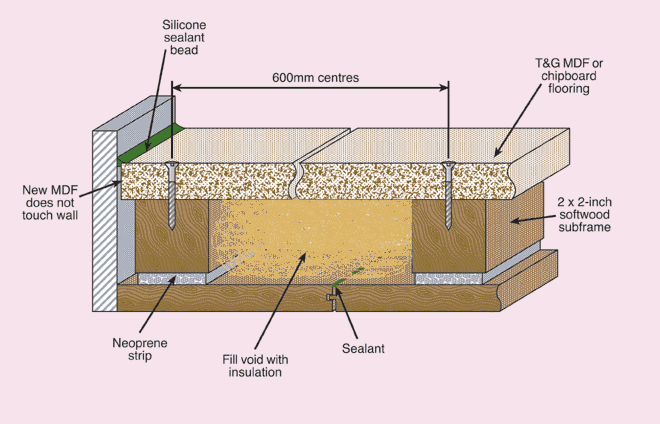 Figure 5. The floor may be improved by making a sub-floor which is isolated from the main floor by Neoprene strips.
Building A Studio From The Ground Up
Many small studios will be built into garages and outbuildings. This situation allows you to build a dedicated sealed and isolated shell within the existing building. The work involved is well within the capabilities of the average DIY enthusiast and need not be too expensive. Figure 6 shows the basic concept. Start by sticking 10mm-thick Neoprene strip to the underside of the floor framing. Next, install the uprights with plasterboard on the outside surfaces if possible. Each frame is fixed to the adjacent frame by the use of 'noggins' and corner plates, just as in any dry-wall construction. Six-inch joist material should be adequate for all but the largest ceiling spans.
 Figure 6.When the framework is complete, you will have a strong skeleton of a completely isolated room. If you need other isolated areas, a drum booth for example, just construct a second skeleton. It is very important that the various skeletons do not join or touch anywhere. Even a tiny connection will destroy the isolation. I once built a studio this way and found that there was almost no isolation between a booth and the mix room. The cause was a single length of 3 x 2-inch timber joining both skeletons. The builder I employed did not understand the isolation concept and joined the frames at a corner. The join was then covered up under the plasterboard wall skin and required major dismantling to correct!
When building the skeletons, arrange for two adjoining walls and the ceiling to be deliberately out of square to reduce standing waves. Generally, the more out of square the better, but this will inevitably reduce the final room size, so it has to be a compromise. I normally aim for a slope of around 15-20:1. The ceiling normally looks best if it slants down towards the monitors. The next step is to 'first-fix' all electrics (including phone lines, lighting and power cables) -- in other words, run in cables and fit socket boxes, but do not install sockets and switches. You should also not overlook plumbing and, of course, ventilation -- the design will be almost airtight upon completion.
After the first-fix is complete, the floor may be fitted. Place polythene sheeting loosely over the joists to avoid damp problems and then fill the floor void with fibreglass insulation. Next, lay the floorboards. It is best to use dedicated flooring chipboard with a tongue and groove. Use sealant on the joints. Fitting the floor at this stage will make it much easier to work within the skeleton.
The void behind the skeleton walls should be loosely filled with fibreglass insulation. Again, if your building is outside, as with a garage, you may need to cover the framework with polythene to guard against damp, before fitting the insulation. Next, the walls may be clad in plasterboard. The plasterboard should be double-tacked with the two skins offset by half a sheet so that the joins are not coincident. All joints should be sealed and taped. Also the joint between the floor and walls should be sealed. When the walls are complete, the ceiling may be fitted. Again double-tack. Make sure that the join between the top of the walls and ceiling is sealed.
 Figure 7.Doorways and windows need particular attention. Think of doorways as air locks. The door frame on the skeleton side must not contact the main building structure or the isolation will be compromised. Doors and windows between different skeletons must be double -- in other words, one on each skeleton. The frames can be isolated by an air gap and/or a small strip of Neoprene (see Figure 7). The gap may be disguised with carpet and wall coverings. When fitting windows, it is a good idea to angle them towards the floor or ceiling slightly. This reduces direct sound reflections and helps reduce standing waves.
Once completed, the room should be acoustically treated as discussed above. In new rooms I find it beneficial to use alternating hard and soft areas around one plasterboard sheet in width on opposing walls. The hard areas are formed by the plasterboard, which may simply be wallpapered. The soft areas can be acoustic tiles, cloth or curtaining. I also like to use a suspended ceiling with Rockwool tiles if height allows. This helps kill off high-frequency standing waves.
Although the system described above may sound complicated and labour intensive, the average home or project studio shell can be constructed in just a few weekends. As always, remember that if you do not feel confident tackling any of the tasks -- electrics in particular -- call on the services of a professional. Some or all of the methods described above should prove useful to anyone constructing studios at all levels. They have been well tried and tested by myself in rooms as large as 30 x 20 feet.