There's more to Live's Resonators effect than you might think...

If you've dismissed Live's Resonators effect as a one‑trick pony, take a closer look. You'll find it's a powerful tool for shaping and re-purposing percussion, bass, leads, vocals and sound effects. Resonators is easy to set up and, with a little automation, you can make it follow the musical contour of your project. This month we're going to look at just how much you can get out of Resonators. I'll start with an example of a basic setup and then describe how to enhance it with Live's Gate and Simple Delay effects.
Introduction
Resonators consists of five resonators in parallel. Controls to set each resonator's pitch and level are arranged in columns labelled I to V across the top of the effect's control panel. Resonators II to V are set in semitones (using the knobs) and cents (using the numerical boxes under the knobs) relative to the root note set for resonator I. Turning resonators off saves CPU power, and resonator I's Note knob will set the root pitch whether resonator I is on or off. The full stereo signal is fed to resonator I, whereas the remaining resonators alternately process the left and right channels.
The Width knob controls the stereo width of the output, but even if you set it to 0.0 percent (mono), you'll hear the effect of resonators II and IV on only the material on the left input channel, and the effect of resonators III and V on only the material on the right input channel. Try the settings in the screen below with a kick drum panned full left and a snare panned full right. Now rotate the Width knob counter-clockwise and you'll immediately hear what I'm talking about.
The Basic Setup
 The settings shown here can be used to turn a vocal sample into a major chord.
Aside from the individual resonators' controls, the controls furthest left have the greatest impact. The first column controls a multimode filter applied to the input signal. Use a full‑wet mix and set the Decay knob to 0.00 to audition the effect of the filter on the input (that's the sound being fed to the resonators).
You can use the controls in the second column — Mode, Decay, Const and Colour — to produce anything from muffled pings to over-the-top twanging that obliterates the original sound.
Follow this example (also shown right) to see what I mean:
- Insert and loop a spoken‑word clip on a track containing a Resonators effect.
- Turn all of the resonators on and set the pitches of II-V to +4, +7, +12 and ‑12.
- Use a 100 percent‑wet mix with Mode A, Const On and the Decay and Colour knobs all the way up.
You'll hear a major chord with the root doubled an octave above and below. The chord tracks the volume contour of the speech but follows the pitch of the Note knob. As you would expect, the Decay knob controls the tail of the chord. The Const switch keeps the delay time constant regardless of pitch (otherwise it tends to shorten with rising pitch). The Colour knob mostly rolls off the high end, making the chord less twangy. The Mode button radically changes the character of the effect, as well as lowering the pitch by an octave. (If you raise the Note knob setting by an octave after switching from mode A to B, you'll get a more accurate sense of the change in character.)
You can use the same setup to turn white noise or a noise‑based sound effect into an airy choir singing the chord. Use the filter in low‑pass or band‑pass mode to bring out the chord. This makes an excellent carrier for a Vocoder.
A Different Drummer
, which can then be mixed in without any resonator or delay processing by adjusting the volume of the empty chain labelled 'Dry'. The setup shown produces a C7 chord from each drum hit. Each chord will be arpeggiated at 2, 3, 4 and 5 16th‑notes after the drum hit.") Both effects here are set to 100 percent wet in order to suppress the source (drums), which can then be mixed in without any resonator or delay processing by adjusting the volume of the empty chain labelled 'Dry'. The setup shown produces a C7 chord from each drum hit. Each chord will be arpeggiated at 2, 3, 4 and 5 16th‑notes after the drum hit.
Both effects here are set to 100 percent wet in order to suppress the source (drums), which can then be mixed in without any resonator or delay processing by adjusting the volume of the empty chain labelled 'Dry'. The setup shown produces a C7 chord from each drum hit. Each chord will be arpeggiated at 2, 3, 4 and 5 16th‑notes after the drum hit.
Resonators is a fascinating effect to use with drum tracks, but be careful not to use too many individual resonators at once, as things quickly become cluttered. You can also take advantage of Resonators' stereo processing with Live's Simple Delay plug‑in. This produces a stereo arpeggiator‑like effect that's considerably more interesting.
Begin with settings similar to those in the screen to the left, and then insert a Simple Delay after the resonators. Ensure that the left and right delays are not linked and are both in Sync mode (the default settings). Different delay times for the right and left channels yield different arpeggiator‑like rhythms accompanying the drum track. You'll probably want to use this setup as a pre‑fader send effect, so that the delays aren't applied to the drums themselves.
Here's a slightly more complex setup that you can use as an insert effect and that will arpeggiate four resonators instead of two.
- Select the Resonators and Simple Delay and choose 'Group' from the Edit menu.
- Click the dots and lines button at the left to reveal the Group's Chain List and duplicate the chain by right‑clicking and selecting 'Duplicate' from the menu.
- In the newly-created chain, turn off resonators II and III and turn on resonators IV and V.
Experiment with different Pitch and Delay Time settings in both chains to create a chord and rhythmic pattern you like. If you want some of the dry drum track in the mix, create a new, empty chain, then use its Chain Volume setting to control the dry level (see screens below).
Adding Gate effects before the Resonators is another way to increase interest. The gate restricts the resonator and delay processing to only the loudest hits (or the softest, when the Gate is in Flip mode). If you insert a Gate effect at the beginning of each of the two top chains, you can apply different gating to each of the Resonators while leaving the dry chain ungated. Using Flip mode for one of the Gate effects allows you to spread the arpeggio across louder and softer hits in the drum track.
Resonators & Bass
The three setups mentioned above also work well with simple, percussive bass loops such as electric bass patterns that use just the root and fifth. If you keep the dry loop out of the mix, you can generate a bass line that tracks the song's harmony (using the Resonator I Note settings) and that incorporates other chord tones (those generated by resonator channels II through V). This technique cries out for one of the automation schemes detailed in the 'Going Remote' box.
Even with tweaking, Resonators has a characteristic sound. You can mitigate that with some of Live's other effects, such as Amp, Cabinet, EQ, Chorus, Phaser, Flanger and the various distortion processors. There is lots of room to experiment, and that is, of course, the key to turning Resonators into a powerful, multi-purpose effect.
Going Remote
You'll get a lot more mileage out of all of the setups discussed in the main text when you modulate the resonator pitches and the delay times in sync with your tracks. This lets you follow chord changes and create different delay‑generated note patterns on the fly.
The simplest approach is to record or draw‑in clip or track automation, but you'll have to create and maintain many lanes of automation. It's much easier to set up MIDI remote mappings and use note ranges to control the necessary settings. You can then perform pitch and time changes on the fly from your MIDI keyboard, and with a bit of trickery, record the changes in MIDI clips. (Note that MIDI remote mappings intercept notes before they get to Live tracks, so you'll need to dedicate a MIDI channel to your mappings.)
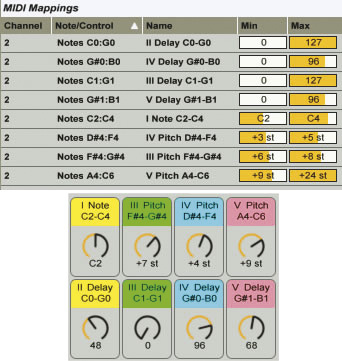
In the rack shown in the screen above, all of the essential pitch and delay settings have been mapped to the rack's Macro knobs. I've mapped a two‑octave mini‑keyboard on channel 2 to control those knobs, dedicating C0-B1 to delay‑time, C2-C4 to root note, and C#4-C6 to chord colour. For chord colour, I've matched the map to root‑position voicings in C: D#4-F4 for the Third or Fourth, F#4-G#4 for the Fifth, and A4-C6 for the Sixth, Seventh, or upper elements. You can keep the same key assignments but change the Min/Max ranges to suit your needs. For example, the range of 0-96 that I've used for the IV and V delay times maps the four notes G#-B to delay times 1, 3, 5 and 6.
To adapt this setup for recording automation, use a different keyboard MIDI channel, set up a MIDI bus for MIDI Remote in Live's MIDI preferences, and record the keyboard automation on a MIDI track routed to that bus. On a Mac, you can use an IAC bus, which you set up in the Audio MIDI Setup utility. On the PC you need a third‑party MIDI routing utility such as Midi Yoke Junction (free) from www.midiox.com or LoopBe1 (free) or LoopBe30 ($20) from www.nerds.de.