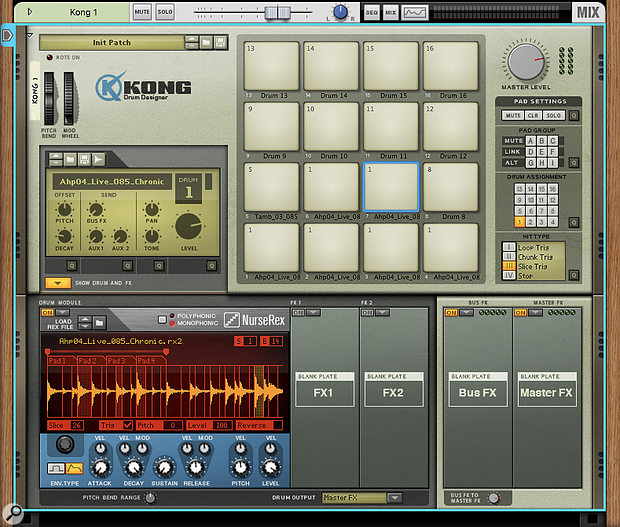
 1. Multiple Kong pads can be assigned to the same loop, each triggering different sections.
Kong is more than just a drum machine: it’s Reason’s secret weapon for dynamic performance with loops and breaks.
Last time we looked at beat sampling and chopping in Reason, and promised to return to look at the extensive REX loop functionality available in the Kong drum machine. As the Rack has a specialised REX loop player device (DrOctoRex) many Reasonistas have probably not used REX files with Kong other than to load individual slices onto pads. DrOctoRex provides both synchronised playback of sliced loops, and the ability to play individual hits via MIDI notes. However, Kong has some unique tricks that make it great for dynamic performance with loops. For example, it can layer loops, trigger partial loop sections, and freely stop and start loop playback.
To start experimenting with this month’s techniques first add a Kong Drum Designer to the Rack, then clear out the default kit by right-clicking and choosing Reset Device. Now you can drag a REX loop to the first pad. There are lots of REX loops included with the Reason Factory Sounds refill. These are located at the top level of the refill in the DrRex Drum, Instrument and Percussion Loops folders. I keep all these, plus my own loop collection, in a Favourites folder in the Browser. You can also type ‘rx2’ into the Browser search to see all REX files in your library. Once you’ve dragged a loop to a Kong pad you can trigger tempo-matched playback from that pad. Hitting the pad plays back a single cycle of the loop. Hitting it again during playback re-triggers it from the start — unlike DrRex you can trigger loops freely and unquantised here. Selecting the pad with the mouse will show its top-level controls to the left, which include channel mixing controls such as level, panning and sends, but also Pitch and Decay knobs which are actually offsets for the underlying NurseRex playback device. Decay affects each slice rather than the whole loop, and is one of the great things about working with a sliced loop compared to a continuous sample.
The engine powering a Kong pad loaded with a loop is the NurseRex device. This is revealed by clicking the Show Drum and FX button below the main pad settings (screen 1, above). This is a cut-down, single-loop version of Reason’s DrOctoRex device. The bottom half of the NurseREX panel contains settings that affect all slices, such as Envelope, Pitch and Level. By default the main Level is velocity sensitive. If you want to use Kong for sequencing loops Ableton-style you’ll probably want to turn this sensitivity to zero by turning the VEL knob to the 12 o’clock position. This will give you consistent playback volume each time you trigger the loop. You’ll probably need to turn up the overall level for the pad after this, as quite a lot of headroom is left for positive velocity settings. Above the waveform view is a playback range selector: drag the handles at each end to choose a start and end position for the loop. As with the regular REX player, you can select individual slices and adjust their Level, Pitch and Reverse settings independently.
Trigger Modes
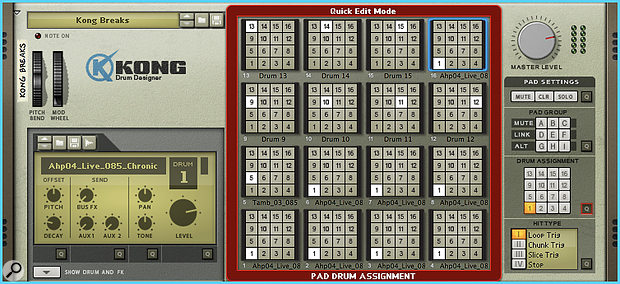
Kong pads that are loaded with a REX loop have four possible play modes, chosen in the Hit Type section to the right of the pads. The default mode is Loop Trigger, which, as we’ve seen, plays your whole loop within the range defined in NurseRex. The second mode, Chunk Trigger, lets you divide playback among several pads. This will behave the same as Loop Trigger until you assign more than one pad to the loop. To do this you select another pad and, in this example, choose pad 1 in the Drum Assignment grid. As with all Kong pad settings, you can bring up the Quick Assign matrix by clicking the Q button and assign multiple pads to a particular Drum (screen 2). Once this is done you’ll notice that the range selector in NurseRex is split into multiple sections, showing which range each pad will play. You can click and drag the boundaries of these sections to adjust the chunks. In the screenshot I’ve set up four chunks from an 85 bpm acoustic funk/hip-hop loop across the bottom row of pads. With the song tempo set to 160 I then experimented with triggering the chunks back in various different ways. This is a great organic technique for quickly generating breakbeats and drum and bass drum patterns.
 2. Quick Edit mode reveals several pads assigned to the loop on pad 1.
Depending on the situation, you may wish to set the NurseRex device to play back in mono or poly mode. The default is mono, and works great in the above example where I was re-sequencing the original loop in chunks. Each trigger stops whatever was previously playing. With some loops or use cases, you’ll want to the switch to polyphonic playback so that you can layer chunks over the top of each other. For example, you might define a chunk of hi-hats that you want to loop over the top of other hits or sections. This is also the right option if you use a large number of pads/chunks to effectively turn your loop into a drum kit.
The third playback mode is Slice Trigger. This allows you to set pads to trigger single slices. This is not the same as the technique from last time where we dragged single loop slices to pads. That is still the easiest and most precise way to chop a loop’s individual transients across the pads (and can be combined with the techniques here). A pad set to Slice Trigger mode will trigger all slices that have their Trigger tickbox ticked, playing them one after another in a round-robin fashion. By default this is only the first slice. If you want to pick out a single slice you can do it by making sure it’s the only one ticked. However, a more sophisticated trick is to choose several different instances of the same hit type, say a snare, to introduce some variation. To help you find the hits you want, you can Alt-click on slices to audition them. You can also select multiple slices at once (as I’ve done in the main screen) for changing settings like the Trigger tick box by Command-clicking (Mac)/Ctrl-clicking (Windows). Pads in Slice Trigger mode that are assigned to the same loop all play the same slices. It can be useful to set a couple of pads to this mode if you need to play hits in quick succession. However, if you want to have different Slice Trigger assignments within your Kong patch, you can import the loop again to a different pad.
The final mode is Stop. This simply stops playback from the NurseRex that the pad is assigned to. This is mainly useful when triggering whole loops but can also be used creatively for inserting a hard stop while playing with breakbeat chunks, etc. My final setup in the example picture combines all these different ideas to create a fun and expressive instrument that has elements of both a drum machine and a loop player. The bottom four pads play chunks of my loop on pad one; Pad 5 plays a tambourine loop; Pads 6 and 7 cycle through all the snare hits in the first loop; and Pad 8 stops the loops. This ends up as a really engaging device with which to record drum parts in real time.
Templates
Once you’ve created a cool Kong device like this you should save it as an instrument patch for future use. This can be used as a template to save much of the setup process. If you replace a loop in the DrRex device, the settings such as Chunk and Loop playback range, and the slice trigger selections will be reset, but all your Pad settings will be in place. I have three Kong patches that I use as templates for working with loops. One we’ve seen in the examples above. Another is set up to take a single loop on pad 1, with eight pads set to Chunk mode, one set to trigger the loop, and one set to Stop. Typically I can drop a loop onto this patch, adjust the playback range and automatically have all the individual slices come up on different pads, while maintaining the ability to play the whole loop. Finally I have a patch for spreading low-, mid- and high-frequency loops across the pad rows for live loop mixing. Having a number of elements under your fingertips like this allows for fast and improvised arrangements. Once you’ve captured your performance, remember that you can flip the Rack and use Kong’s multiple audio outputs to patch your different sources into separate channels of Reason’s mixer.
