GRM Tools’ new sound design software is an absolute tour de force!
Groupe de Recherches Musicales (GRM for short) is a French experimental music institution established in the 1950s. It was born from Pierre Schaeffer’s ‘Musique Concrète’ — a groundbreaking approach to composition that treats any recorded sound as raw material to be shaped, rather than notes to be written on a score. Many consider Musique Concrète to be the birth of modern sound design.
GRM released their first plug‑ins (also called GRM Tools) back in 1992, when virtual instruments and effects were still in their infancy. GRM Tools is still going strong more than 30 years later and has become a staple for sound designers. After all this time, it is exciting that a new product has been released.
Atelier is a contemporary continuation of GRM’s experimental ethos and builds on the GRM Tools suite. It’s a multi‑channel, modular, sound‑design sandbox. It comes as a standalone application and as VST3, AU and AAX plug‑ins. At the time of this review, only the Mac version was available. However, GRM tell me that a Windows version should be available by the time you read this review, or shortly after.
Atelier
If you’re familiar with GRM Tools, you’ll instantly see its influence in Atelier. In essence, Atelier is a modular environment where you can add sound sources, effects and modulators, and then connect them with cables. In one sound‑design session, you might create a complex, ever‑morphing drone made with 30 oscillators and a dozen comb filters. The next day, you might be creating your own custom reverb using multi‑layered delays and band‑pass filters. After that, some granular sample mangling, using either your own samples, or by resampling Atelier’s output. You get the idea.
Currently, the Atelier plug‑ins only work as effects or as a standalone application. There is no instrument version, which means there’s currently no way to play Atelier like a synthesizer, even though you can generate sound with sample playback, oscillators, self‑resonating filters and delays. There is some rudimentary MIDI mapping, but not the kind of keyboard playback you might expect from a regular synth. GRM tell me that this is a feature they would like to add in the future.
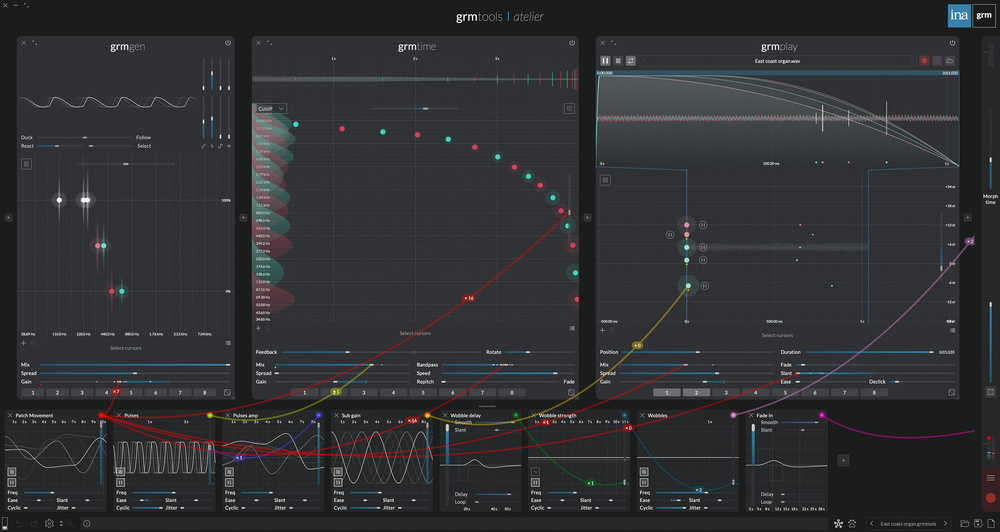
 Despite first appearances, there is simplicity in the UI. This patch is 11 oscillators, going through four comb filters, then into a cluster of 10 delay taps.
Sound Design
You can start, of course, by loading presets. There aren’t many included (just 30 by my count), and the onus is clearly on creating your own, which I wholeheartedly recommend. So, with an empty canvas, you start by adding a processor module. These are sound generators or effects. You might add a Gen module that creates oscillators, followed by a Comb module for comb filtering, and then a Time module for delays. There are eight processor modules to choose from. Apart from the ones I’ve already mentioned, there is Play (for sample recording and playback), Band (for filters), Pitch (for pitch‑shifting), Gain (for amplitude) and Viz (for various handy visualisers).
Processor modules occupy the top two‑thirds of the interface, and you can add as many as you wish. They will always be processed from left to right, in series.
Below the Processor section, in the bottom third of the interface, you can add Modulators. There are just three types, but don’t think this is limited. Each of them is a complex modulation source that covers a wide range. Agitation is capable of all manner of cyclical and random modulation. It’s an LFO on steroids. Peak is more focused on transient shapes: an envelope on steroids. And Control is a macro source: a slider on steroids. Almost anything in Atelier can be modulated. Even randomisers and presets (and each processor module has its own).
 LFO. How slow can you go?
Multi‑channel
It’s worth taking a brief detour at this point to explain how Atelier handles voices and channels. It’s quite a unique and clever system. Almost everything related to polyphony, channel management and voices is handled automatically. It’s virtually invisible to the user.
The first thing to note is that each processor module can handle multiple versions of itself. In the Time processor, for example, you can add up to 32 delay taps. The Pitch module can add up to eight pitch‑shifters. Coloured dots represent each processor voice on a graph in the main interface. So in the Delay, each dot represents a unique delay tap with its own settings (delay time, gain, band‑pass filter). Other parameters, such as feedback and dry/wet mix, can be adjusted globally, but modulated per voice. The modulation sources are designed to work in a multi‑channel mode as well. So, one instance of Agitation (the LFO) will modulate all 32 delay taps’ global parameters via a single cable.
Each voice is assigned to a dynamic channel system. Most users will be working in stereo (so two channels), but imagine you’re working in surround....
You are reading one of the locked Subscribers-only articles from our latest 5 issues.
You've read 30% of this article for FREE, so to continue reading...
- ✅ Log in - if you have a Digital Subscription you bought from SoundOnSound.com
- ⬇️ Buy & Download this Single Article in PDF format £0.83 GBP$1.49 USD
For less than the price of a coffee, buy now and immediately download to your computer, tablet or mobile. - ⬇️ ⬇️ ⬇️ Buy & Download the FULL ISSUE PDF
Our 'full SOS magazine' for smartphone/tablet/computer. More info... - 📲 Buy a DIGITAL subscription (or 📖 📲 Print + Digital sub)
Instantly unlock ALL Premium web articles! We often release online-only content.
Visit our ShopStore.