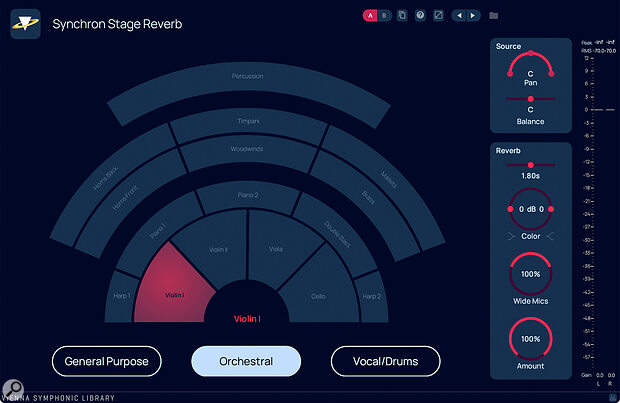
 Screen 1: The default Orchestral preset offers the widest range of options.
Based on Vienna’s Synchron Stage A, this new reverb promises to offer great sounds without taxing your CPU.
The latest plug‑in from Austrian software developers VSL comes in the form of a convolution reverb. Synchron Stage Reverb uses impulse responses captured with a Decca Tree mic array in VSL’s famous Synchron Stage A in Vienna — the recording venue for hundreds of music and film scores, including Captain America: Brave New World, Guardians of the Galaxy Vol. 3, Star Wars: The Acolyte and Mission Impossible – Dead Reckoning Part One, to name just a few fairly recent examples. Synchron Stage Reverb uses similar technology to that used in VSL’s MIR Pro 3D, which I reviewed in SOS September 2024, but is nowhere near as complex.
Synchron Stage Reverb comes in VST, VST3, AU and AAX formats, and is compatible with Windows 10 (latest update, 64‑bit) and 11, and macOS (Big Sur and higher) on an Intel Core i3 or Silicon machine. Licence activation is via iLok.
Setting The Stage
On opening an instance of Synchron Stage Reverb, it’s immediately clear what’s going on. The GUI is uncluttered, and there’s not a lot to tweak and fiddle with. Along the bottom are three preset mode buttons: General Purpose, Orchestral and Vocal/Drums. Above these, a display depicts the room placement for the selected preset. To the right, various controls allow you to tweak things further, and beyond these is an output level meter, which can be hidden by pressing the little meter icon that’s down in the bottom‑right corner.
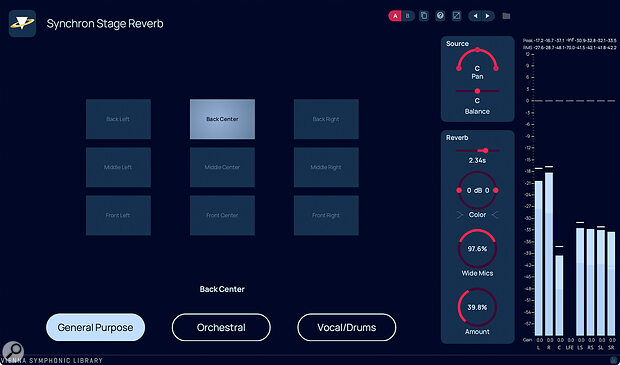
The plug‑in opens in Orchestral preset mode (Screen 1), but it’s General Purpose (see Screen 2) that’s the most basic of the presets, so I’ll start there. There are nine positions to choose from: three on the left (back, middle and front), three in the centre (again, back, middle and front) and three on the right (you get the idea). The room positions in each preset correspond to where the instruments (the incoming source sound) are placed in relation to the fixed‑position Decca Tree array. So, obviously placing something at the back of the room further away from the mics gives the effect of more ambience, whereas placing something at the front makes things sound more present, with slightly less ambience.
 Screen 2: A 7.1 configuration of the General Purpose preset.
To the right of the placement selection display is a ‘Source’ box with two parameters, Pan and Balance. These adjust the source sound rather than the reverb effect — they allow you to place the source sound in relation to the room position selected, to achieve a more realistic sound. By the way, the Balance control can also be adjusted by clicking and dragging left or right on the room position selection, while a Command‑ (Mac) or Control‑ (Windows) click will reset it to zero.
The Orchestral preset is about as complicated as things get for users of this plug‑in (ie. not very!). The graphic shows a typical layout of an orchestra. Depending on the instrument you’re sending to the room, you choose that instrument, and it gets placed virtually in the room at that precise location. There are positions for violin 1, violin 2, viola, cello, double bass, harp 1 and 2, piano 1 and 2, horns front and back, woodwinds, brass, timpani, mallets and percussion. Some might, of course, prefer the orchestra to be set up in a different way, so these are guidelines — there’s nothing to stop you placing your cellos in the violin 2 position or, say, your double basses more centrally — but generally speaking this feature allows you to set the reverb up for typical instruments pretty swiftly.
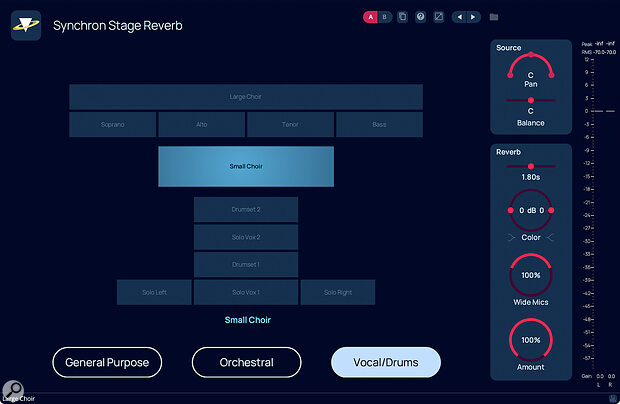
The Vocal/Drums preset (Screen 3) works in exactly the same way, this time with positions for solo vox 1 and 2, solo left and right, drum set 1 and 2, soprano, alto, tenor, bass, small choir and large choir. Again, these are guidelines for placement — I assume these are the go‑to placements for the engineers who work at Synchron Stage, know the room and have helped VSL to develop this software.
 Screen 3: The Vocals/Drums preset works in the same way as the Orchestral one.
While you’re previewing sounds, you can change between the three presets quickly. The controls on the right‑hand side always remain the same while you’re auditioning presets, which means experimenting with different positions is hassle free; it’s pretty simple to get things sitting exactly as you’d like.
I put their claims to the test in Pro Tools, running on my Intel i7 Mac Mini — it’s no slouch, but not exactly the newest or most powerful machine today...
Really, this plug‑in is designed to be used as a channel or subgroup insert effect, rather than on an aux send, because the settings will be unique to each instrument or set of instruments. If you were mixing a whole orchestra, then, and wanted to use it this way, you’d end up with a lot of instances of the plug‑in. However, VSL say that this plug‑in is very CPU‑efficient, such that running, say, 100 instances shouldn’t be a problem with most modern setups. I put their claims to the test in Pro Tools, running on my Intel i7 Mac Mini — it’s no slouch, but not exactly the newest or most powerful machine today — and while things did slow down a little with so many instances, I experienced no major problems or crashes.
The other box of controls on the right‑hand side shapes the reverb/room sound. You can set the reverb length to anything from 0.9 to 3.6 seconds, with the default being 1.8. I imagine that’s the natural decay of the room in the real world and generally that sounds good, but it can be helpful on occasion to be able to manipulate this. The Color control, comprising two movable dots on a circle, operates a simple pair of high‑ and low‑shelf filters, with both bands being adjustable by up to ±9dB. The Wide Mics control adjusts the contribution of the Decca Tree array’s wide mics, with 0 giving you the centre mic only, and 200 percent being the other extreme.
Finally in this section, an Amount control adjusts the mix of wet (reverb) and dry (source) signals, with 100 percent giving you the reverb only. There’s a handy modifier key for this too: if you hold down the Alt button while you adjust Amount, the Amount change will apply to all instances of the plug‑in used in your current DAW session. It might sound a simple feature, since many of us will be accustomed to working with only a few reverbs as aux send effects, but I appreciated it very much as a time‑conserving way of adjusting the reverb mix when I’d deployed a ton of instances as inserts on different instruments.
Finally, the meter display provides a welcome visual clue as to what’s going on, with both peak and RMS values being displayed, along with the ability to change the output levels of the individual channels. There’s also a solo function for each channel — just click on the channel label along the bottom of the meter.
New High Score?
I was hugely impressed when test‑driving VSL’s MIR Pro 3D reverb suite, and it’s fair to say that Synchron Stage Reverb isn’t as ‘all singing, all dancing’ as that one, and it isn’t as fully immersive in terms of channel widths either — though it works from stereo up to 7.1 channels, so there’s no reason why it couldn’t come in useful for those working in Atmos or other immersive formats.
But while Pro 3D certainly offers more, I’ve got to say that I do really like Synchron Stage too. When mixing, I like ‘simple’, and with this plug‑in I was able to get going fast with great results straight away — I never felt the need to consult a manual or dig into a YouTube tutorial. It’s well laid out. It’s easy to see what’s going on; the parameters are labelled sensibly. It doesn’t ask too much of your CPU. Operation is smooth when auditioning between the three presets, and the different placements within them. It works, and it works quickly.
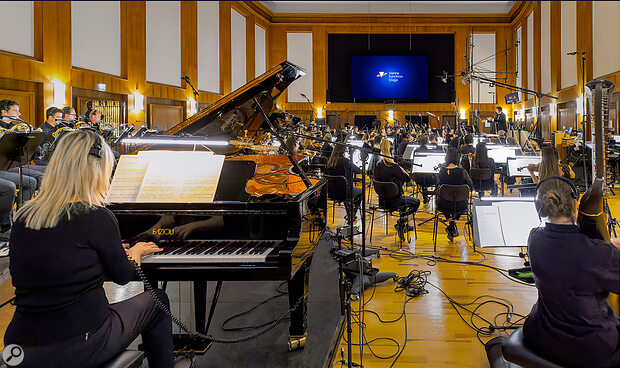
 Synchron Stage A: purpose‑built for film‑score recording.
According to VSL, Vienna Synchron Stage A is the only scoring stage in the world that was built specifically for film music recordings, and with an area of 520 square metres and a height ranging from 10.5 to 12 metres, it can accommodate orchestras with up to 130 members. It’s obviously an incredible‑sounding space. The Synchron Stage Reverb plug‑in aims to bring that sound straight to your DAW, allowing everyone the opportunity to place their virtual instruments and recordings virtually into this world‑famous environment. While I’ve never been to Synchron Stage A myself, the plug‑in certainly produces convincingly natural‑sounding results, and if you use any of VSL’s instruments recorded on that stage, then you should be able to use this reverb to blend other sounds in with them.
If you work in the worlds of classical music or film scoring, you owe it to yourself to check this one out — VSL offer a free trial so you can try before you buy. While those of us working predominantly in genres like pop or rock might not use it everyday, there will still be occasions when it’s exactly what you need so, again, well worth checking out.
Summary
A convincingly real‑sounding orchestral reverb, with the ability to place sources in different positions in this virtual recreation of Vienna Synchron Stage A. It might not be as feature‑rich as MIR Pro 3D, but it’s quicker to use and more keenly priced.
Information
€149 including VAT.
Best Service +49 (0) 89 4522 8920.
