

You are here

Goodhertz VCME 3

VCME 3

It’s billed as a ‘mastering’ compressor, but VCME 3 is way more versatile than that.

Another day, yet another compressor? We all have choice aplenty when it comes to compressor plug‑ins, but Goodhertz’s Vulf Compressor Mastering Edition (VCME for short) is usefully different, and if your compression needs go beyond the basic, it’s well worth checking out. As the name implies, some facilities are aimed at mastering, but VCME has plenty of potential when mixing, whether on individual sources, subgroups or the master bus. Now at v3 (this is my first encounter with it), VCME supports the usual Mac and Windows plug‑in formats, and channel counts ranging from mono right up to 9.1.6.

Main Features

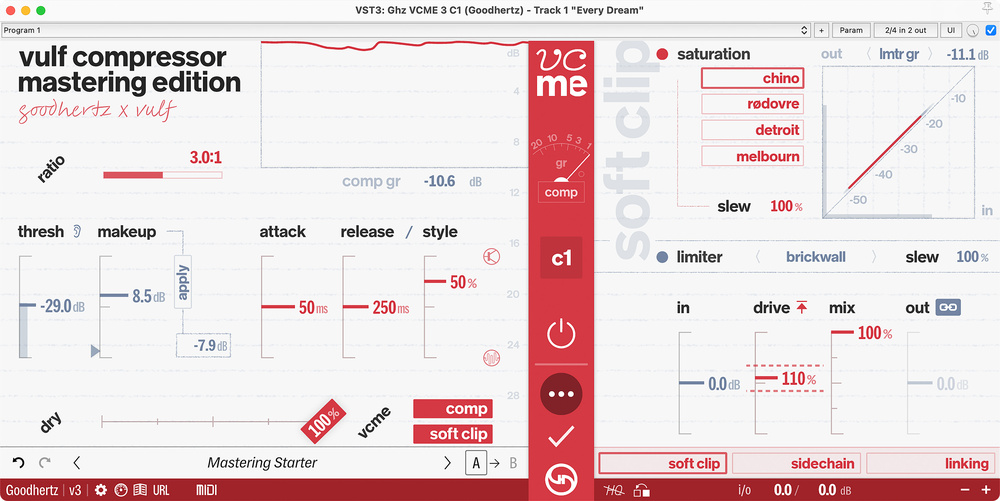
The main screen shows the extended GUI, with a soft clipper limiter/saturation facility in an Advanced Settings pane on the right, which is hidden by default. (You can install this soft clipper as a separate plug‑in too.) There are a couple of alternative views in this Advanced panel, which I’ll come back to later. Meanwhile, the left pane hosts something looking more like a conventional compressor, albeit with a distinctive‑looking GUI (you can change the red on white livery to white and red on black, if you prefer).

On this compressor pane are the usual threshold, ratio, attack, release and make‑up gain parameters and, beneath, a wet/dry mix slider. All have stepped settings — something that’s very common on mastering hardware, as it makes channel matching precise and facilitates reliable A/B comparison of settings and precision recall. By default, the steps are very fine (eg. 0.5dB steps for the threshold) but there’s an option for coarser granularity (the threshold’s individual steps become 3dB).

Not only is the current amount of compression shown on a virtual needle meter and a numerical readout, but there’s also a history plot displaying overall gain reduction post the dry/wet mix control. There’s also a neat semi‑automatic threshold and make‑up gain facility: as you set each manually, you’re always in full control, but next to both parameters’ sliders an arrow can appear to suggest a suitable ballpark setting. For example, if you leave the threshold at 0dBFS, the arrow will indicate roughly where to put the threshold so the changing signal level triggers a broadly sensible amount of gain reduction. You can work the same way with the make‑up gain slider, but this parameter is also joined by a continuously updated numeric readout of the variance between the dry and wet signal levels. Hit Apply, and the make‑up gain is automatically adjusted to compensate for the difference. You don’t always need to match the levels before/after compression, of course, but it can be invaluable when you want to A/B compare different processors, or the compressed signal with that when the compressor’s bypassed, not to mention making it easier to adjust the wet/dry blend.

Yet another intriguing option is the ability to switch the modelled release behaviour between FET and opto types. That’s not unique, but here you can also morph continuously between those extremes, to access a range of different curves.

A cog icon reveals more settings, including window size, GPU acceleration, GUI colour and control granularity. Above, there’s a good range of factory presets, helpfully divided into categories (Mastering, Mix Compression, Heavy Compression, Colourful/Saturation, and Limiter Only), including some ‘name’ presets. Less conventional is a second preset option: the URL button. Hit this and a web page is opened on the Goodhertz site, listing the plug‑in’s current settings. You can copy the URL, right‑click on the plug‑in GUI and paste in those settings. It’s a neat system: it creates a visual record of your settings and might be useful for project archival or, say, students wanting to write up their projects. It also means you can pretty much instantly share settings with anyone, anywhere in the world, working in any DAW. The plug‑in offers other conventional features like A and B buttons to compare settings, and undo/redo, of course.

If you’re considering a sophisticated compressor like this you probably won’t be relying on presets, but there’s a good range of them here, and they can offer some insights about how to get the best out of this processor when you’re first learning to use it.If you’re considering a sophisticated compressor like this you probably won’t be relying on presets, but there’s a good range of them here, and they can offer some insights about how to get the best out of this processor when you’re first learning to use it.

Going Soft

The three‑dots icon on the central red stripe pops open the Advanced Settings pane, whose three views are Soft Clip, Side‑chain and Linking.

As with the compressor, the soft clipper offers an almost bewildering array of options. I say ‘almost’, because Goodhertz have done such a superb job of keeping the GUI uncluttered, organised and intuitive. There are four saturation options: Chino (which Goodhertz describe as “hi‑fi, classic tube sound, notes of Hendrix”), Rødovre (“round, tube‑y, smooth”), Detroit (“grungy, warm, notes of Jamerson, Sousaphone‑y”) and Melbourn (“punchy and British. Strong transformer saturation”). I sense they’re intended largely for the sort of subtle saturation you might choose to apply during mastering, rather than obvious distortion. You can push it harder if you really want to, though, and the characters on offer are as seductive as their descriptions sound. A Drive control effectively sets the saturation threshold, so you have independent control of the overall loudness and the amount of coloration.

Other useful control options include a Mix slider, inverse linking of the input and output faders, and the ability to display the limiter’s gain reduction, loudness range (LRA) or long‑term loudness (LUFS‑LT). More esoteric options include configuring the limiter as a brickwall type or to ‘follow the mix’, and to change the slew rate.

I particularly enjoyed just a touch of Neve‑esque transformer distortion to thicken up a recording of a singing acoustic guitarist.

The stereo linking options, shown here in Dark mode, include the ability to reduce the saturation applied to the Sides channel.The stereo linking options, shown here in Dark mode, include the ability to reduce the saturation applied to the Sides channel.Operating this section is easy. I tend to set Drive to 0 and set up the limiter, before dialling in saturation to taste. For the latter, I find it helps to lightly overcook things to choose the desired character, then bring Drive right down again, before dragging it upwards until I hear just enough of what I want. I particularly enjoyed just a touch of Neve‑esque transformer distortion to thicken up a singing acoustic guitarist recording I was working on during this review, but all the options have their place and, for example, I found I preferred Rødovre on a harder‑hitting pop mix. Horses for courses. I should note that, even with the useful visual feedback on an input/output plot, it’s incredibly easy to overcook this sort of thing when DIY mastering unless you have reliable monitoring. You have more wiggle room for processing individual instruments, though, and it can be really cool to mix into this section on a drum bus.

(Yet) More Options

In the Linking tab there’s yet more control over the clipper: you can reduce the amount of saturation applied to the Sides relative to the Mid, as well as set the limiter’s stereo link mode to Full Off or Hybrid. That last option can work well: it links the limiter’s left and right channels only during the slower phases of gain reduction, and seems to preserves some of the ‘life’ in the transients. There are similar control sets for the compressor and, if using on surround material (something I haven’t had the opportunity to do) the centre and LFE channels.

With only a handful of controls, there’s ample means to adjust the compressor’s side‑chain signal.With only a handful of controls, there’s ample means to adjust the compressor’s side‑chain signal.In the final Advanced panel you can configure the compressor’s side‑chain signal. Internal and external side‑chains can be used and, intriguingly, with external selected, you can blend between the two. You also get a two‑band EQ, but it’s more versatile than that description sounds. A heat map tells you where in the spectrum most of the audio energy resides, and there are nodes for each band and an EQ curve on this. Each band is a cut/boost shelf that morphs into a high‑/low‑pass filter as you dial in more assertive attenuation, and there’s a tilt facility at the top to shift the balance of energy in the side‑chain towards the high or low end, without losing your main EQ settings. An ear icon lets you audition the side‑chain, post‑EQ, so you can fine‑tune the trigger signal more easily. That’s a heck of a lot of control over the side‑chain, with only a handful of controls.

Impressions

As I hinted at the top of this review, I approached VCME 3 with a healthy dose of scepticism. I have plenty of compressor options, both hardware and software, including some excellent ones intended for mastering. Clearly, then, I don’t need VCME 3 — but despite that, it quickly won me over. Not only does it sound good (I include the saturation effects in that statement), but I love that it manages to be both supremely configurable and quick and easy to use, and the more I’ve worked with it, the more I’ve started to appreciate the fast, intuitive workflow it makes possible. Yes, there are other tools that can do what it does, and some that offer different tonalities. But whether you’re working in stereo or immersive audio, on mixing or mastering, this one has plenty to offer and is well worth taking the time to audition.

Summary

A great‑sounding compressor and soft‑clip saturation/limiter. Laden with parameters that allow you to tweak to the nth degree, VCME 3 also manages to feel quick and easy to use.

Information

$199. Discounted to $149 when going to press.

Goodhertz +1 626 720 4815.

support@goodhertz.com

goodhertz.com

$199 (discounted to $149 when going to press).

Goodhertz +1 626 720 4815.

support@goodhertz.com

goodhertz.com