Cubase 6 pushes the boundaries of expressive sequencing, while adding polish and new editing functionality to keep existing users happy. Is it all too good to be true?
Much has happened in the world of music technology since Steinberg released Cubase 5 just over two years ago. Apple's Logic 9, unveiled in the Summer of 2009, brought advanced tools for recording guitarists, and Flex Time audio editing. More recently, Avid launched Pro Tools 9, with support for ASIO and Core Audio‑based hardware. And although Steinberg haven't exactly been resting on their laurels — Cubase 5.5, introduced last Summer, brought significant under‑the‑bonnet changes for multi‑core support and video — there has been much curiosity over what direction the company would take for their flagship music-creation software in the next major version.
Shown for the first time at this year's Winter NAMM show, Cubase 6 had plenty of new features to both delight and surprise. For every feature that could perhaps have been anticipated, such as a new plug‑in to emulate guitar amps and stomp boxes, there was another most users would never have foreseen, such as the ability to record and edit expression data polyphonically. And long‑standing issues haven't been ignored either, with Steinberg finally simplifying the process of multitrack audio editing and cleaning up some interface‑related cobwebs.
You Sixy Thing
As with Logic 9, the first thing you notice about Cubase 6 is that its physical package has been made smaller. While this is great for the environment, it means that Steinberg no longer supply the Cubase Operation Manual in a physical form, which is perhaps a shame. However, it has to be acknowledged that PDF manuals have long been commonplace; and should you want to read the manual away from your computer, I suppose you can always put the documentation on a tablet device like the iPad, even though it's not quite the same. (Let's not even joke about printing it out.)
Cubase 6 is supplied on six DVDs, although the main application itself only requires one disc. The remaining five offer trial versions of Halion Sonic, Halion Symphonic Orchestra and The Grand SE 3, along with a DVD containing video tutorials. These tutorials were produced by Streamworks Audio and should provide a good starting point for new users — even though the lady providing the instruction sounds distractingly reminiscent of someone desperately trying to disguise a heavy cold.
Steinberg have once again tweaked the appearance of Cubase's user interface for version six, building on some of the changes introduced in Cubase 5.5 and, especially, in recent versions of Nuendo (version 5 was reviewed in SOS October 2010: /sos/oct10/articles/nuendo‑5.htm). While some of these changes have not necessarily been welcome — see the Nuendo 5 review for comments on transparent panes and the lack of dividing lines for toolbar buttons — I have to say that, on the whole, I rather like the appearance of Cubase 6. The interface seems a little more refined, and the Inspector in particular has become much cleaner, adopting the curved Section headers reminiscent of those first seen in Nuendo 3, though I still wish it was possible to disable the recently introduced, limacine animation you now have to endure when opening and closing Inspector Sections.
Anot her aspect of the Nuendo 5 aesthetic that's been inherited by Cubase 6 is the way in which parts are displayed on the Project window. Previously, parts were drawn as solid blocks of colour, but now they're drawn with illecebrous linear gradients, making it much easier to distinguish parts on different tracks, especially at small track heights.
Staying on the subject of colour, Cubase now adopts Nuendo's method of displaying track colours. Previously, you would enable track colours by clicking on a button at the head of the Track List, and a track-colours bar would appear next to each track's meter. Now, track colours are always enabled, and shown in the area where the track number is displayed. This area used to be coloured according to track type (grey for MIDI, blue for audio, and so on), but I think it makes far more sense to display the track colour here.
One small thing that might further enhance track colours is if the whole background of a track could reflect its colour, as is the case in Pro Tools. This could potentially look quite vulgar, but it could also make navigating long Track Lists much easier.
Express Yourself
One of my favourite features in Cubase 5 was VST Expression, which simplified the process of working with instruments that contained multiple articulations within a single patch. This was incredibly helpful to those working with large orchestral libraries, where a violin patch might contain different playing styles, such as legato, staccato, pizzicato, and so on. Using VST Expression, a map could be created to enable articulation changes to be edited visually in a Controller lane, rather than the user having to deal with anonymous keyswitches.
However, the real power behind VST Expression was arguably its pervasive implementation across different areas of Cubase. Articulations were accessible via the Project window's Inspector and the Key editor, of course; but VST Expression Maps also included data for interpreting Articulation Events in the Score editor. In addition to being able to switch between articulations such as legato and pizzicato using what Cubase termed as Directions, it was also possible to specify additional Attributes for certain notes. For example, you might be playing the legato articulation (or Direction), but want to make one note play an accent using a different sample set. Assuming your map was set up correctly, this could be achieved by setting a note's Attribute to Accent in the Event Infoline. An accent symbol would automatically be added to the appropriate note in the Score editor.
In Cubase 6, VST Expression is now known under the more generic‑sounding banner of Expression Maps. (For those who are interested, 'VST Expression' is now used as a marketing term to describe a family of related functionality that includes Expression Maps.) However, there have been some other, non‑lexical improvements as well.
One of the hurdles to overcome when using VST Expression in Cubase 5 was that suitable Maps would first need to exist for instruments. Some Maps were made available by developers, but often users would need to create them manually. And while not exactly a task that would validate an application for Mensa, this extra step may have prevented some from garnering the full potential of Expression Maps.
This situation has changed in Cubase 6. Thanks to a 3.5 update to the VST3 plug‑in specification, VST Instruments can now declare keyswitch data to Cubase, so that a suitable Expression Map can be created automatically. Assuming you have a suitable VST 3.5 plug‑in loaded with a patch that has registered its keyswitches — such as the included Halion Sonic SE with the Halion Symphonic Orchestra library installed — a special option will be available from the Expression Maps pop‑up menu called Import Key Switches. Select this, and you'll be ready to go. Thanks to the new 'Import Key Switches' command, Cubase 6 was automatically able to create an Expression Map for the 'Violoncelli A Combi' patch in Halion Symphonic Orchestra.
The fact that the command to automatically create Expression Maps is called 'Import Key Switches' is an indication that, disappointingly, the concept of Expression Maps in general is still tied to keyswitches. By keyswitch, I mean a note on the keyboard that triggers an articulation change instead of making a sound. Although keyswitches are arguably the most common approach used by libraries, it does seem a shame that you can't trigger different sample sets (or Sound Slots, to use the Cubase terminology) via other MIDI messages, such as program or control changes. This is particularly annoying given the fact that you can make a Sound Slot change trigger different types of MIDI messages if you want to make a Map that works with older hardware synths.
Another change to Expression Maps in Cubase 6 is that you can now assign colours to Sound Slots in the Map. This makes it possible to colour data in the Key editor by the different articulations, so that legato notes might appear red, pizzicato blue, and so on. This is visually very helpful, but one slight quirk is that while the notes themselves are coloured, the actual Articulation Events in the Controller lane don't follow the same colour scheme and remain a single colour. This makes it harder at a glance to understand what colour represents a given articulation, and it would be great if the Articulation Controller lane could also follow the 'Colour by Sound Slot' instruction.
Born This Way
To complement the newly improved Expression Maps, Cubase 6 introduces what is quite simply a breakthrough new feature: Note Expression. Since the emergence of MIDI, now nearly 30 years ago, the role of making programmed music sound more expressive has fallen to MIDI controller messages. You might use MIDI controllers to add volume changes, for example, or to make adjustments to various instrument‑specific parameters, such as filtering, crossfading velocity layers, and so on, and then manipulate this type of data with something like Cubase's Controller lanes.
For the most part, the use of MIDI controllers has worked quite well — except for one limitation. When you add MIDI controller data to your track, that data affects all notes playing on a given MIDI channel. And since, in most cases, a track in Cubase is assigned to one MIDI channel, it means that all notes on a given track will be affected by the data in the Controller lanes. It's impossible to play a chord on one track, for example, and only have the top note crescendo — unless you were to assign that note to a different track or MIDI channel.
MIDI itself offered a solution to this problem with a special message type called polyphonic pressure (sometimes known as polyphonic aftertouch). You might be familiar with 'channel aftertouch' if you have a synth like the Access Virus, where, after you've played a chord, you can keep the notes held down and by applying further pressure, modulate a certain parameter within the synth. However, the modulation will be applied to all notes on the MIDI channel, as we've just been discussing. The idea behind polyphonic pressure is that it makes it possible for a keyboard to transmit a stream of aftertouch values for each note independently. Anyone familiar with Yamaha's classic CS80 synth will know exactly what I'm talking about.
However, keyboards offering polyphonic pressure never really took off, partly because they were more expensive to produce. Another problem was that even though you could record polyphonic pressure messages into a sequencer, there was no really good way to edit that data. Previous versions of Cubase could edit polyphonic pressure messages in the List editor or via the Controller lanes, where each note pitch had its own lane, but these methods were far from ideal.
Enter Note Expression, Steinberg's modern solution to the problem of polyphonic articulation, allowing you to record and edit expression data for individual notes. If you want to play a chord and only have the top note get louder, you can now draw a volume curve that only affects the top note. Likewise, if you have three notes playing and you want to alter the vibrato separately for each note, Note Expression makes this possible. This sounds great, but there is one catch.
Because MIDI itself only supports one polyphonic controller per channel — polyphonic pressure — Note Expression has been implemented using a new type of controller known as a VST3 controller, which is part of the aforementioned VST 3.5 specification. This makes it possible to have multiple polyphonic controllers on a single track, allowing simultaneous and independent control for volume, tuning, and whatever else the instrument developer desires, for each individual note. But it also means that to take advantage of Note Expression, you need to be using VST3 Instrument plug‑ins that support the newly introduced VST3 controllers.
As you might guess, right now the only VST3 plug‑ins that support Note Expression are Steinberg's Halion Sonic and Halion Sonic SE plug‑ins — the latter included with Cubase 6. However, I don't want to dwell on the negative aspect of instrument availability right now — there's a box for that — since there are many interesting aspects of Note Expression to explore...
Expression Inspection
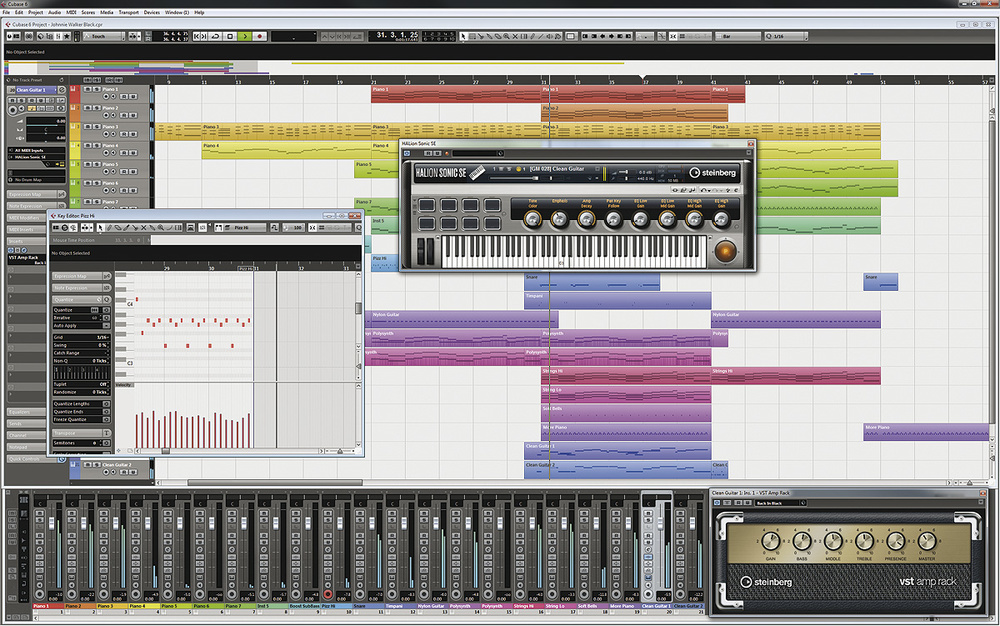
Like many other windows, the Key editor now has its own Inspector panel in Cubase 6, providing access to common editing commands for transposing, quantising and adjusting the lengths of notes. appear at the top, followed by the list of MIDI controllers. In the editor itself, you can see Note Expression data superimposed on the notes; the colouring of the lines represents the colour assigned to the VST3 Control in the Note Expression Section. Volume is red, tuning is yellow.") The Key editor now has an Inspector, allowing easy access to the Note Expression functionality. Notice how the VST3 Controls (from Halion Sonic SE) appear at the top, followed by the list of MIDI controllers. In the editor itself, you can see Note Expression data superimposed on the notes; the colouring of the lines represents the colour assigned to the VST3 Control in the Note Expression Section. Volume is red, tuning is yellow. To configure Note Expression on a track, a new Inspector Section has been added to both the Project and Key editor windows. The Note Expression Inspector Section shows a list of available parameters, and exactly which ones you see here depends on the instrument you're using on a particular track. The VST3 controllers declared by a supporting instrument are shown first, followed by a list of MIDI controllers.
The Key editor now has an Inspector, allowing easy access to the Note Expression functionality. Notice how the VST3 Controls (from Halion Sonic SE) appear at the top, followed by the list of MIDI controllers. In the editor itself, you can see Note Expression data superimposed on the notes; the colouring of the lines represents the colour assigned to the VST3 Control in the Note Expression Section. Volume is red, tuning is yellow. To configure Note Expression on a track, a new Inspector Section has been added to both the Project and Key editor windows. The Note Expression Inspector Section shows a list of available parameters, and exactly which ones you see here depends on the instrument you're using on a particular track. The VST3 controllers declared by a supporting instrument are shown first, followed by a list of MIDI controllers.
Although it's perhaps good that MIDI controllers can be used as a Note Expression parameter, initially I wondered if this was really necessary. Since MIDI controllers are channel‑based rather than note‑based, as we've discussed, I wonder if allowing MIDI controllers entry into the world of Note Expression might be more confusing in the long run. However, if Steinberg's developers hadn't included MIDI controllers, I would most probably have been criticising that decision instead and asking for the inclusion of such controllers to cater for those just‑in‑case scenarios. But, most importantly, it means that Note Expression can be used to edit and output polyphonic pressure data — so, after all these years, we finally have a sequencer that makes working with polyphonic pressure more fun than having a colonoscopy!
Each Note Expression parameter can be assigned a MIDI controller, allowing you to record Note Expression data using a conventional MIDI controller if you don't have one of the vanishingly few keyboards that support polyphonic pressure. Should you want to do this, there's a further 'MIDI as NoteExp' option to enable, so that Cubase knows to treat incoming MIDI controller data as Note Expression data. In addition to recording Note Expression data via a MIDI controller, pitch‑bend and channel aftertouch (along with polyphonic pressure) are also supported. A particularly nice touch is that it's possible to set a range for each parameter: this is especially useful for tuning‑based parameters, where you might want to specify that the range for tuning deviation be only a semitone for some instruments and an octave for others.
The really neat aspect of Note Expression, however, is revealed in the editing process. If you've recorded Note Expression data for a note, or you want to create it from scratch, you can double‑click on a note in the Key editor to open a mini Note Expression editor for that particular note. The Note Expression editor appears when you double‑click a note in the Key editor. If you have more than one note selected, the editor will appear with suitable dimensions to display the Note Expression data for all the selected notes. The operation of the Note Expression editor is similar to how standard controller or automation data is edited: you can use the Draw and Line tools to create the appropriate shape. But the Note Expression editor also introduces a few neat tricks.
Located around the border of the editor are a number of controls to manipulate the expression data within the frame. For example, you can scale the data vertically, tilt it left or right, or stretch it horizontally from any point in the timeline. If the editor is too small, you can increase its size vertically; but the horizontal size of the editor is based on the horizontal zoom factor of the Key editor. The reason for this is that the width of the Note Expression editor represents the length of data associated with a note, and by extending the editor horizontally, you can write expression data that will affect the release of a note.
After you've finished editing expression data for a note, simply click outside the border to close the Note Expression editor. Should you want to see the expression data for notes when the editor is closed, there's a new button on the Key editor's toolbar to Show Note Expression Data. When enabled, the data is superimposed on corresponding notes, and it's even possible to change its height via a small slider on the toolbar.
A particularly sagacious move on the part of Steinberg's developers is that, in addition to being able to edit Note Expression data visually, you can also manipulate it in the Logical editor. This is interesting, and a selection of Note Expression‑related presets are supplied to demonstrate the potential for this kind of processing. One example that a Steinberg developer tried was the idea of randomly applying tuning values to each note in a non‑pitched percussion part. Apparently, this instantly made playback seem more realistic, thanks to the increased level of subtle variation. And I'm sure this example is just scratching the surface of what will be possible.
As you can probably start to appreciate, the Note Expression features in Cubase 6 have incredible sophistication and depth. I could easily spend the rest of this review explaining some of its other great aspects, such as the way you can convert existing controller data into Note Expression data, or how clicking and holding a note previews the note with any corresponding expression data. But alas, there just isn't space.
Even if the Note Expression features aren't relevant to the way in which you personally use Cubase, what's particularly great is how some of the editing functionality for Note Expression has been used in other areas of the program. For example, the way data can be manipulated in the Note Expression editor is so useful that Steinberg have duplicated this idea for controller and automation editing. Now, when you select controller or automation data, editing controls appear at the edges of the data, enabling you to tilt, scale and stretch the selected events, just as you can expression data. This is incredibly neat and clever.
Becoming A Groupie
While Note Expression is a pretty significant part of Cubase 6, Steinberg have also improved certain areas of the program to simplify the process of working with multitrack audio — and, specifically, multitrack drum recordings.
To begin with, editing multiple tracks within a folder has been made easier in Cubase 6, thanks to the new Group Editing mode. But let me digress and mention that putting tracks into folders has itself been made easier, courtesy of the 'Move Selected Tracks to New Folder' command. This does exactly what you would expect, and is a big improvement over having to create a folder and drag the selected tracks in manually.
Once you have a folder containing the required tracks, you can enable Group Editing on that folder. Now, if you select a part or event on a track within the folder, all parts and events on all tracks within that Folder sharing the same start and length times and playback priority (for when you have multiple takes on the same track) will be automatically selected — regardless of any other group settings that have been established. This basically means that edits applied to one track within the folder will be applied to all corresponding tracks within the folder, as long as they form part of a true multitrack recording. Should the folder contain parts and events that don't conform to the same timings and priorities, Cubase will tersely inform you that "The tracks in this folder are not completely in sync. Group editing could fail!”
Group Editing is rather useful, and part of its convenience can be attributed to the ease with which it can be enabled and disabled. Although there's a button on the Folder Track itself, a better way to enable Group Editing when it's required is to select a part or event within the relevant folder and press 'K'. This toggles Group Editing and, in theory, selects all the other 'in sync' objects; in practice, the initial selection state sometimes seems completely random, but this is easily resolved by simply selecting another object within the folder, after which everything works as advertised.
As you might expect, Group Editing is particularly handy for situations where you're recording multiple tracks simultaneously, since the recorded audio events will all share the same start and length times. One of the examples Steinberg give for this type of situation is recording drums, and, in addition to making multitrack editing easier, Cubase 6 also makes it easier to correct the timing of rhythmic material. Or perhaps I should say: non‑rhythmic material...
Multitrack Hits
With your drum tracks in a folder, the first step to quantised bliss is to create Hitpoints on one of the tracks. The Hitpoint detection algorithm is noticeably improved in Cubase 6, and it's now visually much easier to adjust the threshold with the aid of two horizontal lines that indicate the point at which spurious Hitpoints are excluded. Another neat new Hitpoint feature is the Create MIDI Notes button, which converts Hitpoints into MIDI notes of a chosen pitch, with either fixed or dynamic velocities, based on the audio material. This is obviously quite useful for drum replacement.
With the Hitpoints created, you can close the Sample editor and open the Quantise Panel. In order to make quantising audio easier, the MIDI and audio quantise functionality has been consolidated under one set of commands in Cubase 6. This means that the quantise‑related commands that were previously found in the MIDI menu have moved to the more general Edit menu, and can be used to achieve the same results with either MIDI or audio events.
If you open the Quantise Panel for the purpose of quantising audio, you'll see an extra set of controls at the top for setting the so‑called Slice Rules. This is where you specify how slices are created from the Hitpoints, and you'll see the name of the track containing the event for which Hitpoints were created in the Sample editor. Using an example file supplied by Steinberg, here you can see how Cubase creates slices on a multitrack drum recording. The white lines indicate where the audio events will be sliced, and the red lines show from which event the slice will be derived. What's particularly neat is that Cubase 6 allows you to create different sets of Hitpoints on different tracks, and then create a master set of Hitpoints by setting Priorities for the different tracks in a manner that's not so different to working with Loopmash. The reason this is important is that when you click the Slice button, all tracks will be sliced identically, so that everything stays in phase when you move things around. But since not every drum in the kit is going to be playing the same rhythm, adjusting the Priority settings between different tracks allows you to ensure that no beats are left behind.
The master set of Hitpoints is shown in red across the different tracks, making it really easy to see how adjusting the Priorities will affect the slicing. The only thing that could perhaps be a little clearer is the process of enabling different tracks in the Quantise Panel. Initially, everything except the first track appears greyed out. The way to enable additional tracks is by clicking in the Priority column, but this wasn't exactly obvious at first, since I'm so used to seeing Enable buttons elsewhere in the program. A minor point.
Once you've carved up the slices, you can move down the Panel to the newly refreshed quantise section, where you can quantise the audio events as if they were MIDI. And, once the timing of the Events has been refined, there's the final Crossfades section, which makes it easy to smooth over any gaps that were created during the quantise procedure.
The idea behind the Crossfades section seems to be that overlapping events are trimmed, gaps are covered up by stretching previous events, and neat little crossfades are applied to cover up the edits. While this worked reasonably well, I found that gaps were not always resolved, and sometimes I was better off doing the clean‑up manually.
One of the problems with this type of functionality is that it often ends up like the Apples of Sodom: great on the surface, but tending to fail once you attempt anything other than the most basic of edits. I wouldn't say that Cubase 6's process for quantising multitrack audio is such an apple: overall, it's quite impressive, and can undeniably help out with much of the grunt work. Plus, having more flexible commands for quantising audio is going to be useful in so many other scenarios. But don't necessarily expect a one‑button solution to what, at the end of the day, is quite a tricky problem.
It's Comp(licated)
Cubase has never been particularly accomplished at handling multiple takes. Steinberg tried to address this issue way back in SX2 with Stacked Cycle Record mode, where a single track could be divided into lanes to represent different takes. But because this mode was, by definition, tied to Cycle Recording, it could be a pain to use. And in the absence of a feature like Pro Tools' eminently useful Playlists, the best option has long been to simply record different takes onto separate tracks.
Steinberg are once again tackling the multiple‑take problem in Cubase 6, and have revamped both the operation of lanes and the traditional Transport Record Modes. Previously, Cubase had two Record Modes that set the recording behaviour of the program based on whether you were recording in Cycle mode or not. These options have been replaced by two new modes that set the recording behaviour according to whether you're recording audio or MIDI events.
When recording audio events, the default mode is Keep History. If you record an event over an existing event, the original is retained completely, but takes a step back in terms of playback priority. So if you keep recording new takes over the same area in the timeline, the most recent take will be both visible and audible. The best thing about this is that it's now, finally, easy to record additional takes after an initial recording has been made, without worrying about Cycle Record mode or using separate tracks.
After multiple takes have been recorded, you can either choose an appropriate take or compile the takes into a single take by clicking the newly revised Show Lanes button. Unlike previous versions, Cubase 6 displays lanes in the same way as automation tracks: below the original track. Each overlapping event is displayed on a separate lane — where the first 'take' appears on lane one, the second on lane two, and so on — and a nice touch is that each lane has its own Solo button. Events that don't have playback priority are greyed out, showing clearly what sections of what take contribute to the master take. If you want to change playback priorities between different takes, simply clicking on a greyed‑out section will make it active. The main track lane, meanwhile, shows the composite track, made up of all events that currently have playback priority.
As you might expect, the real power in using lanes to compile the perfect take is the fact that Cubase's editing tools can be brought to bear. Particularly useful is the Range Selection tool, which can be used to make small sections within a different take active without making the whole take active. Simply drag the required region on the required take, double‑click it, and only the highlighted region will become part of the master take. Piece of cake! Here you can see the new lane editing tools being used to comp a marimba part. Notice how Cubase compiles a master take on the main audio track, reflecting the different sections of the three takes that have been chosen. And since all the takes are audio events, you can also perform crossfades where necessary.
The new lane handling and Record Modes are a substantial improvement over what has come before, especially since compiling a take works perfectly with the new Group Editing feature, which is very neat. And while, again, such a feature always runs the risk of veering into Dead Sea Fruit territory, lane editing is surprisingly flexible, particularly when compared to the Quick Swipe feature that was introduced in Logic Pro 8.
Six Degrees Of Cubase
Cubase 6 is a great release, and it's especially gratifying that Steinberg have tidied up some of the loose ends introduced with the slightly dubious 5.5 update last Summer. The user interface finally feels as though it's gaining consistency, with a cleaner, luculent and more polished appearance, so much so, that returning to Cubase 5.5 after experiencing the improvements — particularly the new Inspectors in the Project, Score and Key editors — is really disorientating. The phrase "How could we ever have worked like this?” kept springing to mind, which, to me at least, is usually the sign of a good upgrade.
Putting the user interface to one side, it's gratifying to see Steinberg pushing ahead in Cubase 6 and exploring avenues that no other developer seems to be investigating. The Key editor has matured significantly, and compared to the paltry offerings in the competition — specifically Logic, Pro Tools and Sonar — Cubase easily has the best graphical event editing (it seems wrong to use the word MIDI here). The only slight chink in the armour — aside from the fact that it would be nice to have access to the Tempo, Signature and Marker tracks in the Key editor — is that for new features like Note Expression to be truly useful, Steinberg will need the support of its developer community. (See 'Why VST3 Matters' box.)
At the end of the day, Cubase 6 is a formidable release. Cubase users will love it, of course; but some of the new features are sure to make followers of other music production software green with envy.
Why VST3 Matters
At the moment, it's fair to say that VST3 Instrument plug‑ins are as rare as rocking‑horse droppings. And one of the reasons for this is that — until now, at least — there hasn't been a compelling reason for developers to support Steinberg's newer standard. Given that the only similarities between VST2 and VST3 are pretty much the letters 'V', 'S' and 'T', it's understandable that most developers have adopted something of a wait‑and‑see policy. Why invest the time in supporting a newer plug‑in format only implemented by two host applications — Cubase and Presonus's Studio One — if the VST 2.4 version adequately serves the majority of your users?
Note Expression changes this situation. The Halion Sonic plug‑ins, especially when used in conjunction with something like the Halion Symphonic Orchestra library, clearly demonstrate the potential of the technology. And although Steinberg's forthcoming Halion 4 sampler will also support Note Expression, it seems that, finally, both developers and end users have a compelling reason to see all instrument plug‑ins support the VST3 standard.
The VST3.5 SDK for developers will be available by the time you read this, and, according to Steinberg, there was a great deal of interest in the technology at the recent NAMM show from third‑party developers. Fingers crossed.
Dynamic Editing
To complement Note Expression and the enhancement of Expression Maps, the MIDI Meaning function has been reborn as Dynamics Mapping in Cubase 6. In the past, MIDI Meaning was a way for dynamic markings on the score (p, mf, and so on) to affect playback. If you placed a forte symbol on the score, all velocities from that point forward for that instrument would be multiplied by the percentage adjustment specified for forte.
Dynamics Mapping expands the idea of MIDI Meaning much further, making it possible for dynamics markings to influence any combination of velocity, a volume controller, or an additional controller. This is great, because it means you can use dynamics to control velocity, volume and tone simultaneously — useful when you have an instrument with crossfading velocity layers controlled by the modulation wheel, for example. And another nice touch is that the Dynamics Mapping volume controller can also be set to VST3 Volume, to integrate with the new Note Expression features.
Perhaps the best thing about Dynamics Mapping is that the Key editor's Articulation Controller lane now incorporates a Dynamics lane, allowing you to see dynamic changes in both the Key and Score editors. However, in the Score editor, the Dynamics Mappings symbols are a new class of symbol, meaning that existing dynamics symbols have no affect on playback and will not show up in the Key editor. Another small issue is that there seemed to be no way to set the length of the Crescendo Events in the Key editor, which is slightly annoying.
In use, I ran into a few quirks with Dynamics Mapping. The manual seems to suggest that the feature is really intended for use with Note Expression, and I certainly found this to be the case. If the same controller (say, Expression) was used in the Controller lanes and by the Dynamics Mapping feature, chasing wouldn't work correctly and the different methods of expressing the controller would conflict with each other. However, when using only Note Expression in conjunction with Dynamics Mapping, everything seemed fine.
Another point that kept bothering me slightly with Dynamics Mapping is that there's no interaction between this feature and, say, Expression Maps. So, using Expression Maps I can create a Sound Slot that puts a forte symbol on the Score; but this forte symbol has nothing to do with Dynamics Mapping Events that can also put forte symbols on the Score. Maybe I'm being a little picky about this: it seems like Steinberg are onto something with Dynamics Mapping, but the feature might need just a little bit longer in the oven.
Artistic Differences
Since Cubase was reborn nearly 10 years ago, Steinberg have offered the program in two different flavours to cater for users with different needs and budgets. Originally, the all‑bells‑and‑whistles version was known as Cubase SX, with Cubase SL being the capable younger brother. At version 4, Cubase SX became simply Cubase, while SL was rebranded Cubase Studio. This naming strategy remained for Cubase 5, with an entry‑level product known as Cubase Essential joining the family to bridge the pricing gap between Sequel, Steinberg's Garageband‑like music application for beginners, and Cubase Studio.
For Cubase 6, Cubase is still Cubase, but Cubase Studio has been given a new dionym and is now known as Cubase Artist. A full list of differences between Cubase 6 and Cubase Artist 6 is provided on Steinberg's web site, but there are some significant limitations involving the number of tracks and the availability of certain features. For example, Artist offers 64 audio tracks, 128 MIDI tracks, and 32 instrument tracks, all of which are unlimited in Cubase. Certain plug‑ins are not included with Artist, such as the Reverence convolution reverb, but users will get the new VST Amp Rack, Halion Sonic SE, and Loopmash 2 plug‑ins, which is especially good, since the original Loopmash wasn't offered with Cubase Studio 5. But particularly germane to this review is that Artist users don't get Expression Maps, Note Expresson and related features, nor do they get the extended audio quantise features, and only a basic version of the Score editor is included.
Cubase Essential remains at version 5 at the time of writing.
Getting Amped Up
In addition to updated VST3 versions of existing plug‑ins such as De‑esser, SMPTE Generator, and the more advanced Surround Panner from Nuendo 5, Cubase 6 also includes three new plug‑ins: VST Amp Rack, Halion Sonic SE and Loopmash 2.
VST Amp Rack follows very much in the style of Apple's Amp Designer and Pedalboard plug‑ins, which were introduced with Logic Pro 9. Offering a prepossessing graphical representation of amplifiers, cabinets, mic positioning and stomp boxes, VST Amp Rack lets you customise a guitar sound to your heart's content. And the sound it produces isn't so bad either — certainly, it seems better than anything you could have come up with using Steinberg's previous stabs at amp emulation — although, as a non‑guitarist, I'm perhaps not the best qualified to judge the nuances and feel of such a plug‑in.
Steinberg have included some nice additions in VST Amp Rack, such as a tuner module, although this seemed a little sluggish at times. And while the interface is generally quite nice, even including a reduced display mode that hides most of the parameters, there are a couple of odd quirks. For example, at the left and right of the interface are 'hover controls' to show pre‑ and post‑amplifer/cabinet effects (ie. stomp boxes), but all they do is show an overview of the effects while the mouse button is depressed. I guess the idea is to give the user a quick look without having to switch views, but I don't know why it couldn't remain open and even editable. Fair enough, the controls are small; but not so small you couldn't work with them.
Halion Sonic SE replaces Halion One as Cubase's source of bread‑and‑butter instrument sounds, and, as the name suggests, is basically a cut‑down version of Halion Sonic, Steinberg's recently released workstation instrument. Halion Sonic SE inherits much flexibility from its older brother, along with over 900 patches, including a General MIDI compatibility mode, that cover a broad spectrum of instruments, styles and quality. There are some classic‑sounding synth sounds, kind of like a bunch of Roland and Korg instruments from the '80s and '90s got together for an orgy; some truly terrible brass and string sounds; and the slightly tinny piano from Yamaha's S90ES workstation. Something for everyone!
Although Halion Sonic SE is a welcome improvement on bundled instruments past, it's still an SE version of a bigger product. Over the years, it seems as though Steinberg have tried to do everything they possibly can to avoid bundling a more generic sampler plug‑in, like, say, Halion. This is presumably because the company wants to keep Cubase users buying Halion (and now Halion Sonic as well), which, although sensible from a business perspective, leaves users feeling a little short. The EXS24 sampler, though somewhat long in the tooth these days, is a tremendous asset for Logic users, and I really wish Cubase had something similar.
Technically, Loopmash 2 isn't a new plug‑in: it's an updated version of the original Loopmash plug‑in that appeared in Cubase 5.  Loopmash 2 makes it easier to create useful results and adds some nifty new performance controls that make the instrument more interactive.Loopmash 2 takes the original concept — that of creating new loops by slicing up a collection of others — and adds some neat new functionality.
One of the problems with the original Loopmash was that, although you could come up with some interesting‑sounding loops, the result wasn't always as coherent as you might have liked. Loopmash 2 addresses this with a new Similarity mode, giving you more control over how slices are chosen from different loops, and an Adapt mode that makes it possible to adapt the sound of replaced slices to more closely match the master loop.
Loopmash 2 also incorporates more performance control than the original, giving you the option of performing stutters, reversing the samples, and more, from either the plug‑in's interface or your MIDI keyboard. Very nice. If you previously dismissed Loopmash as something of a toy, it's now time to take another look.
Now I'm 64
Cubase 6 is the first time Steinberg have offered both 32‑ and 64‑bit versions of the application for Mac OS X users. Although Windows users have enjoyed the benefits of having access to larger amounts of memory for some time, various issues — some beyond Steinberg's control — have contributed to a 64‑bit release taking slightly longer to arrive on the Mac. However, in supporting 64‑bit architectures, Steinberg have also decided to drop support for PowerPC‑based Macs. And while Apple also dropped support for PowerPC architectures with Logic 9, but kept the application as a Universal Binary so it could theoretically still run on older Macs, Cubase 6 is supplied as an Intel‑only application.
Like Logic 9, Cubase runs in 32‑bit mode when first installed. To enable it to run as a 64‑bit application, you need to use the Finder to Get Info on the Cubase application and uncheck the 'Open in 32‑bit mode' option. And that's all there is to it. Cubase can now address more memory, but you'll also find yourself entering the wonderful world of plug‑in bridging so that your older, 32‑bit plug‑ins can work with the new, 64‑bit version of Cubase.
When you open a 32‑bit plug‑in in the 64‑bit version of Cubase, although the plug‑in appears to be running inside Cubase, it's actually running in a separate VST Bridge application that gets launched automatically and communicates with Cubase. This seems to work well most of the time, but, if it's anything like the Windows version, you can expect a number of incompatibilities. And there's nothing you can really do about this (except for trying other bridging systems) until 64‑bit versions of your plug‑ins become available.
However, the good news is that you may already have more 64‑bit VST plug‑ins than you might imagine. Steinberg have been supplying VST3 developers with a 64‑bit Mac test host since June last year, and a number of VST3 plug‑ins I checked, such as those from FabFilter, already run natively inside the 64‑bit version of Cubase. So as more developers move to VST3, this transition might be smoother than you expect.
Pros
- Cubase's piano‑roll‑based Key editor is arguably the best of its kind.
- Note Expression is one of the most exciting sequencing tools to appear in recent years.
- Certain audio editing tasks are now significantly easier than before.
- Many, many refinements make the program pleasing to both look at and use.
Cons
- Without wishing to detract from Halion Sonic SE, the absence of a more functional and generic sample‑based instrument from Cubase's bundled instrument arsenal is becoming increasingly conspicuous.
- The potential of Note Expression is dependent on third parties supporting VST 3.5.
Summary
Cubase 6 offers sophisticated new functionality for editing both musical data and multitrack audio. It's the most polished and developed version of their flagship music‑creation software Steinberg have ever produced.
information
Steinberg +49 40 4223 6115.
Steinberg +1 877 253 3900.
Test Spec
- Steinberg Cubase 6.
- PC with dual quad‑core X5355 2.66GHz Intel Xeon processors, 16GB memory and Nvidia Quadro FX 1700 graphics, running Windows 7 Ultimate 64‑bit, with RME Hammerfall DSP 9652 audio interface.