Discover the power of Reaper's EQ plug‑in and become an EQ master in the process.
I use Reaper's ReaEQ plug‑in a great deal for general mixing purposes and I think a lot of users underestimate it, so in this month's column I want to explain what I like about it, and in the process pass on some general‑purpose EQ tips.
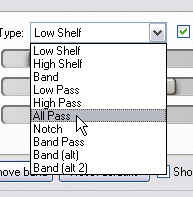
The first thing to say is that ReaEQ will give you as many EQ bands as you want: just click on the Add Band button and then select whichever filter type you like from the new band's Type drop‑down menu. This means you can use a single plug‑in instance to deal with tracks that require both detailed corrective EQ and more broad‑brush tonal shaping. That said, do remember that it's usually a good idea to keep the number of active bands to a minimum when using any EQ plug‑in, because that will tend to reduce detrimental side‑effects of the processing.
. Stacking several high‑pass filters, on the other hand, works a treat, as in the second screen, where six bands are combined to create an extremely steep 72dB/octave roll off.") Reducing the bandwidth of ReaEQ's high‑pass filter won't make its slope any steeper, it'll just add emphasis and resonance around the cut‑off frequency, as shown in the first screen (which uses a Bandwidth value of 0.5). Stacking several high‑pass filters, on the other hand, works a treat, as in the second screen, where six bands are combined to create an extremely steep 72dB/octave roll off.
Reducing the bandwidth of ReaEQ's high‑pass filter won't make its slope any steeper, it'll just add emphasis and resonance around the cut‑off frequency, as shown in the first screen (which uses a Bandwidth value of 0.5). Stacking several high‑pass filters, on the other hand, works a treat, as in the second screen, where six bands are combined to create an extremely steep 72dB/octave roll off.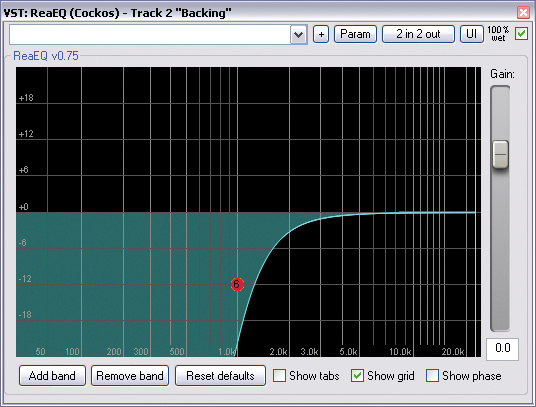
Gain Some Control
It's also nice that there's an overall Gain control (something a surprising number of EQ plug‑ins still don't provide), because that allows you to compensate for any subjective loudness increase you've created through your EQ setting. If any plug‑in makes your track appear louder, that can fool you psychologically into thinking that the sound is 'better', irrespective of whether it actually is. Careful use of ReaEQ's overall Gain control can head off this problem, so that you can use the effects bypass button to assess the effectiveness of your settings without playing perception tricks on yourself. The Gain slider at the right‑hand side of the ReaEQ plug‑in interface helps compensate for any loudness increase, which makes your EQ judgements more objective.
Take The High Road
As far as I'm concerned, any EQ plug‑in without a high‑pass filter is about as useful as a pint of beer without the glass. This simple type of EQ usually accounts for about half the processing bands on any mix I do, and I usually advise SOS readers to high‑pass filter almost every instrument as a matter of course. The basic principle is to listen to each recorded track within the context of the whole mix, and then filter out any low end that isn't actually heard in practice. In some cases, such filtering may make some instruments sound painfully thin on their own, but that doesn't matter as long as they sound right when everything else is playing too.
The main reason why so many Mix Rescue submissions suffer from muddiness and lack of clarity is because few home recordists apply systematic filtering. Another reason to scotch any unwanted low end, however, is that low frequencies are what eat up most of your overall mix headroom, so any rubbish in that spectral region can drastically hinder a mastering processor's ability to increase the subjective loudness of your production (something that's a concern if you're wanting to compete in this regard with heavily maximised commercial records).
One of the things I most like about the filter in ReaEQ is that you get a great deal of control over its slope. The first way to tweak it is via the Bandwidth control. Although the default value of 2.0 is a good general‑purpose setting, I do find myself regularly increasing this, effectively softening the filter curve's 'knee'. Why is this useful? Well, for one thing it means that I can use the filter not just for LF rubbish removal, but also as a substitute for any necessary low shelving cut, and thereby kill two birds with one stone. Why take two EQ bands into the shower, when you can just filter and go? In addition, however, there are good reasons to soften the filter knee for wide‑ranging melodic instruments, in particular, because it doesn't alter the level relationships between neighbouring harmonics as much, so the instrument's tone won't vary so much as it changes pitch. It's not at all uncommon for me to end up at the maximum 4.0 Bandwidth setting in this context.
By contrast, I also regularly want to steepen the filter's slope, for example when eliminating bass/kick sounds from sampled rhythm loops, or when removing the unpredictable fundamental of a bass instrument so that I can replace it with a sub‑bass synth part. Reducing the filter's Bandwidth setting doesn't really do the job here, though, and will just add emphasis and resonant ringing at the filter's cut‑off frequency. This is fine for synth patches, but a recipe for low‑frequency mess in a mixing context. A better way to increase the filter slope is simply to stack several high‑pass filters on top of each other at the same frequency. A single filter will give you a slope of 12dB/octave and each subsequent one will add 12dB to that slope, so a stack of four filters should give you a slope of 48dB/octave, for example.
Peak Performance
After high‑pass filtering, the second most useful corrective EQ, in my view, is the narrow peaking‑filter cut, which is most commonly used for pulling down unwanted recorded resonances: poorly tuned or damped drums may have pitched resonances that clash undesirably with a song's harmonies, any amplified instrument can suffer from strong speaker‑cabinet resonances, and every microphone has the potential to pick up unnatural sounding resonances from poorly treated studio room modes.
One way to find such resonances in a track is to sweep a low bandwidth peaking boost around the spectrum, hunting for frequencies that sound ugly. However, I now usually find it quicker to winkle them out by looking for their tell‑tale energy peaks on a high‑resolution spectrum analyser. (The ReaFIR plug‑in has an analyser that can work well for this, but you may want to increase its FFT Size setting to get a suitably high display resolution. Alternatively, Schwa's affordable Schope plug‑in provides a more elegant solution that won't snack as greedily on your CPU cycles.)
There are several aspects of ReaEQ that are especially handy in this application. Firstly, its peaking filter can be made extremely narrow, and I'll often use settings of less than 0.1 if I want to target individual sine-wave components, such as those of a pitched drum resonance. The ReaEQ peaking filter will also automatically convert into a notch filter (which completely removes the signal at its centre frequency, rather than just attenuating it) when you dial in more than 24dB of cut. This is useful when a recording has a pitched element to it that serves no musical purpose, as in the case of recorded mains hum, for instance. The ability to create as many bands as you want is also handy here, because it's not uncommon for a badly recorded snare‑drum part to have half a dozen unwanted resonances that need in‑depth surgery before you even think of trying to address any overall tonal changes.
; copy that plug‑in instance to a part that's obscuring it; right‑click the duplicate plug‑in's EQ curve display to bring up the context‑sensitive menu (left); and then select Flip All Bands to invert the EQ curve (below).") A good way to emphasise an instrument's characteristic frequencies in the mix is to boost them slightly with ReaEQ (above); copy that plug‑in instance to a part that's obscuring it; right‑click the duplicate plug‑in's EQ curve display to bring up the context‑sensitive menu (left); and then select Flip All Bands to invert the EQ curve (below).
A good way to emphasise an instrument's characteristic frequencies in the mix is to boost them slightly with ReaEQ (above); copy that plug‑in instance to a part that's obscuring it; right‑click the duplicate plug‑in's EQ curve display to bring up the context‑sensitive menu (left); and then select Flip All Bands to invert the EQ curve (below).
 There are numerous other ReaEQ functions that appeal to me beyond these, though. For example, the way you can use the Bandwidth control to adjust the shelving filter slopes, or the way you can flip the gain settings on all bands (via the EQ curve display's right‑click menu). The latter is good for situations where you're wanting to clear space for an instrument's characteristic frequencies, not only by boosting them on its own track, but also by cutting them on conflicting tracks. So even though I now have a lot of great third‑party EQ plug‑ins on my system, I still use ReaEQ to death.
What's Not To Like?
Although I do use ReaEQ an awful lot, there are inevitably occasions when it's not the right tool for the job. The most common situation is where I'm looking for subjective tonal changes, rather than just adjustments of the frequency balance. A more obviously characterful EQ plug‑in (often an analogue emulation) usually works better there, or else I forsake the EQ in favour of some kind of distortion or modulation treatment. The other situation in which ReaEQ doesn't work for me is when I need linear‑phase EQ to avoid phase-cancellation problems, perhaps when sculpting a multi‑miked ensemble recording or a parallel compressor's return channel. Something like DDMF's LP10 is a good affordable alternative in that case.
All Aboard
ReaEQ also incorporates an all‑pass filter, a filter type that can appear a bit nonsensical, because it often doesn't seem to affect the tone of the processed audio at all. However, the point of an all‑pass filter is that it alters the signal's phase response independently of its frequency response. (If you're not clear what 'phase' is, check out my 'Phase Demystified' article in SOS April 2009 for a full explanation. Here's a link: /sos/apr08/articles/phasedemystified.htm.) As such, it's mainly useful where you want to adjust the phase relationships between several tracks, for example when working with multi‑miked drum kits, or combining a single instrument's DI and mic signals. Sweeping an all‑pass filter on a channel in one of these scenarios will change the nature of any phase‑cancellation between the tracks, and thereby deliver a (frequently dramatic) tonal change.