When it comes to mixing drums, few things have studio newcomers tearing their hair out more often than compression. Is a compressor supposed to even out the levels in a performance? Or lengthen sustain tails? Or make individual hits more punchy? Or pull up low-level details? Well, compression could do any of these things, or none of them, depending on how you set the compressor up — hence all the confusion!
In this article I’d like to clarify matters by identifying a series of distinct drum-mixing tasks for which engineers commonly use compressors. I’ll explain in each case what compression settings you might choose for best results, whether the drums you’re working with are one-shot samples, loops, virtual instruments, or live recordings. And I’ll focus specifically on tackling the kinds of undesirable processing side-effects that blight many project-studio mixes. As we’ll see, this can require more sophisticated compression methods, but I’ll also suggest various alternative remedies that can bail you out when compression proves unable to deliver the goods.
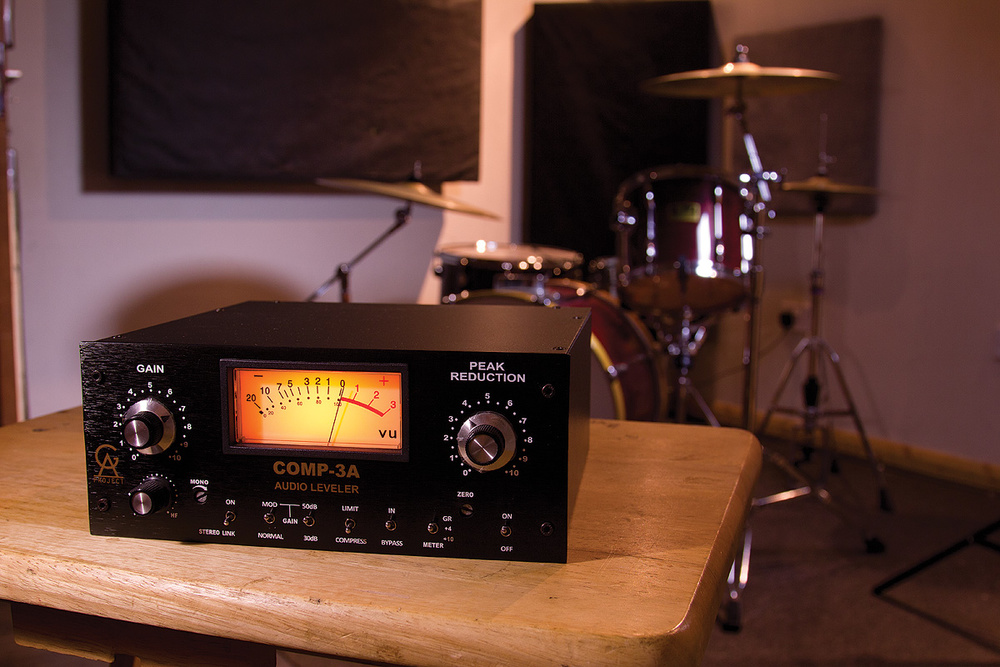
Another frequent source of head-scratching amongst less experienced engineers is that so many real-world compressors have different control sets. For this reason, I’ll restrict myself to the most common configuration, found in compressors bundled with pretty much every mainstream DAW, which is based around five main controls: Threshold, Ratio, Attack, Release, and Make-up Gain. However, I won’t go over the very basics of what these controls do (check out my ‘Compression Made Easy’ feature in SOS September 2009 if you need a refresher: http://sosm.ag/compression-made-easy). Instead, I’ll concentrate on how best to set them up in practice for each specific drum-processing task.
Level Balancing
 The diagram and plug-in settings demonstrate how you might use compression to reduce level differences between drum hits.
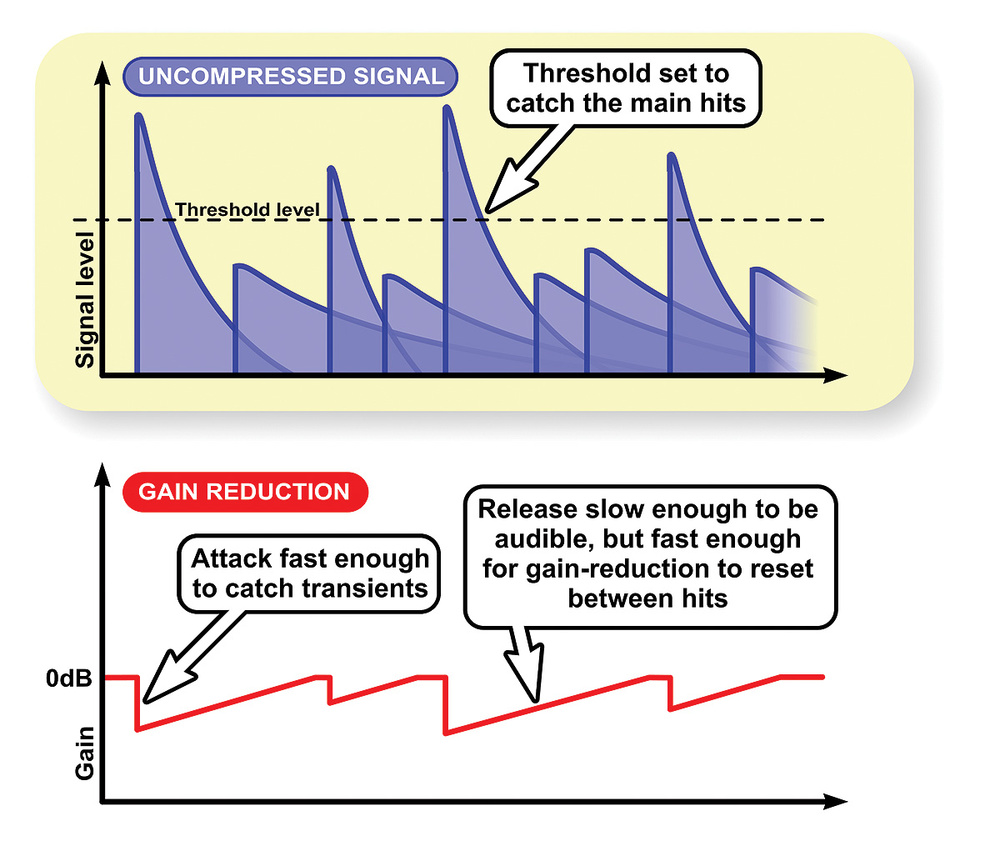
 Let’s start with the most common function of compression, whether you’re dealing with drums or any other instrument — to automatically even out unwanted level variations. In drum terms, that means turning down louder hits to more closely match softer ones, so the processed part can be more stably and reliably balanced against other instruments. Here’s how you can set up a compressor for this purpose, assuming for the moment the simplest scenario, in which I’m dealing with a single ‘instrument’, either an acoustic drum recorded live, or some kind of programmed electronic sound.
First, dial in attack and release settings of around 1 and 100 ms respectively, and choose a ratio of, say, 3:1. Then reduce the threshold until you see activity on the gain-reduction meter for all but the softest hits. You’ll almost certainly want to finesse the ratio based on what you hear. Some hits still too loud? Increase the ratio. Dynamics flattened too much? Then lower it.
While this should yield a sound that holds its place in the mix more solidly, the job’s not complete — you must also make the best of the attack and release times. For pure balancing applications, go for an attack time as fast as you can get away with, so that it catches the fast-moving transient at the onset of each hit. However, many compressors can respond swiftly enough to put kinks into the start of a drum’s audio waveform, altering the drum’s attack timbre, especially when you’re processing the slower-moving waveforms of low-pitched sounds. So make a point of listening to the attack portion of the processed drum signal while you massage the attack time, and actively choose a timbre you favour.
It also makes sense for the release time to be as long as possible, so the compressor’s gain-reduction reset occurs mostly after the sustain tail of each drum hit has finished. Otherwise, you’ll change the drum’s decay characteristics. If you set the release too long, however, the gain-reduction won’t reset fully between hits, thus weakening the compressor’s level-correction effect. So, in practice, you’ll almost always need to adjust the release to suit the tempo and complexity of your drum part. For example, you’ll likely want a much shorter release time for a fast 16th-note tambourine than for a rock ballad’s ponderous back-beat snare. Bear in mind, too, that both attack and release times may impact upon the amount of gain reduction, so don’t be scared to revisit the threshold and ratio controls as necessary.
Bypassing Skills
 While many compressors provide facilities for matching the loudness of the processed and unprocessed signals, these aren’t usually very useful for drum-specific compression tasks.
 One of the most powerful ways to stress-test any processing decision is to toggle the processor’s bypass switch and directly compare what you’ve done with the untouched signal. What complicates this for compression, though, is that compressors sometimes make the processed output hotter, and most of us have an instinctive bias in favour of louder sounds. It’s therefore very important that you use your processor’s make-up gain control to match the subjective loudness of the compressed signal with that of the bypassed signal before critically evaluating your efforts. If you don’t, your ears may vote for the loudest signal, and not necessarily the best!
But, given that the very nature of compressors is that they dynamically alter the loudness of the processed signal, there’s also a choice to be made about which elements of the processed signal you should loudness-match with the bypass signal. For instance, in the simple level-balancing setup I described above, it would be a mistake to try to match the loudest hits in the compressed signal against the loudest hits in the bypassed signal, because this would mean most of the hits in the compressed signal would end up sounding louder. By loudness-matching the softest hits of the two signals, on the other hand, the compressed sound will end up being quieter than the unprocessed sound most of the time, so there’s no way the loudness bias can fool you into accepting processing unless it really does sound better. Of course, there’s always a risk here that the loudness bias may dissuade you from a pursuing a truly workable compression setting from time to time. But I’d say that’s the lesser evil, since project-studio mixes on the whole suffer much more frequently from over-processing than under-processing!
Incidentally, many plug-in compressors provide an ‘auto make-up gain’ facility, which aims to automatically loudness-match the processed and unprocessed signals. While the underlying goal of such functions is a noble one, and can work well with less percussive sources, I personally find them all but useless for typical drum-processing applications, regardless of their sophistication. The reason for this is that their fundamental goal is to match overall loudness, whereas I almost always want to match the loudness of some specific element of the signal: the softest hits in the above level-balancing task, for instance, or the levels of the transients or sustain tails in other circumstances, as we’ll see in a moment.
Trouble Letting Go
As useful as that straightforward level-balancing setup can be in many situations, there are plenty of real-world recordings that’ll fox it. For example, if you want to even up a pattern in which there’s a flurry of drum hits very close to one another in time, you may have to set such a short release time (so the gain reduction resets between hits) that it causes an unnatural gain ‘bump’ in the sustain character of isolated hits. In fact, if the release time gets short enough, you may even start getting audible distortion, as the compressor’s gain-change element starts affecting the shape of the signal waveform, not just its level envelope.
Faced with this choice between insufficient level control and unpalatable artifacts, too many small-studio engineers wave the white flag and resign themselves to the unwanted side-effects. A much more positive attitude is to see the impasse as a message from your compressor that you’re asking it to do something beyond its capabilities — in other words, that you should look for a tool that’s better suited to the job at hand. In this case, for instance, chopping up the part into beat-sized chunks (practically a single-click process in most DAWs these days) provides one solution, allowing you to correct the levels of the faster hits with ‘stepped’ per-beat gain offsets, so that the compressor only has to deal with the more widely spaced hits. Alternatively, SoundRadix Drum Leveler and Melda MDrumLeveler are just a couple of plug-ins that provide a very similar scheme in a more ‘set-and-forget’ format. When extreme drum-rebalancing challenges stymie your compressor, an alternative approach is to chop the audio into
beat-length slices and offset the levels of those manually with your DAW’s ‘per-clip gain’ facility. Similar results are also possible in automated form via plug-ins such as Melda’s MDrumLeveller.
When extreme drum-rebalancing challenges stymie your compressor, an alternative approach is to chop the audio into
beat-length slices and offset the levels of those manually with your DAW’s ‘per-clip gain’ facility. Similar results are also possible in automated form via plug-ins such as Melda’s MDrumLeveller.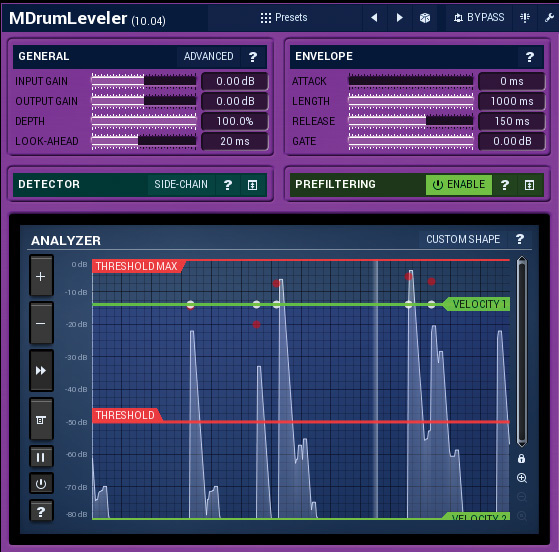
Another insoluble problem is mostly restricted to live recordings, and specifically those where the performer hasn’t just varied how hard they’ve hit the drum, but also the manner in which they’ve hit it, such that the timbre varies considerably from hit to hit. No amount of compression will make a spindly-sounding mis-hit reside happily alongside fuller-sounding on-the-money hits, so there’s a definite risk of over-processing if you try to address this with compression alone. Using your DAW’s audio-editing facilities to paste good hits over bad ones can take the pressure off the compressor, allowing it to concentrate on the pure level-balancing job it’s more comfortable with.
Rebalancing Within Submixes
, while Voxengo Crunchessor provides an example of a more flexible fully parametric design.") Side-chain equalisation is now built in on lots of software compressors. Many are fairly basic configurations, with just simple high- and low-pass filters (as in the T-Racks Classic Compressor and Softube FET Compressor screenshot snippets), while Voxengo Crunchessor provides an example of a more flexible fully parametric design.
Side-chain equalisation is now built in on lots of software compressors. Many are fairly basic configurations, with just simple high- and low-pass filters (as in the T-Racks Classic Compressor and Softube FET Compressor screenshot snippets), while Voxengo Crunchessor provides an example of a more flexible fully parametric design.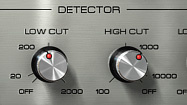
 Balancing a single-instrument recording with compression can occasionally be heavy lifting, but the tough really get going when audio contains more than one instrument — in other words, when you’re tackling things like prefab drum loops, sampled breaks, live-kit overheads, drum room mics, and rhythm-section submixes. And a whole set of challenges arises when you wish to compress one element in a multi-instrument drum track more than the others. Let’s look at a real-world example...
Imagine you have a drum loop with kick, snare and shaker, and you want to use compression to turn down the kick. Perhaps it’s a heavy hip-hop loop you want to fit into more of a pop production. Assuming the kick is louder than anything else, in theory all you need do is adjust your compressor’s threshold so that it only flexes its gain-reduction circuit in response to the kick-drum peaks. But what if that doesn’t make enough of a difference? Even with a 100:1 ratio, a typical compressor is only designed to prevent the signal exceeding its threshold level, but if you pull the threshold down beyond a certain point, you’ll start triggering compression on the snare, undesirably altering that instrument’s balance relative to the shaker.
This is where it becomes helpful to EQ the signal feeding the compressor’s level-detection circuit (or ‘side-chain’). For our drum loop, you could cut away all the high end from the side-chain signal, such that the compressor no longer ‘hears’ such a high snare-drum level, and continues to trigger its gain reduction only on kick-drum hits, even at a lower threshold setting. By the same token, if you wanted the compression to react mostly to the shaker, you might try high-pass filtering the side-chain signal; or if the snare were too loud, you could use a band-pass filter (or a more complicated EQ curve) to emphasis its mid-frequencies in the compressor’s level detector. The beauty of this system is that the side-chain EQ doesn’t directly affect the audio — all it does is change how the compressor reacts.
Side-chain EQ is so useful that it’s included on many general-purpose compressors, while others let you send audio directly to the compressor’s side-chain from elsewhere in your DAW, so you can use a separate EQ plug-in to carve away at the detector signal instead.  If your compressor provides no side-chain EQ facilities, you can achieve very similar results by using equal and opposite EQ curves pre- and post-compression.Even if your compressor has neither facility, you can usually achieve the same ends by applying equal but opposite EQ curves before and after the compressor. So, returning to our drum-loop example, you might use a high-frequency shelf to cut 12dB above 100Hz pre-compression, and restore the missing high end with a complementary 12dB shelving boost post-compressor. In the analogue domain this kind of stunt would cost you added noise, plus the cut and boost EQ curves might not match very accurately, but the low-CPU digital EQs bundled with most DAWs can handle the task without any appreciable sonic degradation. (If yours doesn’t, try Blue Cat’s Triple EQ or Melda’s MEqualizer, both of which are cross-platform freeware.)
There are limits to what even side-chain EQ can handle, though. High-pass filtering the side-chain might stop the compressor reacting to the kick in our loop, but the snare may still out-gun the shaker in terms of level, even just at high frequencies, in which case there’s simply not enough level differentiation to allow the compressor to get an independent grip on the shaker. So what then? Well, seeing as we’ve introduced the idea of feeding an external signal into a compressor’s side-chain, why not program a MIDI drum loop specifically to trigger the compressor’s gain reduction with 100 percent reliability? It doesn’t matter what kind of sound you use for that, as long as it has a well-defined attack, because it won’t be heard in the mix.
Of course, for recorded live drumming, constructing a MIDI trigger part could be tedious, even if your DAW’s grid notionally lines up with your drummer’s playing, because in practice the performer’s natural timing will continually wander somewhat from the grid lines, and you’ll have to tweak the MIDI trigger part bar by bar. Fortunately, with live drums it’s common to use multi-mic recording techniques, so it’s usually much easier to do any internal rebalancing by simply adjusting the faders and EQ settings of individual mic channels than by processing the mixed drum-kit signal in such a heavy-duty manner.
Admitting Defeat
 When you can’t get enough gain reduction for a given threshold, try a specialist plug-in that offers freely editable compression transfer functions, such as Melda’s MDynamics. Dedicated duckers provide an alternative option, especially when you’re hoping to replace a drum in a mixed loop with a sample; the Sonalksis SV719 setting pictured above can pretty much duck a drum to silence!
 Taking full advantage of your compressor’s side-chain can improve its ability to rebalance mixed loops and samples dramatically, but it’s important to recognise that there will be situations where you’re better off admitting defeat and choosing a different processor altogether. For example, a limitation of traditional compression is that it treats the whole frequency spectrum in pretty much the same way. No matter how well I EQ the side-chain signal so the compressor only triggers on the shaker in my loop, any kick or snare hit occurring at the same moment as a shaker hit will also be turned down. Trying to control the shaker independently is a recipe for frustration, because I can’t focus the gain reduction just on the shaker frequencies. This is where a multiband compressor makes sense, because it allows you to compress different frequency bands separately. In this case, you could define a high-frequency band in which the shaker is most prominent, then set that band’s compression to reduce the level with a much greater degree of independence, because only the frequencies in that band will be affected.
Another situation in which traditional compression may fail to deliver the desired balance is where it simply can’t apply sufficient gain reduction. No matter how high the ratio, it’ll only ever reduce a drum’s level to the threshold level, which may have to be set quite high to ensure accurate triggering. This is when it pays to hunt down one of the less common compressors which offer either special ‘negative’ ratio settings (such as on Eventide’s Omnipressor) or the facility to edit the gain-reduction transfer function directly, such as in Melda’s MDynamics or the ‘Broadband Gain’ mode of Tonebooster’s TB_FlX. Or, for truly extreme gain reduction (say you’re trying to replace one drum in a mixed loop with a sample) a dedicated ducker plug-in can take the level of above-threshold hits right down to silence.
Attack Modification
Another reason for the widespread use of compression on drums is its ability to change the attack characteristics of transient sounds. For example, take the simple level-consolidating compression patch I described at the outset. It’s dead easy to turn that into an attack-reduction setting by setting the threshold somewhat lower and shortening the release time until the gain reduction affects only the very onset of each hit. To be more specific, you’re ideally looking for a setting short enough that the gain reduction resets immediately after the transient (so you’re not affecting the drum’s sustain tail), but long enough that it still catches enough of the transient itself. Beyond that, there’s plenty of scope to refine the amount of transient reduction by tweaking the compressor’s threshold and ratio, and you can also finesse the resultant sound character via tiny adjustments to the attack and release times.
 The diagram shows how you can use very fast attack and release times to soften a drum’s onset transient, for example using the kind of configuration you can see in the accompanying screenshot of Stillwell Audio’s The Rocket.
 If, instead of shortening the release time, you lengthen the attack time, the compressor won’t respond quickly enough to catch drum transients, and will only reduce the gain of each hit’s sustain tail. Then use your Make-up Gain control to restore the sustain tails to their previous level, and you’ll effectively have boosted the transients. Again, the amount of transient increase will be determined by the compressor’s threshold and ratio, whereas the sound character of the transient itself can be refined according to your exact attack-time setting. That said, it’s worth pointing out that attack-time changes may also seriously impact the amount of gain reduction for a given threshold, so in practice you usually have to adjust those two controls in tandem.
As time-honoured as both these compression techniques are in professional circles, their power has definite boundaries in practice. For example, when trying to reduce the level of a drum transient, there’s only so low you can set your compressor’s threshold before it begins to process more than just the hit’s onset. This, in turn, restricts the level to which the compressor can reduce the transient. And when trying to enhance a drum’s transient with longer attack times, the action of the compressor resetting its gain reduction between hits can begin to mess with the naturalness of the instrument’s sustain tail. For these reasons, I rarely turn to compression for dedicated transient-shaping tasks these days. With single-instrument recordings, a slow-attack gate can usually remove much more of each hit’s initial transient than a compressor can, because a gate’s gain-reduction envelope starts from silence. Alternatively, if you set up a gate as a send effect and configure its controls so it lets through only the drum’s attack, you can add as much extra transient to your drum part as you like, without gain-reset side-effects — just turn up the gate’s return-channel fader until the transient is powerful enough. You even have the option to EQ it to taste, if you like!
But it’s not just brute force that compressors lack when it comes to transient processing. They also lack finesse when dealing with more dynamic drum performances, because the amount of transient cut or boost they apply depends on the level of each hit in relation to the processor’s fixed threshold level. The louder a given drum hit, the more it will exceed the compressor’s threshold, and the more its transient will be either dulled or sharpened by the compression setting; and, by the same token, sub-threshold hits won’t be affected at all. This is an area where threshold-independent transient processors, such as SPL’s Transient Designer, are a better bet — they detect transients according to their level-envelope characteristics, not their sheer level. And, as it happens, such processors also usually out-gun compressors in terms of sheer transient-sculpting muscle into the bargain. Using a slow attack time and a little make-up gain, as in this Cytomic The Glue screen, it’s possible to enhance drum transients with compression.
 Although a compressor can emphasise transients, a more controllable option is often to use a gate set up as a parallel process.
Boosting & Reshaping Sustain
 This diagram and screenshot show how you can reshape a drum sound’s sustain envelope by causing the compressor’s gain reduction to reset while the sound’s still decaying — and if you use make-up gain to restore the same peak level, it effectively gives you a sustain boost.
  For bolstering the sustain of drum sounds, however, traditional compression remains a firm favourite of mine. At its most basic, this function is effectively a by-product of the fast-attack, fast-release setting I mentioned a few paragraphs ago, when discussing how to reduce transients. However, whereas you’d assess the effects of the transient reduction by leaving the compressor’s make-up gain untouched (thereby matching the loudness of the decay tails in the processed and unprocessed signals), for judging sustain boost you’d increase the make-up gain to match the transient levels instead.
But that’s only one implementation, as you can also lengthen the release time of that setup, slowing the compressor’s gain-reduction reset such that it begins to reshape the envelope of the drum’s decay tail, rather than just boosting its relative level. For example, lengthening the release time only a little creates an audible ‘bump’ in the drum’s sustain as the gain reduction resets. That’s a feature that can either add a flam-like quality at shorter settings, or be timed to support the music’s rhythmic groove at longer settings. Beyond a certain release-time length, however, the gain ‘bump’ smooths out into a more gradual gain-reduction reset that retains the level relationship between the transient and the early part of the drum sustain, but then progressively fades up the level as the drum hit decays — great for situations where you want a subjectively longer sustain tail without losing punch. Of course, if you keep increasing the release time, there comes a point where the gain reduction is resetting so slowly that it doesn’t really change during the duration of the drum hit you’re processing, at which point you’re getting no sustain enhancement at all — in other words, we’re back at a straightforward level-balancing setup.
Now, while I regularly use these three sustain-boosting treatments at mixdown, they all share a side-effect: they fight against the internal performance dynamics by reducing the level differences between hits. This may play into your hands in heavily processed mainstream music genres, but it can lead to rather lifeless and unmusical-sounding results in more natural acoustic styles. In addition, the fast attack typically used to avoid emphasising transients increasingly changes the character the more strongly you boost sustain in this manner.
Parallel Compression
, and what they allow you to do is implement parallel compression within a single channel, rather than sending signal to a separate channel via your DAW software.") Many compressors now have wet/dry mix controls of one form or another (such as the ones you can see here from Toneboosters TB_Compressor, iZotope’s Alloy 2, and Stillwell Audio’s The Rocket), and what they allow you to do is implement parallel compression within a single channel, rather than sending signal to a separate channel via your DAW software.
Many compressors now have wet/dry mix controls of one form or another (such as the ones you can see here from Toneboosters TB_Compressor, iZotope’s Alloy 2, and Stillwell Audio’s The Rocket), and what they allow you to do is implement parallel compression within a single channel, rather than sending signal to a separate channel via your DAW software.![]()
![]() A common workaround to minimise these artifacts is to set the compressor up not as an insert, but as a send effect, mixing the compressed and uncompressed signals together — a process usually referred to as ‘parallel compression’. When drum peaks hit your parallel compression setup, the compressor reduces the gain, such that the uncompressed signal’s peaks (with all their musical dynamics) dominate in the overall mix. Between hits, on the other hand, the compressor releases, bolstering the sustain level by fading up the processed return.
A common workaround to minimise these artifacts is to set the compressor up not as an insert, but as a send effect, mixing the compressed and uncompressed signals together — a process usually referred to as ‘parallel compression’. When drum peaks hit your parallel compression setup, the compressor reduces the gain, such that the uncompressed signal’s peaks (with all their musical dynamics) dominate in the overall mix. Between hits, on the other hand, the compressor releases, bolstering the sustain level by fading up the processed return.
The popularity of this technique has inspired many software developers to design their compressors with ‘wet/dry’ mix controls, creating a one-stop parallel compression setup within the processor, but I’m not a great fan of that approach. Yes, it avoids any potential for problems with plug-in delay compensation (which can cause the compressed and uncompressed signals to phase-cancel in some systems), but it also prevents further processing of the parallel signal. Why would that be useful? Let’s say you set up a parallel compressor on a typical live drums bus and compress it for strong sustain enhancement. You’ll usually discover that the subjective boost normally seems strongest at high frequencies — most compressors are inherently less sensitive to high frequencies, so you get more gain reset for sounds in the upper spectrum. If you’d prefer to have more mid-range sustain instead, you can filter the parallel channel so that it only boosts sustain at those frequencies you actually want it to. Again, you have to be aware that the EQ may introduce some phase-cancellation between the processed and unprocessed signals, so keep an ear out for that — if in doubt, use a linear-phase EQ instead.
Parallel compression does have one important practical drawback, though: it’s rarely straightforward to bypass parallel compression without also decreasing the processed instrument’s overall subjective level in the mix. It’s possible to get around this in most DAWs by duplicating the source track (but without the compression send), boosting its fader level to match the subjective loudness of the parallel-compressed track in the mix, and then toggling between the two tracks using their mute buttons. To be honest, though, that’s a bit of a rigmarole, so most people (including me) rarely bother, even though this increases the risk of loudness bias. Don’t say I didn’t warn you!
Another alternative for adding large amounts of sustain without impacting on performance dynamics is specialist sustain processing (a feature of most dedicated transient processors), which has the added advantage of allowing a loudness-matched bypass for auditioning purposes. However, it’s worth pointing out that different plug-ins of this type seem to implement their sustain processing in different ways, and can therefore impart quite diverse sustain characters (especially if you’re pushing them into nose-bleed territory), so do try out a few different ones to see which best suits the music you’re working on.
 If you feel the need for more timbral control of the added sustain in any of the above setups, then multiband processing is again an option to consider, because both compressors and transient-based processors are available in this format — examples of the latter including Izotope Neutron, Melda MMultibandTransient, and Waves TransX Multi. That said, I’ve rarely felt the need to use anything more powerful than an EQ’ed parallel compressor for sustain enhancement on most real-world mixes, so I wouldn’t personally consider multiband plug-ins essential for this application. They’re much more useful for transient modification, in my view.
Enhancing Detail
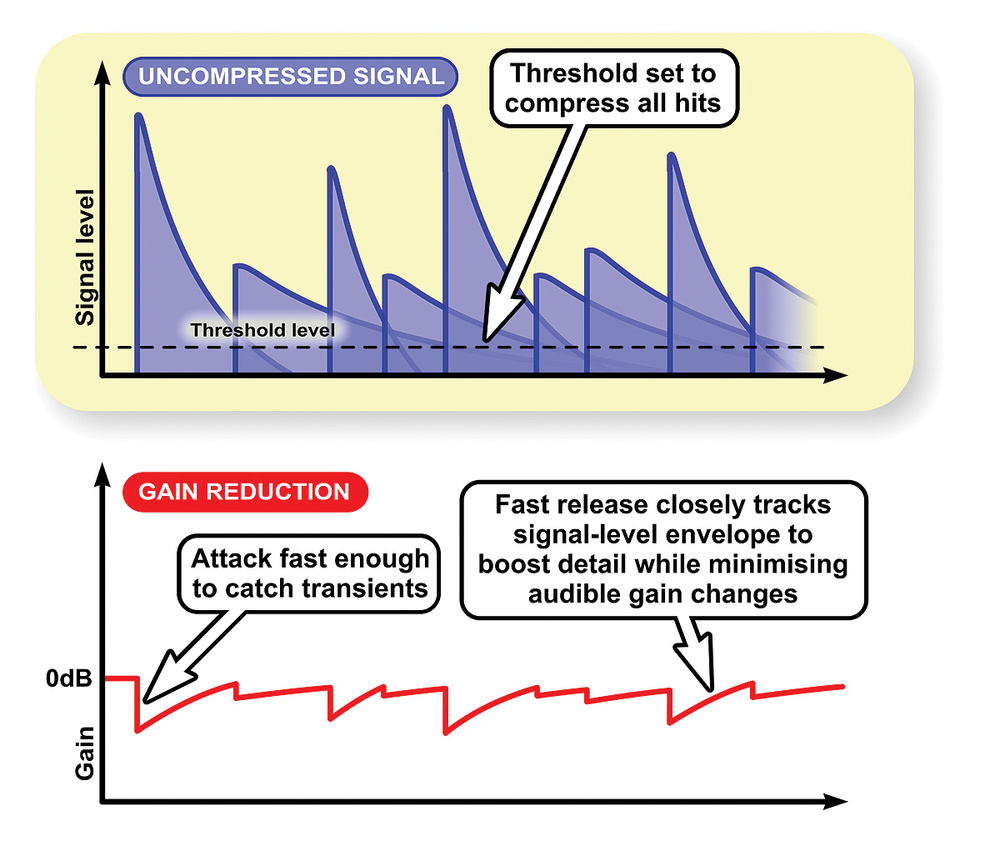
 If we now return to the first of our sustain-boosting treatments (the one with the fastest release), this can easily be adapted to another task: enhancing the sense of detail in drum submixes. What you need to do is lower the ratio (1.2:1 isn’t a bad place to start) and then bring the threshold down far enough to trigger maybe 3-4dB of gain reduction on signal peaks. This’ll cause some degree of compression to be happening the whole time, with the gain-reduction meter fidgeting like an itchy squirrel! The final step is to adjust the make-up gain to match the subjective loudness of the loudest hits in the processed and unprocessed signals, at which point you should hear how the processing is subtly lifting all the lower-level details in the mix, but without any of the obvious gain-change artifacts that make things sound obviously ‘compressed’.
That said, it’s a comparatively subtle effect, and if you try to exaggerate it by increasing the compression ratio, you’ll quickly run up against jittery gain-pumping artifacts that aren’t at all pretty. Switching to multiband processing can mitigate these problems somewhat, allowing a slightly greater range of effect, but this may also come at the expense of changes to the overall tonality of the drums submix, even if you take the sensible precaution of roughly matching each band’s make-up gain setting to the amount of gain reduction it’s applying.
Another side-effect to look out for is a change in transient character, on account of the fast attack and release times. If this turns out to be problematic, then you can certainly lengthen the time settings a little, but that quickly dilutes the detail enhancement too, either by reducing the speed and depth of all the tiny gain fluctuations that are at the heart of the effect, or by making the gain changes slow enough that the ear becomes more consciously aware of them as unnatural processing. Here again a parallel compression strategy constitutes a useful workaround, because it passes transients through to the mix comparatively unscathed.
Super Glue
 Something that many engineers talk about in relation to mixing is often called ‘glue’. Like a lot of subjective terms in audio, there’s plenty of healthy (and also often inebriated) disagreement about what it actually means, but one thing that’s often considered to ‘glue’ a drums submix together is if the different instruments interact with each other in some way. In compression terms, one way to achieve this interaction is to introduce a small amount of gain-pumping, so that louder hits slightly duck the sustain tails of other hits, as well as the levels of quieter percussion elements.
My personal favourite patch for this is broadly similar to the level-balancing setup I outlined at the start of this article, but using a ratio of around 2:1 to trigger roughly 2-4 dB of gain reduction on peaks. A much more critical consideration here, though, is the release time. The basic idea is that the gain reset should be slow enough to be audible, which typically means something over about 80ms, but also short enough to reset pretty much all the way between the main hits, so that it doesn’t end up responding too much to the average level of the drums mix — otherwise the long-term musical dynamics of the part (such as the overall volume differences between your verses and choruses) can easily be compromised. Judge it right, though, and you should get enough interactive gain-reduction movement to give a sense of ‘glue’, but without too much of an ostensibly compressed sound.
The downside of this approach is that it does inevitably reduce the peak dynamics of the drum part, and can also distort the onset transients of bass-drum hits, robbing them of some low end. High-pass filtering the side-chain signal can help here (as well as often helping balance the amount of gain movement triggered by the kick and snare), and parallel compression can also provide a potential solution. However, another very common ‘glue’ compression setting just uses a much longer attack time instead, in tandem with a higher ratio and/or a lower threshold setting to achieve the necessary gain movement. This isn’t without side-effects either, though, as the longer attack time will tend to emphasise transients somewhat. You pays your money, you takes your choice!
Tonal Sweetening
 can generate a whole range of different distortion harmonics — especially if you drive it as hard as this!") Compressors which emulate the workings of classic analogue devices will often do a lot more to the signal than manage its gain. For example, Sknote’s Disto (which is based on the classic Empirical Labs Distressor) can generate a whole range of different distortion harmonics — especially if you drive it as hard as this!Up to this point, I’ve tacitly assumed that compressors do nothing except apply gain changes, whereas many celebrated analogue compressors have become revered precisely because they do more than that, adding some shade of appealing tonal colour to the processed sound in addition — often by virtue of frequency-dependent gain-reduction foibles or the distortion-generating non-linearities of their unique circuit designs. There’s never been a better time to experiment with these kinds of sounds either, because emulations of many classic hardware units are now widely available in plug-in form. (If you’d like details of some of the best-known analogue compressors and their sonic characteristics, check out my ‘Classic Compressors’ article in SOS September 2009: http://sosm.ag/classic-compressors.) But there are also plenty of plug-ins which draw no direct inspiration from specific hardware compressors, yet nonetheless offer a variety of distinct timbral personalities to choose from, so in the final analysis you simply have to let your ears decide whether or not any given plug-in’s ‘sound’ is beneficial in each individual case. As long as the processing sounds subjectively better to you (and not just louder!), then it’s a keeper.
Compressors which emulate the workings of classic analogue devices will often do a lot more to the signal than manage its gain. For example, Sknote’s Disto (which is based on the classic Empirical Labs Distressor) can generate a whole range of different distortion harmonics — especially if you drive it as hard as this!Up to this point, I’ve tacitly assumed that compressors do nothing except apply gain changes, whereas many celebrated analogue compressors have become revered precisely because they do more than that, adding some shade of appealing tonal colour to the processed sound in addition — often by virtue of frequency-dependent gain-reduction foibles or the distortion-generating non-linearities of their unique circuit designs. There’s never been a better time to experiment with these kinds of sounds either, because emulations of many classic hardware units are now widely available in plug-in form. (If you’d like details of some of the best-known analogue compressors and their sonic characteristics, check out my ‘Classic Compressors’ article in SOS September 2009: http://sosm.ag/classic-compressors.) But there are also plenty of plug-ins which draw no direct inspiration from specific hardware compressors, yet nonetheless offer a variety of distinct timbral personalities to choose from, so in the final analysis you simply have to let your ears decide whether or not any given plug-in’s ‘sound’ is beneficial in each individual case. As long as the processing sounds subjectively better to you (and not just louder!), then it’s a keeper.
Mind you, there is one key practical issue to bear in mind: the tonal impact of more characterful compressors tends to be strongest when they’re driven hard, but these same processors often allow little precise control over the finer points of their gain-reduction action and timbral side-effects. In light of this, a couple of operational hacks I’ve already mentioned bear repeating: firstly, if a compressor has no side-chain EQ, you can implement something very similar by bookending it with equal and opposite EQ curves; and, secondly, parallel-compression setups give you the ability to run the compressor super-hot without liquidising all the dynamics and musicality out of the performance, and they also let you filter the compressor’s additions into the most useful frequency region with EQ.
Six Of The Best!
Even after examining half a dozen specific compression applications in detail, there’s still a lot more that could be said about drum-processing with compressors. But once you’ve got these basic templates under your belt, it becomes easier to deduce what any less-easily pigeonholed compression settings are seeking to achieve. Maybe the attack time of a level-balancing patch has been backed off to make the drum’s transient a little edgier. Perhaps the release time of a transient-enhancing patch has been nudged upwards to lengthen the sustain tail a fraction. Or the threshold of a transient-reducing patch has deliberately been pulled down to add some gritty distortion to an otherwise over-polite drum timbre. At the end of the day, mixing’s as much an art as a science, so it’s all fair game as long as it sounds good to you!
Pump Up The Compression!
A lot of the time, working with compressors is about trying to get the enhancement you’re after without obvious gain-pumping side-effects. On occasions, though, huge bumps are the main attraction (“Welcome to the Sid James School Of Sound...”), making the music seem more exciting by simulating the physiological compression effect your ear naturally triggers when exposed to high volumes. If you’d like to experiment with this, the compression patch I mentioned in the main article for adding ‘glue’ isn’t a bad place to start — just increase the ratio and reduce the threshold until you get more like 6-8 dB of gain reduction and you should hear plenty of pumping action (“...and your course leader, Kenneth Williams!”). In this application, the release time setting is extremely important, as it can impact on both the amount and character of the effect. It’s also sensible to try out different models of compressor, as the specific shape of the gain-reset curve varies considerably between designs and the pumping makes its individual identity much more clearly audible. And, as with ‘glue’ compression, side-chain high-pass filtering and parallel configuration both offer remedies if you experience LF loss or mangled transients.
For the most extreme gain-pumping effects, however, such as are regularly showcased on EDM records, compression is only one answer. For example, powerful and highly malleable effects can also be achieved using a side-chain triggered ducker, a programmable tempo-sync’ed volume modulator (such as Cableguys’ VolumeShaper, Melda’s MTremolo and XFer Records’ LFO Tool), or simply via DAW fader automation. Which suits you better will depend as much upon your workflow as anything — they’re all capable of strong and controllable results.
Get Out Of Jail Free!
I talk a lot in this article about alternative strategies that are available to you when compression doesn’t quite do the job you’d hoped it would. What I haven’t mentioned, though, is the ultimate ‘get out of jail free’ card: sample triggering. If you can’t get your snare level consistent enough, you can trigger a fixed-velocity sample of it instead, and if it lacks the right type of attack or sustain, you can layer in a sample that will add precisely what you’re looking for. The technology for doing this is now very mature and affordable, and you’ll find plenty of tips on the subject in our ‘Replacing & Reinforcing Recorded Drums’ article back in SOS March 2011 (http://sosm.ag/drum-replacement).
So why bother with compression at all? Well, fundamentally, because compression’s often a lot quicker to use. For example, it can take a while to refine the triggering and sonic characteristics of the sample in question, especially if you’re trying to minimise phase-related complications when layering the sample with your source recording in the mix. It can also be challenging to retain a sense of realism when triggering samples alongside live drum recordings, because of the difficulty of making the samples track the natural level and timbral nuances of a human drummer.
Peak & RMS Detection
![]()
![]() When you’re dealing with drums, the exact speed with which the compressor reacts can make a big difference to the sound, so this article spends a good deal of time considering attack and release times in particular. However, the peak-sensitivity of the detector circuit itself also affects the nimbleness with which gain reduction is applied, and in some compressors that’s variable too, most commonly between settings of Peak (more peak-sensitive) and RMS (more sensitive to average signal levels, like human hearing). The latter is usually the default for most plug-ins, as it tends to give more natural-sounding gain control for sustained sounds such as bass, vocals and acoustic melody instruments. However, RMS detection isn’t as accurate when you’re trying to grab fleeting transients firmly, so for most routine drum-compression tasks I’d normally start with Peak instead.
When you’re dealing with drums, the exact speed with which the compressor reacts can make a big difference to the sound, so this article spends a good deal of time considering attack and release times in particular. However, the peak-sensitivity of the detector circuit itself also affects the nimbleness with which gain reduction is applied, and in some compressors that’s variable too, most commonly between settings of Peak (more peak-sensitive) and RMS (more sensitive to average signal levels, like human hearing). The latter is usually the default for most plug-ins, as it tends to give more natural-sounding gain control for sustained sounds such as bass, vocals and acoustic melody instruments. However, RMS detection isn’t as accurate when you’re trying to grab fleeting transients firmly, so for most routine drum-compression tasks I’d normally start with Peak instead.
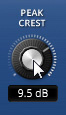
You’ll find a few software compressors offer a variable Peak/RMS control as well (eg. the Cubase built-in Compressor, Tokyo Dawn Kotelnikov or Stillwell Audio Bombardier), which is sometimes labelled Peak Crest or RMS Length/Time/Window, but there’s little mystery to using this once you realise how the Peak and RMS end-stop positions work.
Hard Or Soft Knee?
![]()
![]()
 Some compressors offer the option to gradually ease into gain reduction a little below the nominal threshold level for any given ratio, giving the compression transfer function curve a so-called ‘soft knee’. While this can be good for making compression less audible when working with more sustained instruments, to be honest I’ve never found it particularly useful for drums, as they tend to trigger gain reduction pretty abruptly whatever you do, simply by virtue of their fast-attack envelope shape.
In fact, I typically prefer hard-knee ratios, as these make it easier to catch specific peaks in a mixed signal independently of others for balance purposes, and also tend to make the compressor more incisive at adjusting transient levels.
Audio & Video Examples
You can find a number of audio examples to illustrate the different techniques discussed in this article here:
Download | 126 MB zip file download