 The VST Plug‑in Manager, with its multi‑panel layout, lets you create custom collections of both VST Effects and VST Instruments to streamline your workflow within Cubase.
Organise your plug‑in folder with VST Plug‑in Manager.
With so many bundles, demos and tempting offers around, many of us probably have more plug‑ins than is really manageable when we go to choose one in the middle of a busy mixing session; it’s all too easy to get lost among the possibilities. Thankfully, though, Cubase makes it easy to get your plug‑in folder under control, thanks to its VST Plug‑in Manager. It offers plenty of options to customise which plug‑ins are visible and how they’re arranged when you open a plug‑in selection panel, and a little time spent here can repay itself many times over when your projects are in full swing.
Call The Manager
When you first launch it, Cubase scans your computer and creates two default plug‑in lists (Steinberg call these lists ‘collections’): one for VST Effects and another for VST Instruments. It also does a quick scan every time it is subsequently launched, so it can detect any new plug‑ins you’ve installed. By default, these collections are what’s shown to you whenever you go to select a plug‑in effect or instrument.
The Studio menu (or a key command) access the VST Plug‑in Manager, in which you can view the contents of these two default collections. In its left window, you can view three different categories of plug‑in that, between them, should include all of the plug‑ins that are installed. These are: VST Effects, VST Instruments and the Blocklist. The latter, which may well be empty, is simply a list of plug‑ins that Cubase has scanned, but thinks might have compatibility issues — if you can’t find one you’ve installed it’s worth checking here; you can force a plug‑in off the Blocklist if you are feeling brave, but I’d probably test that in a fresh project just in case! If you select an individual plug‑in in any of these three panels, the bottom‑left panel shows further useful information about it, including where on your machine it is installed.
The panel on the right shows the plug‑ins in the current ‘collection’, depending upon which tab (VST Effects or VST Instruments) is selected in the left‑side panel. These will, at first, be the Default collections (this name appears in the tab at the top of the panel). But you can move, remove, or add plug‑ins to the current collection within this panel, including reordering (almost) any folder structure. For the default collections, via the top‑right drop‑down menu, you can choose to show the plug‑ins organised by Category (eg. EQ, Dynamics etc.) or Vendor; this choice is reflected in how the plug‑ins are shown when you’re making selections in your Cubase project.
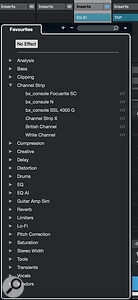
You can compile a ‘favourites’ list — a compact selection of your current ‘go‑to’ plug‑ins that make it easy to find the right effect or instrument.
List Of Lists
The VST Plug‑in Manger also lets you create your own custom collections, and there are a number of reasons why these might prove advantageous compared with the catch‑all ‘default’ list. For example, you can compile a ‘favourites’ list — a compact selection of your current go‑to plug‑ins that make it easy to find the right effect or instrument — or to hide expired demos, duplicate versions of plug‑ins or any plug‑ins installed within a bundle to which you don’t actually have a licence.
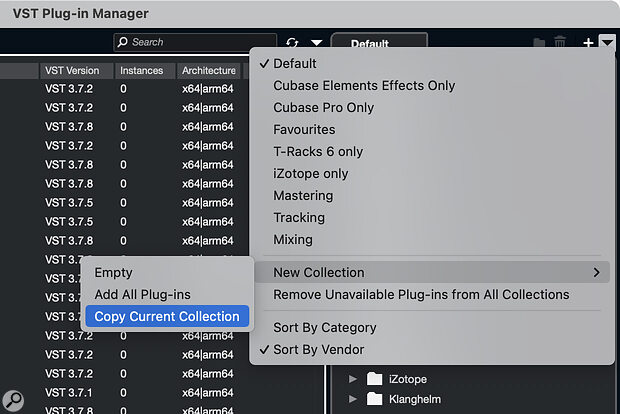
 The drop‑down menu located top right lets you create new plug‑in collections and instantly switch between any of the existing collections.
Alternatively, it could be useful to create collections with only the plug‑ins available to any collaborators you work with — a collection containing only Cubase Elements’ stock plug‑ins, for example, the more comprehensive Cubase Pro options, or a specific third‑party developer’s bundle. Another possibility is more streamlined collections designed for specific tasks, such as composing, tracking, mixing or mastering. In each case, you can customise what’s visible so that you don’t get bogged down with certain plug‑ins or plug‑in formats that you don’t currently use or need to see (for example, mono versions, VST2 versions or older trial plug‑ins).
Two points are worth emphasising. First, adding or removing a plug‑in from a particular collection doesn’t change its actual installation status on your computer, just its visibility in Cubase’s various plug‑in selection panels. Second, whether in the default collections or new custom collections, your VST Effects and VST Instruments form separate lists.
New From Old
Creating a new collection is easy. Select the VST Effects or VST Instruments tab in the VST Plug‑in Manager window, then simply choose one of the New Collection options from the drop‑down menu located top‑right. Any of the three options (Empty, Add All Plug‑ins or Copy Current Collection) can be used, but if you’re currently using the Default collection, the last one is probably the most sensible choice, as it may take less time to move or remove plug‑ins from an existing collection than to start from scratch. Collections can be named, edited or deleted, and allow you to create custom folder structures that can be populated with your chosen plug‑ins.
Let’s imagine we’re creating a ‘favourites’ VST effects collection. First, create a New Collection from the menu using the Copy Current Collection option. This will prompt us to give our collection a suitable title (you can change it later). Once done, the new collection will become the active collection; its name will appear at the top of the VST Plug‑in Manager’s right‑hand panel and the plug‑ins within it will be what we see if, for example, we try to add a plug‑in by clicking on a channel’s insert slot.
 With its custom folder structure and just a few ‘go‑to’ plug‑ins within each category, a ‘favourites’ VST Effects plug‑in collection lets you quickly pick what you need and get on with your mix.By default, our new ‘favourites’ VST Effects collection will contain folders based on Vendor. I prefer to organise my go‑to plug‑in options by type, though, so a useful second step is simply to create a new folder (just click on the New Folder button located top right), name this folder ‘Vendors’, and drag and drop all the individual Vendor folders into this one. This folder will serve as a useful catch‑all category in any collection; while it hides them in a subfolder, if your current ‘favourite’ selections don’t offer you quite what you need for a specific task then you can still easily seek something out here.
At the top level of this folder structure, alongside the Vendors folder, you can now use the New Folder button as many times as required to create your own custom list of categories. For example, in my own VST Effects ‘favourites’ collection for mixing duties, I’ve got folders such as EQ, compression, limiting, saturation, amp modelling, pitch‑correction, creative, vocals, drums, bass, reverb, delay and tools.
Finally, you can find those favourite plug‑in choices and then drag and drop them into their appropriate place in the new custom folder structure. This drag and drop can be done in two ways. First, you can drag them from the catch‑all folder you created (the Vendors folder in our example) or, second, if you want a particular plug‑in to appear in multiple folders (for example, a channel strip plug‑in might appear in a dedicated channel strip folder and also within an EQ folder), then you can simply find it within the main left‑side panel and drag and drop it from there as many times as needed.
In my case, my selection of VST Effects favourites might only consist of three or four go‑to plug‑ins in each category. When subsequently adding plug‑ins to my project, this makes finding those go‑to choices in the plug‑in selection panels much faster. Creating a favourites collection for VST Instruments can be done in exactly the same fashion. And, of course, you can easily edit/update any collection as your tastes change or new plug‑ins replace older favourites.
Switch & Find
Custom plug‑in collections exist globally on your host system so, once created, they can be accessed in any Cubase project. A further neat element of these custom plug‑in collections is that you can quickly switch between them: just visit the VST Plug‑in Manager, select either the VST Effects or VST Instruments tab, drop down the menu from the top left and you can then choose the required collection. The change is applied instantly so, next time you go to select a new plug‑in instance within your current project, you will see your plug‑in choices as organised in the currently selected collection.
Finally, note that changing the collection doesn’t influence any plug‑ins already inserted into your project — a plug‑in that isn’t included in the current collection won’t suddenly disappear from your project; you simply won’t be able to ‘see’ it in the plug‑in selector panel to insert a new instance.
Pick & Mix
As soon as your plug‑in collection starts to expand beyond the stock Cubase offerings, the workflow advantages of creating custom collections via the VST Plug‑in Manager is an absolute no‑brainer. So don’t let your plug‑in addiction slow you down!
