 In this initial configuration, Retrologue’s side-chain input has been activated, the side-chain audio input level set to 7 and all Retrologue’s internal oscillators have been disabled.
Cubase 9 makes side-chain audio inputs possible for VST 3 instruments, the first being Retrologue 2.
Cubase has offered side-chain inputs for insert effects since v4.1, but not for VST instruments. With Cubase 9, though, plug-in designers were given the ability to create instruments with audio inputs. VST is Steinberg’s own technology, so it’s no surprise that the first instrument to exploit this feature is one of theirs: Cubase’s Retrologue 2. The new feature presents a number of creative options which, in essence, all boil down to the ability to apply Retrologue’s filter, effects, arpeggiator and modulation to an audio signal.
To start, you’ll need two tracks. The first, an Instrument Track, hosts an instance of Retrologue. The second contains the audio you wish to route into Retrologue — it could be a WAV file, or another VSTi. If you just want to hear your side-chain audio without any of Retrologue’s own oscillators, configure Retrologue as shown in the first screen (above). Three key things to ensure are that: (a) the Retrologue side-chain input is activated (the orange button on the control strip); (b) all Retrologue’s oscillator modules are off; and (c) the Audio Input knob, which appears only when the side-chain button is engaged, must be set above zero.
 The Pad Audio source track has a pre-fader send to Retrologue’s side-chain input and, with its own fader set to zero, you don’t hear any of the ‘dry’ sample.There are a couple of ways to send audio to the Retrologue side-chain input, the most flexible of which is to use a send from the source audio track. From the Send slot, you can select Retrologue’s side-chain input as a destination. Setting the Send as pre-fader is a good idea, as this allows you both to use the Send level to control the amount of signal going to Retrologue, and to control the level of ‘dry’ signal independently using the source track’s channel fader. Set the latter to full attenuation, and you hear only the audio routed, via the Send, to Retrologue. Hitting playback might confuse you: you’ll hear nothing! But as soon as Retrologue receives a MIDI note, you’ll hear your audio source processed by Retrologue.
Getting Creative
What can you do with your audio in Retrologue? Well, all sorts of creative things: you have access to all the synth’s filter, effects, arpeggiator and modulation features! You can also blend this signal with the dry, unprocessed, version of the audio source (by using the source track’s fader), and/or Retrologue’s three oscillators, its sub-oscillator, noise generator or ring modulation. I covered the basics of Retrologue’s sound engine back in SOS May/June 2016, so I’ll not go over the same ground here. Instead, I’ll take you through a couple of examples to illustrate the potential of the new audio-in feature: an audio drum/rhythmic loop sample, and a sustained pad sample.
Retrologue’s filter, perhaps with some tempo-sync’ed modulation of both the filter and the distortion level, can add a really nice edge to drums — transforming a ‘vanilla’ drum loop into hi-tech electronica in an instant. You can blend (and automate) the wet and dry sounds to taste too. Similarly, with a synth or vocal pad, if you configure the volume to be modulated by a square-wave LFO, you can add a cool rhythmic character to the part, and control its depth and tempo-sync via the modulation settings and LFO Frequency setting. There are, of course, many other, more adventurous, possibilities, but hopefully this illustrates where you can take things.
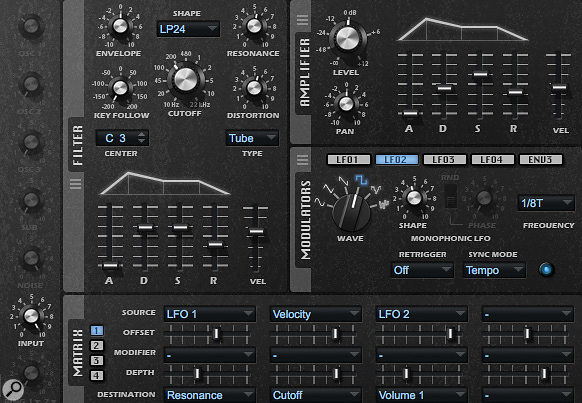
 In this example, Retrologue’s Modulation Matrix is using LFO2 (itself set to a square waveform) to apply volume modulation to a vocal pad sound source and create a rhythmic effect.
Still, I’ll add a couple of further practical points. First, as mentioned earlier, you only hear this Retrologue-processed sound while Retrologue is receiving a MIDI note, so you can add further rhythmic elements to the sound based on how you trigger the MIDI notes. Second, if you trigger multiple MIDI notes, you hear multiple ‘streams’ of the audio input. This can sound great on a drum loop, especially if you’ve configured the filter or distortion settings to respond to the MIDI velocity or note — each note will yield somewhat different tonality. In both examples, you can also add Retrologue’s arpeggiator/pattern sequencer, one of the synth’s most impressive features; there are loads of excellent pattern presets. Whether your original audio source is a rhythmic drum loop or a sustained pad, engaging the arpeggiator can provide some excellent rhythmic effects.
Pitch Perfect
Something that the configuration described so far doesn’t do, which you might expect it to, is offer any option for real-time ‘key following’ of pitch — once processed, the pitch of the incoming audio remains the same on output regardless of which MIDI notes you use to trigger Retrologue. If you want to ‘play’ your carefully created sound in a melodic fashion, this is somewhat limiting, but there is a simple, albeit slightly clunky, workaround...
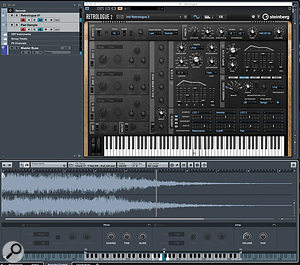
 By combining the Sampler Track with Retrologue’s side-chain input, you end up with some considerable potential for DIY sound creation.In last month’s workshop, we took a first look at the new Sampler Track feature. This allows you to take any audio sample (a drum loop or sustained vocal/synth pad sound would suit) and create an ‘instant’ sample-based instrument; the Sampler Track feature can map that sample across the keyboard and, with appropriate settings, re-pitch the sample in real time on playback. In essence, you can quickly create a playable ‘melodic’ instrument from any single audio sample.
Alas, the Sampler Track is, at present, limited in terms of the sound modulation options it offers. But if you combine the Sampler Track with Retrologue’s side-chain input, giving you access to the filter, effects and modulation technology, then you have the best of both.
To do this, simply place the required sample in a Sampler Track and configure this track as the audio-in source for the Retrologue side-chain input. The ‘clunky’ element of all this is that you have to select, and record enable, both the Sampler Track and the Retrologue Track at the same time so they both receive the same MIDI note data from your MIDI keyboard. That aside, this works really well and, whether by accident or design, when you combine Retrologue’s audio input with the Sampler Track, you create a very powerful, creative and easy-to-use sample-based instrument.
For example, try it with a sample taken from your lead vocal — you’ll get instant EDM vocal ear-candy for your breakdown! In addition, once you have melodic parts coming into Retrologue’s side-chain, the arpeggiator features really come into their own. And, of course, you can still blend in Retrologue’s own oscillator sound sources with your side-chain audio for even more options. I’ve no idea if Steinberg have plans to merge or blend these separate features at some point — I hope so! — but in the meantime, this workaround gives you plenty of potential for instant, yet original-sounding, fun!
