 The Key Editor is packed with MIDI editing features but the trick to a faster workflow is training yourself to access them as efficiently as possible.
With some DIY Smart Controls for Cubase's Key Editor, you could become a MIDI-editing ninja.
Cubase Pro 10's VariAudio Smart Controls bring all the main VariAudio functions within easy reach when you hover the cursor over a pitch segment. It saves you time, and makes you less likely to lose your musical focus. Seeing the concept applied so brilliantly in VariAudio made me hanker after a similar 'smart toolset' for the MIDI Key Editor. When editing MIDI data here, repetitive tasks include: entering and selecting notes, changing note positions or lengths, transposing notes and muting or deleting notes. The potential for streamlining things is obvious, so — in the absence of VariAudio-style Smart Controls here — just how close to hand can we bring the tools and settings required to perform these sorts of tasks?
Tool Utility Belt
The most frequently used MIDI editing tools (eg. Draw, Erase, Trim) are available in the Tool Buttons Palette of the Key Editor's toolbar. This is easy to access, but going back and forth between this Palette (to select each tool) and the notes you wish to edit means a lot of 'mouse travel', particularly if you're working in a floating Key Editor, perhaps expanded to give you more screen space in which to work (rather than the compact Lower Zone).
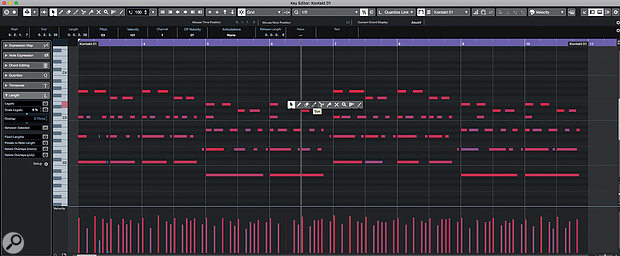
The Key Editor already has a more immediate option that's similar to 'smart tools' — the Toolbox pop-up menu. Right-click and hold while hovering the cursor in the MIDI note grid, and a pop-up Tool Buttons Palette will appear, allowing swift tool selections. If this is the only thing you retrain yourself to do, you'll already have saved yourself a lot of time!
 Enabling the right-click pop-up Tool Buttons Palette is an instant time-saver.
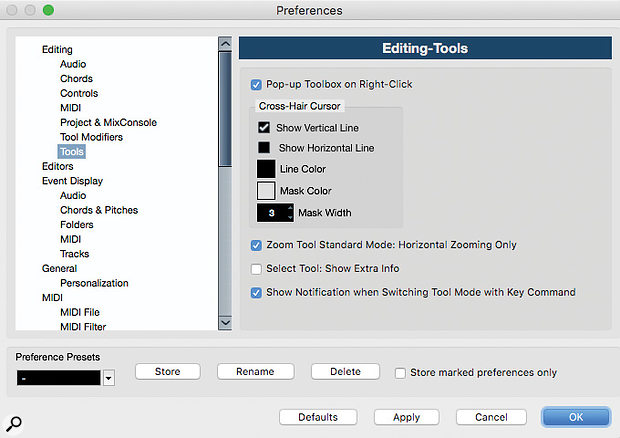
This pop-up only appears when the 'Pop-up Toolbox on Right-Click' option is enabled in the Tools section of Cubase's Preferences. Otherwise, right-clicking opens a subset of the main MIDI menu. There are all sorts of useful commands here, particularly in the Functions submenu, and it can be good to have easy access to this. I prefer the Toolbox as the default right-click action, but you can have the best of both worlds: press the Cmd (Mac) or Ctrl (Windows) key when right-clicking and the MIDI menu will be displayed instead of the Toolbox.
Keyboard shortcuts are another option for rapid-fire tool changes. Many tools are already assigned (in the Tools section of the Key Commands panel) to the number keys. I rejigged these to put the tools I use most frequently (Object, Draw, Mute and Erase) on keys 1 to 4. With one hand on my mouse and the other hovering over these keys, I can select these tools rapidly.
If you right-click and hold while the mouse is hovering in the MIDI note grid, a pop-up version of the Tool Buttons Palette appears.
Snap To It
Using the Object Selection tool to select notes doesn't require you to leave the note editing grid, but controlling subsequent movement of notes might. I find that for most note movements along the timeline I want to snap to the grid, move the note relative to the grid, or turn snap off altogether. You can change between these different modes in the Snap section of the Key Editor's Toolbar.
There are no smart-tool-style pop-up options, but there are still faster ways to move between these modes. By default, for example, you can toggle Snap on/off using the J key — or, probably better, defeat Snap temporarily by holding Cmd (Mac) or Ctrl (Windows) as you move one or more MIDI notes. In the Key Command dialogue's Edit section, you can also define Key Commands for each of the Snap types. I tend to favour Grid and Grid Relative, so I've created easy-to-use key combinations for these.
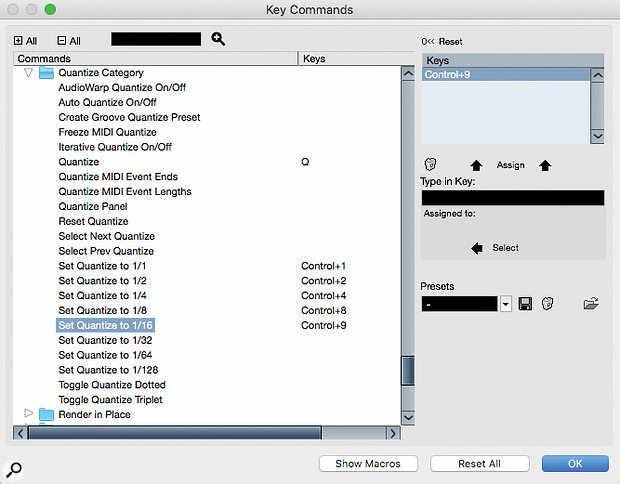
 Key Commands make it super-easy to flip between different quantise resolutions as you enter or move notes within the Key Editor.
Whether inserting new notes with the Draw tool or moving notes with the Object Selection tool, if you want their position to snap in some way to the grid, you'll often find yourself moving between different grid resolutions. The grid resolution can be set via the Quantize section of the Key Editor's Toolbar but, again, this involves navigating to the Toolbar, clicking and selecting the required resolution from the drop-down menu. To speed things up, the Quantize Category in the Key Commands windows comes with all the common grid divisions pre-defined, using Ctrl+number combinations. So, for example, quarter-note or 16th-note quantise settings can be selected with Ctrl+4 and Ctrl+9, respectively.
Nudge, Nudge
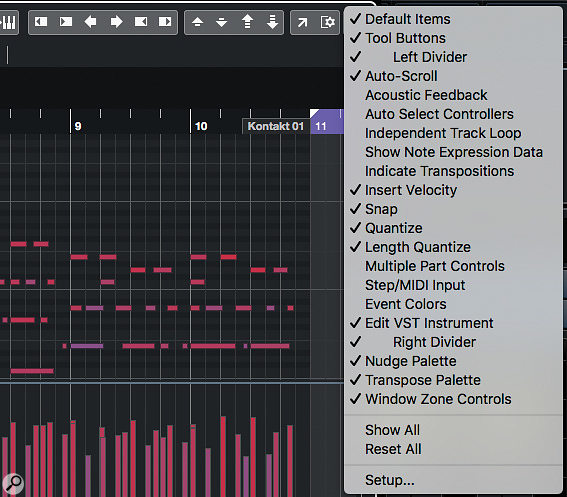
Two further useful Key Editor facilities are the Nudge Palette and the Transpose Palette. They aren't shown by default, but you can toggle their display on via the Settings options at the far-right of the Key Editor's Toolbar string (the cogwheel icon). Collectively, these palettes provide options to move and trim the lengths of selected notes in a speedy fashion. For example, in the Nudge Palette, you can trim the start or end of selected notes relative to the current quantise settings.
Of course, if you configure and master the appropriate Key Commands you may never need to turn on the display of the Nudge and Transpose palettes in the first place; you'll have much quicker access to the same functions. The Nudge section of the Key Commands window has options for moving notes left/right along the timeline or up/down in pitch. Some of these have keyboard shortcuts assigned by default, while others need assigning manually if you use them often enough to make a shortcut worthwhile. Nudge Left/Right are great for moving notes along the timeline but the Up/Down and Up/Down Larger Step commands are also worth considering — these transpose selected MIDI notes by a semitone or an octave, respectively, without requiring any fiddly mouse work.
 Adding the Nudge Palette and Transpose Palette to the Key Editor Toolbar brings some useful editing options, but you can also access the same tools via Key Commands.
Looking at the Key Command's Nudge section, you could be forgiven for thinking that the various Trim commands aren't available for assignment. Actually, they are, but for some reason Steinberg have listed them as Start Left, Start Right, End Left and End Right. If you're unfamiliar with the MIDI note Trim options, these are well worth exploring, especially if you frequently need to tidy up less-than-stellar keyboard performances!
Work Smarter
If you do a lot of MIDI editing, committing only these few key commands and modifiers to finger-muscle memory should save you a massive amount of time in most projects. And not only can you finish projects more quickly (which is obviously great if you have clients with deadlines), but getting what are otherwise tedious editing tasks out of the way rapidly allows you to retain a sharper focus on the creative side of things.
Given just how rich Cubase's MIDI editing features are, the examples I've suggested only scratch the surface, and there are more than enough options for me to revisit the theme in a future column. Of course, if someone in Steinberg's Cubase development team is trying to work out how to bring VariAudio-style Smart Controls to the MIDI Key Editor, there'd be no need for such an article. In the meantime, if you're prepared to train your fingers to fully exploit them, there are plenty of shortcuts available.
