When your audio parts change tempo or time signature, Samplitude can still map them out in bars and beats.
There are many times when it's useful to create a tempo map for material that was not recorded to a click, such as when you want MIDI parts or tempo-based effects to synchronise appropriately. Like most DAWs, Samplitude has the ability to create a flexible tempo map that will follow tempo and time-signature changes within a recording. This map can then be used to quantise or synchronise other parts to the initial recording.
Samplitude has two tempo-mapping modes, called BPM mode and Grid Fit mode, which are chosen from the Edit menu under Tempo. In Pro X, there are two tempo-mapping modes: Grid Fit and BPM. The difference between them is conceptually fairly simple: in BPM mode, each marker fixes a tempo value and Samplitude calculates bar and beat positions to correspond, while in Grid Fit mode, the markers define bar and beat positions, and tempo is adjusted to ensure that these are hit. To start with, we'll be using this second mode, and it's worth creating a keyboard shortcut for inserting Tempo grid markers. Type 'key' in the search box, then click on the 'Edit Keyboard Shortcuts and Menu' entry. You can assign the related shortcuts in the 'Edit > Tempo' section of this window. In my system, I've assigned the hotkeys '/' (left slash) to insert Grid Markers, Alt-/ to insert BPM Markers and Ctrl-/ to open the Tempo Map dialogue.
The Tempo Track
At this point, I'm also going to introduce you to a feature that's new in Samplitude Pro X: the Tempo track. The Tempo track can be enabled from the Automation menu under Tempo, and when you do this, a blue tempo curve will be overlaid on the active track. If you'd rather it appeared on a track of its own, select or add an empty track and go to Automation / Tempo once more. The tempo curve will switch to this track, giving you the flexibility to display the Tempo track anywhere you choose (although it can appear only on one track at time).
The next step is to open a project or import some audio that has been recorded without a click. I'm going to use a multitrack drum session, and because this consists of multiple objects, I'll begin by selecting them and pressing Ctrl-G to group them.
The first stage in creating a tempo map is to define the downbeat of the first bar. In this case, the kick drum hits on the first downbeat, so I'm positioning the play cursor at the transient at this point. Since there is no useful audio before this, I can also press 'T' to split the objects and then delete those to the left of the split. In general, though, it's a good idea to leave some free space before the start, and this is essential if the drum part includes a pickup fill, for example. In this instance I'm going to position the downbeat at bar five allowing me four bars of extra space at the front, in case I need it later on.
Make sure you have snap enabled and set to Bar. Turn on Grid Fit Mode from the Tempo submenu of the Edit menu, or by opening the Tempo Map dialogue and clicking the Grid Mode button at the bottom. With the play cursor positioned appropriately, use your newly assigned hotkey ('/' in my case) and a green Grid Fit marker labelled '5:1' will appear.
My example drum part uses multiple time signatures, beginning in 5/4, and as the Samplitude project I've started with uses the default 4/4 time signature, I will need to change the signature before I proceed. To do this, double-click on the green marker to open the Tempo Map window, type the new value in the signature text box and click OK. The marker will now be labelled '2:1 5/4'.
Tapping In
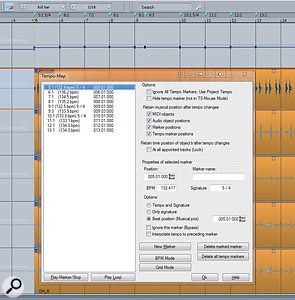
I'm now ready to start mapping the first section of my drum recording to a tempo grid. This process can be done in real time: start playback and aim to insert a marker at every bar by tapping along with the tempo using the Insert Grid Position Marker shortcut. The markers will snap based on the one-bar grid setting. In my case, the 5/4 section lasts for a total of four bars, so I will have a total of five markers inserted from bars 1 to 5. As each marker is added, a corresponding node will be added to the Tempo track curve and the project Tempo will be adjusted automatically along with the grid. Also new in Pro X is the Tempo Track, visible at the top of this screenshot, where it is showing my newly created tempo map (note the change from 5/4 to 9/4 time). The Tempo Map dialogue displays the same information in list format.
If you take this approach, it's likely that you'll want to fine-tune the position of the markers afterwards. To adjust a tempo marker, place the mouse cursor over the marker until it turns to a double-headed arrow, and then left-click and drag left or right to adjust. This method allows you to make fine adjustments (assuming you are zoomed in sufficiently), giving you greater accuracy. You can check how accurately your markers are positioned by enabling the click and playing it back along with the recording.
In my example drum recording, the next section is in 9/4, so I need to adjust the time signature again. Once more, I insert a grid marker where the new time signature begins, double-click on the marker to enter the new signature, and click OK. Now I can map this section by tapping markers in, as above.
Speeding Up & Slowing Down
As well as implementing momentary changes in tempo, it's also possible to introduce continuous tempo changes (accelerandi and ritardandi), though currently these only affect MIDI objects. Before creating any such curves, open the Tempo Map dialogue again and make sure that the four boxes below the entry 'Retain musical position after tempo changes' are ticked, to ensure that relative bar and beat positions are maintained during tempo changes.
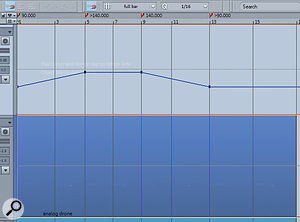
Ensure snap is enabled and set to 'Full Bar'. As an example, let's see how to create an accelerando from 90 to 140 bpm over a duration of four bars. First switch to BPM mode from the Tempo submenu of the Edit menu. Position the play cursor at bar 1 and insert a tempo-change marker, either using your hotkey or from the menu (Edit / Tempo / Insert Tempo Change). The Tempo and Signature window will open automatically. Set the BPM value to 90 and click OK. Now position the play cursor at bar 5 and insert another BPM marker. Type in the new value of 140bpm, but this time also tick the 'Interpolate Tempo to preceding marker' box. Click OK to exit the dialogue. The BPM Marker will now display a '>' symbol to indicate that interpolation is enabled, and the markers and Tempo track should adapt to reflect this accelerando. MIDI objects are automatically stretched or compressed, so MIDI notes stay in sync with any tempo changes.  As well as supporting discrete tempo changes, the Tempo Track can also display continuous accelerandi and ritardandi.
Now let's see how to use just the Tempo track to create a ritardando from bars 9 to 13. Insert another marker at bar 9, leaving interpolation unticked. Then switch the mouse pointer to Object and Curve Mouse Mode and position it over the tempo curve at bar 13 until it turns to a finger. Now left-click while holding down the Shift modifier. This will add a tempo node with interpolation enabled. (You can also right-click on a tempo node to open the Tempo and Signature window.) Now left-click on the node and drag downwards to create a ritardando; if you like, use the Shift modifier to gain finer adjustment and to constrain horizontal movement. A tool-tip will display the tempo as you adjust it.
Finally, here's a few helpful tips:
- Change the snap value to Beats to insert tempo nodes based on the beat position.
- For finer snap settings, choose 'Snap to Quantization' and select the quantise value from the Q drop-down menu.
- You can also add tempo nodes using Universal Mouse Mode by double-clicking.
- Using the Alt modifier will bypass snapping, allowing you to freely insert or move tempo nodes.
- To delete a node or marker, left-click to select it and press the Delete key.
