We find out how much you can do in the mix when the recordings aren't up to scratch - and how much you can't!
A fair few submissions for Mix Rescue suffer much more from tracking problems than mixing problems, and normally we reply to such submissions with a few recommendations for tracking tweaks. The bottom line is that there comes a point when there's more to be gained by addressing problems at source than by trying to fix them in the mix.
 Multi-instrumentalist Scott Martinez formed the band Alice Sweet Alice as a side-project.So when Scott Martinez and his band Alice Sweet Alice sent in the multitrack files for the song 'Broken Heart On A Winter Night', it was clear to me that a remix was very unlikely to give him the sound he was after. The main problem was that he had recorded almost everything with effects, which makes it very difficult to gain a useful degree of control over the sound while mixing. For a start, if there's too much effect you can't take it off, but it's also a problem in other ways. For example, if you compress a sound that has been recorded with reverb, you'll bring up the level of the reverb as well as evening out the dynamics. In short, recording tracks with effects on them can make mixing practically impossible.
Taking my comments on board, Scott endeavoured to record another song, 'With You, With Me', trying to minimise his printing of effects, and sent that over to me in due course when he was unable to get the kind of big, ambient sound he was looking for. Again, I felt that tracking issues were going to limit the extent to which mixing would be able to deliver what Scott was after, but it also seemed to me that he wasn't clear why this was the case, or indeed how he might best improve matters in his simple recording setup (based around a Soundcraft Compact 4 mixer and Cakewalk Pro Audio 9).
Back in SOS August 1997, top mix engineer Jon Gass said "I don't think you even know how to track music until you've done quite a bit of mixing", and with that in mind I decided that I'd try remixing the tracks as they were, in the hope that I would be able to illustrate some of the difficulties and limitations involved, as well as suggesting a few simple ways in which he could improve his raw recordings in the studio.
Rescued This Month...
The band Alice Sweet Alice started as a side-project of Scott Martinez, a multi-instrumentalist and singer who released an album at the age of 19 (with his former band Autumn Cathedral) back in the '80s, but who has since developed a full-time career as a chef! Alice Sweet Alice has now expanded to include band-mates Julie Cartonio (vocals, guitar), Jeffrey Galios (lead guitar) and Ali Kat (vocals, keyboards). However, the song 'With You, With Me' was put together entirely by Scott, who programmed the drums, played the guitar and bass parts, and overdubbed the vocals all on his own.
Remixing Stereo Drums
The first main problem with this new song (as with the previous one), was that the drums were already mixed to a single stereo file from Acoustica's Beatcraft drum machine. Although Scott had removed the effects from the mix, the samples he'd loaded into the drum machine still had a lot of fairly grainy-sounding reverb on them, which couldn't be removed.
 Here you can see some of the steps Mike took to give extra definition to the kick and snare sounds in Scott's mixed drums audio file. The top track contains Scott's file; the second track contains all the kick drums sliced out from the file and then polarity-inverted to cancel out the original kick sound in a controllable way; the third track contains a new triggered kick-drum sample; and the fourth track has all the snare drums sliced out from the original file. These were limited, distorted and then mixed in.These two factors limited my options in a number of ways. One thought I had, for example, was that a little less stereo width in the drum parts would help make them cohere a bit better, but I was only able to reduce the pan settings a little before the prominent reverb tail became very narrow and constricted.
A more important concern was that I felt that the kick and snare sounds needed a lot more weight and definition, but the nature of the mixed drum track rendered all the more straightforward tools I'd use to achieve this pretty ineffective. For example, EQ'ing the drums track to improve the snare sound affected all the other sounds in undesirable ways, as well as adding odd colorations to the reverb tail. On the other hand, simple dynamics processing such as compression or gating started heaving the reverb tails up and down in unnatural ways before any useful adjustments were achieved.
I tried using Digital Fishphones' Dominion to increase the snap of the kick and snare transients, but the hi-hat began tearing my ears off before that made a useful difference. Multi-band compression? That did nasty things to the reverb. Dynamic EQ? Couldn't get it to trigger reliably enough on such a complex mixed signal. Celestial Systems Drum Perfectizer? Unfortunately not yet available in VST format...
Clearly, I needed to try to isolate the kick and snare sounds in some way, and the only way of doing that was by spending a diverting hour manually copying them out of the mixed part onto a separate Cubase track — an ideal activity for anyone willing to trade in their insomnia for a bout of tendonitis! This did, at least, however, enable me to add some body and brightness to the snare drum by soft-clipping and limiting the snare snippets with GVST GClip and MDA Limiter before mixing the track back in with the main drums.
I tried a variety of similar tactics for the kick samples, but the problem here was that I wanted to reduce the reverb that was muddying up the low end, while at the same time pulling the kick drum forward. High-pass filtering to remove the reverb also removed all the weight from the kick drum, and I couldn't add it back in using the sliced samples without getting too much of the muddiness back at the same time.
Hear The Mix Files On-line!
Audio examples from this Mix Rescue can be found on-line at www.soundonsound.com/sos/may08/articles/mixrescueaudio.htm, including 'before and after' files for the full mix and the various individual instruments.
Triggering & Multi-band Compression
In the end I admitted defeat and fired up Koen Tanghe's KTDrumTrigger plug-in on the kick-slices track instead, using it to generate MIDI notes from the drum hits so that I could layer in an additional sample. Once the MIDI part was recorded into another track, I loaded a few samples into Linplug's simple little RMF sample-player from Sample Lab's Drum Fundamentals (a good all-purpose one-shots library) and auditioned them alongside the track, to find a suitable one.

You have to be a bit careful to avoid timing variations between kick-drum samples if you're layering them together, so when I'd chosen a sample I recorded RMF's output as audio using Silverspike's Tape It, re-imported that audio file and further edited the timing of some of the sections to avoid this. A little EQ (peaks of +2dB at 52Hz and -3dB at 220Hz) improved the combined sound a little, but by the time I had enough of the sample in the mix (in relation to the original sample) the kick level was simply too loud compared with the rest of the drums/cymbals. My solution to this was to duck the kick drums in the mixed track by adding in a little of the sliced kick-drum track with inverted polarity (so that it phase-cancelled).

 The exact processing used for the isolated snare slices can be seen here. Although the combination of high-pass filtering, clipping and limiting made for an odd sound out of context, it did the job of restoring some of the brightness, sustain and body that the main drum file was lacking.A final issue remained, which was that the overall drum sound was rather muffled, and adding high end to address this made the hi-hat too bright, so instead I limited just the main drum part's high-frequency band above 4kHz using Cubase's Multiband Compressor. This ducked the hi-hat a bit so that I could then apply some make-up gain in that band to lift the upper frequencies.
The result: not the best drum sound in the world, but one that at least left enough room for the bass while not disappearing behind the guitars! The biggest down side, to my ears, was that the obvious reverb made the sound come across as rather dated — these days sounds tend either to be dryer or more realistic-sounding. Obviously, Scott could have left more options open for mixdown by isolating all the samples to different audio tracks, but to be honest I reckon that he could dramatically improve his band's sound simply by using a few well-chosen sampled loops rather than programming the sounds himself. A lot of musicians reject this approach out of hand, but it can produce excellent results in very little time, and you can also easily modify the patterns to taste if you work with REX files. There are masses of good loop libraries available in every style imaginable — the Sample Lab loop libraries, George Pendergast's Alt Rock Drums and Spectrasonic's Backbeat (now available for Stylus RMX) would probably be my first ports of call here, to give just a few of my favourite examples.
Surreptitious Subterranean Synths
The main problem with the bass part that Scott had recorded was one of consistency — the unprocessed part wasn't keeping a consistent position in the mix balance from note to note. Compression is the treatment for this particular problem, but taking some inspiration from Jack Joseph Puig's mix settings back in SOS November 2007, I decided to go for a mastering-style limiter instead (in the form of Kjaerhus Audio's Classic Master Limiter), which did the job simply and effectively. However, Scott's recording was pretty noisy, and the limiting exaggerated that to the point where it was becoming distracting, so I also low-pass filtered the part at 10kHz to take the worst of the hiss out. I could have filtered lower to get rid of more, but I didn't want to remove the instrument's upper harmonics, which were helping it remain audible in the mix. In fact, I used a bit more EQ to boost a couple of decibels in a wide peak at 3kHz, to try to bring these out more.
The level of noise on the bass recording might simply have been a by-product of Scott's plugging through a DOD chorus pedal on his way into the mixer while recording, but I suspect that his management of the console's gain may also have been part of the problem. A good rule of thumb here is to leave all the gain controls in the recording signal path at unity gain (the 0dB mark, where they don't change the level) with the exception of the preamp gain, which should be set to achieve the healthiest recording level into the computer — without clipping, of course. To be honest, I'd probably suggest Scott used the Compact 4's built-in instrument input for bass recordings, unless he's absolutely hooked on the sound of that particular chorus pedal, as recording the DI guitar signal should give a fuller sound with less noise, and he can add a chorus effect with much greater control later, using the DirectX plug-ins built into Cakewalk Pro Audio 9.
The bass part was defining the low-frequency extreme of the mix, and I felt that a richer sound would help to make the mix seem a bit more hi-fi. One common mixing trick in this situation is to use a sub-harmonic synthesizer process to add in a little sub-octave below the bass notes, but here I took an equally tried-and-trusted (and usually both more reliable and more flexible) approach of doubling the bass part an octave below with a monosynth. Using Cubase SX 2's Monologue monosynth, I set up a patch based on a low-pass-filtered triangle wave, and then high-pass filtered the live bass part at 170Hz to avoid low-end phase problems.
Guitars: The Dangers Of DI
 The remaining guitar parts, three electrics and an acoustic, were all tracked via DI through a Digitech RP80 amp-modelling guitar pedal. Both electric rhythm parts (which play during the choruses) had more low end than was useful here, in the light of the comparatively up-front bass part, but that was easy to address with some gentle high-pass filtering starting at about 300Hz. However, both parts also had some kind of nasty clipping distortion on them (in addition to the intended simulated amp distortion), which gave them a really harsh edge. If the RP80 sounded like this to start with, either there was some clipping going on internally or Scott needs to send it for repair! However, I suspect that the clipping was a result of inappropriate gain management during the recording process, so this is definitely an area that needs attention. Paul White provided an accessible introduction to gain management back in SOS October 2000 (www.soundonsound.com/sos/oct00/articles/soundcard.htm.)
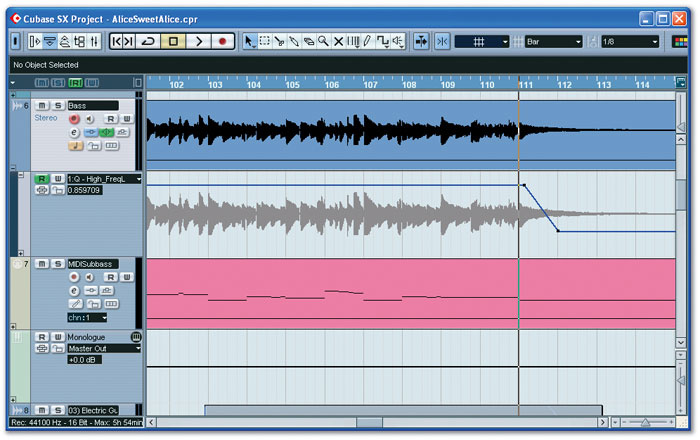
 The low end of Scott's bass recording needed a bit of support to help fill out the production as a whole, so Mike programmed a MIDI part to double Scott's line and used this to layer in a warm-sounding sub-bass patch from Cubase SX2's Monologue virtual instrument.
Initially, I tried simply to low-pass filter the electric guitars to remove the worst of the clipping artifacts — after all, real guitar cabs roll off pretty quickly above about 4kHz, in practice. However, I found that by the time I'd made a useful difference to the clipping harshness I'd also managed to completely kill any bite the guitar parts might have had, so instead I just used a combination of 3dB high-shelving cut at 15kHz and 3dB peaking boosts at 800Hz and 3.2kHz to try to bring out a less abrasive tone.
The third electric guitar part wasn't clipped, but still had delay effects printed with the recording, as well as a fair bit of noise. This could have been a pain, because I wanted to use compression to change the sound's attack/sustain ratio (it poked out of the mix even when faded down to an unsuitably low level), which was inevitably going to emphasise both these problems. I tried out a variety of different tactics to achieve the sonic change I was after, and in the end combined limiting from Kjaerhus Audio Classic Mastering Limiter, emulated tape-saturation from Cubase SX2's Magneto, and low-threshold, low-ratio compression from the Cubase Dynamics plug-in. Fortunately, because the part didn't need to be in the foreground, the increase in background noise and delay levels wasn't really audible in the mix, so I didn't bother trying any expansion to reduce it. Instead, I just slightly brightened the sound with a 100Hz high-pass filter and a couple of decibels of wide peaking boost at 2.7kHz, as it was sounding a little muffled in context.
It's not easy to make an acoustic guitar sound good when it has been recorded using its DI output, but the difficulties were compounded here by a really muffled tonality, layers of recorded effects, and sporadic clipping. I tried a variety of things in an attempt to isolate something usable from the part, but in the end the best processing that I could find was the button with 'Mute' written on it. Simply cutting the part, though, was not the answer, because the musical arrangement relied on it, so I emailed Scott and asked him to re-record the part for me clean.
 Scott's original acoustic guitar recording has been rendered practically unmixable due to recorded effects, but once Mike had received a re-recorded, effect-free part he was able to use Cubase SX2's built-in Chorus plug-in to recreate something of the original effect sound within the context of the track. A short, low-resolution mono reverb was also applied to add a bit of harmonic complexity to the sound, and some of this was fed to the Chorus plug-in as well.
As it happened, he'd just bought an ART Tube MP preamp, through which he tracked the guitar again, and the difference between the two tracks was like night and day. From struggling to get something passable, I could now just dial in a 115Hz high-pass filter and a bit of de-essing (to control the pick noise) and move on. That said, a reasonable miked recording would almost certainly give better results for Scott in future, helping to lend more atmosphere and realism to his productions, given that most of the other parts are electronically generated. He may need to buy a condenser mic to achieve decent results, but the recent plunge in manufacturing costs of such mics should make this acquisition fairly painless. Plus, if he went for a large-diaphragm condenser he could use it to improve the clarity of his vocals, which in this case had been recorded through a Shure SM58.
 Scott had set the vocal levels fairly sensibly on this occasion, and had also left off the effects, which made the vocals much easier to handle. A good dose of emulated optical compression and some de-essing from Digital Fishphones Blockfish and Spitfish evened out the dynamics, while a bit of high-pass filtering and a small peaking cut at 370Hz kept the low mid-range clear. It sounded like Scott had added quite a lot of high-end boost from the Compact 4 while recording (assuming that his SM58 is like every other one I've heard), and this was making the vocals sit a bit too far forward of the rest of the track, so I shelved off 4dB at 6.5kHz to compensate. I also had a few concerns about some areas of tuning, so fired up GVST's GSnap to pull the more wayward moments into line — tuning can make a big subjective difference to how a vocal sits in the mix, and it can be hard to get off-pitch notes to blend. As per usual with automatic pitch correction, I went through the part and automated the scale settings to keep mistracking 'hiccups' to a minimum.
A low-octave double accompanied the lead line throughout the entire track. This seemed like a wasted opportunity for arrangement dynamics, so I only introduced this part during the choruses, using similar compression and EQ settings as had worked on the lead vocal. I reined in the high end a little further, though, to pull the double behind the lead. I also noticed that the two different lead-vocal choruses had been performed separately, so did some copying and pasting between them to conjure up a double-track, mixing this in at a lower level than the lead.
Effects & Automation
The effects on this occasion were fairly straightforward, and were mostly used to tie the rest of the tracks in with the already very ambient drums. The first thing I did was shorten a hall-ambience impulse response using the envelope tools in Christian Knufinke's SIR, and then high-pass filtered it to remove anything below about 300Hz. Subtle levels of this effect allowed me to paint out beyond the edges of the drum parts (which, if you remember, I'd reduced in width), as well as blending the kick sample, acoustic guitar and vocals with the drums.
On the vocals I also added another one-second patch using an impulse response from the venerable EMT250 to give the lead vocals a little bit more of an obvious reverb effect, again in line with the drums. A fairly audible tempo-sync'ed delay helped fill things out as well, but I used de-essing and EQ in the return to keep it fairly understated and sent from there to the EMT reverb to push the echoes further away from the listener.
 Despite using a Shure SM58 dynamic mic for his vocals, Scott had managed to come up with a workable sound by keeping his distance from the mic. He'd also added extra high end using the EQ on his Soundcraft Compact 4 mixer.
The two main electric guitar parts both sounded a bit close and small compared with the drums, but I didn't want to use straight reverb to sort this out because I didn't want to push them too far back in the mix — they had some effects on them already. So instead I selected Silverspike's Room Machine plug-in as an insert on each channel and used its room ambience processing to add some of the missing liveness and make the two guitars seem to belong more to the mix as a whole. If I'd been tracking this song, I would have layered the guitars more here, as I think that it would have the potential to give Scott a more powerful, authoritative sound.
The other electric guitar part during the verses (and also in the climactic outro section) was crying out for more in the way of stereo interest, so I worked up a couple of different tempo-sync'ed delay effects for this purpose: the first a straight mono delay, but with its output fed on to a rotary-speaker effect that whizzed it around the stereo picture in a nice, organic way; and the second a ping-pong delay creating alternating ricochets of each guitar note in the left and right channels. High-pass filtering on each return kept the delays from clouding the mid-range.
The acoustic guitar sound Scott had originally recorded had a lot of chorusing on it and, although I don't normally use chorus a great deal myself, I figured that I should follow that general intention and set up a send to a two-stage patch running in Cubase's Chorus plug-in. However, I also wanted to make the sound a little more complex and three-dimensional, so I plumbed in a very short lo-fi reverb (in mono) from Steinberg's 'legacy' Reverb32 plug-in, sending that to the Chorus effect too. Listening back to Scott's original mix again, it struck me that some chorusing might be appropriate on the vocal parts as well, so I slapped some on those too.
 The lead vocal's main delay patch was EQ'ed and de-essed to keep it in the background, and some character reverb was also added via SIR, using an impulse response from an old EMT 250.
Massive amounts of automation were not going to significantly up the game here, so I only adjusted a few things for the choruses, sneaking the drums up a notch and bypassing the acoustic guitar's mono reverb, which was just adding clutter once the main electric guitars and extra vocals were in the mix. I launched a draft mix through cyberspace to Scott, who suggested some level tweaks to the acoustic guitars, which involved a little level automation, but again nothing complicated. My final tweak was to close down the noise on the last bass note by automating the track's low-pass filter — a trick that had stuck in my mind after reading Paul White's Mix Rescue back in SOS May 2006.

Mixed Results
If you listen to the audio files that accompany this article (at www.soundonsound.com/sos/may08/
articles/mixrescueaudio.htm), you can hear how far I was able to take this mix. While I was able to make the instruments somewhat clearer and more audible, and improve their balance, it has to be said that the final result still sounds very much like a demo. However, I hope that by demonstrating what I was and wasn't able to do at the mixing stage I've been able to provide some insight into how a few unwise basic decisions at the tracking stage can really make mixing a struggle: in the long run, taking a little extra time to record cleanly and without noise, clipping or unnecessary effects saves you much more time at mixdown. That way you can afford to be sparing with more drastic measures such as the sneaky addition of extra samples and synth lines, keeping them for those less common occasions where technical problems are, for whatever reason, unavoidable. .
Scott Martinez: Remix Reactions
"I jumped at this opportunity to have Mike remix one of my songs, just for the pure learning experience of it. I'm very much accustomed to live tracking and old-school analogue recording, but I have a lot to learn about DAWs. I also don't do any MIDI, although this may have to change, given the drum problems Mike had! Scott says that his Mix Rescue experience has taught him useful techniques for the future. Equipment limitations have been a big obstacle, as I only started recording on the DAW in the summer of 2007. For example, my computer's limited RAM prevented me from using Cakewalk's effects, so I was forced to record 'effected'. Fortunately, I've recently made some improvements to my studio setup, such as replacing my stock soundcard and upgrading my computer, which should hopefully make quite a difference to my tracking abilities.
"This song was one of my last tracking efforts before these upgrades, so I'm surprised that Mike's mix turned out as well as it did, despite all of the problems. I think the overall feel is ambient and very nice, which is what I wanted. I really like what he's done with the background vocals, just letting them come through in the choruses. I was pleasantly surprised when I heard that — it was one of those 'How come I didn't think of that?' moments! The main thing, though, is that I've now not only got a good-sounding song, but also a manual for improving my future endeavours. What a great learning tool! Thanks, Mike."