, Dan Ecclestone (vocals and guitar), David Youngs (drums and electronics) and Dom Hall‑Smith (bass guitar).") Ember Rev are, from left, Chris Peckham (accordion), Dan Ecclestone (vocals and guitar), David Youngs (drums and electronics) and Dom Hall‑Smith (bass guitar).
Ember Rev are, from left, Chris Peckham (accordion), Dan Ecclestone (vocals and guitar), David Youngs (drums and electronics) and Dom Hall‑Smith (bass guitar).
New arrangements, new mixes and new masters present an album in a fresh light — and offer an escape route from a sonic trap.
To stand out in a saturated music scene, you need a point of difference. Cambridge four‑piece Ember Rev have several, starting with their unusual line‑up of vocals, guitar, drums, bass and accordion. Under the benevolent dictatorship of singer and songwriter Dan Ecclestone, the Rev have released five albums, evolving and expanding their horizons every time. I’ve been involved with several, and greatly enjoyed mixing their recently released fifth album That Night I Dreamt A Forest Grew.
After the dust had settled on that project, Dan came to me with an interesting suggestion. Back in 2019, I had engineered the basic recordings for Ember Rev’s third album, From The Country To The City To The Sea. These recordings were made on location, with the band playing all together in a room, before replacement accordion and vocal parts were overdubbed.
This approach showcased the band’s excellent musicianship, and captured all the energy and drive you could hope for. But it also had its down sides. Since the core tracks were laid down in a single weekend, there hadn’t been time to develop different sounds for individual songs, and we had struggled to get satisfying recordings from Dan’s guitar. Casting a look in the rear view mirror, Dan felt there was scope to revisit the album to unlock some of its untapped potential. From his point of view, this meant overdubbing extra guitar parts on all of the songs, and reworking some of the arrangements with electronic elements and other instruments. And from mine, this meant getting the chance to take it in a slightly different direction sonically.
You can hear ‘before and after’ audio examples from this article on this month’s media page at: https://sosm.ag/mix-rescue-0426
Stone Soup
The room in which the band was tracked is very ‘live’, with stone walls, minimal absorption and no separation. It’s a space that makes its presence felt on anything you record there, and on drums in particular, presents a sound that is exciting but also quite ragged and uncontrolled. The original mixes, by Simone Silvestroni, had enthusiastically embraced this, with the room mic to the fore, and lots of compression bringing up the ambience.
Nothing about them needed ‘rescuing’, but in its original form, the album made a pretty uncompromising sonic statement. So, when Dan asked if I’d be willing to remix the album to incorporate his additional parts, I was keen to see if I could give it a different slant, and perhaps wriggle free from some of the limitations my raw recordings had imposed.
 The original recording sessions for From The Country To The City To The Sea took place over a single weekend in 2019, on location.
The remixed album can be found in full on Ember Rev’s Bandcamp page at emberrev.bandcamp.com, but in this article I’m going to focus on the epic ‘Ultramarine’. A standout track that has since become a live favourite, this is also the song that changed the least between 2019 and now. For the 2026 version, Dan undid a mistaken vocal edit and added an acoustic guitar part, but otherwise I was working from the same multitrack that was used for the original mix.
Light & Shade
David Youngs’ drum parts are more complex and varied than is typical of rock music, incorporating everything from delicate jazz rudiments to Bonhamesque hard rock. Several of the album tracks, including ‘Ultramarine’, featured multiple styles within one song. At the mix, this creates some interesting challenges, because the settings that are appropriate to one section may not work for the next section.
As I see it, there are two ways of dealing with this. One is to create a duplicate set of drum tracks for every section that requires different settings. The other is to use automation to adapt the settings to the section. The first option makes the DAW project unwieldy and can throw up issues at the transitions between sections, so I prefer the second approach where possible. As an example, I generally use Sound Radix’s Drum Leveler both as a gate and for transparent dynamics control on close mics. By automating the Lo Threshold and Target parameters, it’s possible to ensure that the gate triggers reliably throughout the song, and that the compressor doesn’t attempt to push things up too far in quietly played sections.
 On ‘Ultramarine’, drummer David Youngs switched to a more jazzy approach for the quieter middle part, and I also wanted to introduce effects that were specific to each section of the song. This Pro Tools screen capture shows some of the automation that was used to do so. Automated parameter changes for Sound Radix’s Drum Leveler allow its gating and compression action to follow the level of the snare.
Another way of managing this sort of very dynamic drum performance without splitting it out into duplicate tracks is to use dynamic EQ or multiband compression rather than conventional EQ. That way, for example, you can set things up so that a midrange cut is applied only to the louder sections, or a high‑frequency boost only in the quieter parts. Most of my drum mixes thus contain a few instances of FabFilter’s invaluable Pro‑MB, but this was an extreme case.
Pointy Sticks
There is a chapter in Lord Of The Rings where the hobbits attempt to find their way through a malevolent forest, which subtly forces them in the direction it wants to take them instead of where they want to go. Something of the sort was true of the drum recordings here. All of the individual tracks sounded decent in isolation, and once the necessary automation was in place, they responded well to standard processing such as gating and filtering. But when they were faded up together, they always seemed to coalesce into a sound that was unforgivingly hard and midrange‑y. Even muting the room mic, gating the close mics and applying different snare reverbs couldn’t hide the fundamental abrasive character of the recording. I was beginning to see why Simone had taken the approach he did!
Bringing things under control required using both static and dynamic EQ, and across 10 drum tracks and a handful of busses, I ended up with probably 15 to 20 different cuts at various points between 200Hz and 3kHz. Usually, I find you can locate these points by sweeping a peaking band through the midrange until something leaps out at you, then attenuating at that frequency instead. In this case, however, throwing the focus almost anywhere in the midrange made me want to cut at that point.
One thing to pay close attention to in this situation is the attack and release times on any dynamic EQ bands. On the tom close mics, for example, it was mainly the initial transient attack that sounded very hard, so I used a fast attack and release with a look‑ahead option to try to bring that under control. If a drum is ringing too much, by contrast, you’d want to use a slower attack so that the processing only kicks in during its decay portion.
 The generally midrange‑y, aggressive sound of the raw drum tracks necessitated extensive use of dynamic EQ, mostly from FabFilter’s Pro‑MB. In this case the attack time for the centre band is set to its fastest and look‑ahead to its longest setting, allowing it to act instantly when tom transients occur.
Another strategy which I used on some of the songs in this project, though not ‘Ultramarine’, is to have a dynamic EQ on the drum bus that is keyed from one of the close mics. I find this is especially valuable when you want to reduce the ‘knock’ of the bass drum without affecting the snare or toms.
Soft Soap
At the original tracking session, I had taken DI signals from Dom Hall‑Smith’s bass and Dan’s guitar as well as recording the amps. For ‘Ultramarine’ I also had the new acoustic guitar overdub to contend with, though this was a relatively low‑key part.
I used amp simulator plug‑ins for both bass and guitar. The beauty of this approach is that you can duplicate the tracks as many times as you like to combine different settings, or to achieve different sounds in different sections. However, one thing I’ve learned from bitter experience is that some plug‑ins either shift the phase of the signal or reverse its polarity, so a little checking in mono is always advisable when you combine them.
One thing I learned on this project is that some of the guitar amp settings in the Line6 Helix plug‑in work surprisingly well on bass. For ‘Ultramarine’, however, I went with a tried and tested Ampeg B15 emulation. Preceded by an Ampeg Scrambler fuzz set low, this gave a good balance of warmth and snarl, but was a bit lacking at the very low end. To address this, I duplicated the raw DI track and used Soundtoys’ FilterFreak plug‑in to isolate everything below 100Hz or so, compressed this and mixed it back in to taste. A certain amount of compression on the entire bass signal was also beneficial, as was some dynamic EQ to keep the tone stable and avoid too much honkiness on the louder notes.
 To add some weight to the bass guitar, I created a parallel track and applied some extreme settings in Soundtoys’ FilterFreak to isolate the very low end.
My go‑to guitar amp emulator is Softube’s long‑superseded Vintage Amp Room plug‑in. I still think it’s one of the better‑sounding plug‑ins of its type, and most importantly, it doesn’t overwhelm me with choice. In fact, 90 percent of the time I head straight for its AC30 emulation, and that was the mainstay of the guitar sound here. To thicken it out and add some stereo width, I also used the original amp signal at a relatively low level, and a second copy of the DI track with Vintage Amp Room on its Fender model.
The Big Squeeze
Chris Peckham’s accordion is a mighty beast of an instrument. Miked close, as was the case here, it can produce both a surprising amount of low end and impressive volume. And miking in stereo, as was the case here, spreads the sound across the full width of the field. All of which would have been great if this had been an album of solo accordion pieces. Since it was actually a rock album that features accordion, quite a bit had to be done to tuck the instrument into the mix, and have it be present at a stable level without either getting lost or overwhelming the other parts.
I had recorded the accordion overdubs with two pairs of mics: Extinct Audio BM9s at either end, and a Mid‑Sides stereo mic in front of the instrument. The latter was easier to work with at the mix as it wasn’t quite so wide, and the placement meant less button noise. Judicious use of EQ, especially at the low end, was needed, along with a fair bit of level automation.
Like most of the songs on the album, ‘Ultramarine’ featured a single lead vocal plus several backing parts. These were often quite imaginative, running the full gamut from wordless oohs and aahhs to gang vocals and call‑and‑response phrases. The vocal overdubs had been done in a proper studio, and consequently sounded very good and devoid of noticeable room ambience. Little EQ was needed, but Dan’s performances spanned quite a large dynamic range. On ‘Ultramarine’, I let compression plug‑ins do the heavy lifting when it came to evening things out, but on the more delicate songs I much preferred the open sound of the raw vocal, and used some pretty extreme automation moves instead, positioning a transparent compressor post‑fader to apply just a couple of dB further flattening.
I don’t really believe in depth of field. If I’m mixing a rock or pop track, I’m just not trying to create the illusion that some things are nearer than others.
Shallow Space
A word, then, about reverb and delay. With my editor’s hat on, I was interested to publish Christopher Heimer’s workshop about depth of field last year, because it provides such a sharp contrast with my own approach. In fact, I’d go so far as to say that I don’t really believe in depth of field. If I’m mixing a rock or pop track, I’m just not trying to create the illusion that some things are nearer than others. At least 95 percent of the time, I want them all up front and in the listener’s face. After all, on any live stage, all the band members are effectively the same distance from the audience.
Does it follow from this that I don’t like or use reverb? Not at all. I rarely want to make things sound more distant, but I often want to make them seem bigger, and reverb is a great tool for this. I’m primarily interested in what a particular reverb can do for a particular instrument, so although I do set my reverbs up on auxes, each one might have only one or two sources going to it. In this case, for example, I had a dedicated chamber reverb for the vocal, plus a drum room verb from EastWest’s Quantum Leap Spaces II that was used only on the snare and toms. The guitars fed the Studio 1 Live Room preset in IK’s Sunset Sound Reverb, while the accordion suited a medium hall from iamreverb’s eponymous plug‑in. I also used mono instances of Softube’s Spring Reverb on the DI guitars just to dial in a touch of sustain.
 The iamreverb plug‑in was one of several reverbs used for different sources, in this case the accordion.
Reverb and delay can also be used to provide ‘ear candy’, and there were some good examples in this project. In the first two verses, the sparse arrangement left the exposed snare drum hits begging for a gated reverb‑type effect, and Arturia’s Intensity supplied something just right. I also created a subtle but effective effect at the start of the second verse by duplicating a single snare hit and routing it into a delay with the feedback cranked up, which in turn fed Imdsp’s Superchord resonator plug‑in.
Power Up
Throughout this project, there was a balance to be struck between taming the midrange energy of the raw recordings, and diluting the impact and power that was such a feature of the original mixes. Given the way the album was tracked, you might think that the balance would be the same on all the songs, but it didn’t really work out like that, and even though ‘Ultramarine’ was the last one I mixed, I spent a lot of time on this. In fact, it’s all too easy to become fixated on this sort of ‘problem’, to the point of going too far and creating a cure that’s worse than the disease. Initially, that’s exactly what I did. I was pleased with the clarity and balance of the first mix I sent in, but Dan rightly pointed out that it had the wrong feel: it was tight and snappy rather than expansive and epic.
I was already using more compression than I normally would on the drums, but in my initial mix, I’d had the room mic muted. It was clear that I needed to incorporate some of its brattish midrange energy after all, and since the exciting drum sound on the original mix seemed to involve heavy compression, I experimented with numerous dynamics plug‑ins. It’s surprising how differently they respond when pushed hard on this sort of source. Some unnaturally accentuate the bass drum transient, others distort or become grainy, and yet others just sound flat and uninteresting. My two favourites in this case were both analogue ‘plug‑ins’ running on the McDSP APB platform. Chickenhead was the more thrilling, but in the end I went with the Moo Tube valve‑style limiter, which zapped the transients and brought up the ambience in a more controlled yet still exciting way.
Dan wanted more drive from the electric guitars, so I duplicated the DI part yet again and applied FabFilter’s Saturn 2 to create a thoroughly nasty buzzsaw fuzz tone for the second half of the song. Dan also came up with another interesting perspective on the use of reverb and delay. Several of the songs on the album are meant to evoke the ocean, in an oblique sort of way, and he heard delay‑based effects as being key to this. So I created another special‑effect reverb for the extended drum roll in the song’s central section by feeding the signal first into Arturia’s Spring‑636 and then into IK’s The Farm Stone Room, and used Baby Audio’s Spaced Out to create a trippy vocal delay/reverb combo that could be faded in and out.
One other piece of band feedback necessitated a revision. On most of Ember Rev’s songs, the bass is doing much more than merely supporting the chords, and Dom felt it needed more bite to make the parts clearer. Achieving this without choking up the midrange proved hard; I changed the settings in the Helix plug‑in, but also discovered that reintroducing some of the miked bass cab into the mix helped to bring out the articulation in Dom’s playing.
Mastering
With everyone satisfied — or possibly just too tired to request further changes — it was time to get the album mastered. This presented a unique opportunity as far as Mix Rescue articles go, because mastering engineer (and sometime SOS author) Ian Shepherd had also overseen the original version of From The Country To The City To The Sea. Ian kindly agreed to dig out his notes and offer some thoughts, which you can read in the boxout.
Ian Shepherd: Mastering & Remastering
 Ian Shepherd mastered both editions of From The Country To The City To The Sea, six years apart!Getting revised mixes to master is fairly common, but remastering an entire album from new mixes is much rarer, especially years after the original release! It was an enjoyable challenge, though. Dan is an old friend, and I’ve hugely enjoyed mastering all Ember Rev’s albums, and watching their sound evolve from quirky indie progressive folk‑pop (or something) through to quirky epic progressive synth‑folk‑pop (or something else!).
I decided to start completely fresh with this new version, and didn’t refer back to the original until the new master was approved. I knew that Dan had approached the reworking mainly for musical reasons, but I also knew how much the band’s sound has evolved, and felt it was important to go in and react entirely by instinct, as if it were a brand new album. I also didn’t realise at that stage that Sam had recorded the album originally, which makes the very different final result even more interesting.
The mixes were already in great shape, so I was able to use simple, straightforward moves — subtle EQ tweaks, gentle multiband compression and light limiting — to achieve a satisfying, musical result. I was really pleased with how it turned out and Dan described the final result as “extraordinarily satisfying”, which is the kind of feedback I like to hear! And so the time came to listen back to the original and offer some comments for SOS. The comparison proved to be even more interesting than I’d anticipated.
When I first listened back to the original release, I was surprised by the overall sound, especially in comparison to the band’s more recent albums. I didn’t remember having any particular problems with the original mastering process — although, looking back at emails, I had requested that Simone remove the under‑snare mic, as it added a brittle, harsh quality that prevented me opening out the high frequencies of the overall mixes as much as I wanted to. I’d also queried the generally crunchy, distorted drum sound, but this was something Simone said Dan liked and wanted him to lean into, so I followed their intention in that respect.
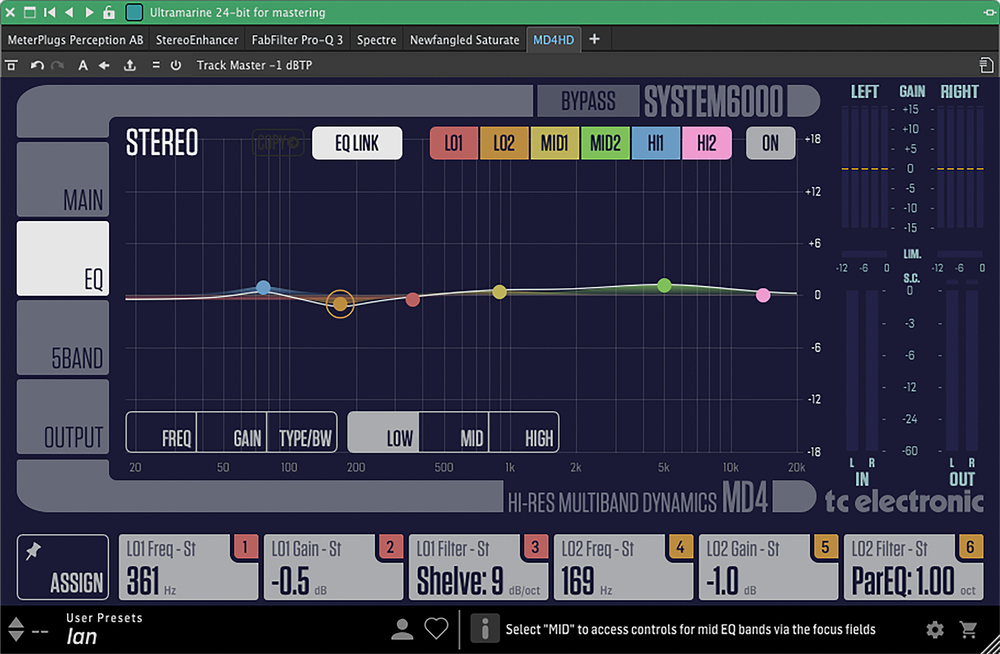
.") Ian Shepherd’s EQ settings for the original mix of ‘Ultramarine’ and the remix (below).
Ian Shepherd’s EQ settings for the original mix of ‘Ultramarine’ and the remix (below).
As Sam has described, the original mixes were very dense in the midrange. My masters worked to enhance the lows and open out the highs, but even so, when I listened anew, I found myself wondering why I hadn’t gone even further in that direction. I decided to open up the original project and take a look. What I found was that, as expected, I’d worked to address the heavy mids in the original masters, generally boosting the highs and lows more, but also shaping the contours of the higher frequencies differently for several songs. I’d also used a three‑band compressor with the crossovers at 160Hz and 3150Hz and each band having the same settings. This helped to smooth out aggressive moments in the midrange, while still allowing the highs and lows to come through better without adding extra density.
But when I tried experimenting with more dramatic moves, I quickly remembered why I hadn’t gone further originally. In a nutshell, the gritty drums and edgier guitars and vocals prevented more dramatic EQ changes — especially since Dan had said he liked them. Sam’s new mixes had much more air and space generally, but also bigger and warmer drum sounds, reflecting the different mixing decisions he describes in the main article. Dan’s original idea had been to present a “band playing together in a room”. The new mixes move away from this and have much more of a traditional studio‑recorded feel, which provides an interesting contrasting perspective on the recordings, and forms a transition to the band’s later sound, to my ears.
I also noticed that Simone’s original mixes were more heavily compressed and full of complex delays and reverbs, which fill up the textures, whereas Sam’s are simpler and have much more space. I mentioned this to Dan recently and he thinks this is also something he encouraged from Simone for the original release, along with the more aggressive sound. This meant that with the new mixes I was generally working to optimise and manage the dynamics — most people know what a fan of balanced dynamics I am, but these benefited from some extra glue and consistency — whereas with the original mixes my process was much more about preserving and in some cases increasing the contrast between sections of songs, sometimes using automation moves before the dynamics processing.
Looking at the bigger picture, overall my new master is about 1dB louder. What’s interesting, though, is how this plays out over the whole album. The integrated loudness of the loudest songs from both were similar, but the loudest short‑term moments within songs were higher in the new version, reflecting the extra variety in long‑term (macro) dynamics of Sam’s new mixes, even though the micro‑dynamics (short‑term transients) were similar. Generally the gaps between songs were shorter on the new master as well. This was partly because many of the original mixes included longer fades of delays and processing texture, partly because Dan has said recently that he typically prefers short gaps, but perhaps also because the extra dynamic variety makes the album overall feel less intense, and needs less ‘space to breathe’ between songs.
Comparing the different mixes and masters in this way gives a really interesting perspective on the limits and remit of mastering, for me. The sound of the original mixes constrained how far I could move the sound of the master, but also raises the question of how much I should have moved them. The original vision was for a dense, band‑in‑a‑room vibe, and that’s what Simone achieved. These new mixes and masters give us a different take on the same recordings, and the new mixes are closer to my own personal taste — but they’d also been approved by Dan, the artist. Knowing he was happy with the original mixes at the time, and even requested the way they sounded to an extent, means it wouldn’t have been right for me to make them sound more like the newer mixes than I did back then, even if that had been possible.
Mastering engineers have great power, which comes with great responsibility! Yet, despite this power, there are plenty of things we can’t control without stems — but at the point where the client agrees this might be necessary, we should really be going back to the mix, in my opinion. Recent stem‑separation technology makes it more tempting than ever for mastering engineers to overstep the bounds of their responsibility, and I really think we should be cautious about this. Partly because it will never sound as good as a mix adjustment, but also because it’s our responsibility to respect the creative wishes of the artist, and have empathy to support and enhance their vision of the way the music should sound. Ian Shepherd
Head to www.productionadvice.co.uk/ember-rev for Ian’s video analysis.
Listen Good
You can hear ‘before and after’ audio examples from this article on this month’s media page at: https://sosm.ag/mix-rescue-0426