Cakewalk's Sonar makes an ideal pre-production tool for creating loops to use in Ableton's Live. We explore some of the possibilities of the partnership.
As you've probably figured out if you've been following Sonar Notes for the past few years, I'm quite a fan of the program. Yet for live performance, Ableton's Live gets the nod. This is because, at least to me, Live is a musical instrument that just happens to come in the form of software, as opposed to being packaged in plastic and metal. It's a great 'what-if' playground for improvising with loops, resampling on the fly, and even adding hard disk tracks.
However, it takes a while to assemble the components that make up a convincing Live act. You need to find loops that work well together, optimise them for the best stretching and timbral qualities, and create 'scenes' that fire particular sets of loops at the same time. Furthermore, it's almost mandatory to program a control surface in order to have instant, hands-on access to important parameters while performing. Just try moving three faders at a time with a mouse and you'll see what I mean!
Although updates to Live over the years have given it more DAW-like capabilities, it's unrealistic to think it's on a par with programs like Sonar, any more than it is to think Sonar is as optimised for live performance as is Live. But as someone who uses both programs, I've found that they complement each other very well. In fact, Sonar makes an excellent 'software development kit' for preparing the elements needed for a Live set — as we'll see.
Auditioning And Selecting
I usually start creating a Live set with a few 'core' loops that got me inspired in the first place, then bring them into Sonar. I'll determine a good tempo for them, then start rummaging through my hard drives and sample CDs for loops that work well with the core loops. During this stage, Sonar is invaluable because its track view makes it easy to load and view a large number of tracks at one time — I'll frequently have 30 visible at once with a standard 1280 x 1024 monitor. Live 's Session view, on the other hand, requires scrolling if you want to see more than about 15 tracks or so. Of course, with Live, you can drag loops over as desired, so you can try out various combinations without having to scroll, but this can lead to organisational problems. With Sonar, the 'one track, one loop' paradigm makes it easier to keep track of which loops are where.
 In Sonar's Loop Explorer window, Ctrl-clicking on multiple Acidised loops lets you hear them play together.
Sonar 's Loop Explorer window is also handy when auditioning Acid ised files, as they will play at the host tempo. However, Live and Sonar 's browsers each have a unique talent I wish the other had. Live 's browser applies stretching to match the host tempo when auditioning any file type, not just Acid ised ones. But Sonar lets you Ctrl-click on multiple loops to hear them play together (as long as they reside in the same directory), which can save time compared to dragging files into tracks, auditioning via solo and/or mute, and only then being able to decide whether they'll work well together or not (see screen, left).
I tend to start off with a large number of loops — I'll drag over anything to Sonar that seems remotely useful — which means that the tracks really start to pile up. At this point, I start using the solo buttons to choose combinations of loops and judge what works well together. You can do something similar with Live by placing loops into scenes and firing them all at once, but again, it's likely you'll need to move clips around or do a fair amount of scrolling during this process.
Another advantage to using Sonar is that the Solo buttons are 'latching' — you can have multiple solo buttons activated at once, whereas with Live, soloing any track 'de-solos' other tracks. The workaround in Live is that you can turn off all the Track Activator (speaker icon) buttons, and listen to various combinations of tracks by turning them back on for the desired tracks. However, Sonar has one more trick up its sleeve: a small Solo indicator toward the lower right part of the screen. Clicking on this turns off all solo buttons to return you to 'square one'. As this might give you a sudden blast of audio, though, remember to stop playback (or turn down the master volume) before turning off all the solos.
Now you can begin the winnowing-down process (see screen, top right) and delete tracks with loops you don't think you'll use. I recommend being merciless and saving only the best loops. As a DJ friend of mine once said, "No matter how bad you are on a given night, good loops are a safety net — they'll let you fall only so far". As you discover combinations of loops that work well together, write down what you find, as you'll want to base Live scenes around these.
Of course, it's rare that I can get by exclusively with existing loops, which means doing a bit of recording. I find Sonar very painless for quick recording and editing, but it's not time to create any extra loops just yet.
Better Looping Through Not Looping
Now that you have your collection of loops together, it's time to finalise the tempo. Live 4 added the ability to associate tempos with scenes, so don't be afraid to throw in a few tempo variations. However, life is certainly easier if you stick to one tempo, for reasons we'll see later. Don't take the process of setting tempo casually; live with the tune for a bit and make sure it's right, because we're going to need to commit the loops to that tempo. Once the tempo is frozen, now's a good time to record any additional loops. Record these at the desired tempo, and trim to the proper length before proceeding.
 About 50 loops had been dragged into Sonar, and they were whittled down to these 27. Some of the loops are being solo'd to see if they'll work well together as a 'scene' in Ableton's Live.
Next, using Sonar 's Loop Construction window, optimise each loop for the best possible fidelity within Sonar. If you've been following Sonar Notes, or have my Sonar Insider book, you already know about the steps needed to optimise Acid ised loops. In a nutshell, the most important factor is to make sure that all the slice points fall exactly on transients. Also, if at all possible, use loops that were recorded at a slower tempo than the project tempo — loops almost always sound better when sped up than slowed down.
If the loop needs to run slower than the native tempo, you may have to insert additional markers to prevent artifacts from occurring with sustained sounds. For example, if a sound sustains for an eighth note, you may need to add another marker a sixteenth into the note.
After optimising the loop's stretching characteristics, what you hear playing back in Sonar is essentially what you'll hear in Live — including any artifacts or glitches (which is why you want these loops to sound as good as possible). Once the loops have been optimised for the chosen tempo, select each one and use the 'Bounce to Clip' edit option. This essentially locks in all the changes you've made, and converts the Acid ised file into a standard WAV file. Any Acid isation markers will be gone, and the loop will be cut for the project tempo.
At this point, to ensure totally seamless looping, you might want to add a very fast fade-in and fade-out (say, 3-4 milliseconds) to guarantee that there aren't any clicks or pops when the loop jumps back to the beginning. I recommend the Fast fade curve for both the loop start and end, although if there is a transient at the loop start you will probably need to use the Slow fade curve instead. To incorporate these changes into the loop destructively, as part of the file, apply 'Bounce to Clip' again.
Note that Live allows you to add a fade on a per-clip basis simply by clicking on the Fade button in the Sample area. However, the duration of the fade is about 10ms, which can definitely affect the initial attack transient of some loops. It's best if you can get away with not using a fade, but if you need one, shorter is better and Sonar lets you adjust fade times for the minimum possible.
Next, create a folder on one of your hard drives and call it something like 'Loops for Live '. Drag each clip into this folder and it will be saved. Once they're in the folder, you'll want to rename them, as Sonar embeds the project name into the file.
The Looping Issue
At this point, you may be wondering why, since Live can loop files, you need to deal with Sonar. Well, Live does do a good job of looping files you bring into the program, but it's a misconception that Live recognises Acid ised files. Basically, Live can load and stretch any WAV or AIFF file, but it ignores any Acid ising markers and tempo information in the file header. Instead, Live uses its own stretching algorithm, which is in some ways superior (for example, the 'elastic audio' and granular stretching options) and in some ways inferior. In particular, in 'beats' mode Live slices audio at fixed intervals, such as eighth or 16th notes.
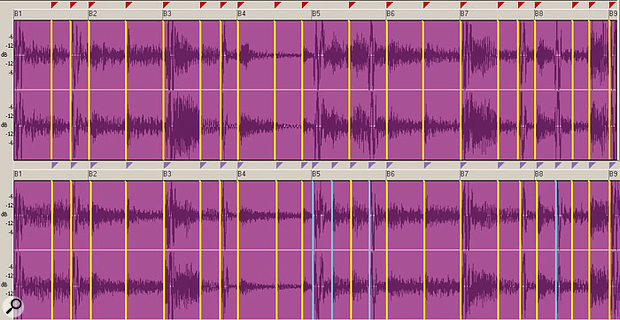
 The top waveform shows Sonar's original 'guesstimate' of where markers should fall in one of the loops. These markers have been highlighted in yellow to make them clearer to see. The optimised waveform on the bottom shows the markers added in beats five and eight (coloured in light blue) that define additional transients; it's important to set markers at all transients for proper stretching.
Most of the time this works fine, particularly with percussive material. But consider a situation where a loop has a 16th-note hi-hat part, then at one point has an open hi-hat that sustains for an eighth note with nothing else happening. If you set the beats division to eighth notes, the 16th-note patterns won't parse correctly. But if you set the beats division to 16th notes, a marker will be inserted in the middle of the sustained open hi-hat. This can produce a slight but audible glitch, whose severity depends on how close the original loop tempo is to the song tempo. And, as with any stretching situation, it's difficult to obtain good fidelity when the source and target tempos are fairly different, especially since you don't have the option to move markers around to customise the stretching for particular loops. As a result, for the best fidelity it's best to have loops that are already cut to the song tempo, as this requires Live to do the smallest amount of work.
Over To Live
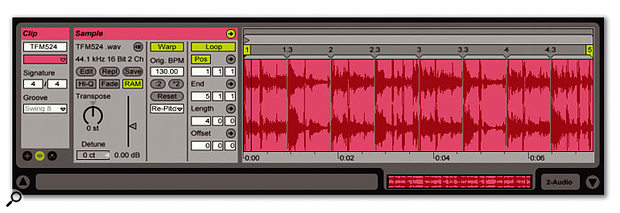
You can now exit Sonar, as it's time to reap the fruits of your labour over in Live. Open Live 's browser, drag the files you prepared in Sonar into Live, and set Live 's tempo to match the tempo at which the loops were created. Live's Sample area for the loop created in Sonar. Note that Fade is turned off because fading was already done in Sonar, RAM is turned on to minimise hard disk access, and Re-pitch is selected as the 'warping' algorithm because it gives the cleanest sound quality for a loop running at its native tempo.
If you're using Live with a laptop that doesn't have a fast hard drive, in the 'Sample' area turn on the RAM button for as many loops as possible. If you try to pull 16 loops or so off a 4500 RPM hard drive, you may end up hearing gapping and stuttering that you mistakenly think relates to latency but actually reveals the inability of the hard disk to access files efficiently.
Next, enable the Loop and Warp buttons and set their characteristics. You'll probably want to start with Warp mode set to Beats. Because the loops are already cut for the proper length at Live 's tempo, you can choose a Beats setting of, for example, one bar, or even jettison the beats option altogether and choose the 'Re-pitch' stretch mode, which merely changes the sample rate and adds no markers at all. Of course, using re-pitch with melodic material will produce a pitch-shift if the original tempo differs from Live 's, but for loops cut to the same tempo there will be no shift at all.
The one exception is if you plan to do any pitch transposition within Live. In that case, the sample is re-pitched and stretched rhythmically, so if there's only a marker every bar the loop tempo will speed up or slow down. If you do need to transpose, experiment with the Beats rhythm for the best audible results (typically, 1/8 or 1/16 will do the job). For legato, arhythmic material, you might be better off with the Tones or Texture warp algorithm anyway.
You should now be ready to get to work creating your Live set. Assign your hardware controller to strategic Live parameters (volume, filter sweeps, and so on) and go for it! I've seen some online debates on the subject of which is better — Sonar or Live — and I feel they're very different programs with very different applications, but they also make a great team. Try the ideas above and find out for yourself.

