 Steinberg's V-Stack is designed not just for use with their System Link, but in stand-alone mode as a way to manage a 'rack' of virtual instruments for live use.
I'm interested in using my VST instruments when performing live. What different ways are there to achieve this? How, in particular, can I change between different instruments during a song, and are there any pitfalls I should be aware of?
Malcolm Carpenter
SOS contributor Craig Anderton replies: There are many options for using VST instruments live, but your primary concern should be to 'bullet-proof' your setup for maximum reliability. If a computer crashes in the studio, you can just reboot and carry on. Playing live does not afford that luxury.
The three main issues that need to be discussed are the computer running your instruments, the software host (if any) under which they will be running, and how to deal with MIDI control, routing, layering, and signal processing. A laptop might seem like the most convenient option for running VST instruments due to the size, weight, built-in screen, and (thanks to its built-in battery) relative immunity from power problems.
However, soft synths can place tremendous demands on your CPU — far more than hard disk recording. There's no fixed equation for how many instruments can run for a given processor speed, but get the fastest CPU you can afford. You will also want lots of RAM if you plan to use samplers that load samples into RAM. If samples can be streamed from hard disk (as is the case with GigaSampler, Halion, and Kontakt), be aware that many notebook hard drives spin at 5400 RPM rather than the desktop's usual, noisier 7200 RPM, making it harder to pull lots of samples off the drive simultaneously. Laptops can be fragile and won't tolerate too much rough and tumble, and the mini-jacks used for audio I/O are a disaster waiting to happen. For audio interfacing, a small USB box with (at least) a stereo out is probably your best bet.
On balance, a small desktop computer might be a better choice than a laptop. While bulky, they're easier to fix on the road, and generally offer better performance for a given price. However, you will be stuck with carting around an external monitor. A 15-inch LCD screen should do the job, and offers the advantage of light weight. Make sure you also get a UPS (uninterruptible power supply). A USB audio interface is again a good option for audio interfacing, although most desktop computers will accept PCI cards, which can offer more extensive I/O.
Another possibility is a dedicated hardware box designed to run plug-ins, such as Plugzilla from Manifold Labs, and the Eko keyboard from Open Labs. Although neither is yet available as of this writing, they are essentially computers optimized for road use, and designed solely to host plug-in instruments and processors. While not cheap, they hold great promise for the performing musician. Meanwhile, there is an alternative hardware host which is available now — Creamware's Noah, reviewed in last month's SOS. However, it runs only Creamware virtual instruments, not VST devices. Still, the packaging is roadworthy, and as anyone who has heard Creamware's Minimax and Six String can attest, their instruments sound great and have virtually no latency.
Speaking of latency, consider how you'll deal with it in a computer-based system. Ideally, you'd want to use the minimum possible latency for the best 'feel' and response when playing live. But the lower the latency, the greater the potential for processor overload, resulting in crackles, pops, and possible malfunctions. Even though many computers can produce latencies in the 1.5-3ms range, I'd recommend setting it for 5-10ms. The feel won't be compromised too much, but your system will be much more solid.
There are two programs designed specifically to host VST instruments: DSound's RT Player Pro (Mac/Windows) and Steinberg's V-Stack (Windows only at the moment). You can download a demo of RT Player Pro, as well as read a review I wrote about it, at www.dsound1.com . Steinberg's web site www.steinberg.net has info on V-Stack, but no demo. Basically, V-Stack is like the VST instrument section of Cubase SX with a mixer, so it's no big mystery. Of course, you can use any VSTi-compatible program to host instruments. And don't forget products like Propellerhead's Reason and Cakewalk's Project 5 (the latter also accepts VSTi devices), as they have their own virtual instruments and might be the only 'rack' you really need. Furthermore, if you plan to run only a few devices, you may not even require a host if the instruments can run in stand-alone mode under ASIO. For example, when Native Instruments' B4 first appeared, quite a few people got a cheap laptop, loaded it up with B4, hooked up a MIDI interface and keyboard, and treated it as an instrument.
The optimum way to select and play instruments varies greatly depending on your needs: how many instruments will you be using, and will you play one instrument at a time, or do you want to layer several? For example, you could set every instrument's MIDI in to Omni, and vary each device's level to change the balance of the instruments when layering, or to turn selected instruments off entirely. However, having all instruments playing notes, even if you have the levels down, is going to have a serious impact on the processor.
Probably the most flexible approach is to use a master keyboard with storable presets that determine splits, layers, MIDI channels, velocity curves, and so on. Then, you can set each instrument to respond to a unique MIDI channel, and call up a keyboard preset to send data to specific instruments. Instruments which are not being played will not generate notes, and therefore should not draw significant CPU power. If your keyboard can't store presets, you can almost always change channel assignments manually, but that may not be satisfactory if you have to do lightning-fast changes in the middle of a song. Also, consider what happens when you load a preset into a virtual instrument. With synths, the process is fairly instantaneous, but if you're loading a 100MB sample into a sampler, it can take quite some time, and slow down your system. Sometimes, you may need to think ahead and load one instrument while playing another.
If you're using a sequencer host like Cubase, Logic, or Sonar (with a VST-DX adaptor) you have the option of using a dedicated hardware controller, like the Kenton units or the Peavey PC1600X. You can program the faders to set levels, and the buttons to mute or solo channels. However, not all programs treat MIDI similarly. Sonar assumes you will always want to record to one MIDI instrument, so you can't layer instruments (Project 5 can, however). With Cubase, you can select multiple tracks and, when record-enabled, they will echo the MIDI data to whatever output(s) you have selected.
One particular pitfall to be aware of is MIDI notes 'sticking'. This can happen if you're playing into one track, then switch the output to a different instrument while your fingers are on the keys. The first instrument won't see any Note Off commands, thus sticking the note(s). A similar problem can happen with pitch bend; if you change tracks while a note is bent, it will remain at that pitch until it receives another new bend message. Make sure you know where to find the 'All Notes Off' command!
For now, I believe your best bet is to use a dedicated piece of software like RT Player Pro or V-Stack, along with a master controller that can store presets. However, keep your eye on the upcoming generation of dedicated hardware hosts, as they are likely to be more road-friendly than personal computers.
I have a couple of MIDI control surfaces with endless knobs, but I'm not sure how to use them. When I've tried using them on some of my software, the software controls just jump between a couple of values, but on others they work fine. Do they use some special kind of MIDI?
SOS Forum Post
 Your hardware and software may not correctly interpret the MIDI output from endless rotary knobs, like those on the Steinberg Houston. SOS contributor Len Sasso replies: Endless rotary encoders (or, in other words, knobs that you can turn all the way around) are designed to solve the problem of the controller and the thing being controlled getting out of sync. That happens in hardware, for example, when you change presets — fixed-position knobs and sliders don't change and therefore no longer reflect the settings they control. That's why most synths have at least one endless rotary encoder (often called a "Data Wheel") used to update settings selected in the synth's LCD. The same problem, of course, arises in software when you use a hardware controller for controls that can also be changed on screen. If you've ever used a hardware fader box for software mixing, you're undoubtedly aware of the problem. In that case, the expensive solution is motorised faders, but endless rotaries can also be used.
Where endless rotaries really come in to their own is for software synthesizer programming. Many soft synths feature a MIDI Learn function that will detect the incoming MIDI message type and automatically assign it to the targeted synth parameter. Some of those — Native Instrument's Reaktor and Ableton's Live are just two examples — will also attempt to deduce whether the incoming MIDI represents an endless rotary control. Endless rotaries use standard MIDI Control Change messages, but they must be interpreted differently at the receiving end. Instead of representing the actual value of the parameter, the MIDI data value represents the direction and speed at which the knob is being turned.
Endless rotaries can be set up in several ways, so it can be tricky to automatically detect what's going on at the receiving end. For example, a common practice is for data values 64 and above to represent clockwise motion whereas values 63 and below represent counterclockwise motion. Higher and lower values represent faster clockwise and counterclockwise motion, respectively. If your software interprets those as fixed values, the targeted on-screen control will jump between values near 64, which is probably what you're experiencing. If your software doesn't accept endless rotaries, there's not much you can do. If it does, then it typically also allows you to manually override its interpretation and select from several alternatives.
Having trawled the net looking for information on a MIDI/SMPTE Controller I have just purchased, I noticed that your May 1987 Issue features a review of the controller is question, a Nomad SMC1.0. Obviously, the magazine is well out of print now, but do you know of any way that I can get a copy of the full review? I have tried eBay for back issues, but to no avail.
Steve Fisher
 Assistant Editor Tom Flint replies: From every print run of SOS we have retained some spare copies of the magazine which have subsequently been made available as back issues for sale to readers. Naturally, some issues have been sold more than others (the December 1995 and January 1996 issues containing the two-part Korg Trinity review spring to mind), so over the course of time these have sold out and are no longer available from us. Otherwise, we have extremely limited stocks of other issues. Early issues from the '80s and early '90s are very rare indeed, so much so that we only retain one complete set of every Sound On Sound here at the office, and that is definitely not for sale!
In 1998 we began making SOS articles available on our web site. Our web designers began working backwards from that date, individually formatting previous features, reviews and articles ready for inclusion on the site. Eventually they reached as far back as 1993 but we decided to draw the line at that point, largely because our archiving format pre-1993 made converting the old articles a slow and expensive process. Therefore, there are only two ways I can immediately think of to get hold of articles preceding that date. The first is to call SOS and ask for a photocopy of a specific article. However, this is a very time-consuming thing for our staff to do and so we have to charge a reasonable amount per copy just to cover our labour costs. We also reserve the right to refuse unreasonably large requests for copying!
The second option — one that we heartily recommend — is to post a wanted advert on the SOS web site (www.soundonsound.com/adverts ). There are many readers out there who still have back issues stored in their gran's loft dating back to the early years, and many of them may be prepared to get out the step ladder and find them for you. Whether they'll be willing to part with them is another matter!

 Think about the order in which you combine reverb and stereo imager plug-ins, like Waves' Trueverb and S1.I was wondering how best to use the combination of the stereo reverb and stereo imager (stereo width control) plug-ins in my sequencer. Should I adjust the stereo width of a track before treating it with reverb or vice versa?
SOS Forum Post
Technical Editor Hugh Robjohns replies: The vast majority of reverb processors (both the hardware and plug-in varieties) generate a very wide stereo soundstage, often from a mono input source. Adjusting the width of the stereo source going into the reverb will therefore not usually affect the width of the reverb signal coming out of it. Instead, adjusting the stereo width of the source effectively controls the size and width of the musicians placed within the artificial room created by the reverb.
On the other hand, if you apply the stereo imager after the reverb, then you will be able to control the overall width of the complete source/reverb mix. Since the reverb tends to fill out the edges of a mix, reducing the stereo width at this point will have a most pronounced effect on the amount of reverb perceived overall and give the effect a much less natural sound. Both arrangements are perfectly viable, though I would go for the former myself.
I recently moved to a new house, where one room was already set up for home recording. The room is square (I know you're already shaking your head!), measuring 3.6 metres on each side. There's only one door and no windows at all. Two or three layers of soundproofing materials have been installed, the walls and ceiling are totally covered with sound-absorbing foam panels, and the floor is carpeted. The only variation is provided by several metre-high wooden panels.
When I initially put my gear inside, the room was almost empty and the sound from my speakers was coming out as if they were underwater! Now that I've put some more furniture and equipment in the room, the overall sound has improved but it still isn't satisfactory. I also need to push my amplifier more than before. Can you tell me what I need to do to improve the sound? I'm still wondering why the room was built this way, and by a professional company too!
Amir Zuccala
Technical Editor Hugh Robjohns replies: I can see why you are concerned; foam panels like the ones you describe do very little to provide sound isolation as such. What they actually do is provide some absorbtion and therefore help to control unwanted reflections within a room. The thicker and more dense the foam, the lower the frequencies affected, but in general most panels of this type only have an appreciable effect down to the midrange at best, and the upper midrange, more usually.
So, by lining a room completely with foam panels like this all the high- and mid-frequency reflections are absorbed, leaving only the lower-mid and bass frequencies to rattle around, usually resulting in a very dead but boxy-sounding room — and if this is taken to the extreme, then you can experience the kind of underwater effect you describe.
Wooden wall panels will certainly bring back some mid- and high-frequency reflections, as will all the furniture and equipment that you have installed in the room, which is why the sound now seems better than previously.
The aim is really to create a good balance between LF, MF and HF reverberation times — not to remove reflections altogether. It's usually a good idea to curb any reflections from the side walls and ceiling between monitors and your listening position, so I'd leave the foam panels in those areas alone. Likewise, leave the panels behind the monitors themselves. Elsewhere, you could try temporarily covering some of the panels randomly with sheets of plywood about one metre square to reintroduce some reflections and diffusion back into the room. Or you could experiment moving your bookcases around to achieve the desired effect. It will be a process of trial and error I'm afraid, but you should be able to achieve a good sound without too much effort.
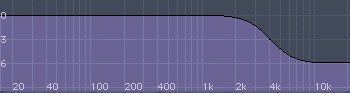


: a high shelf cut at 4kHz; a high shelf boost at 4kHz; a low-pass filter set to 4kHz, with resonance; and a low-pass filter set to 4kHz, without resonance.") These diagrams show (from top to bottom): a high shelf cut at 4kHz; a high shelf boost at 4kHz; a low-pass filter set to 4kHz, with resonance; and a low-pass filter set to 4kHz, without resonance.What is the difference between low-pass and low shelf, or high-pass and high shelf filters?
These diagrams show (from top to bottom): a high shelf cut at 4kHz; a high shelf boost at 4kHz; a low-pass filter set to 4kHz, with resonance; and a low-pass filter set to 4kHz, without resonance.What is the difference between low-pass and low shelf, or high-pass and high shelf filters?
Philip Vernon
SOS contributor Len Sasso replies: Firstly, it's important to note that the more apt comparison is between low-pass and high shelf or high-pass and low shelf filtering. Shelving filters apply a fixed amount of cut or boost with a gradual slope (often adjustable) to the required level. The shelf frequency is taken as the frequency at which the cut or boost reaches 3dB. Low- and high-pass filters apply an increasing high- or low-frequency attenuation respectively. Their cutoff frequency is also defined as the frequency at which the signal is reduced by 3dB, but the drop-off continues rather than levelling off. Historically, high shelf filters were more commonly used in equalization contexts, whereas low-pass filters were used in synthesis, but now both filter types are common in both applications.
The accompanying illustrations of two high shelf and two low-pass filter curves should make the difference clear. One thing to notice is that the high shelf filter can be configured to either boost or cut the signal, whereas low-pass filters always cut. In the illustration, the low-pass cutoff and high shelf shelving frequencies are all set to 4kHz, and that is the point at which the 3dB line crosses the curve.
Another difference between high shelf and low-pass filters is that low-pass filters often offer resonance, which produces a boost just before the cutoff frequency. A further difference is that low-pass filters generally have a fixed slope, whereas the slope is usually variable for high shelf filters.
I want to record a CD of tuba pieces with piano accompaniment. In terms of microphones, I'll be using matched pairs of Groove Tubes GT33s and GT57s and a couple of Rode NT1s. How should I set them up? I was thinking of putting one pair of mics on the piano and and another pair on the tuba. I'd be greatful for any assistance!
SOS Forum Post
Technical Editor Hugh Robjohns replies: I would start off by questioning the assumption that you need to separate the instruments. Presumably you are planning to record a single performance — you won't be overdubbing more tuba parts or replacing sections of the piano backing later on. If this is indeed the case, all you really need to do is arrive at a mic technique that delivers the sound you want — a nicely focused tuba, probably in the centre of your stereo image, with the piano behind, and some room ambience, possibly enhanced with some digital reverb.
You have two choices. If you're recording in a room with a nice sound, I would stand the tuba player in front of the piano and put up a stereo pair of mics about three metres in the air and the same distance in front of the performers, so that you can capture everything in one go, with natural perspectives and ambience. Alternatively, you could place the tuba further away from the piano and facing it, and then rig a figure-of-eight crossed pair between them, with one side facing the piano and the other looking at the tuba. This arrangement allows the musicians to see each other better, and you can still control balance and perspective by moving the tuba player closer to or further from the mics.
These two methods will both capture a lot of room sound, which is great if the room is a good one, but a pain if it isn't. So, you may want to consider close-miking each instrument instead ('close' being a relative term here). I would try miking the grand piano with a spaced pair about two metres away and high enough so that they are more or less looking down the edge of the lid, one looking more towards the high strings and the other towards the lower strings. The tuba can be miked from above at a distance of about one and a half metres, and the more on-axis the mic is, the more upper harmonics you will pick up. I would not recommend your idea of two mics for the tuba — it's asking for trouble! Use one mic and move it around until you find the best balance of upper harmonics and body. By using a spaced pair on the piano you will tend to end up with a bit of a hole in the middle of the stereo image into which the tuba will fit nicely. Don't pan the piano too wide, and add digital reverb to taste. You'll also need to be careful to ensure that the sound of the tuba doesn't get into the piano mics, and vice versa, to prevent phasing problems or colouration. You might want to put the tuba behind the piano, so that the open piano lid provides a degree of isolation and helps to minimise the direct spill from the tuba to the piano mics. There will still be good sight lines between pianist and tuba player, and a cardioid mic on the tuba will reject most of the direct piano sound, maintaining good separation between the two instruments.
If you want to use a spaced pair placed further out to capture room ambience, make sure that it's sufficiently far away so that the sound it captures will be diffuse and incoherent enough to avoid phasing problems.
Although I have a General MIDI synth and use it all the time, I'm somewhat confused about the full meaning of GM. It seems to mean one thing for synthesizer sounds, another for drum sounds and yet another for MIDI files. What's the scoop?
Trevor Gardner
SOS contributor Len Sasso replies: General MIDI (GM) is an extension of the original MIDI specification for communication between electronic musical instruments (and now including computers and many types of other electronic devices). At the outset, the primary purpose of GM was to establish compatibility between the programs, or presets, of different instruments, so that, for example, when you call up program one you always get a piano sound (though of course pianos on different instruments might sound completely different). With reference to drums, GM is intended to insure that the map connecting note numbers (pitches) to drum sounds is consistent, so that, for example, MIDI note number 36 always plays a kick drum sound. It also specifies that MIDI channel 10 will always be used for drums—consequently the standard MIDI program numbers don't apply to channel 10. GM does not specify a program numbering for drum kits, because when it was devised it was unusual for a synth to have more than one drum kit.
The GM specification only covers one bank containing 128 programs. Many synths have a GM bank along with other banks of programs not fitting into the GM classification. As multiple banks of programs became common, two leading manufacturers, Yamaha and Roland, developed extensions to the GM program set called GS and XG, respectively. Those include both more banks, standardised drum kit numbers, and effects program numbering. The general strategy is to follow the GM program numbering and place additional sounds of a similar type on other banks at the same program location. For example, program one on all banks would be some form of piano sound. GS and XG are different specifications, but XG, coming later, implements most of the GS protocol.
MIDI files are another topic entirely and are not related to the GM protocol, but commercially available MIDI files typically follow the GM protocol as far as program numbers and drum maps are concerned. The Standard MIDI File (SMF), of which there are three types, sets a standard for transferring MIDI sequences between different sequencing applications. In the process, much of the application-specific information is lost — things like graphic layout, scoring information, and so on — but the MIDI data along with its timing and channel are, at least, preserved. Tempo and time signature data is also retained. Type 0 SMFs are the simplest — everything is packed into a single track. Type 1 allows for separate tracks as well as for track names. Type 2 (almost never used) attempts to also preserve regions within tracks, for example, to correspond to loops from a pattern sequencer. Most software sequencers will both load and save SMFs in Type 0 and Type 1 formats.
I record using a computer system with an RME Multiface soundcard. I'm thinking of buying an eight-channel mic preamp, like the Focusrite Octopre or the Presonus Digimax, to use for recording drums. I have done some drum recordings before with a Behringer MX8000 and the usual mics for drums (AKG D112, Shure SM57, AKG 414 for overheads, and so on). I feel I do not really use the full gain available and leave a lot of headroom because I'm afraid of causing digital distortion and clipping. Does it make sense to use a limiter as a kind of safety net when I record drums straight into Cubase via the Multiface ADAT extension?
SOS Forum Post
 When recording drums, applying limiting as you record can destroy valuable transients. Technical Editor Hugh Robjohns replies: I would advise against using any form of dynamic control when recording your drums into any digital system — or, indeed, using any other kind of signal processing — unless absolutely essential. In my experience there is simply no need, and any processing done before recording only serves to reduce options when it comes to mixing. Whereas a certain amount of pre-conditioning was necessary in the days of analogue recorders (in order to optimise the characteristics of the tape medium) this is no longer the case with digital systems, especially if you're using decent 24-bit converters.
A lot of people are still hung up on the idea that unless the signal is almost hitting the 0dBFS meter point in a digital system 'signal quality' is being lost in some way. This is simply not the case with modern digital audio systems. In fact, it is far more likely that quality is being lost if the meters get anywhere near 0dBFS!
Of course, it is true that the lower the average recording level the less the effective system signal-to-noise ratio will be — just as is the case with analogue systems. However, even a 16-bit digital system has such a huge dynamic range in the first place that leaving a few dB's as a headroom allowance makes little practical difference to the noise floor, yet it makes the task of recording a whole lot easier, and the results a whole lot better.
For example, a reasonable amount of headroom to allocate would be around 12dB above the average level. In a 16-bit system we would then be left with a noise floor about 84dB below the average signal level — far better than virtually any analogue tape recorder, even with a decent noise reduction system — and in a 24-bit system the floor theoretically would be about 130dB down. In either case this system noise floor will be completely swamped by the acoustic noise floor of a typical home recording environment, and is therefore not a critical factor at all. The advantage of leaving this sort of headroom allowance, though, is that the system can accommodate 12dB of transient peaks without your having to worry about the possibility of overloads, and without damaging the transient attacks which are so critical to drum sounds. So you can concentrate on the performance, rather than the technology, and the recorded results will be a faithful recreation of the original, rather than a 'bent' version which can't be 'un-bent'.
Once the recording is preserved within the digital domain, then you can start processing as you feel necessary to control the dynamics using compressors, limiters, equalisation, editing or whatever is necessary to achieve the results you are looking for. And should you change your mind about what kind of processing to apply during the mix, you can without restriction, because the original sound will have been recorded in all its transient-rich glory!
I'd like to try doing some stereo recording using the M&S technique, where (as I understand it) the signal from a cardioid or hypercardioid mic pointing towards the sound source is combined with the signal from a figure-of-eight mic at 90 degrees to the cardioid/hypercardioid to create a stereo image. However, I don't currently own either a figure-of-eight mic or an M&S decoder. Do I need to buy either or both, or can I set up an M&S configuration without them? Also, is it essential that the two mics sound the same, in the way that you'd use a matched pair of mics for recording with a spaced pair or X-Y crossed pair?
SOS Forum Post
Technical Editor Hugh Robjohns replies: To answer your last question first, ideally the microphones used should have similar tonal characteristics because the stereo image is created by the arithmetic sum of the two (more on this shortly). If their characteristics differ wildly, then the tonal quality of the image will vary noticeably as the sound source tracks across in front of the mics. If recording a static musical group you may not notice any difference in the quality of the sound across the stereo image, but if a source moves, as it would in a radio or TV drama, for example, then you would hear it very clearly.
 in red and the figure-of-eight (S) in blue. Above right: three cardioids, shown in red (M), blue and green(S), are used to create an M&S pickup pattern.") Above left: the polar response pattern of the conventional M&S microphone arrangement, with the cardioid (M) in red and the figure-of-eight (S) in blue. Above right: three cardioids, shown in red (M), blue and green(S), are used to create an M&S pickup pattern. Converting the M&S signal to conventional stereo involves what's called a sum-and-difference decoder matrix. The Middle signal plus the Sides signal produces the left side and the Middle minus the Sides produces the right side of the resulting stereo signal. M&S decoders are availble in hardware and software forms, and are built into some mic preamps and mixers. However, you can achieve the same result quite easily with a conventional mixer. The nicest way to do this is to route the Middle mic to, say, channel 1 and pan it to the centre. Route the Sides mic to channel 2 and pan it fully left. Next, turn up a post-fade aux send on channel 2, then take the output from that aux send and route it to a spare channel or return somewhere out of the way — let's say channel 24. Push the fader of this channel right to the top and tape it down so that it can't be moved accidentally. Then pan this channel fully right and switch in the phase reverse (if the mixer has inverted aux outputs, and some do, you won't need to switch in the channel's phase reverse).
Above left: the polar response pattern of the conventional M&S microphone arrangement, with the cardioid (M) in red and the figure-of-eight (S) in blue. Above right: three cardioids, shown in red (M), blue and green(S), are used to create an M&S pickup pattern. Converting the M&S signal to conventional stereo involves what's called a sum-and-difference decoder matrix. The Middle signal plus the Sides signal produces the left side and the Middle minus the Sides produces the right side of the resulting stereo signal. M&S decoders are availble in hardware and software forms, and are built into some mic preamps and mixers. However, you can achieve the same result quite easily with a conventional mixer. The nicest way to do this is to route the Middle mic to, say, channel 1 and pan it to the centre. Route the Sides mic to channel 2 and pan it fully left. Next, turn up a post-fade aux send on channel 2, then take the output from that aux send and route it to a spare channel or return somewhere out of the way — let's say channel 24. Push the fader of this channel right to the top and tape it down so that it can't be moved accidentally. Then pan this channel fully right and switch in the phase reverse (if the mixer has inverted aux outputs, and some do, you won't need to switch in the channel's phase reverse).
Basically, what we now have is the Middle mic going to both left and right outputs (channel 1), and the Sides mic going in-phase to the left output (channel 2) and going out-of-phase to the right output (channel 24). So on the left output we have M + S, giving stereo left, and on the right output we have M - S, giving stereo right. You now have to set up the aux send levels to ensure that the +S and -S components are equal and opposite, or, equal in amplitude as well as opposite in polarity, so that they cancel in mono. With someone talking on-axis to the Sides mic, set a nominal gain to get plenty of signal in the left channel (channel 2). As you increase the post-fade aux send you should get the signal coming out of the right hand channel (channel 24). Switch the monitoring to mono and find the point where the signal reaches a silent null. This is where +S and -S are equal and opposite. Fix the fader at this position, then switch the monitoring back to stereo.
You may have to juggle the channel aux send, the aux master, and the -S return channel gains to optimise the gain structure, but there's no rocket science in that. All you have to do now is set the appropriate gains in the Middle and Sides mic inputs (channels 1 and 2), then adjusting the Sides mic's fader will adjust the amount of stereo width. If you are using a cardioid Middle mic, the Sides channel's gain should be about 8dB lower than the Middle channel to equate to the same acceptance angle as a pair of 90-degree crossed cardioids.
Although this may sound like a complex way to do the decode, it only takes a few minutes to set up, and offers several practical advantages over the 'idiots way' of using two adjacent Sides channels and a splitter lead to split the signal from the figure-of-eight mic. For a start, each mic is handled by only one mic preamp. This means less noise, no phantom power issues, and only one gain control for each mic. Secondly, it's easier to adjust width using a single Sides fader, rather than a pair of linked faders — and if the gain matching between Sides channels drifts, as it can easily do with linked faders, your mono compatibility goes out of the window. Finally, if you wanted to work with more than one M&S pair (and you often do, just as you might use more than one conventional stereo pair), you only need to tie up two more channels, not three. The -S element of the second M&S pair can be sent to the same post-fade aux output bus, and collected by our -S channel (channel 24 in the plan above). This is the technique routinely used by dubbing and televsion sound mixers. It works extremely well, and is very fast to set up once you are familiar with it.
You don't necessarily need a figure-of-eight mic to record using the M&S technique either — it's equally possible to use three mics instead. In fact, a lot of the single-bodied M&S stereo mics do exactly that, mainly to ensure that the mics all have identical characteristics. They typically use three cardioid capsules, one facing front, and two facing sideways, back to back. If you combine the two sideways cardioids in opposite polarities, you're left with a figure-of-eight response. This can then be combined with the Middle signal for decoding.