Make sure your edits go unnoticed with Reaper's audio editing features.
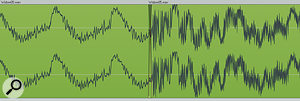
 Here you can see an example of momentary mid‑phrase silence in a vocal part: in this case, between the two words of the lyric 'your queen'.
I spend a great deal of time doing audio edits in Reaper, whether it's for creative purposes, such as comping various takes together, or corrective purposes, like fixing dodgy performance timing. If you're comparatively new to audio editing, it can seem like quite a challenge to achieve the edits you need while also keeping them inaudible to the uninformed listener, and nowhere more so than with lead vocals, where heavy editing is often the key to a chart‑friendly production sound. In this month's column, I'd like to talk about a variety of ways to hide your edits.
Essential Tools
The basic activities of audio editing are chopping up Items into smaller pieces, shifting them about relative to each other, and then smoothing over any points where they meet, using a 'crossfade'. The reason for the crossfade is that any abrupt waveform discontinuity across the edit point will otherwise generate an unwanted audible click. The art of editing is in choosing exactly the right points for your edits and then selecting an appropriate length and type of crossfade.
Before I get into the mechanics of that, though, let me briefly suggest a few preparatory steps to speed up the editing process. First you need to make sure you can navigate around the project quickly, and I recommend using your scroll wheel for this. By default, it zooms horizontally, and you can switch to vertical zoom by holding down the Ctrl key. You can also scroll horizontally/vertically by holding Alt, although it makes sense to tick the 'Prevent ALT Key From Focusing Main Menu' option in Reaper's preferences first: hit Ctrl‑P to open the Preferences and look for the tick box in the Keyboard section.
The other Actions I like to have under my fingertips are Toggle Snapping (Alt‑S), which lets you decide whether your edit points will snap to your bars/beats grid; Toggle Auto‑crossfade (Alt‑X), which determines whether Items will automatically crossfade when overlapped; and Split Item Under Mouse Cursor. The last of these doesn't have a default key assignment, but it's so useful you should pop it onto your keyboard without delay.
Basic Edit Points
 If you're going to use the Alt key in conjunction with the mouse scroll wheel for screen‑zooming purposes, it's best to tick the 'Prevent ALT Key From Focusing Main Menu' box in the Keyboard page of the software's Preferences.
It might seem to be a statement of the blindingly obvious, but one of the best places to put an edit is during a silent section of the recording. What is slightly less obvious, though, is that such silences don't just occur between phrases, but are also frequently to be found tucked into the phrase itself. It's not uncommon to damp the strings of a plucked instrument occasionally while playing, for instance, leaving a little gap in the waveform for an edit to inhabit. Also, when players of wind instruments 'tongue' notes for better articulation, this effectively causes a brief interruption in the airflow, which can open up another little editing cranny. Vocals are usually full of little holes too, for a similar reason: many consonant sounds (most commonly 'b', 'd', 'g', 'k', 'p' and 't') involve briefly stopping the breath. Such edits can usually survive without any crossfade at all, but I do usually put a tiny 1-5ms crossfade in there, just for safety's sake.
 One of the best editing Actions in Reaper (Split Item Under Mouse Cursor) has no default keyboard shortcut, so be sure to set one up for yourself at the earliest opportunity.Another preferred editing spot is during a noisy section of the recorded signal. Noisy waveforms are inherently unpredictable, which means that any waveform irregularity introduced at the edit point will normally pass by unnoticed, even if you don't crossfade at all. Again, though, I usually put in at least a 2ms crossfade by reflex, to avoid the danger of any really obvious click poking out of the noise. Some instruments, by their very nature, feature many noisy elements and, therefore, provide a lot of editing leeway: vocals have breaths and noisy consonant sounds (things like 'ch', 'f', 's' and 'sh'), for instance, while fuzzy electric guitars can often be edited almost anywhere, in practice, without anyone smelling a rat. With vocals, though, be aware that some consonants (the so‑called 'voiced' consonants, such as 'j', 'v' and 'z') include a pitched element alongside their noise components, so rarely afford such rich concealment opportunities.
A final no‑brainer editing point is just before a prominent recorded transient — for example, the attack of a drum hit or loud piano note. By virtue of a slightly freaky psychological effect called 'pre‑masking', any sound that immediately precedes such a transient will be perceptually hidden to some extent. Although the pre‑masked time region is only very short, it's more than enough to slip in a little 2ms‑crossfade edit, so pre‑masking opens up a huge number of potential editing options for percussive parts in particular.
Advanced Edits
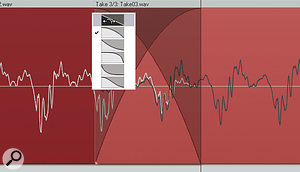
 In this screen, the boundaries of the two Items have been dragged to overlap, and the contents of the later Item slid over the earlier one to achieve the best match of the two waveforms. The crossfade type I'm going to choose is a straight, equal-gain one, to replace the one that's been inserted by Reaper as a default.
These three basic edit locations already give you a lot of flexibility with many parts, but none of them really help when you find yourself wanting to edit during sustained pitched notes. There are two main methods of dealing with this. The first works well for monophonic lines and takes advantage of the pitched note's internal waveform repetitions. If you carefully align the Item waveforms either side of the edit point, it will minimise any waveform mismatch across the boundary. Here's a good way to do this: The edit in this screenshot is deliberately placed right before a powerful drum transient, in order to take advantage of the psychological phenomenon of pre‑masking.
You should only need to crossfade over a waveform cycle or two to get a smooth result. If it still sounds iffy, try putting the edit slightly earlier or later in time to see if you can find a closer waveform match. For a visual walkthrough of this technique, go to /sos/jan11/articles/reaperwalkthrough.htm.
It frequently amazes me how inaudible a good matched‑waveform edit can be, but there are some occasions where you simply can't avoid a little audible hiccup at the edit point, no matter how you tweak the waveforms and crossfades. A good example is where polyphonic pitched instruments are concerned, because their waveforms don't have such clear repetitions as monophonic sounds.
It's here that a final option really comes into its own: the masked edit. For example, if you have a strong snare‑drum backbeat in your mix, its transient momentarily masks the rest of your arrangement to some extent, often enough to hide even quite awkward editing lumps and bumps on other parts. This is a type of edit most people completely ignore, but it expands the scope for fine edits enormously, even on ostensibly exposed parts such as lead vocals.
Where a transient is doing the masking, very short crossfades make sense, to keep any editing irregularities from trespassing outside the masked time‑region. However, because many background parts in an arrangement are often heavily masked most of the time, you'll find that you can usually put a 50ms crossfaded edit in the middle of almost any note without anyone raising an eyebrow, because any chorus‑like side‑effects during the crossfade region simply won't be audible. Such crossfades will usually be undetectable within double‑tracked parts as well, because of the inherently chorus‑like composite sound.
With unmatched‑waveform edits like these, though, I'd recommend using an 'equal‑power' crossfade (using the first of Reaper's curved crossfade types for both fade‑in and fade‑out), because this will typically maintain the perceived volume of the sound through the fade. By contrast, an equal‑gain crossfade will usually give rise to a momentary level dip during the edit, which is seldom appropriate.
Editor's Choice
Although the audio editing tools I've described are very simple, they are capable of dealing with all but the most extreme comping and correction tasks. Indeed, almost all the in‑depth comping and timing correction work I do for my Mix Rescue remixes is achieved entirely by these means. With practice, you'll find you can slide in a sneaky little edit almost anywhere!
Editing In Action
If you're interested in hearing these techniques in action, go to /sos/jan11/articles/reaperaudio.htm, where you'll find some of Mike's own examples.
