
You can mike up a string section in many different ways, but which one sounds best? We explain the theory behind the most popular mic techniques and then record several of them on a real string session so that you can let your ears decide.
The quality and realism of both synthesized and sampled strings available today is undoubtedly impressive — especially to someone like me who once owned a Solina string machine! However, real strings still bring something to a recording that defies even the best artificial sources, and it is often surprising just how much of an improvement to the feel and realism of a track can be made by adding a small string section over a pad of 'fake' strings. To many reading this, the idea of recording a live string section may seem a little daunting. However, it really isn't that hard to achieve superb results, it doesn't need exotic equipment, and it needn't cost much to do.
I was recently asked by Sound On Sound reader Ryan Teague for advice on how to record a string orchestra performing various material he had written. The project involved a couple of stand-alone pieces plus some backing tracks for more elaborate electroacoustic material already recorded and which would have to be performed to a click track. Ryan had an amateur orchestra already lined up, and had identified a suitable venue. At the point he contacted SOS he was planning to hire suitable microphones, stands, mixer, and other appropriate equipment to provide a feed to his Apple Logic system.
As we discussed the various options and techniques, it became apparent that this would be a good opportunity to tackle a real-world string recording as the basis for a Sound On Sound article, so I offered to help Ryan out with my equipment, and engaged SOS Reviews Editor Mike Senior to help out. Little did I know at the time that it would involve a 5:30am start on a cold, dark, damp Sunday morning in January, and a drive across the country in thick fog!
Planning The Session
The 22-piece string orchestra Ryan had hired comprised three basses, four cellos, four violas, six second violins, and seven first violins. All players were talented amateurs, although the leader and conductor were both professionals, and were therefore familiar with the demands of recording. The material to be recorded involved two solo works, one of nearly nine minutes and the other lasting about six minutes. The longer one was reminiscent of Vaughan Williams, while the shorter had a hint of Górecki about it. The five other pieces were between 90 seconds and four minutes long, and all had to be performed to click track. Two of the pieces involved just violins and violas, and one just the first and second violins — clearly, it made sense to reorganise the seating layout to record these pieces.
The room Ryan had located was the main hall of a school, tucked away at the end of a quiet cul-de-sac on the outskirts of Cambridge. It was an entirely wooden building with a parquet floor and a high vaulted ceiling, with a convenient room across a corridor which would serve well as a control room. The reverb time in the hall was quite short, but it had a pleasant character that would make it quite an easy room for the musicians to perform in, and we could easily add a more expansive artificial reverb afterwards to suit. The only slightly negative aspect of the venue was that it appeared to be on the flight path into a small airfield, which lead to several re-takes because of aircraft noises.
Ryan expected and required only a stereo mix to feed his Logic system, but for flexibility we decided to record the individual mic outputs separately as well. The necessary click track was generated from Ryan's system for the pieces that required it, and we had to feed that through to the conductor, of course. The schedule called for the orchestra to be in place by 10.30am and recording by 11.30am, with a wrap at about 5pm, so it made sense to have the control room and mic cabling installed and running before 10.00am, hence the early start — I live over two hours away from Cambridge! However, with Mike's help we had everything up and running very quickly.
Ryan Teague: Coins & Crosses
The  string session featured in this article was carried out as part of the recording of Ryan Teague's latest project, Coins And Crosses, due to be released through Type Records in September. Ryan's sound fuses elements of electronic and acoustic music, exploring the relationship between more traditional instrumentation and modern synthesis techniques. You can hear excerpts from his previous record, the Six Preludes EP, on the label's web site.
Setting Up A Control-Room Area
The first thing to do was plan where the orchestra would sit, and after listening to the way sound reflected around the room and discussing options with the conductor we decided to place the players across the short axis of the room, slightly biased towards one end rather than exactly in the middle.
The control room was long and thin, but surprisingly dead sounding, and it afforded plenty of space for my recording equipment, as well as for Ryan's Mac system. As always, I started by checking the mains power sockets I planned to use to ensure they were safe, and then arranged some tables to support the equipment. With simple classical work, where there is no requirement to adjust the balance during each recording, I prefer to place the mixer to the side, where it is less distracting. I find this allows me to concentrate more fully on the balance.
To provide the maximum flexibility of outputs, I decided to use my Yamaha DM1000 mixing console, but with outboard preamps connected digitally. The preamp rack contained a four-channel GML 8400 linked to the A-D card in a Focusrite ISA428, providing eight mic channels in total. The digital resolution was set to 24-bit, 96kHz, with the ISA428 acting as clock master. The eight mic channels were routed as pre-EQ, pre-fade direct outs to an eight-channel Genex 8500 hard disk recorder, and mixed as necessary to provide a stereo analogue feed out to Ryan's audio interface.
Monitoring was provided directly from the Yamaha console via a pair of PMC DB1s (powered by Flying Mole DAD100 amps), which I selected mainly on the basis of their being very small and light — space was limited in my car for all the equipment! The diddy PMCs are actually very good, but absolute monitoring quality wasn't essential, since I was recording each mic output separately anyway and therefore mixing wasn't that critical. The requirement was to place the mics appropriately, and the little PMCs were absolutely fine for that. I also used a DK Audio MSD600M++ meter to keep a check on the mix levels, stereo image width, and spectral balance.
Ryan provided a stereo output from his machine for the backing and click tracks, which I routed through the console to feed an aux output to the studio. I also rigged a mic in the control room for talkback and routed this through the desk to the same aux send. Normally, I would have used my dedicated monitoring controller, which also provides talkback, cue, and red-light switching, but space limitations in the car persuaded me to make do with just the talkback facilities in the DM1000. For convenience, I programmed the console's user-definable buttons to provide an instant mono check facility for the monitoring — the function is a little buried in a menu otherwise.
Since I wasn't able to check out the venue before the recording session, I wasn't quite sure of the distance between the hall and the control room, so I took a 50m 16-way multicore cable which proved more than long enough! Eight channels were used for the mics, and a ninth for the aux return to the studio — this was fed into the analogue input of a Roland M1000 digital line mixer in the studio, which I used to provide a headphone amplifier for the click tracks and also to provide a convenient local level control for a talkback speaker.
Choosing Mics For Strings
It is  are therefore often a very suitable choice. If you're using directional capacitor mics, then small-diaphragm models such as the Microtech Gefell M300s (below) are advisable because of their good off-axis frequency response.") Mics with a smooth, resonance-free high-end response are good for the upper strings, and ribbon mics such as the AEA R84 (above) are therefore often a very suitable choice. If you're using directional capacitor mics, then small-diaphragm models such as the Microtech Gefell M300s (below) are advisable because of their good off-axis frequency response.usually
Mics with a smooth, resonance-free high-end response are good for the upper strings, and ribbon mics such as the AEA R84 (above) are therefore often a very suitable choice. If you're using directional capacitor mics, then small-diaphragm models such as the Microtech Gefell M300s (below) are advisable because of their good off-axis frequency response.usually  best to record strings in a relatively large environment, ideally with lots of reflective wooden surfaces. A string orchestra needs space for the sound to integrate and become coherent, which is why relatively distant miking is the most common approach for a balanced sound. Distant-miking techniques require either sensitive microphones or very quiet mic preamps. The former suggests high-output capacitor mics, but ribbon mics can also be used to good effect if very quiet preamps are available. Both capacitor mics and ribbons have a suitably wide frequency range and the fast transient response necessary to capture the very complex sound of an orchestra.
However, it is important to avoid capacitor mics with obvious presence peaks, as these will tend to produce an unpleasantly hard sound, particularly on violins. For that reason, the very smooth and resonance-free top end of a ribbon mic works very well on strings — ribbon mics are making something of a comeback at the moment, with models available in various price ranges.
Another attribute of capacitor mics to take care with is the off-axis response. The room ambience will mostly arrive at the microphones off axis, and can easily become quite coloured if the mic's polar response varies dramatically at different frequencies. Large-diaphragm cardioid mics are particularly prone to this problem, which is why many engineers prefer to use omnidirectional or small-diaphragm mics for orchestral work.
Positioning The Mics In Practice
Mike and I rigged three basic stereo arrays, starting with a coincident M&S pair comprising small-diaphragm Sennheiser MKH40 cardioid and MKH30 figure-of-eight mics in a Rycote cradle. The DM1000 has facilities built in to decode M&S pairs as part of the stereo channel-linking function, and I prefer the flexibility and centre-stage quality that the M&S arrangement gives over a more standard coincident approach. The second pair was an ORTF pair using Microtech Gefell M930 large-diaphragm cardioids, and the third pair consisted of spaced Sennheiser MKH20 omnidirectional mics on dedicated shockmounts. Heavy-duty K&M tripod stands were used throughout. The last two channels were used by a pair of Neumann TLM103 large-diaphragm cardioids intended to serve as spot mics in case the sound required them.
The M&S and ORTF pairs were mounted on separate stands with boom arms, and were positioned above and behind the conductor's position. The omnis were rigged on separate stands and positioned left and right of the centre, roughly half way between the centre and back rows of the orchestra. I initially placed one spot mic in front of the basses, while the other was reserved for a violin soloist.
Once the orchestra were in place and warming up I was able to assess the mic arrays and fine-tune the position of each. After talking with Ryan about what he needed, I figured we were really looking for a fairly crisp clean sound with lots of definition. I also decided to aim towards a slightly bright overall character, as I felt this would work best to help the strings sit in with his backing tracks. I also wanted a relatively dry sound to afford the flexibility of adding a more suitable reverb later, so that meant choosing relatively close mic positions (in the general scheme of orchestral miking) to minimise the room acoustic and provide a more detailed sound.
 Here you can see the three main stereo pairs which were compared while recording the string session. In the middle are the coincident M&S pair, comprising Sennheiser MKH40 cardioid and MKH30 figure-of-eight mics, and a pair of Microtech Gefell M930s set up on a mounting bar in the ORTF configuration. The stands at the edges of the picture hold a spaced pair of Sennheiser MKH20 omnidirectional microphones.
From a balance and perspective point of view, the M&S pair seemed pretty much in the right place from the off, although I decided to move it back a little to improve the stability of the stereo image. In its original position the sound from the extreme edges of the orchestra would arrive well around the edges of the Middle cardioid mic. The Sennheiser MKH40 has a very consistent polar pattern compared to many mics, but the best image stability is obtained where the response of the Middle and Side mics are most similar. Pulling the array back a little meant that the incident sound was 'seen' more by the frontal portion of the Middle mic, and thus the imaging became a little sharper. The resulting change to the image width was easily accommodated by adjusting the balance between the two signals.
The ORTF pair was moved a little further forward and down slightly to improve the definition and stereo spread. The Microtech Gefell M930s are large-diaphragm mics despite their diminutive bodies, and the sound quality changes as the sound sources go off axis. Angling them correctly is essential to optimise the sound, and I felt that lowering them and angling the mics down slightly would help — a subtle but worthwhile difference. The image width is determined purely by the placement of the mics relative to the source, and at the time I felt a slightly closer position would be better. However, having the benefit of hindsight, I think they might have been better where they were originally...
The spaced omnis were initially too wide apart, giving a 'hole in the middle' effect, so I pulled them in towards the centre slightly. I could have 'fixed' the hole in the middle by using a third centre mic (creating a sort of Decca Tree), and I did experiment briefly with this idea using the centrally-placed Middle mic from the M&S pair. However, the different type and height of the Middle mic didn't sit too well with the omnis, so I settled for simply pulling them closer together, and back slightly. The cardioid in front of the basses seemed to be doing a reasonable job, so I left that alone for the time being, and I didn't have any specific application for the other cardioid at that stage so I left it alone looking over the rear of the first violins out of the way.
The mic gain was adjusted on each of the preamps to provide average levels around -20dBFS or so, rising to about -6dBFS on full crescendos. For the stereo mix, the ORTF mics were panned fully left and right, as were the spaced omnis, while the width of the M&S pair was adjusted to provide a suitable image. The spot mic in front of the basses was panned to match the perceived image from whichever pair I was playing with at the time — it varied slightly between ORTF and M&S pairs because of the way the stereo image was portrayed by these different arrays.
Matching the imaging positions of spot mics to the main arrays is critical. If the panning is wrong the image will move slightly as the spot mic level varies relative to the main pair. The technique to match the pan positions is very fast and simple: listening to the main pair, tune yourself in to the position of the relevant instrument or section, and then fade up the spot mic. As the signal from the spot mic starts to dominate the mix the image will shift and condense towards it. Simply adjust the pan pot to place the image in the correct space, then close the spot mic fader and try pulling it up again. You often have to go through the loop a couple of times, but when the spot pan position is correct the instrument will appear simply to get louder and move forward in the mix without going sideways too.
After some experimentation, I decided on a balance that used mainly the ORTF pair (because I preferred its sound character over the M&S pair), with a hint of the bass close mic to fill out the bottom end slightly. Adding in the omnis confused the image, and didn't really add anything useful. Ryan declared himself happy with what he was hearing, so we started the session in earnest.
Suitable Mic Techniques
There are three basic approaches to recording a string orchestra in stereo. The most difficult option is a multi-mic approach, because creating a well-balanced natural orchestral sound from the close-miked component parts is no easy feat. Typically mics would be placed over each pair or quartet of violin and viola desks, and over each pair of cellos and basses. Where multi-miking is necessary, 'bugs' are increasingly used rather than traditional mics — these are usually miniature omni mics clipped to each instrument, and they provide a very good ratio of direct sound to unwanted spill. These techniques may be necessary in live-sound situations, but they are probably best avoided in the studio in the interests of both sound quality and simplicity.
Assuming reasonable room acoustics, most engineers and musicians prefer a mic technique that leaves the musical balancing to the conductor and performers, with the mics capturing the overall orchestral sound. In this case there are two main approaches: coincident pairs (favoured by 'purists') or spaced arrays (favoured by most commercial engineers). Both techniques are equally valid, but produce different sound characters. It is up to the engineer, producer, and conductor to agree on which sound best suits the project.
The most common coincident technique, sometimes referred to as the X-Y method, requires a matched pair of directional mics — cardioid, hypercardioid, or figure of eight — mounted in such a way that their capsules are aligned vertically above one another and angled outwards either side of the centre line. The specific angle (called the 'mutual angle'), the mic array's polar pattern, and the distance of the array from the orchestra allow considerable flexibility in determining the perspective and stereo image of the recording. Depending on the acoustics of the venue, I might choose to start with a pair of hypercardioids placed around three metres above the floor and perhaps four metres behind the conductor. If the perspective were too ambient, then a closer position could be tried, but you might have to switch to cardioid patterns to maintain a sensible stereo image. If the perspective were too dry, then a more distant placement could be tried, or the polar patterns changed to figure of eight.

 set up one above the other and with their polar patterns angled apart, as shown in the top diagram. The M&S coincident stereo technique, on the other hand, uses cardioid and figure-of-eight mics, arranging the polar patterns as shown in the centre diagram. The ORTF technique combines elements of spaced and coincident miking, mounting two cardioid mics on a bar at an angle of 110 degrees and with the capsules 170mm apart.") The most common coincident stereo technique, often called X-Y, consists of two directional mics (often cardioids) set up one above the other and with their polar patterns angled apart, as shown in the top diagram. The M&S coincident stereo technique, on the other hand, uses cardioid and figure-of-eight mics, arranging the polar patterns as shown in the centre diagram. The ORTF technique combines elements of spaced and coincident miking, mounting two cardioid mics on a bar at an angle of 110 degrees and with the capsules 170mm apart.The two major benefits of the coincident technique are excellent mono compatibility and a very precise stereo image, and many people feel these qualities are very important. However, directional microphones have to be used, and all pressure-gradient mics inherently suffer from off-axis coloration and a restricted (and often uneven) bass response. The off-axis coloration is significant because the middle portion of the orchestra is inherently off-axis to both mics — and this can make it very hard to capture a natural and consistent sound quality for the entire orchestra.
The most common coincident stereo technique, often called X-Y, consists of two directional mics (often cardioids) set up one above the other and with their polar patterns angled apart, as shown in the top diagram. The M&S coincident stereo technique, on the other hand, uses cardioid and figure-of-eight mics, arranging the polar patterns as shown in the centre diagram. The ORTF technique combines elements of spaced and coincident miking, mounting two cardioid mics on a bar at an angle of 110 degrees and with the capsules 170mm apart.The two major benefits of the coincident technique are excellent mono compatibility and a very precise stereo image, and many people feel these qualities are very important. However, directional microphones have to be used, and all pressure-gradient mics inherently suffer from off-axis coloration and a restricted (and often uneven) bass response. The off-axis coloration is significant because the middle portion of the orchestra is inherently off-axis to both mics — and this can make it very hard to capture a natural and consistent sound quality for the entire orchestra.
An alternative form of coincident technique is the Middle and Sides arrangement, which uses a forward-facing directional mic and a sideways figure-of-eight mic processed through a sum-and-difference matrix. This arrangement has the advantage of pointing the Middle mic directly at the centre of the orchestra, but it then means that the edges of the sound stage are now off-axis to both mics...
The more common approach for recording orchestras is some form of spaced microphone array. With spaced arrays the stereo image is dependent on the time differences between sound arriving at the mics. This produces rather more vague imaging compared to the coincident technique, but many find this sounds more natural. The key benefit, though, is that it allows the use of omnidirectional microphones, which have extended and smooth low-frequency responses and minimal off-axis coloration. However, since the stereo image is created by timing differences between the two channels, mono compatibility can sometimes become problematic, resulting in a slightly coloured sound.
Probably the most common spaced technique for orchestral work is the Decca Tree, which employs three omnidirectional mics arranged in a triangle of roughly 1.2 metres on each side and with the central mic forward of the two outriggers. The mics are panned fully left, right and centre to match their physical positions. As omnidirectional mics capture ambience from all directions, the Decca Tree usually has to be placed very close to the orchestra — typically about three metres above the floor and more or less directly behind the conductor.
There is a third alternative which is half-way between the extremes of coincident and spaced arrays: the near-coincident array. The best known is the ORTF pair, which uses directional mics angled outwards much as with a coincident technique, but the two mics are spaced apart by a small distance. The idea is to capture both timing differences (because of the spacing) and level differences (because of the directional polar patterns), and most people seem to like the stereo image that results. The ORTF technique requires cardioid mics angled outwards 55 degrees either side of the centre line and spaced 170mm apart. Again, small-diaphragm mics or those with very smooth off-axis responses work best.
Managing The Takes
In total we recorded roughly two hours and twenty minutes of material. To make life easy (and because I didn't have a red light available) I left the Genex recorder running continuously for each separate piece, but used marker points to keep track of where each take was, noting all the timecodes, bar counts, and status/editing intentions for each take on a log sheet as we went. The Logic system was started and stopped for each separate take.
 While the orchestra were warming up, Hugh narrowed the positioning of the spaced mic pair to avoid a 'hole' in the middle of the stereo image.We started with the longest stand-alone piece, recording a complete take before going back and tackling various sections, and then finished with a complete take again. All in all we recorded 14 separate takes to ensure that we had everything fully covered. The second slightly shorter stand-alone piece was dispatched in 12 takes, although, to be fair, three of those takes were actually rehearsals of difficult parts by separate sections of the orchestra and not usable in their own right. After the initial recordings in each case the conductor and various members of the orchestra came into the control room to hear the playbacks.
The remaining five pieces were all recorded to click tracks fed to the conductor's headphones. I provided AKG K240s — open-backed headphones — so that he would be able to hear the orchestra acoustically at the same time. It would have been easy to provide a feed of the recorded sound to the phones as well, but a lot of conductors inexperienced with studio recording seem to find that distracting. Again, we invited the players into the control room to hear the playbacks — this time as a rough mix with the rest of the electronic instrumentation already recorded. I'm sure it came as a surprise to some to hear what they were contributing to!
Most of these shorter pieces were dealt with in three to five takes — often retakes being required because of low-flying aircraft! The last three pieces didn't require the cellos or basses, so those musicians were asked to pack up early and we reset the seating to maintain a sensible stereo image. The mics were repositioned slightly to take account of the narrower sound stage. The last piece only involved the violins, so we dismissed the viola players and reset the chairs (and mics) once again.
By the end of a long day we were confident that we had enough good material to compile suitable master tracks, and it was duplicated as a stereo mix on Ryan's system as well as being recorded as separate tracks on my Genex.
The Acoustic Properties Of String Instruments
The four main instruments of the string section — the violin, viola, cello, and double bass — emerged in their current form around the start of the 17th century, so they are very 'mature' instruments. Like all acoustic stringed instruments, the string vibrations are much too weak on their own to move enough air to be audible at any distance, so a 'mechanical amplifier', namely the body of the instrument, is used to boost the sound intensity. The string vibrations are coupled to the body of the instrument through the bridge, and that body is essentially a resonant box (albeit of a complex shape and construction) designed to amplify the appropriate range of frequencies generated by the vibrating strings.
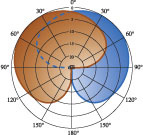
Given the complex panel shapes and sizes, different parts of the instrument's body resonate at different frequencies, and thus both the tonal character and radiation pattern of the instrument vary considerably with frequency. The diagrams in this box give some idea of the average polar responses of the violin and cello at a range of different frequencies, and illustrate how the bulk of the instruments' sound comes from the top or front panel. However, the width of sound dispersion and the dominant axis vary considerably with frequency — sometimes in most unexpected ways!
The nature of stringed instruments is that they are all slightly different in their construction, and so the actual radiation pattern of a specific instrument may well be slightly different to the typical plots here. Consequently, it is important to listen to the actual instruments and position the microphones accordingly. Moving a mic a few inches can make all the difference between a bright, detailed sound or a rich dark tone.
 Typical dispersion characteristics of string instruments at different frequencies.It is interesting that the body resonances play a big part in determining the harmonic structure of the instrument. When playing high notes on a violin, for example, the fundamental is the strongest component (the highest being around 2.6kHz). However, in the lower registers the fundamental can be as much as 25dB below the strongest second or third harmonic, simply because the body is not large enough to resonate efficiently at the true fundamental frequency — the lowest open string on a violin, for example, vibrates at 196Hz, which has a wavelength of around 0.6 metres. The audible effect of the weakened fundamental is that the upper strings tend to have a slightly more mellow sound than the lower ones.
The distinctly nasal tone of the viola is due to the same effect. The viola is tuned a fifth lower than a violin (the lowest fundamental is 130Hz), and thus the wavelengths are 1.5 times longer. If the viola body were also 1.5 times larger than a violin it would have a similar tonal character, but in fact the body is only about 1.2 times larger. This means that the fundamentals are even weaker across the lower registers and the harmonics are an even more dominant part of the sound.
The cello is tuned an octave below the viola, with the bottom open 'C' string producing a fundamental at 65Hz. However, the body of the instrument is again undersized and poor at amplifying such low fundamentals. In fact, the enclosed volume of air in the body resonates at around 110Hz, which amplifies the first overtone extremely well.
The double bass produces fundamentals as low as 31Hz, but the lowest resonance peak in the body (air resonance again) is an octave above this. Hence the fundamental is a relatively weak component of the sound of the lowest strings, and the majority of the sound energy is contained in the band between 70Hz and 250Hz.
At the top end of the spectrum, the violin can generate strong harmonics that extend up to 10kHz or so — although the level of these is very dependent on the playing technique. The type of strings and the dimensions of the panels in a double bass work to restrict it's harmonic structure to about 2.5kHz, while the cello goes a little higher, as you would expect, to about 3kHz.
Open strings produce a full harmonic structure because the ends of the string are defined precisely by the bridge and nut. However, stopped strings (in other words, those shortened by pressing a finger on the fingerboard) produce a smoother sound with fewer harmonics, purely because of the less well-defined string end under a relatively soft finger! Pressing harder against the finger board can boost the harmonics quite significantly.
The more critical element of harmonic balance is the position of the bow. Drawing it over the strings close to the bridge produces a harmonically rich sound, whereas a position over the fingerboard gives a softer quality.
Editing & Compilation
Ryan had assumed that the orchestra would simply perform each piece as a complete take, and wasn't expecting to have to edit the various takes together, so I also agreed to perform that task for him. Editing orchestral music is a little harder than editing music with a strong beat, because of the less well-defined edit points, but a little practice and some lateral thinking in choosing edit points is all that is required to master this skill.
The raw tracks from the Genex were loaded into my SADiE System 5 DAW — all at 24-bit, 96kHz — and I then went through manually adding individual take names to ensure I could identify everything correctly. Next, I created separate edit decision list (EDL) folders for each piece of music and dumped the relevant takes into each one to make the whole project more manageable.
The first stage of working on each piece was to decide on a master take and then to go through that against the score adding markers to identify bar counts, thereby aiding my navigation through the piece. I then simply chopped up the appropriate sections of the alternate takes required to replace sections of the master take, and dropped them into place, working on all eight tracks simultaneously. With everything in the right sequence I then went back and fine-tuned each edit, constantly referring to the score and log notes to make sure everything was as it should be.
I used the ORTF pair as my listening reference throughout, but, given the different mic spacings, I couldn't rely on a single edit position working perfectly for all the mic tracks, so after completing the eight-track edits, I went back and checked the edit points on each separate mic pair, fine-tuning them as necessary. Most were fine, but a few needed slight adjustments to the timing to ensure inaudibility. The longest piece only involved eight edits, and there were seven in the second stand-alone piece. Most of the other tracks required only one or two edits (one was a complete take), and this took about four hours of work in total to complete.
Balancing & Reverb
With the editing sorted out, I was in a position to re-balance the recording (still in SADiE) in the comfort and familiarity of my own listening room. Ryan also asked me to add suitable reverberation to the stereo masters. I started with similar fader settings to those I had used on the recording session, and it was immediately obvious that I had overcooked the bottom end a little, adding too much of the bass close mic — the side effect of using small monitors in an unfamiliar room. It wasn't disastrous, but it was a little overpowering in some pieces.
 Later on in the session, some pieces were recorded which only required the upper strings. For these pieces, the seating was simply rearranged in order to retain a sensible stereo image.I therefore closed all the faders and started again, listening to each pair to decide the optimal balance. For me, the spaced pair was a little too vague and wide, while the M&S pair was a little too narrow and precise — although both were perfectly usable. The ORTF pair seemed to have the desired levels of spaciousness, definition, presence, and clarity to suit the project, so that's what I went with. I experimented with adding in some spot mics and the omnis, but neither enhanced the sound significantly, so I settled on the raw ORTF pair and set about creating a suitable reverb.
There was a little reverb on the raw recording from the original hall, but this was quite short and didn't complement the music particularly well, despite having a nice warm character. I needed something a little longer and fuller to give some 'bloom' to the works. SADiE incorporates a pretty crude stereo reverb that wasn't suitable, and although it can run VST and DirectX plug-ins, I had nothing suitable in plug-in form. The reverbs provided in the DM1000 are very good — especially the REVX plug-ins — and can operate at 24-bit, 96kHz, but I had a particular Lexicon reverb in mind for this job, so patched my PCM90 into the SADiE.
This machine can only operate at 44.1kHz and 48kHz sample rates, so I hooked it up through a pair of sample-rate converters, re-configuring the SADiE I/O to provide a stereo aux send and stereo effects return. I selected a medium room programme in the Lexicon and tweaked the parameters slightly to provide an effect that seemed to complement the original room acoustics, but extend them in a natural way. Again, I left it slightly understated so that Ryan could extend it further if he wanted to use additional reverb.
The final stage was to perform an internal bounce of each edited stereo track, with reverb, and archive these bounces as WAV files, both in the original 24-bit/96kHz format, and as 24-bit/44.1kHz versions for Ryan to import into his project.
Which Mic Technique Sounds Best? Choose For Yourself!
There's no 'standard' mic technique for recording string sections, as each method has its own specific sound and devotees. So I've posted some audio files from the session at www.soundonsound.com/magazine/20... so that you can compare the different sonic characteristics of the different mic setups:
The full string orchestra recorded through small-diaphragm Sennheiser MKH30 figure-of-eight and MKH40 cardioid mics set up as an M&S pair.
The full string orchestra recorded through two Microtech Gefell M930 large-diaphragm cardioid mics set up as an ORTF pair.
The full string orchestra recorded through two Sennheiser MKH20 omnidirectional mics set up on separate stands several metres apart and operating as a spaced pair.
Here the sound of the full string orchestra through the ORTF pair has been reinforced at the low end by mixing in some signal from a Neumann TLM103 spot mic set up in front of the double basses.
The final string orchestra mix, comprising the ORTF pair and some extra artificial reverberation from a Lexicon PCM90.
A violins-only section captured by the M&S mic pair.
A violins-only section captured by the ORTF mic pair.
A violins-only section captured by the spaced omni pair.
The violins-only mix, comprising the ORTF pair and some extra artificial reverberation from a Lexicon PCM90.