Recording chamber music in Birmingham's Symphony Hall is not something you get to do every day, so we decided to make the most of the occasion by using two completely different setups, one based on professional equipment and one on project-studio gear.
A few months ago, I was approached to see if I would be interested in recording the young violinist John Garner, and I was asked if I could suggest a good location. As John was to be accompanied by piano, I said that the prerequisites were a room with acoustics suitable for the violin and also a good-quality, well-maintained piano. John's father Frank clearly thought that John's playing was something special, but I really had no idea what to expect from a lad who'd only recently turned 14, so I was taken rather by surprise when I heard that they'd hired Birmingham's prestigious Symphony Hall for the day-long recording session! To give you some idea of how serious this is, the normal hire rate for a day in the Symphony Hall is around £3000, though they had managed to negotiate a discount because the day in question fell between two concerts, so the hall probably wouldn't have been used on that day anyway. I think the management also liked the idea of what John (a local musician) was doing, and wanted to offer what encouragement they could.
Given that this was starting to look interesting, I asked Technical Editor Hugh Robjohns if he'd like to get involved. Also, because of the expense of hiring the Hall, the accompanist, and a standby piano tuner, I felt it would be safer if we took along two completely independent recording systems so that if there was a technical problem with one system, we'd still have the recording made on the other. Unsurprisingly, Hugh was very enthusiastic, because there's nothing he likes better than pointing expensive microphones at even more expensive instruments in a prime acoustic location!
Two Different Recording Systems
Hugh has a Genex hard disk recorder, which, despite its limited SCSI internal drive size, is ideal for location recording where you don't need a huge number of tracks — see the 'Hugh's Recording Setup' box for more details. For my own system, I used an Alesis HD24 running at 44.1kHz/24-bit resolution and teamed this with an Alesis 3204 mixer, which is surprisingly quiet and transparent-sounding, as well as having full in-line monitoring. At Hugh's suggestion, I also packed a pair of Mackie HR624 active monitors so that the performers could listen to the playbacks.
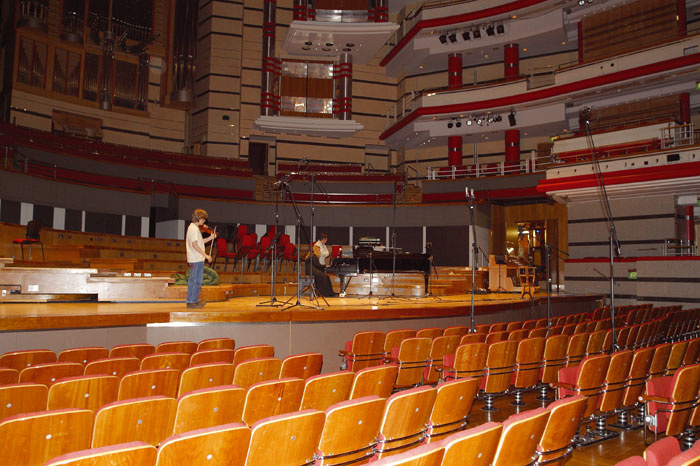
 Paul and Hugh set up their separate recording rigs just off the stage in the wings. Paul recorded through an Alesis analogue mixer to an Alesis HD24 multitrack recorder, while Hugh recorded to his Genex high-resolution multitrack recorder via Focusrite and GML preamps.
Although it is perfectly possible to mix and record into stereo on location, there's no opportunity to redress the balance between instruments later if the client requests it, and there's also no way to experiment with time delays to compensate for the different mic locations and distances unless you take a digital console (with individual channel delays) along and then hole up with a pair of reference monitors in an isolated room that you can use as a recording control room. Coming from a multitrack background, I wanted to keep my options open while at the same time using fairly standard miking techniques for this kind of project.
When we arrived at Symphony Hall just before eight o'clock in the morning, my car packed to the roof with our combined recording systems, the designated parking place had indeed been reserved as promised and the security staff couldn't have been more helpful in showing us around, helping plan the easiest route to move the gear and finding trolleys for us. Having dealt with so many disinterested 'jobsworth' types in the past, this came as a refreshing change!
Symphony Hall is a relatively new concert hall which was designed to have a very low noise floor. This was achieved by sitting the entire hall (around 35,000 tons of it) on 2000 rubber pads as a completely separate room within the International Conference Centre complex. (Rumour has it that cats are used to track down rats that might try to eat the rubber!) It also features mechanically variable acoustics, with vast echo chambers behind huge doors, so that it can be used for both classical and contemporary music performances. It had been set up in classical mode for our session.
We needed a place to set up the recording systems where we wouldn't get in the way of the performance, but where we could still see what was going on. After wandering around backstage looking for areas that didn't sound too live, we eventually settled on using the wings to the right of the stage, where there was also clean audio power and tables we could use for the gear. This meant we looked out directly onto the right-hand side of the stage and could keep the microphone cable runs to a sensible length. We finished rigging everything just after nine o'clock — about an hour after we had unloaded the car, which was about the same time that the piano tuner finished as well.
Hugh's Recording Setup

My recording background is rather different to Paul's, and my normal approach for a project like this would have been to use a backstage dressing room as a temporary control room, making critical mixing decisions using known loudspeakers and recording straight to stereo. Of course, good communications between control room and stage are essential when working this way, and so I have built up facilities for loudspeaker talkback, a telephone, and cue lights with cables to enable the control room to be located up to 50 metres from the stage. A simple black-and-white TV camera and monitor can also be used to see what's happening on the stage if needed, but I often find the pictures can become a distraction.
However, as this was primarily Paul's project, and a suitable room hadn't been booked in advance, I went along with his way of doing things, which was to set up at the side of the stage, multitrack everything, and sort it out later on. I don't like making mixing decisions on headphones and, although Paul decided to bring his little Mackie monitors along, it wasn't possible to mix while recording, because we were located at the side of the stage and so had to turn down the speakers while recording. Therefore I used my Sony MDR7509 headphones to try to judge the quality and perspective of each mic (or mic array), recording to multitrack to increase the probability of getting something suitable.
For location work I use a Genex 8500 recorder which can record up to eight tracks at 16- or 24-bit resolution at sample rates up to 192kHz. The recording medium is either an internal SCSI hard drive or internal MO drive, and external SCSI drives can also be connected if required. Had I been recording a stereo mix I'd have worked at 24-bit/88.2kHz, but as I needed to record a full eight tracks for the entire day's recording, the limited disk capacity restricted me to 24-bit/44.1kHz. I actually recorded over three hours of material across eight tracks, and had to resort to two sides of MO disc once the hard drive was full!
I have GML 8300 and Focusrite ISA428 four-channel mic preamps. The Focusrite is fitted with the optional A-D card, and the GML outputs are hooked in to use channels five to eight. The eight-channel AES output was then hooked directly into the Genex's AES inputs. Recording levels were set so that the highest peak was about -4dBFS, with most tracks peaking around -8dBFS. Hugh Robjohns
Placing Performers & Setting Up Mics
For my rig, I opted to use a Soundfield SPS422B mic (set up to behave as a coincident cardioid pair) with its controller box plugged directly into the recorder as the main stereo mic. Initially I set this up around three rows of seats back from the stage, with Sennheiser cardioid (MKH40) and omni (MKH20) small-diaphragm mics spot-miking the violin around three feet above and just in front of the player. I used both because I wasn't sure which would sound best in such a lively acoustic environment, and I had plenty of tracks so I could leave the decision as to which to use until mixing. For the large Steinway concert grand piano I used a pair of very inexpensive SE1 small-diaphragm cardioid mics (I wanted to see how these would rise to the challenge) spaced a little over a metre apart and aimed into the piano from a little under a metre away. All the mics were mounted in shockmounts.
 Both Paul and Hugh chose Sennheiser MKH20 and MKH40 mics for close-miking the violin. However, Paul used a widely spaced pair of SE Electronics SE1 mics for homing in on the piano, in contrast to the closely spaced Sennheiser MKH20s which Hugh opted for.
We decided on a 'half stick' position for the piano lid after hearing how loud the piano was with the lid fully open! Because of the volume of the piano, we tried to get a reasonable distance between the piano and the violin without compromising their line of sight, so as to give us adequate separation. When we arrived, the piano was to the left of the stage and John was standing to the right looking at the pianist, Jo Sealey, which meant that his violin was pointing towards the back of the stage. This was clearly less than ideal from the point of view of the front-of-house stereo mic, so we moved the piano to the right and angled it slightly so that John could stand on the left of the stage facing outwards, while still maintaining good eye contact with the pianist. John ended up standing just under five metres to the left of the piano, which was about four metres back from the front of the stage. John was further forward, and about 1.5m from the stage front — which helped to balance his relatively quiet violin against the powerful piano. John played two violins, mainly his own J B Collin-Mezin dating from 1895, while the other was by Kudenowski, a local Birmingham maker. The Kudenowski was used for only one piece to avoid a 'wolf' note present on John's own instrument.
Classical miking often involves the use of larger mic stands than usual, as normal stage stands tend to become very unstable when used at their maximum extension. Professional mic stands of this type are quite expensive, but I found a cheap solution by buying a pair of lighting stands from Adam Hall Supplies in the UK and then slotting the inner sections of regular boom stands into the tops of them. This gave me all the height and stability I needed for around £20 per lighting stand.
 Although Paul's Soundfield mic was placed only three rows from the front of the stage, it was found to be picking up too reverberant a sound, so it was moved closer to remedy this.Once we'd both set up our microphones and tested them (see the 'ORTF Or M&S Miking?' box for more details of Hugh's miking choices), we noticed an audible hum in the building which was traced to some overhead work lighting. A technician turned up within minutes and killed the offending lights, after which we did a short test recording to set the levels and to confirm that everything sounded OK. Hugh then dutifully measured and recorded all the distances between mics and instruments, just in case we wanted to delay the close mics to time-align them with the distant stereo pairs when it came to the mixing.
After recording the first two or three pieces (with the levels peaking at around -10dB in my case), we took a short break and I listened to my playback more critically. I concentrated particularly on the Soundfield mic tracks, as I was planning for these to be the foundation of the recording, with the spot mics used to add focus and to help balance the violin and piano. On the whole, I was very pleased with what I heard, though I felt that the Soundfield was picking up an excessively reverberant sound. To address this, we moved the Soundfield mic a couple of rows closer to the front of the stage, and this produced a more satisfactory wet/dry balance, necessitating less use of the spot mics in the mix.
It really surprised me how reverberant the sound became only a little distance from the stage. Hugh had set up an M&S pair at about the same distance as my original Soundfield position and was finding the same thing, but he'd also set up a spaced stereo pair closer to the front, which is what he mainly ended up using in his final mix.
ORTF Or M&S Miking?
Because I didn't want to have to make critical decisions about mic placement over headphones, I wanted to keep as many options open as I could, so I miked accordingly. My basic plan was to use an ORTF pair of closely-spaced large-diaphragm cardioid mics, in this case a pair of Microtech Gefell M930s, to provide the main stereo image. Wandering around the stage and hall as the musicians warmed up led me to believe that a position about two rows back would give a good balance of direct sound and reverberation. The Symphony Hall's acoustic is quite superb, with a lovely smooth decay.
I placed the mics on a stereo bar to provide the required 17cm spacing, and relied on the engraved markings on the mic's own stand clips to get the 55-degree offset angle correct. I then fixed these to one of my K&M tripod stands, and raised the mics to a height of about 3.5m. The stage itself was a little over one metre high, so the ORTF pair ended up about a metre above the level of the violin, and roughly three metres away.
As a flexible fall-back option I also rigged an M&S pair of Sennheiser MKH30 figure-of-eight and MKH40 cardioid mics in a bespoke Rycote suspension mount. I recorded the raw output of these mics on the Genex and decoded them to normal left-right stereo back at base using my Yamaha DM1000 mixer. I placed this array on another tall K&M tripod stand about 1.5m further back, and about an extra 0.5m higher. Listening to the output of the Middle signal, it sounded a little too 'wet' on the headphones, but often things can sound drier over loudspeakers, so I decided to go with it. The Sides output provided a glorious reverb and ambience, which I was very pleased with.
 In addition to these two stereo arrays, I decided to add some closer mics, in case I required some additional definition in the mix. I covered the very fine piano with a pair of Sennheiser MKH20 omnidirectional mics spaced on a bar about 40cm apart. I find omni mics are invariable the best choice with a nice grand piano, and give a natural rich sound that cardioid mics just can't match, which is especially noticeable at the bass end. These were supported in a rather odd way from a standard K&M boom stand, to place the mics just below the half-open lid, looking in towards the strings from almost exactly the centre of the piano's waist. The relative distances between piano and violin meant that there was plenty of separation, even though I was using omnidirectional mics.
For the violin I put up two more Sennheisers: an MKH40 cardioid and an MKH20 omni — the same as Paul. However, unlike Paul (who used separate stands), I mounted them adjacent to one another on the same stand, then moved them around until I found a position that gave what I thought was the most balanced and representative sound. That ended up being almost directly in front of the violin, about two metres away and at a height of about 2.5m. As Paul also discovered with his setup, the difference in sound quality between omni and cardioid was fairly subtle on this occasion, but listening back afterwards I ended up favouring the omni by a small margin. The cardioid rejected more of the piano spill, but the omni just sounded a touch more natural and the transients from pizzicato sections seemed slightly faster and with a better-defined edge.
I ran the two stereo pairs through the Focusrite mic preamps and the close mics through the GMLs. As it turned out, all eight preamps ran with exactly the same amount of gain of just 30dB, and in the case of the ISA428 I used the high-impedance setting and bypassed the high-pass filters — all the mics (except the M930s) were in decent shockmounts. As I mentioned earlier, the highest peaks of the day hit -4dBFS, and these were on the close piano mics and the ORTF pair. The two close violin mics peaked at -8dBFS. At the other end of the scale, I was amazed at how low the background noise was in the Symphony Hall. In most public venues I find the ambient noise floor is typically about 50-55dB below the peak level of a modest orchestra, organ, or choral group. In the empty Symphony Hall it was easily 70dB below, so the audible reverb tail really did run on for a considerable time! Hugh Robjohns
Getting Down To Recording
Over the course of the day, John, and his accompanist Jo, played for more than six hours, recording between two and five takes of each piece, as well as re-recording some short sections that could be edited in if necessary. We took meticulous notes documenting all the takes and part takes, including locate times, and jotted down the times of any passages that we thought might need replacing. At one point during the session we both heard a loud clunk in our headphones, which we duly noted, and it turned out that somebody had allowed a couple of Japanese tourists in to see the hall (despite this being a closed session), and they'd allowed a door to bang shut! We also noted any unusually loud piano pedal noises, which can often become audible in exposed sections — where necessary, these sections were redone.
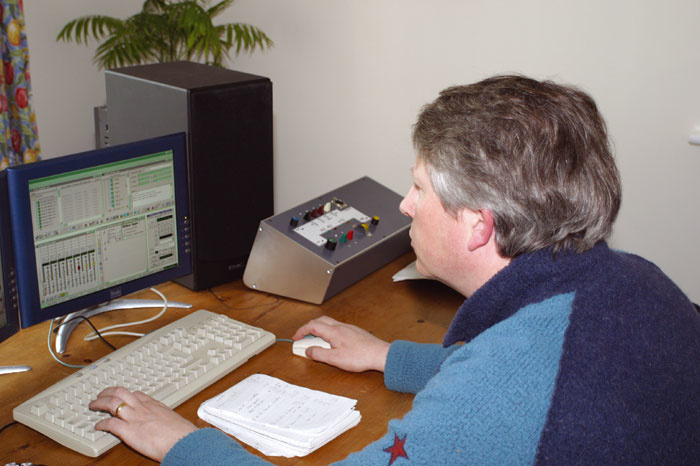
 Hugh kept detailed notes of all the takes recorded, complete with time locations and suggestions for editing.
It turned out that Mr Garner's opinion of his son's talents was completely justified, as he played some very challenging material with a great deal of passion and maturity. He's definitely a 'big name' in the making, so it was a privilege to be involved with his first ever serious recording. John's not one to blow his own trumpet (to use a rather inappropriate metaphor!), but he only started playing the violin at the age of seven, and by eleven he had achieved grade eight — with distinctions at every grade along the way!
 Hugh carefully measured the positioning of all the mics to facilitate the calculation of delays for the spot mics during the mixing process.
Rough Mixes & Editing Decisions
Once I got home, I ran off rough mixes of the whole day's recording in Logic. All I did was set levels and match the spot mic panning to the stereo mic image. As it turned out, both the omni and cardioid violin mics sounded good, though I felt the omni's more open sound was more artistically well-suited. Instead of delaying all the spot mics, I added a negative delay of roughly 3ms per metre to the main Soundfield mic signal, then fine-tuned the result by ear. I sent these preliminary mixes to John so that he could pick the best takes and decide if any sections needed to be replaced. I received a very complementary email back regarding the sound quality, but I felt the final edit should be done using Hugh's recorded version, as he hadn't needed to move a mic part-way through the session, and we'd also be able to work on Hugh's SADiE system, which is better suited to final editing than any of the software on my system. See the 'Mixing & Editing' box for Hugh's account of what we did.
I was surprised how similar in sound our two recorded versions were, especially when you consider that I was using a small Alesis mixer while Hugh used his Focusrite and GML preamps and had better mics available for the piano. Neither of us experienced any noise problems, and the natural ambience of the room meant that no artificial reverb was needed.
Mixing & Editing
When it came to post-production, I decided to do as I would for a normal recording session, and simply use the recorded Genex tracks as if they were live microphone sources. So I hooked up the AES outputs to my Yamaha DM1000 console and mixed accordingly, recording the result straight into the SADiE as a stereo track for subsequent editing. I monitored on my PMC IB1 three-way speakers with a DK Audio MSD600 meter to check levels, panning, and stereo widths, as well as to keep an eye out for LF anomalies.
The Yamaha has facilities for M&S decoding built in as part of the stereo pairing options, so I ended up with the decoded M&S pair, the stereo ORTF pair, the stereo piano close mics, and a pair of violin mics. I adjusted the panning of the two violin mics to match the position of the violin in the ORTF pair (slightly left), and I also did the same with the piano, which occupied a narrow spread from slightly right of centre to three-quarters right. I also adjusted the balance of the M&S pair to match the image with that of the ORTF pair, and dialled in appropriate delays for the close mics and ORTF pair to time-align everything to the M&S pair — the latter was the most distant mic array, and was therefore the reference point. The Yamaha console makes life easy by allowing delays to be set either in milliseconds or metres, so I was able to translate my measured distances directly to delay values. In fact, I chose to increase the close mic delays by a few additional milliseconds to ensure that the main sound source was perceived as the ORTF pair — a technique used by a lot of classic engineers. All equalisation and dynamics processing was bypassed, and the desk output was re-dithered to 24 bits to feed the SADiE.
Switching between the close violin mics revealed that the omni was the preferred option, and switching between M&S and ORTF pairs showed that the M&S was a tad too wet and ambient, while the ORTF pair was, if anything, slightly too dry. So I ditched the Middle component of the M&S pair completely, and retained a little of the Sides component to add a little reverberation and spaciousness to the ORTF pair. The close piano mics brought in a little more low-end weight and clarity, which was useful, and the close omni violin mic added a touch of extra definition as well — although these close mics were a good 12dB below the level of the ORTF pair, so their contributions were subtle.
Having established a mix I was happy with, I recorded the entire three hours of material into SADiE in real time, with peaks around -4dBFS again, logging each individual take in SADiE with the appropriate music title and take number to make the editing process as simple as possible.
Most of the editing was very straightforward. John had generally recorded a couple of complete takes of each work until we had a master take we were all happy with. In addition, he had often recorded additional short sections to capture a perfect rendition of any particularly tricky parts — and there were a fair few of those! So the editing mainly consisted of trimming the start and end of the main master take for each work, dropping in any section re-takes as necessary. In addition, I also replaced the odd note or short section here and there where there was a better version on an alternative take — John chose some of these as well during the editing session. Of the 12 tracks recorded, few tracks required more than three of four edits in total, which is a testament to John's abilities.
At a practical level, I copied all of the takes belonging to a particular work from the initial SADiE recording playlist into separate playlists for each work, and aligned each take on separate tracks so that it was easy to switch between them when looking for the best take at any given time. Once each work had been edited to everyone's satisfaction, I copied the complete piece to a new playlist to form the final CD compilation, and at this point I also raised the level slightly to optimise the final CD volume. Everything came up exactly 3dB, which maintained the relative levels and dynamics between each track, and gave a peak level of -0.6dBFS. With everything in the right order, we were able to optimise the gaps between tracks and the fade-outs (which essentially just chased the reverberation down). SADiE's mixer incorporates provision for a word-length-reduction and dithering plug-in, which I set up to provide 16-bit resolution with simple triangular dither for the final CD, and when I ran the entire CD playlist through this, the peak level rose slightly to -0.4dBFS. I then burned this version to CD-R as the finished product. Hugh Robjohns
Comparing Approaches
This project was both enlightening and artistically rewarding. It was good to work with Hugh on his familiar territory to see how a BBC-trained engineer goes about the job — Hugh was clearly very much at home with this kind of recording. I also found it interesting to compare results, given that I was using a lot of very much 'project studio' kit while Hugh has an enviable collection of 'serious' mics and preamps. Critical listening revealed that Hugh's Sennheiser MKH20 Omni mics did sound cleaner as close mics on the piano, but once the spot mics were blended with the main stereo pair the differences became less apparent and I was astonished at how well the budget SE1s held up in this difficult application. Clearly the more professional kit does sound better, but it's amazing what you can do with well-chosen budget equipment — where you put the mics is still the most important part of the process.
I was also interested to see how Hugh's editing process differed from mine. When it comes down to it, the basics are pretty much the same but SADiE lends itself very well to this kind of task. However, had I done the editing, I would still have mixed all the takes to stereo first, then edited the stereo files, rather than try to edit the multitrack recording. Overall this was a thoroughly enjoyable project, and I'd like to extend a special thanks to Hugh's wife Caroline for providing us with seriously high-grade chocolate biscuits throughout the evening we spent editing!
Audio Examples
We've put the following audio files into a downloadable Zip file (see righthand sidebar) so that you can assess them on your own studio setup.
- Close piano pair (mp3)
- Close piano pair (WAV)
- Close violin cardioid (mp3)
- Close violin cardioid (WAV)
- Close violin omni (mp3)
- Close violin omni (WAV)
- Main M & S pair (mp3)
- Main M & S pair (WAV)
- Main ORTF pair (mp3)
- Main ORTF pair (WAV)
- Here is a mix of another track from the session mixed by Paul to his own taste from the signals he recorded.
John Garner 320 (mp3) - John Garner Sample (aif)