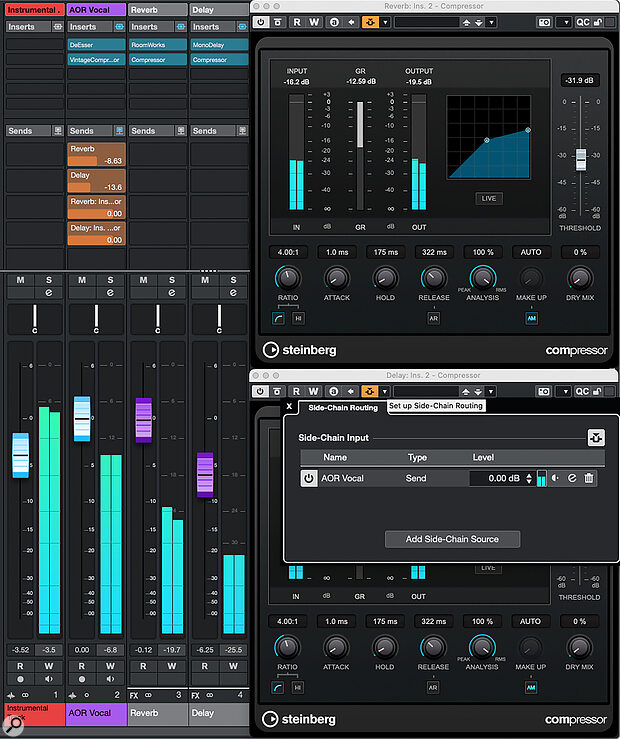
 Automated effects ducking can give your vocals a little extra clarity within the mix.
Ducking your reverbs and delays can bring greater clarity to your vocals.
Ambience effects, such as reverb and delay, are an essential part of vocal production in many genres. But slapping on these effects indiscriminately also risks compromising vocal clarity, and even the whole mix: long effect tails can mask or otherwise clash with different sounds, while if you keep the tails too short, then they might not create the sense of space and dimension you’re looking for. In this month’s workshop I’ll explore some ways to unpick this conundrum.
Options
In a DAW like Cubase, one way to tackle the issue is to set your effects up on FX Tracks rather than as inserts, and create an automation envelope for the send levels from the vocal track. Use a lower send level in the busier sections of a vocal to keep things sounding cleaner, but allowing more of the effect to be heard between well‑spaced words or phrases. Alternatively, you can use automation of the level of the FX Track — similar, but this time, we’re controlling the ‘return’ from the reverb or delay, not just what’s sent into it. Either tactic can work well and they both give you very precise control, but it can also be a fiddly and incredibly time‑consuming approach.
The classic alternative is to use ‘ducking’, whereby a gate or compressor reacts to the vocal to pull the effect’s output level down automatically. Some newer reverb and delay plug‑ins — including the reverb and delay modules in Cubase Pro/Artist’s VocalChain plug‑in — have this option built in. Another, perhaps less obvious alternative for Cubase Pro users is to use the new Envelope Follower Modulator: you can set this up to control the send level to the FX Track. If you want to try this, be sure to dial in a negative Modulation Depth, so that the send level is lowered when the vocal signal increases!
I want to be inclusive here, though, so I’m going to take you through an approach that any user can employ, from Cubase Elements upwards, and with any reverb or delay plug‑in. We’ll start by setting up a conventional ducked effect, before refining it to give us finer control over the result.
Line Up Your Ducks
The main screenshot shows the key elements of of our basic ducking configuration. You can hear this in action in the audio examples on the SOS website at: https://sosm.ag/cubase-1025. My first step was to create conventional sends from the vocal track to two FX Tracks....
You are reading one of the locked Subscribers-only articles from our latest 5 issues.
You've read 30% of this article for FREE, so to continue reading...
- ✅ Log in - if you have a Digital Subscription you bought from SoundOnSound.com
- ⬇️ Buy & Download this Single Article in PDF format £0.83 GBP$1.49 USD
For less than the price of a coffee, buy now and immediately download to your computer, tablet or mobile. - ⬇️ ⬇️ ⬇️ Buy & Download the FULL ISSUE PDF
Our 'full SOS magazine' for smartphone/tablet/computer. More info... - 📲 Buy a DIGITAL subscription (or 📖 📲 Print + Digital sub)
Instantly unlock ALL Premium web articles! We often release online-only content.
Visit our ShopStore.
