Bitwig continues to blur the boundaries between instrument and DAW, while offering some welcome practical enhancements.
Bitwig Studio seems to be living its life at something of an accelerated rate at the moment. We are seeing a major release once every couple of years, which is quite an aggressive schedule, and the expansion of features from each version to the next also tends to be quite considerable. Version 3 brought us The Grid, a fully integrated modular synthesis environment, nudging Bitwig into becoming an instrument or algorithmic composition tool. Version 4 is another step in that direction, but mostly at the level of sequencer events: notes, audio fragments and loops. So let’s see what’s in the box...
Comping
Bitwig Studio now supports audio comping. Users of Ableton Live 11 will be familiar with comping as a way of laying down additional takes within the linear arrangement. Bitwig supports this too, but its notion of ‘take’ is slightly different.
To fully make sense of how Bitwig supports comping, it might help to recall how it structures clips. A Bitwig audio clip is not a single piece of audio: it’s actually a sequence of consecutive audio ‘events’, analogous to notes in a MIDI clip. Think of comping as a way of also stacking audio events vertically, in separate takes. What makes Bitwig’s comping unusual — and powerful — is that the takes are encapsulated within clips, not just in the project’s linear arranger. You want multiple takes in the clip launcher? You got them. If you copy and paste clips, the takes come too.
 Bitwig Studio 4's comping view of a clip, with multiple take lanes.
The obvious way to work with comping is to set a loop in the arranger. Each trip round the loop adds a take to any audio clips which are currently recording. If the recording process starts before the beginning of the loop, then the first take will be longer than the subsequent ones.
Any attempt to record over an existing clip will incorporate a new take into it, rather than replace it. If you do a recording pass over a sequence of clips, each will accumulate a new take, while any gaps in the existing track will be populated with new clips. This does mean that a ‘single’ recording can get rather confusingly fragmented across multiple clips, although the track will play back fine. (A subtle bug which can cause audible clicks in this situation should be fixed by the time you read this.) If this sounds confusing or inconvenient, I recommend clearing out any audio track that you are planning to record into.
 Setting the take length when comping in the clip launcher.I’ll mention one ‘gotcha’ in the linear take recording process: if the arranger clip has its own internal loop then any attempt to record over it will, well, record over it. Adding takes in this situation was perhaps considered too complicated to implement, or perhaps too complicated to be useful.
Since the clip launcher doesn’t have a timeline or a global loop, setting up comping here requires the take length to be set explicitly. Turn on Record as Comping Takes from the Play menu and set the take length in bars and beats at the same time. Any clip containing multiple takes is marked with a little icon at the right hand end of its title tab.
 Multiple takes inside a clip are marked with an icon.Stop recording half way through a clip, and you end up with a combination of the last two takes, split at the ‘punch out’ point. Split points separate editing regions across all the takes: click into any take, and its audio for the clicked region will be made active at the top of the clip. You can walk around the various takes and regions with the arrow keys, auditioning different combinations. To subdivide into smaller regions, click and drag horizontally inside a take. You can drag the boundaries between regions to change their size, or you can even ‘peel back’ a region in the composite view to create a gap into which you can link another take.
If you click the Audio Events button on the left of the clip view, you’re back in the world of multiple sequential audio events within a single clip, with no sign of the comping machinery. Well, almost: the audio regions are still coloured, indicating that these are still links into the original takes, even though Bitwig’s menus now refer to these audio areas as ‘events’ and not ‘regions’. Perform any serious editing here, and the link to any take is broken, as a ‘region’ gets demoted into a plain old ‘event’. Switch back to the comping view, and the editing area is now grey, showing its disconnection. (You can still click on another take region to replace it.)
There are a few editing operations which can be applied to take regions without ‘breaking’ them. Regions can be resized by moving a left or right boundary, or sliced into smaller portions. Their audio gain can be adjusted, and the underlying audio can be nudged forwards or backwards in time.
Bitwig’s implementation of comping is versatile and logical. Implementing comping within clips, rather than within tracks, initially seems a little strange, and results in some rather odd outcomes: a single linear recording can create takes within several clips, and there is no overall ‘comp view’ across the arrangement. But for modern, bar‑oriented music, the comping machinery can be repurposed as a creative tool at the clip level, which is a more‑than‑fair trade‑off. Being able to edit comps from rhythmic fragments of material whilst working in the clip launcher feels like a really empowering workflow development.
Operators
Bitwig Studio has slowly been growing into a kind of hybrid environment somewhere between DAW and modular synthesizer. Version 2 saw the arrival of ‘modulators’, which allowed arbitrary plug‑ins to be extended with additional control components like LFOs, envelopes and step sequencers. The concept was pushed further with The Grid, the modular synthesis environment introduced in v3.
 Bitwig's Operators applied to a note.
Any kind of modulation system, especially one which can randomise its behaviour, potentially pushes the composition process away from literal notes and towards musical ‘systems’ where the composer builds structures which generate note‑like events, possibly in unpredictable ways. Bitwig 4’s operators (unrelated to FM synthesizer operators) are an attempt to bring in a kind of modulation feature at the level of sequence data, whether that’s MIDI notes or audio events in a clip. From a synthesist’s perspective, you can think of operators as a kind of modulation that’s applied whenever a note is played or an audio event triggered.
Before we look at operators proper, it’s probably worth revisiting a feature of Bitwig that’s been present since version 1, namely histogram editing. Select a set of events such as notes or automation points, and it’s possible to edit them as a group: a histogram display shows all the values as a continuum, and they can be shifted, scaled or randomised in a single operation. A histogram is purely a temporary editing shortcut, an alternative to manually editing each of the individual events. Once altered, values remain fixed until another edit.
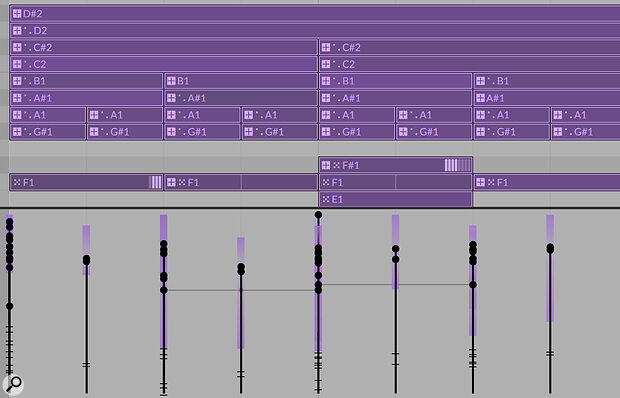
 Bitwig Studio 4 lets you edit a selection of velocities with a histogram.
The first step into the world of operators is through a feature called ‘expression spread’. This is similar to scaling using a histogram, but is dynamic: there’s no editing of the values, but before every playback pass, the values are randomised within a spread range.
Looking at MIDI data rather than audio for a moment, it’s possible to apply a ‘spread’ to note velocities — rather than having a single velocity, a note can be assigned a velocity range (a percentage variance from a central value). Every time a clip is triggered, or each time its loop restarts, actual velocities are assigned randomly within the range and the notes are played. Not all notes have to have the same spread, or any at all — it’s on a note‑by‑note basis. And to add a layer of editing sophistication, since velocity spreads are editable properties of notes, you can select a whole set of notes and then alter the spreads in a histogram.
 Velocity spreads in a tight rhythm clip.
How much effect velocity randomisation has depends, of course, on the instrument that the notes are playing. For most off‑the‑shelf instruments. you’ll probably get some variance of loudness or brightness, but this kind of controlled randomness might hint at some sound‑design ideas: start with a quantised MIDI loop for drums or a rhythmic synth motif, and dive into editing the response to velocity in more radical, unconventional ways. Even a simple trick like layering two instruments on the same track, using note filters to pick instrument according to velocity, can really animate a simple musical sequence.
 Spreading the MPE pitch‑bend in a single note.For instruments that support MPE, we can play similar games with per‑note performance data (timbre, pressure and pitch‑bend). Unlike velocities, this data is notionally continuous, like automation, so the spread is applied to control points of the data, not just at note‑on. I’m struggling a bit to think why I’d want to randomise pitch (except perhaps for slight detuning), but random timbre or pressure could animate the tone of individual notes within a chord each time it’s played. Audio clips support expression spread as well, for gain, pan, pitch and formant.
Random Interlude
At this stage we should probably talk a little about how randomisation works. It’s all well and good to apply random processes to musical composition, but sometimes a particular roll of the dice will yield a good result which you want to keep (or which your client wants to keep), making a degree of reproducability important. Based on what we’ve discussed so far, each clip launch or trip around a clip loop starts with a randomisation process which replaces what happened the last time through.

