Bitwig’s first hardware product takes a characteristically individual approach to audio interfacing.
It seems to be something of a rule that every music software company must, at some stage, get into the hardware business. Ableton played the control surface game with the Push and Push 2, and added audio with the Push 3. Now Bitwig have entered the ring with a desktop audio interface, although its controller features are also deceptively powerful, and it has connectivity clearly aimed at the modular synth market.
First Impressions
The Connect 4/12 is visually striking. It sports a colour scheme incorporating Bitwig’s signature bright orange, and prominently features a large dial on its top surface, much in the style of Universal Audio’s Apollo interfaces or the Mackie Big Knob. The Connect’s case is all metal, and the unit is reassuringly heavy.
The top surface presents the interface’s most unusual feature: a row of 3.5mm sockets, intended primarily for modular synth control but usable for (unbalanced) audio at a pinch. To the left of the big dial are stereo meters calibrated in 4dB increments from ‑40 to 0 dBFS, and status LEDs for audio input type, phantom power and MIDI I/O. There are transport controls bottom left, and mode switches below and to the right of the dial, which itself is set in a 360‑degree ring of LEDs (32 of them).
Mini‑jacks aside, all other connections are on the back panel. Sadly, there’s no silkscreened guide on the top, so you do have to peer over the back and squint a little to see the labels. There are two balanced quarter‑inch audio inputs (one a combi jack to support a microphone), six balanced line outputs, headphone out (annoyingly this isn’t on the front of the device), and two mini‑jacks for MIDI in and out via the bundled adaptors. Power and connectivity (USB 2) are via a USB‑C socket, and there’s no facility to use an external power supply (though at no point in my testing did I feel like I needed one). There’s not even a power switch. Buttons on the back select the input type for inputs 1 and 2 (instrument/line). If there’s an XLR plugged into input 1 then the device assumes a microphone is attached and goes into microphone mode, otherwise not; there’s no manual microphone selection. A dedicated button toggles phantom power. Inputs 1 and 2 can be ganged into a stereo pair, in which case they both operate at line level.
 Round the back we find a USB‑C port, 3.5mm MIDI I/O sockets, and the analogue audio I/O.
So far so good — and the Connect is class‑compliant so you can just plug it in and you’re away. (Some brief testing confirmed that it also works on a USB‑C‑enabled iPad.) The dial, which is aluminium and feels smooth and solid, lets you set input and output levels: click the relevant button marked In 1, In 2, Main or Phones, then turn the dial, and the ring of LEDs unfurls in orange for visual feedback. The maximum gain for the main two inputs is 30dB for instrument and line input and 62dB for microphone. The minimal setting (no LEDs lit) is unity gain — there’s no way to attenuate. Output is attenuated only, there’s no signal boost.
The Connect claims to be compatible with the Mackie Control protocol. Sure enough, when I fired up Ableton Live and configured the Connect as a Mackie control surface, the transport buttons worked, as did the dial for scrolling. The integration is, shall we say, minimal; the behaviour with Bitwig Studio is much more immersive, as we’ll see.
Audio
This is probably about as far as you’ll get without reading a manual, and since my unit arrived without one, I had to do a bit of hunting around on the Bitwig site to find one, at which point I discovered that there’s also a dedicated control panel application for setup and mixing on‑screen. If you’ve already gone ahead and connected the device to a computer and fired up your DAW of choice, you’ll notice that it actually claims to have six inputs, not four. Inputs 5 and 6 are a dedicated loopback connection from the (pre‑fader) main outputs, useful for capturing live mixes or non‑DAW computer audio.
 The Connect’s control panel application.
It’s a credit to the device that pretty much all of the functions of the control panel app can be accessed pretty immediately from the front panel. There’s a hardware monitor from input 1 and/or 2 direct to main outs or headphones — the dial’s LEDs turn red to indicate monitor level.
The audio features are rounded out by three dedicated buttons to the right of the dial. Mono switches the output to mono, useful for checking a mix. Alt toggles the main mix to an alternative pair of outputs, such as a second pair of speakers. Dim is a toggle which attenuates the main mix by a configurable amount. I recently played a couple of small live gigs with the Connect, and Dim is exactly what you need to talk to your live engineer during a soundcheck.
The audio interface will run at high sample rates (176.4 or 192 kHz) but doing so disables inputs 3 and 4, outputs 9 to 12, and direct monitoring.
Bitwig Control
The Connect 4/12’s control functions fall into two groups: parameter control and transport. As a parameter controller, the device operates rather like any other MIDI controller, except that rather than 16 sliders or eight knobs it offers its single dial. Glancing around my studio at my collection of multi‑fader control devices, I was initially sceptical of the Connect: how can a single dial be any kind of control surface?
The answer is that it can only control one parameter at a time — no surprise there — but the parameter is chosen by mousing over the controls in Bitwig’s visual interface on screen. Click the rightmost Bitwig button to put the Connect into controller mode, and any moused‑over control (fader, knob) gains a small white indicator triangle. The Connect’s dial jumps between controls as you move the mouse pointer, showing the current value on its LED ring, and even lighting the LEDs in the appropriate colour for devices with differently coloured control sections. At first it feels a rather odd, two‑handed workflow, and moving the mouse pointer doesn’t offer any physical feedback, but the system works surprisingly well. It doesn’t matter which track or device is currently selected in the session. Click the Bitwig button again, and the dial locks to that parameter regardless of mouse pointer position, with a subdued white indication of this mode on the LEDs — useful for automation recording where you don’t want to accidentally knock the mouse pointer off target mid‑record.
 An LFO‑modulated control voltage comes out of Bitwig Studio, through a patch cable and back into an oscilloscope.
Virtual faders and knobs are afforded very fine control — the Connect dial’s LEDs fade in or out individually to indicate the slightest move. Some discrete parameters can be controlled, others not: in the Polymer synth, I can spin the dial to select my sub‑oscillator waveform, but not the main oscillator type (perhaps understandably, as this requires a swap of the internal modular synth modules). Sample scrubbing is rather fun: put a Sampler instance into ‘freeze playhead’ mode and you can sweep the sample, positioning with 0.1 percent accuracy, a good deal better than with a conventional MIDI controller. Support for third‑party plug‑ins is partial: you have to click on a control in a VST window, at which point the parameter becomes live in Bitwig’s generic device view and you can control it with the dial: not ideal, but certainly usable.
Automation recording is supported only in the linear Arranger view for now, and integrates with the Connect’s transport controls. The Record button enables MIDI or audio recording on armed Arranger tracks, as you would expect. Hold the Bitwig button and press Record to arm automation recording only. The actual automation mode is a Bitwig preference: latch, touch or write. For latch or touch, the Connect’s dial touch‑sensitivity comes into play: latch starts recording when the dial is touched, while touch punches in only whilst it is being touched. The dial’s sensitivity is a slight liability here: I noticed occasional automation points being registered even when I was sure the dial wasn’t being moved, but these can easily be removed afterwards.
The Scroll button enables scrolling of the Arranger view. Scrolling moves the playback start marker without affecting playback immediately; to jump to the scrolled position while playing, tap the Play button. Tapping the Scroll button again toggles between scrolling and zooming, with LED colour indication to match — or you can double‑tap and hold the dial itself to switch to zoom mode momentarily. The extent of the dial’s lit LEDs gives an indication of the zoom level. Scrolling is not compatible with playhead following: if you scroll the start marker, following is turned off. (It feels to me that there should also be some button combo to re‑enable following.)
Modular Interfacing
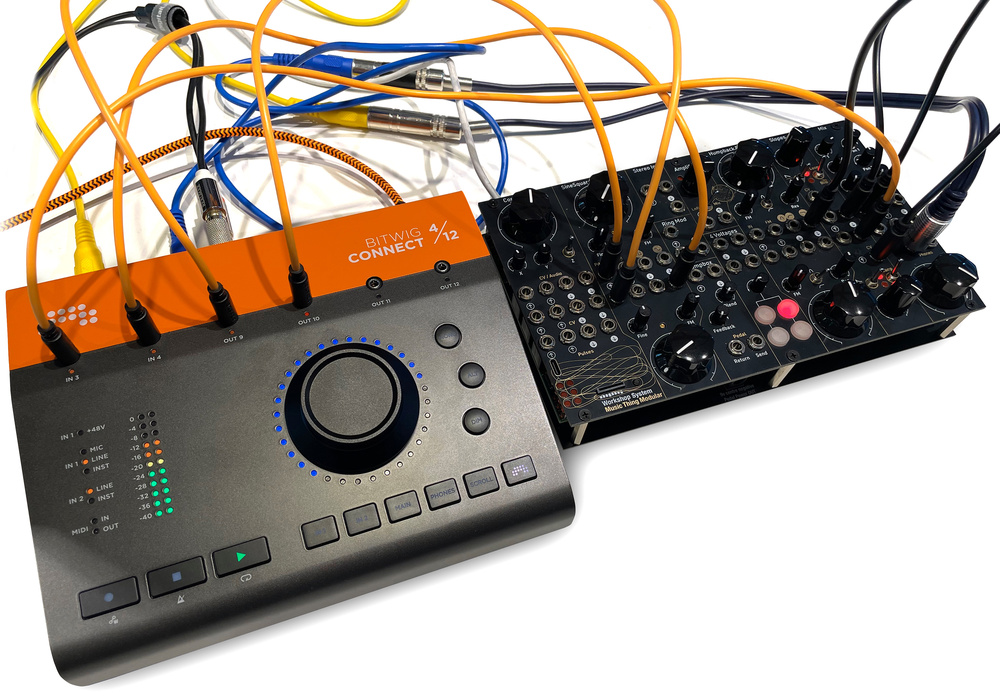
To put the Connect 4/12 through its paces as an interface for controlling modular synthesizers from Bitwig Studio, I reached out to my colleague Tom Armitage at University Of The Arts London who duly turned up with a Music Thing Modular Workshop System (reviewed in Sound On Sound April 2025), a self‑contained modular synth that’s not much bigger than the Connect itself (shown in the header photo).
The most direct way to hook up a modular is by using the HW CV Instrument device, a Bitwig instrument which takes in MIDI, converts it to CV/gate, sends that to the hardware and takes in the resulting audio. You select the two interface ports for CV and gate output, and the input port (or port pair for stereo) for audio coming back. All of Bitwig’s CV I/O endpoints detect when a Connect interface is attached, and rely on its internal 1V/octave calibration. The HW CV device also has an embedded device chain purely for hosting additional CV outputs: these are fixed, although you can alter them with modulators, automate them and so on. In the screenshot, I’ve demonstrated by modulating a CV out with a Bitwig LFO, physically patching it up as a loopback on the Connect itself, and have an oscilloscope display of the result coming in.
 and corresponding filter‑controlled audio from the Workshop System (red).") Two oscilloscopes in Bitwig Studio’s Grid device: control voltage in (white) and corresponding filter‑controlled audio from the Workshop System (red).
Two oscilloscopes in Bitwig Studio’s Grid device: control voltage in (white) and corresponding filter‑controlled audio from the Workshop System (red).
At a more granular level, CV input is available as a modulator for devices in Bitwig Studio. We spent a happy hour or so routing a meandering LFO from the Workshop System into a sampler, using the signal to perform a granular sweep over a drum loop.
It is a fascinating process to be patching two modular systems at the same time — one physical, one virtual — and the Connect allows them to be linked together with minimal fuss.
To really explore the control potential of analogue sources, you need to dig into Bitwig’s Grid modular environment. Here, CV and gate inputs and outputs can be wired up more flexibly, and you can send control and audio back and forth between the real and virtual modular worlds in all sorts of combinations. It is a fascinating process to be patching two modular systems at the same time — one physical, one virtual — and the Connect allows them to be linked together with minimal fuss. Add non‑modular software devices to the picture and the potential is enormous.
As with my loopback experiment, the Grid’s oscilloscope comes in useful here to see what’s going on. Each of the 3.5mm jacks has its own multi‑colour LED, which tracks the colour of the Grid module’s input or output on screen (though the colour indication was not totally reliable for me). Multiple signals to the same output are summed.
At this stage I did start to question the choice of six main audio outputs and only two inputs (not counting headphones or the 3.5mm jacks). I would have thought it more likely that users would want to bring more audio channels into Bitwig Studio than drive lots of outputs: for most gigs, stereo + headphones is plenty, and if you want to do serious surround then you’ll want more than six outputs, maybe even an ADAT connection. A Connect 6/10 (or even an 8/8!) would probably suit my needs a little better.
4/12 Conclusion
I was initially sceptical of a control surface with only one dial, but the workflow of the Connect 4/12 has been really well thought out, the routing and control functions are easy to reach, and the mouse‑over navigation works much better than I expected. Its interfacing with modular gear is easy to use and just works, which fits in perfectly with Bitwig Studio’s existing modular environment. I just wish it had a few more audio inputs!
Pros
- Well designed ‘hands on’ functions on the front panel.
- High‑resolution dial works well for editing, scrolling and scrubbing.
- Neatly integrated into Bitwig Studio as control surface and modular interface.
- Good build quality.
Cons
- Limited number of audio inputs.
- Some functions disabled at high sample rates.
- No scroll or zoom functionality for Launcher clips.
Summary
Bitwig have scored a triple whammy with the Connect 4/12: it’s a solid hands‑on audio interface, a well‑integrated control surface and a powerful link between the Bitwig DAW and a modular synth environment. It pushes all the right buttons.
Information
£439 including VAT.
$599
When you purchase via links on our site, SOS may earn an affiliate commission. More info...
When you purchase via links on our site, SOS may earn an affiliate commission. More info...