 A traditional ‘you’d never use these all these settings in real life’ shot to highlight some of HitStrip’s features!
With its combination of creative and corrective tools, HitStrip puts all the channel processing you’ll ever need in one intuitive window.
Channel strip plug‑ins aren’t a new idea, but DJ Swivel’s HitStrip seeks to bring it up to date, combining commonly used elements of different plug‑ins — plus a few more special features — in a single, intuitive GUI. This plug‑in is available in the usual formats on Mac and Windows and authorisation is by serial number. The download was refreshingly small (a 69.1MB DMG file for my M1 MacBook Pro) and installation painless. On first opening an instance, only the EQ and dynamics sections are activated, but you’ll can see an array of greyed out options in tabs across the top, and I’ll run through all of these facilities below.
Banding About
Let’s start with the EQ, which is based around a familiar‑looking nodes‑on‑curve plus frequency‑analyser display. There are multiple ways to create nodes, the most intuitive being to click on the yellow line. This adds a bell node and, in FabFilter Pro‑Q‑esque fashion, the controls for this band or whichever you select thereafter float over the display. Other features are borrowed not only from Pro‑Q, but some other modern EQs too. For example, not only can each band can be static or dynamic, but it can instead be set to EQ only the transient or tonal portions of the signal, as in Eventide’s SplitEQ (whereby the default range control for the dynamic bands becomes a transient‑length control). These modes are selected from a drop‑down on the floating control set.
Each band is a bell by default, but another drop‑down presents different options: low‑pass, high‑pass, band‑pass, notch, low‑shelf, high‑shelf, and two variations on a ‘tilt’ EQ (a straight line or dual shelves). There are two more drop‑down menus, the first setting the slope from 6 or 12 dB/octave up to 96 dB/octave in 12dB/octave steps. Such options are a familiar sight for high‑/low‑pass filters, but here they’re available for all filter types, meaning you can do some very interesting things to the curves, as seen in the main screenshot. But it’s not just about making interesting shapes possible: it also means you can create pretty intricate EQ responses using just a few nodes — and so with less clutter. The final drop‑down menu determines which signal(s) the band acts on: stereo, left, right, Mid or Sides.
Between the menus, you have the main length/range, gain, frequency and Q knobs, and top right of the floating control set you can engage band solo, and split the band into separate channels (if the band is in stereo, left or right mode, you’ll have separate linkable nodes for left and right, whereas if you start with a Mid or Sides band, you’ll have both Mid and Sides nodes). You can also delete the band. Some of this control is helpfully duplicated in a smaller control set under the node nearest the mouse cursor, but there are some subtle differences: while you can see the settings, for example, you can’t tweak them on this window (you can move the node to change the frequency and gain, of course, and can hold down a modifier key to adjust the Q); the band solo here is a click‑hold type, whereas that in the lower window latches on when clicked; and you can’t split nodes, access the dynamic/transient functions or set the slope steepness.
You can create anything up to 24 nodes, so there’s plenty of scope to get as surgical as you need to. The display also includes a frequency analyser, and can be set to show a mastering‑friendly ±6dB range up to a more radical ±36dB; it defaults to a ±12dB, and the range grows automatically if you boost/cut beyond the display. An EQ wet/dry blend at the top applies to all bands, making it possible to scale back an exaggerated curve, which can be handy if you take things too far.
At the bottom, a virtual keyboard can be popped out. As well as giving your EQ moves a musical reference point, you can click on any key to create an instant 3dB bell cut. This makes it trivially easy to nix a fundamental and then zap some harmonics, and since you can lasso‑select multiple nodes, you can then change the Q, gain or frequency of them all en masse. Very slick! One little gotcha to watch out for is that if sweeping the frequency of multiple nodes, you can run out of road: if the outermost nodes hit the 20Hz or 20kHz extremes and you keep sweeping, the nodes start to bunch up, and it’s not undone if you then dial things back; the built‑in undo didn’t seem to undo these moves.
In, Out, Squash It All About...
Flanking the EQ’s graph display are input and output meters and some interesting level controls. A stereo (L‑R) meter on the left ranges from ‑∞ to 0 dBFS, and a draggable numeric field above provides input gain control (‑∞ to +12 dB). You also have a gate, which can be activated in a tab at the top, by turning the attack or release knob under the meters, or popping open the ADV (advanced) panel, which brings up more controls (ratio, threshold, range, knee, low‑ and high‑cut filters, and look‑ahead delay). On the right of the display, it’s a similar setup for the output limiter: there’s a threshold control on its gain reduction meter, and it features automatic make‑up gain so that as you drag the threshold down the signal gets louder. That’s not how I like to work for every source, as it happens, but it’s easy enough to dial in the desired gain reduction and then pull the signal down post‑limiter by dragging/typing the output level at the top.
The gate and limiter aren’t the only dynamics processors. Not only can any of the EQ bands be made dynamic, but there’s also a dedicated Dynamics tab with a control set just beneath. As with the other tabbed sections (other than the input and output stages) this can be dragged to the desired place in the signal chain, and it can be a compressor or expander, as you prefer. The usual controls are available (threshold, ratio, attack, release, knee and make‑up gain), along with another level meter for the Dynamics section’s input signal, and a large horizontal bar graph for gain reduction; from 0 all the way to ‑60 dB, with the most useful area in the right half. The make‑up gain can be set manually or automatically and the left and right channels linked or not.
 The Dynamics section can be a compressor or expander and as well as reacting to the internal or external side‑chain, it can be set to react to pulses on beat subdivisions: instant pumping effects!
This is all handy to have in view, if pretty conventional. But the Dynamics processor’s side‑chain support is more unusual: the compressor/expander can react to the internal signal as usual, to an external side‑chain sent from another DAW track, or to an internal pulse set to beat subdivisions of your choice (1/1 down to 16th triplets), for sync’ed pumping or tremolo effects. There are dedicated plug‑ins that might give you a little more control over this sort of effect, but for the pumping effects you hear in so much EDM and hip‑hop these days, you have exactly what you need, with no fiddly routing or extra plug‑ins involved.
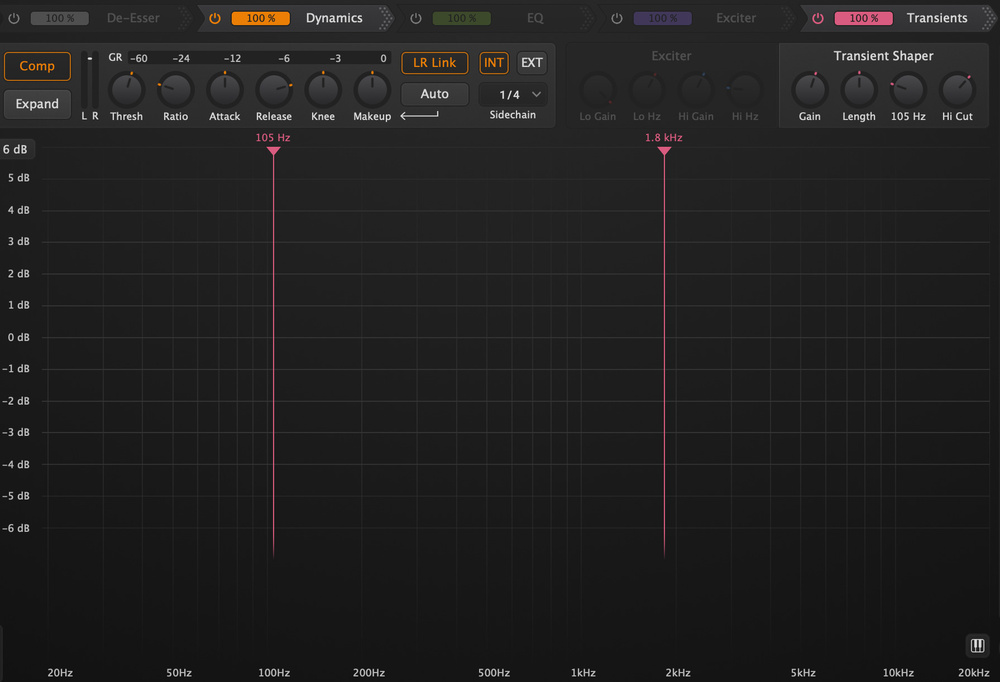
 It’s not just the EQ section that makes use of the main graph display in the centre: tweak the high and low filters of, say, the gate or Transients sections, and their turnover frequencies are displayed there, while the harmonic enhancers appear as a sort of heat map.
On The Tabs
The remaining tabs are labelled De‑esser, Exciter and Transients. The De‑esser takes the form of an additional cut‑only dynamic EQ band with a slightly different control set, and it can employ either a cut‑only bell or a high‑shelf filter. The Exciter tab has controls beneath for a two‑band harmonic enhancer (gain and frequency for low and high bands, respectively) and, helpfully, the target area and intensity of process are reflected for each band as a sort of ‘heat map’ on the main EQ display. The Transients processor allows you to set the length of transients and apply gain to them, and to shape them with low‑ and/or high‑pass filters. These filters are, again, displayed temporarily on the main frequency analyser display (the same happens for any process which includes filters to target the processing, by the way).
A neat user guide gives you a step‑by‑step tour of the GUI and a range of modifier‑key shortcuts.
Finally, across the top are a few more global controls and an unassuming‑looking master section, whose appearance barely hints at the power hidden within. You can access a neat user guide that gives you a step‑by‑step tour of the GUI and a range of modifier‑key shortcuts, which I’ve not listed exhaustively here but which allow you to do things like lock one axis while dragging EQ nodes, make fine adjustments and more — very useful things to learn if you want to work quickly. There are both global and per‑effect module presets, and you can organise these in banks on a menu, which is a nice touch.
After the ubiquitous undo/redo and A/B compare controls comes the master section. This includes a polarity inverter, a stereo widener and a colour (saturation) control, and the latter two in combination can sound very effective. Importantly, there are some handy listening facilities: you can choose to listen to the full stereo signal, fold it down to mono, or to solo the left, right, Mid (the same result as mono!) or Sides channels. Now, all this could be very handy if you have an instance of HitStrip on the master stereo bus, obviously, but these controls also allow you to check properly for side‑effects from your stereo widening and coloration. As with so much in this plug‑in, it makes doing what needs to be done quickly very easy.
Stripped Ease?
I’ve found HitStrip a genuinely interesting plug‑in. DJ Swivel has clearly looked at the software tools he uses in his productions, and set out to combine their features in a way that puts everything he routinely needs in a single plug‑in window. He’s gone a step further, though, and usefully included visual feedback from the different processors on the main EQ display. Of course, with so many controls and so much information in that window, it can at first appear busy and take a little time to reach the point where you start reaping the productivity gains. But once you have found your feet, you’ll find that it all makes good sense and, more importantly, that this plug‑in makes it possible to achieve decent results incredibly quickly.
Can you do everything here with plug‑ins you already have? Possibly. There are plenty of channel strip plug‑ins that cover the basics of gating/expansion, de‑essing, compression, EQ and even width, saturation and harmonic enhancers. Also, your DAW might allow you to arrange plug‑ins in a standard window layout. Some of the analogue‑inspired virtual racks like Slate’s VMR and PSP’s InfiniStrip provide another approach, albeit without the same visual feedback of more proudly digital plug‑ins. You may have a good EQ plug‑in that offers dynamic EQ and control over different channels, but not many of them will offer 24 bands, and while something like Fabfilter’s Pro‑Q 4 does so (and has plenty of unique features) for a similar price, HitStrip offers other benefits such as transient EQ’ing.
Really, though, it’s having an EQ like this at the heart of a full, drag‑and‑drop re‑orderable channel strip, complete with metering, width processing, limiting and monitoring facilities, and with useful visual feedback from different processors all on the one grid, that makes HitStrip different from anything else I’ve used to date. I can see some scope for further features and workflow efficiencies in the future, for example making more options available at a right‑click, and I imagine DJ Swivel will already be looking hard at the host of features FabFilter introduced in Pro‑Q 4 shortly after HitStrip was launched. But it’s early days for this plug‑in, and it already works very well indeed.
I for one think Mr Swivel may well be on to something! You could easily make this your go‑to channel strip: no more burning of time deliberating which plug‑ins to choose, you’d just fire this up and get to work, and then lean on other plug‑ins only when you decide you need their specific features. If you’re looking for ways to sharpen the focus of your plug‑in collection and to mix and master more quickly, HitStrip combines bread and butter features with some more rarefied tools, all in a neat, well thought‑out GUI. It could well deliver the goods for you and is definitely worth a test drive.
Pros
- Everything you’d want in a modern channel strip focused on speed of use.
- Richly featured EQ.
- Width and monitoring controls are really useful.
- A range of modifier keys.
- Good learning/support features.
Cons
- Nothing to write home about.
Summary
A clever combination of traditional and modern software processors with a simple GUI that does everything on a single page.