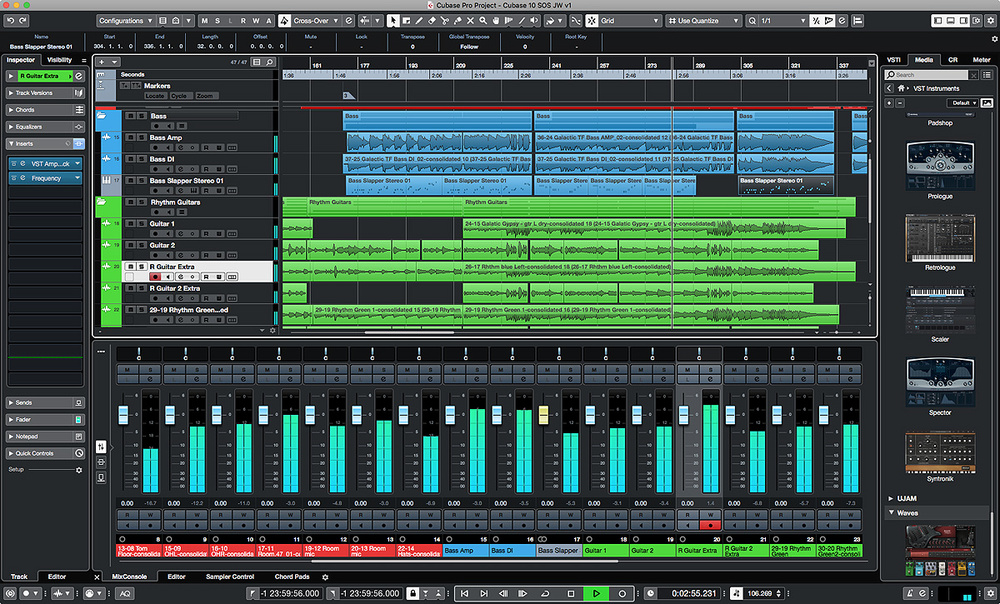
Cubase celebrates a milestone birthday with an update that makes almost every aspect of the program slicker and easier to use.
It's amazing to think that Cubase turns 30 in 2019. With such a long career behind it, it is naturally a very mature, feature-rich application. It has also built up a huge and very loyal user base, ranging from home-based hobbyists to the upper echelons of the music‑producing world. And to support all these varied users, Steinberg continue to offer Cubase in three flavours — Elements, Artist and Pro — ensuring there is something to suit all budgets and upgrade pathways for those with growing ambitions.
As now seems to be the Steinberg norm, the end of the calendar year sees a new Cubase update and version 10 is now with us. SOS has given plenty of coverage to the core Cubase feature set over the years, both in reviews and in many Cubase workshop columns. This feature set remains intact, so I'll simply focus here on the new elements introduced in Cubase Pro 10. Steinberg's website has a handy comparison chart that outlines which of these new features are included in the more accessible Artist and Elements versions.
I Like The Way You Look
 Almost every dialogue box — including the Export Audio Mixdown dialogue shown here — has been refined in Cubase 10.On first start, there are some obvious cosmetic changes in the new version. Cubase 10 now offers support for high-resolution (HiDPI) displays, so things ought to appear crisper on a Retina or 4k monitor. To exploit this, and to bring some workflow streamlining, the interface has gone through numerous detailed changes, and these are apparent whatever monitor resolution you are using. The look is slightly darker overall, with light-on-dark tool icons throughout, as typified by the main Project window toolbar.
Many windows and dialogue boxes have undergone redesigns; there are too many changes to list here, but at the same time, none of them are drastic enough to be disorientating for existing users. The Export Audio Mixdown panel is a typical example: though there are only minor changes in the actual functionality, it has been reorganised and made easier to navigate, while features you don't use regularly can easily be folded away.
 Like many of the stock plug-ins, Stereo Delay has received a welcome makeover.Many of the stock plug-ins have also been given a makeover, continuing a process that has been ongoing over the last few update cycles. The results are much slicker in appearance, and also make the controls more logical in use.
Other examples of 'cosmetic but practical' improvement include, for example, the Colorize Palette and the Add Track dialogues, both of which can now be kept open as floating windows. This sounds like a minor change, but actually makes these tools much easier to use: you can now colour-code your whole project without needing to continually return to the main menus, and rapidly add all the tracks/track types required in a new project to get you started. The functionality of this second dialogue has also been enhanced so, for example, if you're creating a new audio track and you assign it to an as-yet unassigned hardware input, that input is automatically added to your Audio Connections configuration; you don't have to do this as a separate operation.
 Both the Add Track and Colorize dialogues can now stay open as floating panels: a small change, but a very useful workflow enhancement.
 The Project window's Right Zone now includes drag and drop for VST effects selection, and options for showing image icons for third-party plug-ins.Another obvious cosmetic/practical enhancement is in the Media tab of the Project window's Right Zone. You now have the option to drag and drop VST effects as well as VST instruments into your project. In addition, you can also capture an image of the user interface of any third-party plug-in (once the plug-in is open, there is a small camera icon located next to the plug-in's preset browser) so that you see a visual representation of the plug-in within the Media tab browser. Very neat!
As indicated above, these are just examples of the sort of small-but-worthwhile changes made throughout the program that enhance both its appearance and usability. Worth noting, however, is that because of the extensive GUI changes, any user-defined colour schemes or Project and MixConsole window layouts are not carried forward into Cubase 10. These can, of course, be recreated in version 10, and although this will be irritating for some, it is at least a one-time task. Overall I think Steinberg have done good job of further refining the appearance of Cubase.
Vari Able
Audio pitch correction is now a near-universal studio tool, and for me, Celemony's Melodyne has always been unrivalled in the degree of forensic control it allows you to apply to your pitch curve. Unrivalled until now, that is — because, in VariAudio 3 within Cubase Pro 10, Steinberg have really upped the ante, both in terms of the degree of control and the ease with which the different pitch editing tools can be accessed. No, it doesn't offer Melodyne's polyphonic pitch‑correction options, but for working with monophonic melodic lines such as vocals, VariAudio 3 is a very impressive upgrade.
 The comprehensive VariAudio 3 Smart Tools collection makes for super-efficient pitch-correction.Once you have enabled VariAudio on an audio clip, and Cubase has done its pitch analysis, your individual pitch segments now appear with up to 11 different 'smart' controls arranged around the currently selected segment (you can toggle on the display of all 11 using the VariAudio tab of the Inspector panel). This means that all the editing functions are now instantly available. For example, as you hover towards the base of a segment, a horizontal line or glue stick appears so that you can instantly split a segment or join two together without needing to visit the Inspector to change tools.
You can quantise the pitch, adjust the tilt of the pitch curve (from either end and with a user-defined anchor point) and straighten the pitch curve, all without moving away from the segment. However, you can also adjust the formants and (rather wonderfully) the segment's volume using the tools located bottom left and bottom right, respectively. The latter is very useful as an alternative to creating detailed volume automation for levelling an inconsistent vocal take. The left/right 'triangle' tools at the top of the segment allow you to quickly define zones at the segment's start and end where straighten edits are excluded, which is obviously useful for keeping note transitions sounding more natural. Many of these editing options can work across a selection containing multiple segments, and you also still have controls within the VariAudio tab if you wish to adjust settings there.
As before, the actual quality of the pitch correction remains very good indeed, whether you're simply nudging a few cents or rewriting a melody by a semitone or three, and many of these controls existed within the second generation of VariAudio. However, having them all instantly to hand while editing a segment makes them much, much more efficient to use. For monophonic audio, the degree of pitch control is now on a par with that found in Melodyne — and, if anything, the new workflow enabled by this expanded set of smart controls is even better. Oh, and from the VariAudio Inspector tab, you can now pick a MIDI track to overlay in the Sample Editor window as a pitch reference while editing, which can be very helpful. If you do any amount of vocal (or instrument) pitch-correction work, VariAudio 3 is going to save you a huge amount of time.
All Lined Up
For some time, Steinberg's Sample Editor has provided users with all the tools required to tighten the timing of audio recordings, using a combination of VariAudio and Hitpoints. What's missing has been some sort of automated alignment function, and version 10 finally delivers that courtesy of the Audio Alignment panel. This allows you to select a reference track as a timing 'master', and one or more target tracks. One click and these will automatically align to the reference.
 The new Auto Alignment feature is a massive time saver for matching the timing of multiple takes.
For things like backing vocal parts, this really does work very well and, compared to doing the same job manually, it is a massive time-saver. The Alignment Precision setting allows you to specify just how tight (or loose) you want the alignment to get. At one level, this new process is obviously making use of the existing audio‑warping technology, but the Match Words option goes further, apparently being capable of detecting and matching phonemes and syllables in spoken and sung audio. Auto Alignment also seems to work well for tightening non-vocal sound sources such as double-tracked guitar parts, and seemed happy to work with stereo recordings as well as mono.
While Cubase might not be the obvious environment for extensive Automated Dialogue Replacement (ADR) for film dubbing, I did give this a brief try and, providing the live audio (your reference) isn't masked by lots of other 'on-set' noise, the Auto Alignment algorithm does a decent job. The Prefer Time Shifting (as opposed to time-stretching) option is intended for time-aligning multi-mic recordings of the same source, and could be used on, for example, top and bottom snare mics to tackle phase issues.
Of course, Audio Alignment is not completely foolproof, and the options for manually aligning audio are still available. However, one further addition to the Sample Editor makes this manual alignment somewhat easier. If you select multiple clips that overlap on the timeline, the Show All Selected Audio Events means you can visually overlay multiple waveforms within the display. As you warp edit the active clip, you can now see how its waveform shifts relative to the other displayed clips.
 You can now overlay multiple audio waveforms within the Sample Editor.
Sharp Shots
The Cubase MixConsole already has a History feature — available as a tab within the Left Zone — and while this is very useful for undoing changes you decide you don't like, it is not saved within your project. You can, of course, save multiple versions of your project if you want the option of experimenting with different mixes but, in Cubase 10, you now also get a further option: MixConsole Snapshots. These are also available from a tab in the Left Zone, while a Snapshots button is available in the MixConsole Toolbar and you can also recall, delete and rename Snapshots from here. You can create up to 10 such Snapshots and these are saved with your project.
 The new MixConsole Snapshots system provides a useful tool for comparing alternative mixes.A MixConsole Snapshot Recall Settings dialogue allows you to specify which settings are recalled from any of your saved Snapshots, and you also get an option just to recall settings for a selection of channels. As shown in the screenshot, this includes the contents of the various MixConsole Racks as well as volume and pan information. You could, for example, use snapshots to compare different effects processing options on tracks or your master bus, as well as simple level changes.
Two qualifiers are worth noting, though. First, any automation associated with MixConsole plug-ins is not stored within a Snapshot. This means that Snapshots might not be so useful if you like to spend ages creating automation data for your compressor or reverb, although at least Cubase can warn you before it deletes all that carefully crafted data as you recall a different Snapshot. Second, as should be obvious from the feature's name, these are MixConsole SnapShots and not 'project' Snapshots. If, for example, you experiment with different virtual instrument sounds, these changes outside the MixConsole are not preserved within the Snapshot system.
As long as you keep these points in mind, Snapshots are very useful indeed. If, like me, you regularly find yourself second-guessing mix moves in the final stages of completing a track, it is a welcome additional tool, and one that I'm already finding myself depending upon.
Clearer Channels
One of the most effective of the visual reworkings mentioned earlier is that received by the Channel Strip within the Channel Settings panel. Visually, things are much more appealing, and each section of the strip's controls now has a fetching graphic panel directly above the controls. In some cases, such as the De-Esser and Noise Gate, these include some graphical editing features.
 Within the Channel Settings windows, the Channel Strip has received some very useful visual and functional refinements.
You can also now reorder the Channel Strip sections by dragging within the central pane rather than just within the Right Zone or the MixConsole itself. In addition, while the Channel Strip already allowed you to see the full EQ display as a tab within the central pane, the dynamics section now includes an 'E' button that opens the full interface of the selected dynamics plug-in. Given that dynamics and EQ are perhaps the most routinely used processing tools in any mix, this is a modest, but useful, workflow addition that helps you get the best from the stock suite of plug-ins.
Seek & Distroy
 The new Distroyer plug-in offers multiple flavours of saturation.Talking of which, a new bundled plug-in is included in both Artist and Pro editions of Cubase 10. As the name suggests, Distroyer is a distortion-style effect that adds harmonics to a sound — but as the name doesn't suggest, it can actually do some quite subtle overdrives as well as obvious mayhem. The control set is quite flexible: low- and high-pass filters allow you to constrain the range of frequencies sent through the plug-in, while a Drive control changes the type of distortion rather than just the amount of gain applied and is reflected in the central graphic. The Boost control actually sets the gain, while an interesting Spatial knob changes the character of the distortion separately in the left and right channels for an enhanced stereo effect.
You can shape the tone of the processed signal using the Tone control (a low-pass filter) and a high shelving filter, but perhaps the quirkiest control is the Offset setting. This also changes the shape of the central graphic and obviously influences the harmonic structure of the distortion, but exactly how it does this is unclear, as the description of this control within the Plug-in Refence manual is a little opaque.
Anyway, what's going on under the hood is not really the important bit, and once you start to experiment beyond the supplied presets, you soon discover a remarkably flexible distortion tool that's ideal for adding character to a sound. It's easly to target a specific frequency range in your source, meaning that it can do a great job of transforming an overly polite EDM kick into a raging monster. Equally, applied to a bass, it is easy to get Distroyer to bring out some of the mid/upper-mid frequencies to add a bit of bite.
New Dimensions
With interest in MIDI Polyphonic Expression growing it's good to see that both Pro and Artist versions of Cubase 10 now include MPE support. For mainstream devices such as the ROLI Seaboard controllers, detection and setup should be pretty much automatic, and support includes easy parameter assignment within your VST Instruments. The sound libraries for both Retrologue and Padshop have been expanded to include some MPE-ready presets.
I didn't have access to an MPE controller in my own studio to experiment with this during the review period but, having used a Seaboard RISE on a couple of occasions and been impressed with the additional expressive options if can bring, this is undoubtedly a welcome addition.
Best Of The Rest
What else? Well, amongst a lot of other changes or additions, Cubase 10 also includes some new impulse responses for the Reverence reverb focused on vintage reverb styles, around 5GB of new media content including loops and samples spanning a range of genres, revisions to the audio engine that provide better performance on hosts with higher CPU core counts (as well as getting the engine ready for higher-resolution audio interfaces), enhancements to the Hitpoint detection algorithm, and some improvements for those composing to picture (in particular, editing options for placing events onto exact frame locations on the timeline, which is great for musically 'hitting' visual events).
Cubase 10 also introduces support for Advanced Authoring Format (AAF) both on import and export. Moving complex multimedia projects between systems/platforms can be a challenging process and, while Cubase Pro has had Open Media Framework (OMF) support for some time, for Steinberg, AAF has been a Nuendo-only feature up until now. For those collaborating with other musicians, or working in music-to-picture contexts, its arrival in Cubase will be an important development.
This release also sees some tools added to support those creating audio for VR applications. This is not something I was able to explore during my own testing but, given just how rapidly VR is now moving into the consumer mainstream, developers need systems capable of producing suitable content and, in particular, making audio respond to head tracking in a typical VR experience. Both Nuendo and Cubase can now offer such a platform for audio producers.
Finally, while it's not here quite yet, Steinberg have announced that support for Audio Random Access 2 (ARA 2) — a technology developed between Celemony and PreSonus — will be forthcoming as a free update. This is planned for the first quarter of 2019, and offers deep integration of Celemony's Melodyne pitch-correction software within the Cubase Project window.
The 10 Experience
As I hope is clear from the above, Cubase Pro 10 is not an update that focuses on a single big feature. Instead, there are innumerable changes and additions that affect almost every aspect of the program at least to some extent. Perhaps the best way to close, therefore, it to provide some brief comments on the overall user experience when compared to version 9.5. Having run both versions side-by-side, for me at least, the first observation to make is that the transition was a pretty smooth one. I like the visual changes but, aside from some minor changes in a menu item or dialogue box, there was only one thing that disturbed my existing practices.
In the fine line between evolution and revolution in established software products, developers tend to favour the former so as not to disrupt the practices of existing users. This often means long-standing features remain even if later updates have essentially rendered them unnecessary: someone, somewhere, uses these long-established features as a core part of their workflow. In the main, in version 10, Steinberg seem to have stayed the right side of that line, but one workflow change has caused some users to complain: namely, the behaviour of the contextual menu when you right-click on an event. This is a method of reaching commands that has become ingrained in many users over many years of working. Of course, all the same operations are available from the main menus, and many using key commands (which, you might argue, is a faster approach once you are accustomed to it), but it is a somewhat odd decision to make this kind of change with no obvious warning to users. I do wonder whether there might be enough user pressure to encourage Steinberg to think again on this specific point.
In terms of performance, I can't say I noticed a great deal of difference on my OS X test system. Having run through a range of projects, from simple to more complex, there were no significant changes in resource demands between the two versions. I also didn't experience any technical issues: on my test system, Cubase Pro 10 seemed very stable.
So, there's nothing about Cubase 10 that should put 9.5 users off from updating — but, without a massive headline addition, does it provide enough positive reasons to update? The new features it does include bring very noticeable workflow improvements with certain key tasks. Top of my personal list is the combination of the dramatically improved VariAudio environmant and the Auto Alignment feature, but even the more modest options to keep things like the Colorize and Add Track dialogues open shouldn't be underestimated, nor the option to add VST effects by drag and drop from the Right Zone, the easier side-chain configuration and the MixConsole Snapshots feature.
All the additions of this sort mean less time spent configuring or editing and more time being creative. So, if I had to offer a single phrase to summarise what Cubase Pro 10 delivers, therefore, it would be 'enhanced workflow'. In my own, somewhat unglamorous, part of the music production world, which often involves the need to create music quickly, 'enhanced workflow' is a big deal: personally, therefore, I'll happily welcome that.
If workflow is not your key priority, is there still a case for upgrading to Cubase Pro 10? Certainly, for anyone who does modern vocal production work, VariAudio 3 and Auto Alignment will be more than enough to justify the cost, and for monophonic vocals, VariAudio 3 is now a pitch-editing environment that is on a par with anything else out there. In this context, I think there will also be users of Elements or Artist, who have perhaps not yet invested in something like Auto-Tune or Melodyne, who might be very tempted to go Pro just to access VariAudio.
For others, the key features that justify an upgrade will be found among the new technologies supported in Cubase Pro 10: MPE, AAF, VR and the forthcoming ARA 2. These are all welcome additions that have never previously been supported in Cubase, and in professional contexts, where time is always money, even the availability of one of these might be enough to tip the update balance.
Of course, when a program has been around for three decades and offers a feature set as rich as that now found in Cubase Pro 10, many users will only routinely use a fraction of what's on offer. One person's highlight new feature in the latest release might be another's 'meh!' moment, and only the individual can decide on the merits of moving up — but Cubase Pro 10 is undeniably impressive. After 30 years in the business of creating premier music production software, as you might expect, Steinberg have become really rather good at it. In Cubase Pro 10, they have created a very worthwhile evolution of their flagship product.
Click to check out the SOS Tutorial video course on Cubase 10.
Groove Agent SE5
 Amongst other enhancements, Groove Agent SE5 includes an impressive new acoustic drum set called The Kit.
Steinberg have recently updated their Groove Agent virtual drummer to version 5 and, as before, the SE version of this is included in Cubase 10 Pro, Artist and Elements. SOS has a full review of Groove Agent 5 in the works, so in this review, I'll just highlight the key changes to SE5. However, I'll preface that with a general comment: despite a somewhat busy user interface, I think Groove Agent is an often-overlooked gem and, even in its SE form, has plenty to offer.
In terms of what's new this time around, there are some notable changes, and some impressive new content for both the Beat Agent (GA's drum machine environment) and Acoustic Agent. For the former, this includes the new Laser Beams collection of electronic drum kits; as well as some very cool new drum sounds, these kits also include more melodic-type samples than previous kits, forming something similar to a sample library loop-based construction kit that lets you easily create complete music beds from just a single kit.
The new Acoustic Agent kit, simply called The Kit, is particularly impressive. Under the hood, Steinberg have expanded the number of velocity layers Groove Agent supports from eight to 32. I'm not sure if The Kit fully exploits this, and it might not offer the same level of realism as, for example, Toontrack's Superior Drummer 3, but The Kit is impressive in its own right and, given the mixing and effects options the Acoustic Agent offers, you can coax a wide range of acoustic drum styles from GA SE5.
One further cool new feature for the Acoustic Agent is the Export Mixer And Effects To Cubase option. This takes any settings from the GA SE5 mixer and reproduces them as channels within the Mix Console. You could previously have done this manually by activating multiple outputs and copying settings, but to have this work all done with a single click is a massive time-saver if you prefer to do all your mixing in the Mix Console. It is not supported (yet?) for Beat Agent but it would be great to see that added at some point down the line.
Other changes include an improved browser that offers better navigation and auditioning of kits, individual sounds and any of your own samples. This makes it very easy to replace drum sounds on the fly while GA SE5 is in playback. A new keyboard display option is available for easy reference and triggering of any loaded patterns, the interface can now be resized and, if you need them, you now have 32 outputs rather than 16. GA remains a fairly 'dense' instrument but, even in its SE form, this is powerful stuff with an impressive collection of content.
Compensation Payments
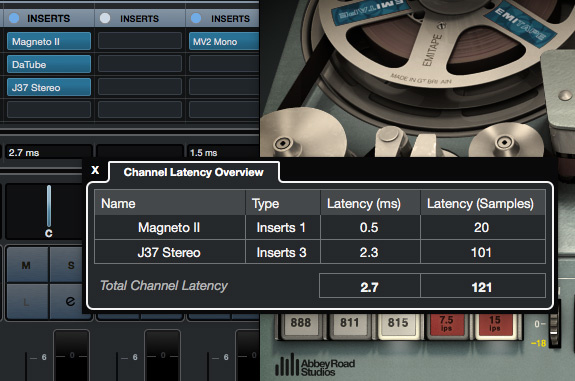
For many years, Cubase has automatically compensated for latency induced by plug-ins and other real-time processing. This is designed to operate behind the scenes, so that users can simply ignore the issue and get on with making music. However, if you want more information on where latency is occurring within your project, you can now enable a Channel Latency Overview feature in the MixConsole's Setup menu. This appears sandwiched between the upper racks area and the lower faders zone, and provides you with a figure for the overall latency of each channel. For more detailed information, clicking the drop-down to the right of the latency figure pops open a latency-per-plug-in display.
I have to admit that I found the information displayed a little puzzling at times. For example, some plug-ins on a channel didn't produce any data within the detailed overview. I assumed this might be because they operate at zero latency — but then some third-party plug-ins I tried did show up with a zero-latency value. I presume there is some under-arching logic, but a somewhat expanded entry in the PDF Operational Manual might be useful so users can get the most from what is a potentially useful utility.
Taking Side
Side-chaining is a very common mix technique, particularly when it involves compression, but even for experienced users, it can be a bit of a faff to configure. Steinberg have tried to simplify that initial configuration process in Cubase 10. Let's consider a typical application where a compressor on your bass guitar has a side-chain input fed from the kick drum track. Every time the kick hits, the bass gets a little bit of compression to 'duck' it slightly out of the way and ensure that the kick is always clearly heard.
Previously, configuring this required visiting both the bass track and the kick track, but now it can be done just from the bass track. Once you have inserted the compressor (or activated the compressor within the Channel Strip), if you engage its side-chain input, a drop-down becomes available that allows you to select the required audio input to feed the side-chain. Making a selection here automatically sets up the required audio send from that source track, so you no longer have to go and do that as a second stage of the configuration. This works an absolute treat, and once you see it operate in this fashion, you are left wondering why it wasn't always like this. It's an efficiency gain for everyone, and for those new to the concept of side-chaining, it is a very welcome simplification that will encourage experimentation.
Pros
- VariAudio 3 and Auto Alignment features are worth the upgrade price on their own if you do any work with vocals.
- MixConsole Snapshots are a very useful addition.
- Graphical overhaul makes for a slicker look.
- New Groove Agent SE5 acoustic kit is a star amongst the additional media content.
- Many simple, but useful, workflow enhancements.
- Some welcome technical additions including MPE, AAR, VR and ARA 2 support.
Cons
- Changes to the context-sensitive right-click menu system not welcomed by some.
- Distroyer aside, there are no shiny new effects or instrument plug-ins as an obvious selling point.
Summary
Thirty years in, Cubase Pro 10 is a powerful, sophisticated music‑production system that can meet the needs of many types of user. The latest update contains some significant workflow enhancements all round, and particularly for those who do vocal recording.
information
Cubase Pro 10 £480; Cubase Elements 10 £85; Cubase Artist 10 £265; Pro upgrades from £85. Prices include VAT.
Cubase Pro 10 $552; Cubase Elements 10 $99.99; Cubase Artist 10 $302; Pro upgrades from $99.99.
test spec
- Steinberg Cubase Pro 10.0.5.
- Apple iMac with 3.5GHz Intel Core i7 CPU and 32GB RAM, running MacOS 10.13.6.