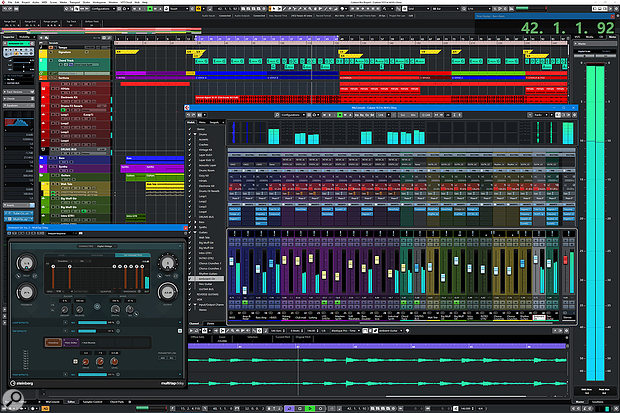
 Cubase Pro 10.5 in all its glory. Note the new MultiTap Delay effect included with the Pro and Artist editions, and the coloured channel strips in the mixer.
There's something for everyone in the latest version of Steinberg's flagship music production package.
Christmas was coming, the goose was becoming rather overweight due to a lack of dietary restrictions, and Steinberg released what has become the now-traditional end-of-year update to Cubase. Given that the last release of the company's Advanced Music Production System was version 10, launched on November 14th 2018, Steinberg's past roadmap strongly suggested 2019 would be an x.5 year. And indeed, the company didn't disappoint, unveiling Cubase 10.5 almost a year to the day on November 13th with no shortage of new features and improvements.
Available in the usual Pro, Artist, and Elements editions, this review focuses primarily on Cubase Pro 10.5 — the inclusion (or lack thereof) of certain new functionality in other editions will be mentioned as necessary.
Exporting Video, Ten-Point-Fivenally!
One of the most requested features in Cubase has been the ability to export a video file containing both the audio mixdown and accompanying video from a Project. Long-time Cubase users might remember the Replace Audio in Video command, which allowed you to replace the audio within an existing video file, and which was dropped when Steinberg introduced a brand-new video engine in Cubase 9.0.30.
Despite some consternation, this new video engine was necessary — and arguably overdue — because Steinberg's previous cross-platform video engine utilised Apple's QuickTime technology. The Windows version of this had been withering on the vine for years, and was finally put out of its misery in 2016. The new engine was a huge step forward in terms of supporting modern containers and codecs for playback, but the capability to export video was, to paraphrase a Steinberg support article, pushed back as a planned development for future updates. It was promised for Nuendo 10, released in April 2019, but missed the initial 10.0 release, and eventually showed up in Nuendo 10.2 around six months later. Finally, it's now available to Cubase users too.
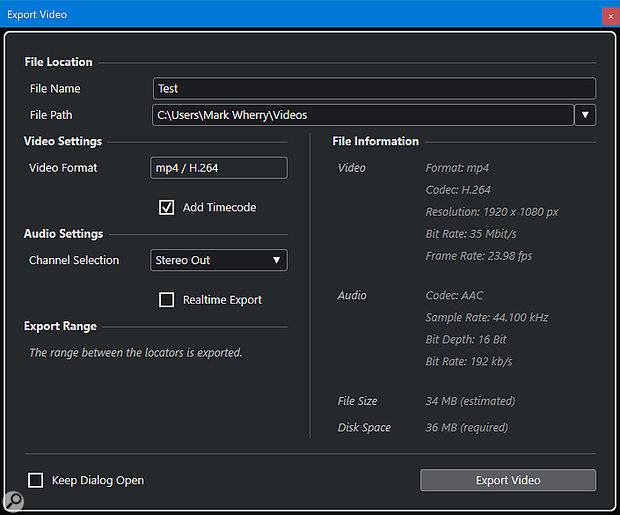
Unlike the original Replace Audio in Video command, which added audio to an existing video file, the new Export Video command offers much more flexibility by creating new video files based on the position of the locators. To export a video, simply set the required range using the left and right locators and select Video from the File / Export submenu. In the Export Video window, set a name and path for the video file to be created, choose the stereo output to use for the audio to be included in the video (and whether that audio should be rendered in real time or not) and click the Export Video button. Et voilà!
A new video file will be created in an MP4 container, using the H.264 codec to render HD (1920x1080) video (upscaling or downscaling the resolution as necessary from the source resolution) at the same frame rate as the imported video. For audio, the AAC codec is employed to compress audio at a 16-bit resolution using the Project's sample rate, although only 44.1 and 48 kHz sample rates are supported.
 The new Export Video window makes it easy to create a new video file with audio from the active Project.
I tested the Video Export command by importing a MOV file into a Project. The video was encoded with Apple ProRes 422 SD (1280x720) at a 23.976 frame rate, and the feature worked as advertised, which was great. However, I couldn't help but think I'd like to see more options for choosing additional containers and both video and audio codecs, with support for 24-bit resolutions and other sample rates. The lack of options on offer at export stands in sharp contrast to the wide array of video formats supported for import and playback. Perhaps we'll see more choice in future versions, although maybe I'm being picky: even in professional contexts, sending a file created using the current Export Video offering gives you something that can be played back by almost any system and will be more than acceptable to almost any client.
For such a useful and advanced feature, it's perhaps surprising Steinberg decided to include Export Video not in just Cubase Pro, but Artist and Elements as well.
One additional thing that an be optionally included in a video exported from Cubase is a timecode burn-in based on the current Project time. This could be useful for reference, or if the source video doesn't include such a burn-in already, although there aren't too many options to define how the timecode appears on the video. Based on the Video Player settings in the Studio Setup window, you can set how the timecode is horizontally aligned, resulting in white numbers in a black box being displayed. Again, more options would be nice: since you can add burn-in to the video, why not offer size, font, colour, and vertical alignment options as well? Or take it a stage further and allow dates to be added, plus the source video file name and custom text if required?
For such a useful and advanced feature, it's perhaps surprising Steinberg decided to include Export Video not in just Cubase Pro, but Artist and Elements as well — although given the number of users who add audio to video clips these days, it probably makes sense, giving Cubase Elements even more allure for those looking for powerful features at a cheaper price point.
In Retrospect...
The seemingly innocuous Retrospective MIDI Record command has been both renamed and enhanced in Cubase 10.5. Previously, this relatively straightforward feature captured any incoming MIDI data while the sequencer's transport was either stationary or playing back, maintaining the timing data in both states. If you happened to play something unbelievably brilliant, rather than kick yourself for not being in record, you could simply select Retrospective MIDI Record, and a new MIDI part containing the captured sequence of Events would be created on the selected MIDI or instrument track. Easy. In fact, many people I know prefer to use this command rather than putting the sequencer into record, although I find myself being more old-fashioned in this respect.
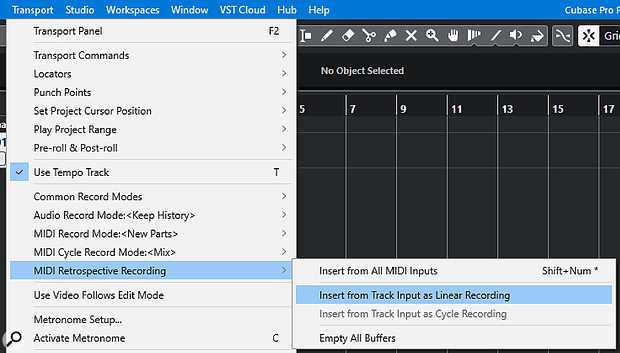
MIDI Retrospective Record functionality is now accessed through several different commands, which are available in a few different places, starting with the Transport menu. There's now a MIDI Retrospective Record submenu, and the closest command to the original is called Insert from All MIDI Inputs, which is assigned the same default key command (Shift and the * key on the numeric keyboard) as before. This results in the captured Events being inserted on the selected track; but, where previously the command could only be used once, this is no longer the case. Now you can select the command as many times as you like, inserting the Events on the same track or different tracks, with the buffer only being reset if Cubase either begins receiving new Events or you select Empty All Buffers from the submenu.
 The new MIDI Retrospective Record commands can be accessed from a Transport submenu, or a new menu from the Basic Settings section in the inspector.
You'll notice the command is named Empty All Buffers and not Empty Buffer, and this is because — in addition to there being one overall buffer, as before — each MIDI and instrument track now has its own, independent buffer for retrospective recording. Using the new Insert as Linear Recording command you can insert Events played on the track selected at the time of capture, which is similar to Insert from All MIDI Inputs except that Events can only be inserted on the track that was selected when they were captured: if a different track is selected, Insert as Linear Recording is unavailable.
 To make this a bit more obvious without having to access the Transport menu, the Inspector's Basic Track Settings section now features a new Retrospective Recording pop-up menu at the bottom that provides access to the appropriate commands (sans Insert from All MIDI Inputs) for that track. This pop-up will be greyed out and inaccessible if there are no Events to specifically insert on that track. And, in addition to being able to insert a linear recording, if you were playing back a project in Cycle mode, MIDI Retrospective Recording can also insert the captured Events as a cycle recording, which is rather neat.
Overall, I think it's fair to say that if you use MIDI Retrospective Recording, Cubase 10.5 has got you covered — and, if you don't, this release might convert you.
