Unisum boasts a unique array of advanced parameters, but achieving good results isn't as daunting as you might think.
With so many controls, the initial impression of Unisum is pretty daunting, but not all of its controls have to be used all of the time and you might not use some very much at all. Furthermore, the option of sticking to the presets (created both by this plug‑in's designer Rune Lund-Hermansen and some excellent mastering engineers, none of whom had a particular technique they wanted to push) and adapting just the standard compressor settings in the main section is genuinely viable, because rather than try to 'knock your socks off' with what the plug‑in can do, the presets are useful. So heavy users of analogue mastering kit still have an accessible starting point.
Another approach you can try, without going 'all in', is to start by choosing one of the 'styles', and then listening to what happens as you try things out. After all, whatever the technical description (who knows what 'RMS Speed' is doing in variable increments from 0.500 to 5,000 Hz?), it's only possible to discover what a control does to the music when it can be heard, and what really matters is what decisions an engineer makes based on what they can hear. With the Unisum there are sometimes more things to listen to and more decisions to make than with most compressors, but with practice it becomes easier to find the right ball park in which to begin tweaking.
With all that in mind, I'll approach this review in three stages. I'll first consider Unisum as a broadband compressor, a role in which it is flexible and sounds extremely good, and has a couple of additional features that work very well in mastering and on the mix bus. Then, I'll explore the multiband side-chain controls, which allow the tuning of the compressor's action in three bands. Finally, I'll move on to the other controls, which affect aspects of the other two stages and really set this plug‑in apart from the competition. But it's worth me saying up front that I think the first stage (broadband compression) on its own is already worth the price of admission.
Tweaker's Delight
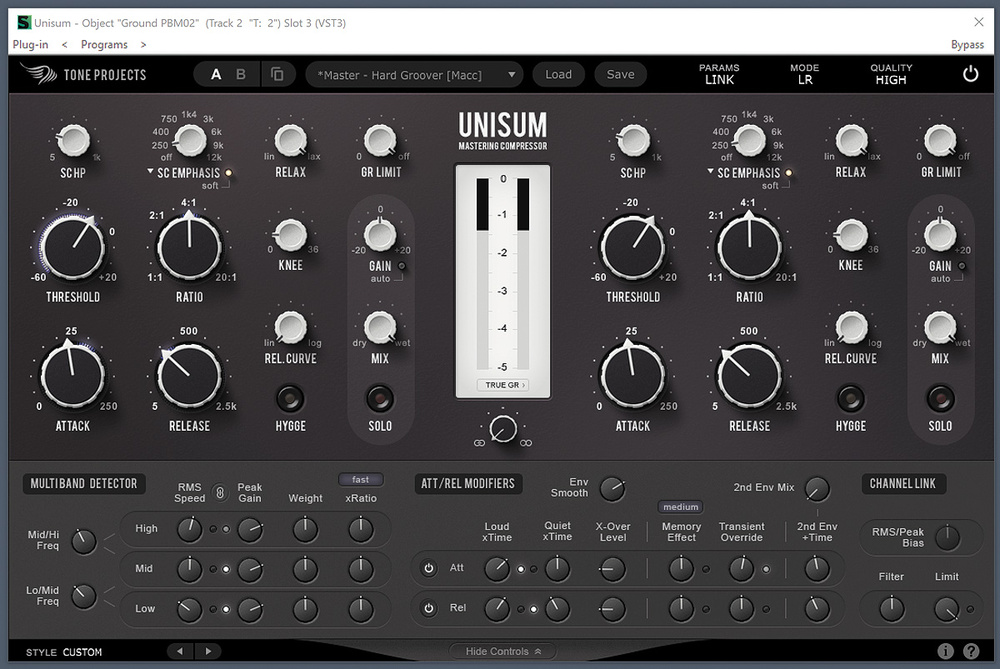
The main section of the GUI hosts a standard roster of controls, in the form of neat Sontec-styled knobs, for two-channel (L‑R or M‑S) broadband compression: Threshold, Ratio, Attack, Release, make-up Gain, a continuously variable Knee and a gentle 6dB high-pass filter on the side-chain. There are some less familiar functions too, all of which are nicely explained by switchable tool-tips: three kinds of broad side-chain filters (emphasis, dip and LP) which increase/decrease the sensitivity in the area of the chosen frequency; a Relax function, which reduces the amount of compression as it is reaching its maximum, making it less aggressive towards transients; an extremely useful Gain Reduction limit, which sets an absolute limit beyond which the other compressor settings cannot take the gain reduction; a Release Curve, which changes the shape from linear to log (linear sounds more energetic, log more relaxed); a dry/wet mix; a solo button (likely more useful when M‑S processing); and a unique 'Hygge' function, which emulates tubes and transformers. In the centre, a large, clear meter can display VU, PPM and True GR and offers three levels of zoom (-20dB, -5dB and 02.5dB).
Clicking Edit Style at the bottom of the main display reveals an array of additional controls. These modify the settings of the main compressor section, the behaviour of the side-chain detector, the Attack and Release parameters and the Channel link settings. It would take several pages to describe these fully and the manual already does a really good job of that, so the descriptions that follow are somewhat simplified.
The Multiband Detector settings split the side-chain into three different frequency bands via 12dB/octave crossovers, and these are adjustable with low/mid (40-1000 Hz) and mid/high (1-12 kHz) controls. Individual controls then affect the detector's sensitivity to RMS and Peak levels within each band, as well as the relationship between them. The weight control affects the contribution given by each of the bands to overall detection (the greater the weight, the more influence of the band on the overall level detection), and a multiplier of the ratio for each band allows for frequency-dependent ratios from 0.1 (slow) to 10 (fast).
The attack and release modifiers are independently enabled multipliers, consisting of Loud and Quiet settings, and a crossover control which allows the user to set what level divides these categories. In effect, Loud means sections of a song where there is quite a bit of compression intensity, and Quiet describes sections where there's less gain reduction at the beginning and ends of the attack and release curves, respectively. While this is possibly the least intuitive of all of the controls, in practice it turned out to be very useful indeed.
The memory effect control sounds a bit similar, as it also enables you to either increase or decrease the release and attack time based on compression intensity, but it responds to the length of the compression as well as to the amount. The idea is that it can be used to mimic the action of analogue optical compressors, in which prolonged or intense compression tends to heat up the photocells and increase the timing.
The transient override control enables the compressor attack and release times to be altered just on transients (the quickest, most peaky of the peaks; use the Peak Gain control to change the transient sensitivity) independently of the main RMS/Peak settings. Turned anti-clockwise, the knob slows the timings down, and turned clockwise it makes them faster. The control sets the transient-detection threshold too: the further it's turned in either direction, the more of the signal is affected.
The 2nd Env (second envelope) is a separate, slower compression envelope which runs in parallel with the main one. It has two main controls: the additional time added to the main attack and release times to create the second envelope; and a mix control, which sets the amount of the secondary envelope in the main mix. Finally, an Env Smooth control adds a smoothing filter to the combination of the main and the secondary envelopes.
The Channel link controls here modify the behaviour of the channel link control in the main section, and are inoperative when that main setting is at 100 percent (fully linked). Clicking on the RMS/Peak control displays the balance of RMS and peak biasing as a percentage. The Filter control affects the influence of the high and low frequencies on the channel linking and, finally, the Limit control sets the maximum permitted difference in gain reduction between the two channels.
Most of the settings have virtual LEDs which are only 'lit' when the respective change parameters are active. This is extremely useful when setting up the parameters, and almost indispensable when starting Unisum exploration, as the numerical values that are displayed aren't really all that informative.
 The lower panel might look daunting, but you won't really need to start tweaking here until you've familiarised yourself with the more conventional controls in the main panel.
In Use
Unisum comes in VST3 (32/64-bit), AAX (64-bit) and AU plug‑in formats and works on Mac OS and Windows. Authorised by a serial number, the process requires no dongle or internet access and is refreshingly simple. There are three quality settings, Realtime, High and Pristine, each offering greater oversampling and consuming more CPU than the last, but even Pristine was easily accommodated on my relatively modest computer.
This is the first time I have ever suggested such a thing, but I think the quickest and most useful way to begin to get to grips with Unisum is, as I hinted earlier, to take some time to explore the excellent presets. This is precisely what I did for my first few learning sessions. There are some real gems in the collection, and having found one that suits the character of the mix, it's then easy to adjust the more familiar wide-band compressor settings as needed. You might want to look at the settings of the advanced controls too, just to see what they're doing for each preset, but I'd suggest leaving them alone until things become more familiar.
Opening the Style section (bottom left of the main window) reveals a choice of 15 different named sets of settings for these additional controls, and they range from the smooth to the aggressive. I found that a good way of getting familiar with the various controls was to start with the Default Style (described as "a well-balanced starting point") and then invoke the different Styles to see how they changed the various settings.
The Default Style sets the side-chain multiband crossover points at 150Hz and 4k, it sets the same RMS Speed (10Hz) and Peak Gain (-3dB) for each band, gives slightly less Weight to the low and high bands, and increases the xRatio of the high band and decreases it for the low bands. It also modifies the Att/Rel by reducing the Loud times but increasing the Quiet; it has no Memory Effect and no Transient Override engaged; it sets a moderately slow 2nd Env and mixes it lightly with the main envelope; and it doesn't engage any of the Channel Link modifiers. In contrast, for example, the Aggressive Style ("Exaggerated low-frequency detector and rough Att/Rel curves") sets each band with the same xRatio, but gives the three bands entirely different detector settings. For instance, it markedly reduces the Weight of the high band, reduces the mid slightly less and increases the Weight of the low band. It also slightly increases the Loud Time ratio, decreases the Quiet Time ratio, disables the Memory Effect, gives the same attack but a faster release to the Transient Override, and introduces a pretty slow-release second envelope.
Unisum can also go in the opposite direction: with all of the smoothing boxes unticked, it can be easily pushed into controllable aggression. Its flexibility really is amazing.
In my own mastering work I found that modifying the settings of the Open Style gave me just what I needed for some sections of a deliberately muted electronica soundtrack for a 1930s French silent movie. I chose low Peak Gain settings and barely gave any Weight to the high band. I then slightly increased the Loud xTime attack and release settings and allowed a high degree of channel independence (only a 20-percent link), with greater influence given to RMS in the Bias settings.
The idea was to get clarity without thinning out the basic sounds, and one of the main challenges came from mid-range arpeggiated synths with rising levels, which, at the higher levels, began to cloud the mix. Some careful adjustment of the Loud xTime settings worked really well: slightly slowing the attack allowed the full musical contribution to come through, but slowing the release in time with the duration of the over-resonant later part of the notes made what they previously clouded in the mix more clear. This is a great feature.
In contrast, for mastering an instrumental dance track, which the client wanted me to make 'wider, warmer and clearer', I started with the Forward Style. I worked in M‑S mode with 35-percent Channel Link, biased towards the Peak. Peak Gains were moderate (except for the low, which benefited the weight and presence of the kick by being a tad higher) but still dominated the behaviour of the Multiband Detector. Again, I set the Loud xTime to minimally slow the attack and the release, to get the unclogging effect, and I set the Transient Override to operate relatively slowly, to allow more of the transients through. In both the main section and the advanced controls, the various settings which encourage a smoother compressor response were disabled or minimised. It all worked very well.
Conclusions
It might have become clear that there is a general tendency in Unisum to encourage, or at least to enable, very smooth compression. The Release Curve in the main section, the use of RMS detection in the multiband detector and the slower second envelope all point that way, and it's true that some very smooth compression behaviours can be found here that work well for subtle, sensitive or exposed material that one might previously have felt would be better left alone. But, as the dance-track example demonstrated to me, Unisum can also go in the opposite direction: with all of the smoothing boxes unticked, it can be easily pushed into controllable aggression. Its flexibility really is amazing.
I was somewhat sceptical to begin with, but having now got to grips with Unisum my main conclusions are entirely positive. The half-dozen controls on both of my analogue compressors have served me pretty well in mastering over the past decade and more, and the Unisum is definitely not a replacement for them. But, as it so often does, familiarity overcame prejudice and the lightbulb moment, when I knew what to do to get the sound I wanted, came much earlier than I'd anticipated. Despite their number, the controls are all nicely laid out and arranged in a logical progression, so once you cotton on to the basics the rest becomes less daunting, and being able to finesse sounds with a very high degree of specificity starts to feel natural.
Alternatives
The unique features of Tone Projects' Unisum mean that it's not just the new kid on the block: it's got a whole new block to itself! But a few mastering compressors share one or two of its nice features. Tokyo Dawn Labs' Kotelnikov, for example, offers more modest frequency-dependent ratios, and the Sonoris Mastering Compressor also has the useful second knee and the best program compression I've yet heard in a plug‑in. DMG's Multiplicity goes even beyond Unisum in its complexity and flexibility, but it's a true multiband compressor, with entirely separate settings for direct control of each of many bands, so isn't strictly comparable.
Pros
- Unique, stellar-sounding compressor.
- So much control and flexibility.
- Informative interface.
- Very useful presets to get you up and running fairly quickly.
Cons
- The more advanced functions present a significant learning curve.
Summary
Unisum is a unique, supremely versatile and great-sounding compressor, with applications in both mixing and mastering.