Vir2’s Phoenix is a one‑stop shop for rises, hits and whooshes.
Sound‑design elements such as risers, hits and whooshes (a riser that also includes a similar tail/fade portion to the sound) are now a common production element in all sorts of musical contexts. While building these sounds using old‑school manual sample layering from scratch is a lot of fun, it’s also time consuming. Thankfully for busy composers and producers, the last few years have seen the arrival of a selection of tools designed to take the heavy lifting out of this task. Vir2 are the latest developers to pitch their hat into this particular ring. So, if you need to rise, hit and whoosh with the very best, is Phoenix less mythical, but just as magical, as its namesake would suggest?
It Is No Myth
Conceptually, Phoenix is fairly straightforward in that it builds directly on the DIY process of sample layering. In essence, therefore, what you get is an underlying 14GB collection of rise, hit and whoosh samples, a user‑friendly engine for combining, manipulating and triggering your chosen combination of samples, and full control over their timing and sync to your host project.
In principle, this is very similar in nature to a number of the other tools designed for the task such as NI’s Rise & Hit or UVI’s Meteor. The relative appeal of Phoenix will therefore depend upon a) the capabilities and user experience it offers and b) the quality of the underlying samples (although, as we will see later, Phoenix includes a cool twist in this regard). Let’s consider these two key elements in turn.
Phoenix Sighting
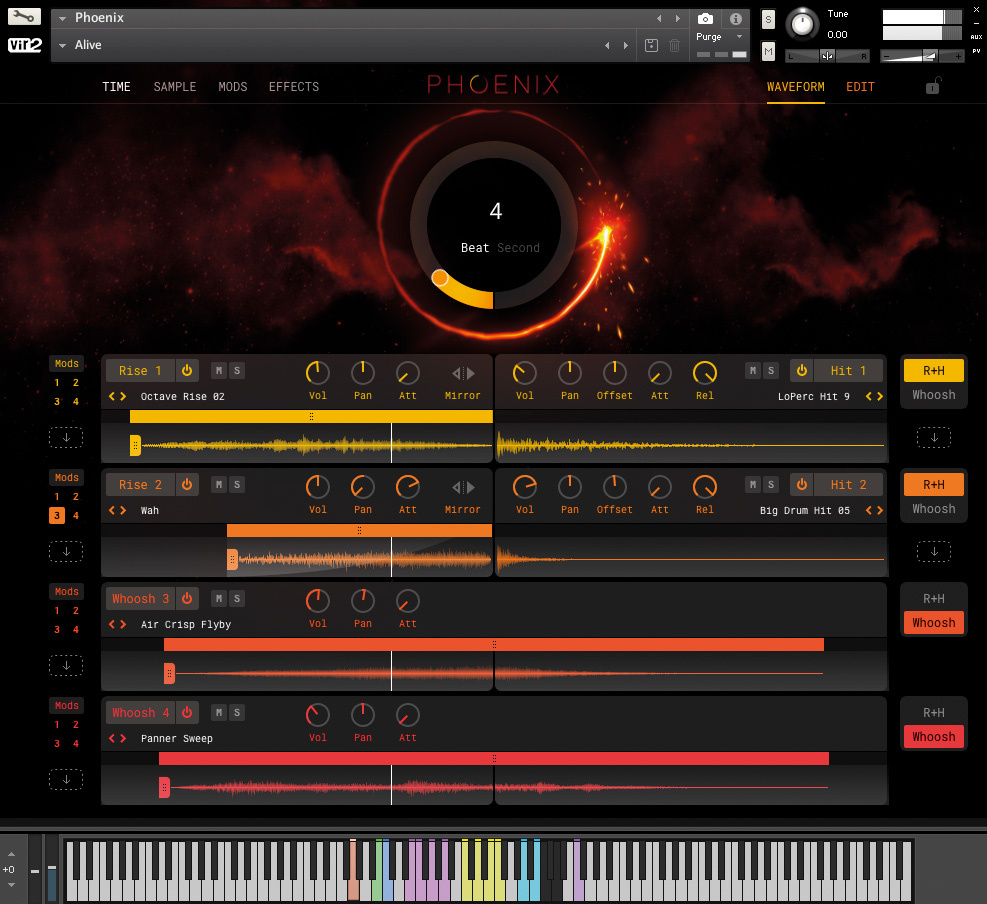
Phoenix’s extensive snapshot‑based preset collection can be accessed from Kontakt’s top‑most control strip, while Kontakt’s virtual keyboard displays the well‑thought‑out trigger key mapping. Phoenix’s controls themselves are contained within a number of tabbed pages. The upper third of the UI can be toggled between Time, Sample, Mods and Effects displays, while the lower zone can be switched between the Waveform and Edit screens.
 Switching the lower portion of the display to Edit view provides access to more detailed controls for each engine.
This lower zone shows the four engine lanes (layers), each of which can be configured (via the buttons located on the far right) to operate as a riser (on the left side) and hit (on the right side) combination or, spanning the full width of the UI, a whoosh engine. Each engine can be toggled on/off individually as required. The Waveform view provides access to some key controls (for example, volume and pan). For risers or whooshes, you can adjust the playback start position via the Waveform display and, within some limits, move the sample left/right to adjust its playback position. The Edit view swaps out the Waveform display for access to a fuller set of controls for each engine. These include a very useful low/high‑pass filter, pitch and, for the hit engines, a Speed control that, alongside the Rel (release) control, can be used to adjust the length of the hit portion of your sound.
In the upper portion of the display, the Time panel allows you to set the length of your riser (or the rise portion of your whoosh), either in seconds or beats (from 1 to 32) and sync’ed to your project’s tempo. Whichever timing method you use, when you make a change, Phoenix stretches/compresses the samples as required.
 The Mods page offers some powerful sound‑design options via a pair of LFO and step‑sequencer modulators.The Sample panel lets you access the neat tag‑based browser so you can audition and pick individual samples for each engine. The Mods panel provides access to four user‑selectable processing options that offer either step‑based or LFO‑based sound modulation. A button array on the far left of each engine lane allows you to enable any of the four modulation effects for that lane. There is lots of fun to be had here and options such as adding a wash of reverb only at the end of the hit phase, or a pitch drop to the hit to create a ‘downer’ effect, are easy to configure. The Effects panels provide easily configured effects chains for both the individual engines and the master output.
It’s also worth noting that the keyboard mapping for triggering your riser, hit and whoosh sounds is very well implemented. For example, it provides both a global trigger (mapped to G1) but also options for triggering individual riser, hit and whoosh engines (so you can mix and match between your four layers for added variety). The hit engines are also velocity sensitive, so you have control over the intensity of the hit via your MIDI input.
Drag & Drop DIY
I’ll come to the included sample library in a minute but first let’s deal with the cool twist I mentioned earlier: the ability to drag and drop your own samples into the engine. Each engine has a drag‑and‑drop zone (the small downward arrow boxes located at each end of the waveform display). Once imported, you have access to all of Phoenix’s processing options and can also save snapshot presets that include your own sample content.
During testing, this worked very smoothly although, of course, you have to apply some common sense in placing a suitable sample into the respective engine type; Phoenix isn’t intended as a full‑fat sample editor. However, as a means of getting a new lease of life out of any riser, hit or whoosh samples you have lying around, Phoenix does an impressive job. Sample import will undoubtedly be something that attracts the attention of potential purchasers.
Transformed Transitions?
Sample import notwithstanding, it also has to be said that Phoenix’s included sample library is well stocked with top‑quality content. What’s here could be used in the most sonically demanding of contexts and it will be a long time before you run out of ways to blend and manipulate the supplied content. Oh, and do note the UI includes a simple randomise system (via the dice icon located top‑right of the browser panel) that offers a number of different ways to take a lucky dip with the included samples.
Stylistically, the content covers the kinds of ground you would expect and, while that perhaps favours cinematic over more conventional pop music applications, the ease with which you can tweak the sounds (especially via those very neat high/low‑pass filters and the pitch‑shifting) means that it’s very easy to transform any sample into something even its own mother wouldn’t recognise.
The Browser tags for the hit, riser and whoosh sample categories give a good sense of what’s here. For example, we have Intense, Airy, Metallic or Sci‑Fi amongst the Riser tags; Dark, Drum, Destruction or Sub amongst the Hits; or High End, Low End, Motion or Non‑Tonal amongst the Whoosh tags. And, for trailer music composers, yes, there are plenty of hits that are big enough to do justice to worlds colliding and lots of edgy riser sounds to ensure the audience is already on the edge of their seat before the worlds do actually collide. Epic is supplied... but Phoenix can also do the lightest of whooshes if you just need to create the faintest hint of a ghost passing behind you.
If I was feeling greedy, there are a few small additions I think would be great to see at some stage. For example, the ability to adjust the end point of a sample in the rise engine would be useful (particularly when loading your own samples of this type). A similar option in the whoosh engine to adjust the end of a sample (or adjust the release of the sample as you can in the hit engine) would also be helpful.
Having used a number of existing riser/hit/whoosh designer instruments that Phoenix is now going up against, I have to say that I think the engine and front‑end is as good as it currently gets.
Conclusion
Phoenix has definitely risen out of the box with some style. If you already have a well‑established workflow with one of the established competitors, then perhaps Phoenix would be ‘good to have’ rather than ‘essential’. However, having used a number of existing riser/hit/whoosh designer instruments that Phoenix is now going up against, I have to say that I think the engine and front‑end is as good as it currently gets. The actual sound‑design process manages to be conceptually straightforward, efficient to use and very flexible. Add in that the sounds themselves are excellent, plus the ability to import your own sounds, and it’s a winning combination. Media composers are going to love it.
Summary
For busy media composers, Phoenix makes the creation of stellar riser, hit and whoosh sounds a breeze via a well‑designed UI and slick workflow. Top‑notch stuff from Vir2.