Whether it's getting rid of the audio you don't want or improving the audio you do want, skilled editing can be the key to making your multitrack project sound polished.
In the first part of this month's double‑headed cover feature, we introduced the basic principles of audio editing in a software digital audio workstation. Now it's time to make those principles work for us, as we look at some of the more advanced applications for multitrack editing.
Silence Isn't Golden
Large multitrack projects contain a surprising amount of silence. Or, to put it more precisely, they contain a surprising amount of unwanted, low‑level audio. Before and after the song itself, our DAWs capture the fascinating sounds of guitarists shuffling about, singers coughing, drummers picking up their sticks and so on. Even during the song, not every part will be playing all the time, and even when you record overdubs for shorter sections, these, too, often capture unwanted noises. The sound of a singer putting his headphones on might not be noticeable on one track in the context of a mix, but if it's repeated across 25 layered backing vocal parts, it certainly can be.
Although it's sometimes fun to leave in studio chatter and stick clicks for artistic effect, mixes are usually improved by getting rid of all this unnecessary noise. The listener will feel the impact when the drums kick in much more strongly if it's not preceded by the sound of the drummer getting ready to kick in! Likewise, audio editing is usually the most effective way of 'gating' tom tracks to remove the unwanted spill between fills.
In most cases, you'll want to clean up your audio as invisibly as possible. The first stage is to cut out only the wanted audio on each track, and fade it in at the start and out at the end. You could fade all the tracks in and out together, but usually better results are achieved by working on a track‑by‑track or instrument‑by‑instrument basis. With fade‑outs, in particular, err on the safe side, as it's easy to lop off the ends of your cymbal crashes or bass notes by accident.  Here, fades have been used to tidy up the end of a Cubase Project. Note the use of different fades on different parts.
When you have multiple instruments hitting a final, sustained chord, you'll often find that some of them have more sustain than others. What starts out as a nicely balanced chord sometimes becomes dominated by the bass, for instance, because its sound decays more slowly. With this in mind, it's often possible to tailor the fade‑outs on individual tracks to keep a better balance as the last chord decays.
Where there are instruments or vocal parts that don't play for large sections of the song, you might also want to snip those out and apply fades there too. Most DAWs have a Strip Silence feature that can automatically detect and cut out sections of audio containing no signal above a certain threshold, then apply fades either side of the gaps.-1xdn68pfg5HnkvBiMOqbrae1LaTnP0hE.jpg "Reaper's equivalent of 'strip silence' is its Dynamic Split feature, used here to gate a drum track.") Reaper's equivalent of 'strip silence' is its Dynamic Split feature, used here to gate a drum track. These functions can be useful in some circumstances, but bear in mind that if an unwanted noise is loud enough to be intrusive, it might also be loud enough that it doesn't get detected as 'silence' and automatically thrown away.
Reaper's equivalent of 'strip silence' is its Dynamic Split feature, used here to gate a drum track. These functions can be useful in some circumstances, but bear in mind that if an unwanted noise is loud enough to be intrusive, it might also be loud enough that it doesn't get detected as 'silence' and automatically thrown away.
If in doubt, it's usually best to leave things in rather than edit them out. This applies especially to the squeaks and scrapes that characterise performances on some acoustic instruments. To the engineer, that finger noise or bang on the guitar body might be a mistake, but at the end of the day, it's an artifact of a real human performance, and if you remove too many such artifacts, you risk losing that human quality.
Comping
These days, alas, it's rare for 'keeper' vocal parts to be recorded in a single take; and other instrumental performances too are routinely 'comped' from multiple performances. So commonplace is it that many DAWs now provide dedicated editing tools to make it easier, such as the Comp tool in Digital Performer 6/7 or the Takes feature in Logic 8/9 (both of which have been covered in detail in workshop articles in Sound On Sound).
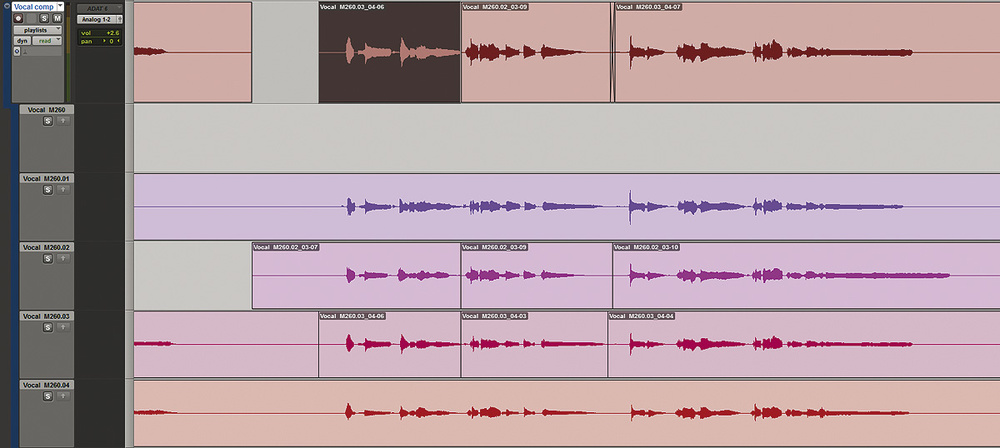
The starting point for a comp is a series of 'stacked' regions, often on the same track, though it is equally possible to use a separate track for each take. There are various ways of approaching the task, but the basic idea is to work through the track in convenient chunks — you might, for instance, 'comp' each line of a vocal performance in turn. So, for example, you might begin by selecting all the regions and dividing them all up at the same vertical positions, so that you have multiple stacked sets of regions, each stack representing all the takes of a particular vocal phrase. Then you can cycle playback around the first phrase, auditioning each vocal take in turn. When you've selected the best, click on it to select it, hold down Shift to constrain its horizontal position, and drag it to a new lane, playlist or track, before turning your attention to the next phrase. Typical vocal comps in Reaper and Ableton Live. Whatever DAW you use, the principle is the same: the best parts of multiple takes are snipped out and assembled on a single track or playlist.
![]()

Once you have a single lane or track containing the best take of each phrase, the chances are that you'll then need to do some work to make the regions flow smoothly into one another. They will need to be crossfaded, and you may also have to adjust region boundaries or introduce gaps to take account of breaths and other artifacts that can sound unnatural when comped. The devil is in the detail, especially with something as exposed as a lead vocal! Make sure you audition your final comp at least once through with any post‑editing effects and processing in place, as compression, EQ and reverb can make audible problems out of things that previously seemed insignificant.
The nuts and bolts of the comping process will vary from DAW to DAW. For example, you'll need to figure out the most painless way to repeatedly audition the same section of song, while cycling through the takes on your vocal track(s) one at a time. If you need to know the details of how to do this in the major DAWs, the SOS web site is a goldmine of information.
Vocal Treatments
When we consider vocal tracks in particular, the processes of comping and tidying up soon shade into a world of editing tasks that have an 'improving' effect on the sound. As well as simply choosing the best phrases, many engineers will zoom in more closely to perform much more detailed editing work. Most of this work is straightforward and surprisingly fast with a little practice, but be sure to keep a safety copy of the original vocal track in case things go wrong.
It's common to apply a lot of compression to vocals at mix stage, and this can bring up the level of breath noises, mouth clicks and other incidental elements of the recording to a distracting degree. You could use volume automation to 'duck' these, but many people find it faster and easier to deal with them using editing tools. There are a number of different approaches here. Perhaps the most common is to cut out breaths as separate regions and use an off‑line Gain plug‑in (most DAWs have one) to reduce the level of those regions by a few dB. Alternatively, you could move the breaths en masse to a second track, which could then simply be made quieter than the original. A third way, which is often the most natural, is to shift prominent breaths and mouth noises along so that they sit exactly on a beat or sub‑beat. This can lead to their being partially masked by loud sounds on other tracks, such as snare drums or power chords, and even if not, will make them fit more easily with the groove of the song. Whichever approach you choose, don't be tempted to delete the breath sounds altogether, or duck them in level too much, as a vocal performance with no audible breathing sounds jolly weird.
There are other common corrective tasks for which editing is ideally suited, too. If your chosen vocal performance suffers from plosive 'pops', the easiest way to deal with them is usually to isolate them manually (you will probably see a distinctive waveform with a lot of low‑frequency content where the pop occurs) and use off‑line processing to apply a high‑pass filter or even a multi‑band compressor just to that region. with different EQ and compression settings. Note also the automation lanes for the reverb and delay — I've used less of these effects on the sibilants.") Manual de‑essing in Cubase. I've chopped the sibilant sounds out of my main lead vocal and placed them on a separate track (below) with different EQ and compression settings. Note also the automation lanes for the reverb and delay — I've used less of these effects on the sibilants.
Manual de‑essing in Cubase. I've chopped the sibilant sounds out of my main lead vocal and placed them on a separate track (below) with different EQ and compression settings. Note also the automation lanes for the reverb and delay — I've used less of these effects on the sibilants. Eliminating a plosive pop in Cubase's sample editor. The upper screen shows the 'before' waveform, with its distinctive low‑frequency content. The lower screen shows the results of applying a high‑pass filter to that section alone.
Likewise, if you have time, the most effective way of de‑essing a vocal track is to do it by hand, using your DAW's editing tools and off‑line plug‑ins. With practice, it takes only a few minutes to solo a vocal track and step through it, cutting out offensive sibilant syllables as separate regions. Once you've done so, you have several options. Quite often, sibilants on the dry vocal itself are unproblematic; the trouble arises when the vocal is fed to a bright reverb or delay. In this case, you can simply use your original safety copy of the vocal track as the dry vocal, and the edited version — with all the sibilants deleted or ducked in level — as the source for the vocal reverb and other effects. 
If sibilance is a problem in the dry signal as well, you can either apply off‑line EQ to the sibilant regions in an effort to tame them, or remove them to a separate track where they can receive their own real‑time processing. When you're using a lot of high‑frequency boost and compression on a vocal track, it's often the case that simply taking the sibilants out of the line of fire and onto an unprocessed track of their own resolves the problem.
Editing can also help in situations where pitch correction is required on parts of a vocal performance, but not the whole thing. Where the singer was in tune, you can leave his or her notes on the original track, while cutting out any dodgy sections and moving them to a second vocal track on which you've inserted a pitch‑correcting plug‑in. Pitch‑correction always seems to compromise the sound, and this ensures that it's used only when it's needed. You could even create several tracks and use more than one instance of your pitch‑correction plug‑in with different settings, perhaps to deal with key changes.
Backing vocals present issues of their own, precisely because you don't always want them as prominent in the mix as the lead vocal. Experienced backing singers will often deliberately miss out or soften the consonants as they sing, in the knowledge that having 20 takes of stacked 'p' or 't' sounds can create something all too prominent. Where the backing vocalists haven't done this, editing can come to the rescue, chopping out anything too prominent and making sure that all the backing vocal passes are in time with the lead vocal phrasing.  in Pro Tools, both to tighten up their timing against the lead vocal (bottom) and cut out or attenuate any distracting loud consonants.") Here, I've manually edited two backing vocal parts (top) in Pro Tools, both to tighten up their timing against the lead vocal (bottom) and cut out or attenuate any distracting loud consonants.
Here, I've manually edited two backing vocal parts (top) in Pro Tools, both to tighten up their timing against the lead vocal (bottom) and cut out or attenuate any distracting loud consonants.
With all this chopping up going on, it's vital to make sure that your editing work isn't undermined by clicks and pops. Listen to the finished vocal parts all the way through, in solo, on headphones, and apply short fades or crossfades anywhere you detect the hint of a problem.
Creative Vocal Effects
Let's take things further into the realms of creative effects and think about how our editing skills might be used to add interest to a vocal part. Duplicating a vocal track in any DAW is trivially easy, and once you have copies of the main vocal to play around with, there's no limit to what you could do. For instance, take the duplicate and slip it back or forward in time by a few tens of milliseconds. Instant ADT! Better still, create two copy tracks, slip the audio on them by different amounts and pan them hard left and right. Instant stereo ADT! For further thickening, try applying small amounts of pitch‑shift to the duplicates, or for a vintage effect, roll off the top and bottom end with EQ, or apply a 'lo‑fi' plug‑in.
Now consider the situation where you want to apply a delay effect to just one word in a vocal part. You could do this by automating a send on the vocal channel, but that's not the only way. Why not cut out the relevant word, copy it to a new track and slide it to the right until it fits with the timing of your song? You can then go crazy with distortion, EQ or effects on this new track to create something more interesting than a basic delay, without having to worry about affecting the original vocal, or creating a new effects bus just for one word. Create lots more tracks, copy the same word to them, apply a different time‑stretch or pitch‑shift to each copy, and you have a crowd vocal.
Duplicate tracks also make the classic 'backwards reverb' effect very easy to apply. On your duplicate track, cut out the section of audio you want to effect, making sure to include a decent amount of silence beforehand. This will eventually become the initial build‑up of your reverse reverb. Now look for your DAW's off‑line Reverse function and apply it to the selected region. You will now have a 'backwards' vocal region, to which you can apply 'forwards' reverb, either using an off‑line effect or by soloing the track and bouncing it through a real‑time reverb plug‑in. Finally, take the reverbed region and Reverse it again.
Drum Replacement
It has become relatively common practice, at least in some styles of music, to replace or augment recorded kick and snare drums with samples. This can be a useful technique, especially when you're dealing with a drummer who can't hit the drums with consistent force. Indeed, replacing the kick drum with a sample is almost de rigeur in modern metal music, where blast beats and other extreme playing techniques can be almost impossible to play with real consistency.
There are numerous plug‑ins available to automate the job, but as with de‑essing, it's one of those tasks that many engineers prefer to do manually, feeling that the small additional investment of time pays off in tighter and better‑sounding results.
The first thing to do is to decide what sample(s) you want to use. If you're using samples to obtain a more consistent performance, rather than deliberately to change the drum sound, it's often best to work with snare and kick hits taken from the original recording session. Many engineers record single‑hit samples as part of the recording process, but if this hasn't happened, it's usually not too difficult to track down a few decent kick and snare hits that don't suffer too badly from spill. Once you've done so, cut them out and copy them to an area of the edit window outside the boundaries of the song, and trim them carefully. For accurate timing, it's vital that these replacement regions are trimmed right up to the start of the waveform — you'll need to zoom right into sample level to get this as tight as possible. The other end of each region will also need to be trimmed and faded; as an artistic choice, you might wish to cut down on unwanted ringing by shortening the region and fading it fairly aggressively.
The next step is to create the additional tracks on which your replacement kick and snare samples are going to live. It's usually easiest to create these directly below the originals, and depending on how your DAW handles things, you might find it easier to work with empty tracks or with duplicates of the original kick and snare regions. Personally, I usually find this easier with empty tracks, so I'll explain this approach.
In essence, what you now need to do is work through the tracks to be replaced one at a time. Let's say, for the sake of argument, that you're beginning with the kick-drum track. First, copy the replacement kick sample you've just isolated to the clipboard. Then work along the kick-drum track listening and/or looking for kick-drum hits, and when you find one, position the DAW's edit cursor exactly at its start. You then hit Ctrl-V (or Command-V on a Mac) to drop the replacement sample onto the empty track just below the original kick-drum track, making sure you're are zoomed in closely enough to check that it aligns both in time and in polarity. If it doesn't, you'll need to nudge it left or right, reverse its polarity using an offline plug‑in, or perhaps even use a different kick sample. , then moving it down to the next track and pasting in my replacement sample.") Manual drum replacement in Pro Tools is a lot easier than it sounds. Here, I'm simply using the Tab to Transient feature to move the cursor along the original kick drum track (top), then moving it down to the next track and pasting in my replacement sample.
Manual drum replacement in Pro Tools is a lot easier than it sounds. Here, I'm simply using the Tab to Transient feature to move the cursor along the original kick drum track (top), then moving it down to the next track and pasting in my replacement sample.
With practice, this can be done surprisingly fast in most DAWs, especially if — like Pro Tools — they have a Tab to Transient function or similar. Tab to Transient automatically places the edit cursor at the next transient along, so if you're working in Pro Tools, you can simply hit the Tab key until you reach a hit you want to replace, then move the cursor down to the replacement track and paste your sample in. With the Pro Tools Keyboard Command Focus active, this sometimes makes drum replacement as simple as hitting Tab, semicolon, 'V' and 'P' over and over again. Other DAWs support macros, which are very handy for repetitive editing tasks such as this.
There are a number of refinements you can apply to this technique. For instance, using the same sample to replace each snare or kick drum hit can sound very samey, so you might want to go through in several passes, replacing a few hits each time, and using different samples each time. You could isolate separate quiet and loud samples and use them either to reinforce or iron out dynamic variations in the original drum track. You could edit your replacement samples so that they are all transient with no ring, or vice versa, and use them to rectify a lack of 'crack' or sustain in the original sound. You could pitch‑shift the replacement samples to help them cut through or add low end. And so on, and so on...
Making Rearrangements
The plastic nature of digital audio means that it's easy to use editing tools to change the structure of an entire multitrack song. For instance, let's suppose you decide that an instrumental section in the middle is too long, and that removing eight bars starting from bar 96 would help it flow better. If the song is recorded to a bars and beats grid, you'll want to have snap to grid enabled; otherwise not. Next, make a selection that extends vertically across the entire song, beginning at the first beat of bar 96 and ending just prior to the first beat of bar 103. If your DAW has a Shuffle edit mode, you can now simply turn it on and hit Delete; if not, you'll need to hit Delete, then select everything to the right of the gap and drag it forwards. If the song is not gridded, you'll probably need to experiment and move these regions around a little to get the edit into time.
If you're lucky, the same edit position and the short crossfade on every track will work acceptably, especially if they occur just before a drum beat or some other masking event. However, it's entirely possible that some of the tracks may need to have their edits moved to a more amenable position. For instance, it may be that some instrumental licks originally started on the pickup beat at the end of bar 102, rather than precisely on the start of bar 103. In this case, you'll need to relocate the edit on those tracks so that it occurs a beat earlier. Likewise, a short crossfade of a few milliseconds will probably suit most tracks, but sustained sounds might require longer fades.
Timing Correction
Like comping and drum replacement, timing correction is another editing task that has become so commonplace in the DAW universe that specialist tools have evolved to carry it out. The grandaddy of these, and arguably still the best, is Beat Detective in Pro Tools, but every major DAW has its own way of automating the process to a greater or lesser degree. And many of the more modern variants, such as Cubase's Audio Warping or Elastic Audio in recent versions of Pro Tools, move away from a traditional editing‑based approach to a world of time‑stretching and hitpoints that is beyond the scope of this article.
Nevertheless, there are still plenty of engineers who don't trust automated tools to get things right, don't like the sound of time‑stretched audio, and prefer to do everything manually.
Supposing you're working with a multitrack drum recording, the first step is to group all the relevant source regions or tracks together. It's vital that all your edits occur in exactly the same place on each track, or you'll end up with a horrible phasey mess. Next, you need to establish what exactly your timing reference is going to be, and make it visible adjacent to the drum tracks. In this example I'll assume that you're correcting to the bars and beats display on your DAW's timeline, but you might need to take another audio region, a video file or even a MIDI part as a timing reference.
After this, you need to listen to the tracks again and think a little about what sort of correction is required. Is it a question of the odd out‑of‑time hit in an otherwise solid drum performance? Does the whole performance drift away from the beat? Or are you trying to actually introduce timing variation to match some other freely recorded part? The answer will determine where it is most appropriate to introduce edits. In the first case, it will simply be a question of locating the errant hits, cutting either side of them, nudging them into time and crossfading at either end — the bulk of the performance can be left well alone. In the second case, it may be more appropriate to chop the entire performance up into regions a bar or two long.  and then minutely edited to place everything hard on the grid. (I ran out of patience at the end and simply looped the last four bars for a fade‑out...) The lower screen shows a close‑up of one of the transitions between the two takes. Note that the tom hit from the first section is allowed to run over into the second for a more natural transition.") An extreme example of the editing that is sometimes required to produce a good drum take! This multitrack drum recording was stitched together from two separate takes (colour‑coded grey and yellow) and then minutely edited to place everything hard on the grid. (I ran out of patience at the end and simply looped the last four bars for a fade‑out...) The lower screen shows a close‑up of one of the transitions between the two takes. Note that the tom hit from the first section is allowed to run over into the second for a more natural transition.
An extreme example of the editing that is sometimes required to produce a good drum take! This multitrack drum recording was stitched together from two separate takes (colour‑coded grey and yellow) and then minutely edited to place everything hard on the grid. (I ran out of patience at the end and simply looped the last four bars for a fade‑out...) The lower screen shows a close‑up of one of the transitions between the two takes. Note that the tom hit from the first section is allowed to run over into the second for a more natural transition.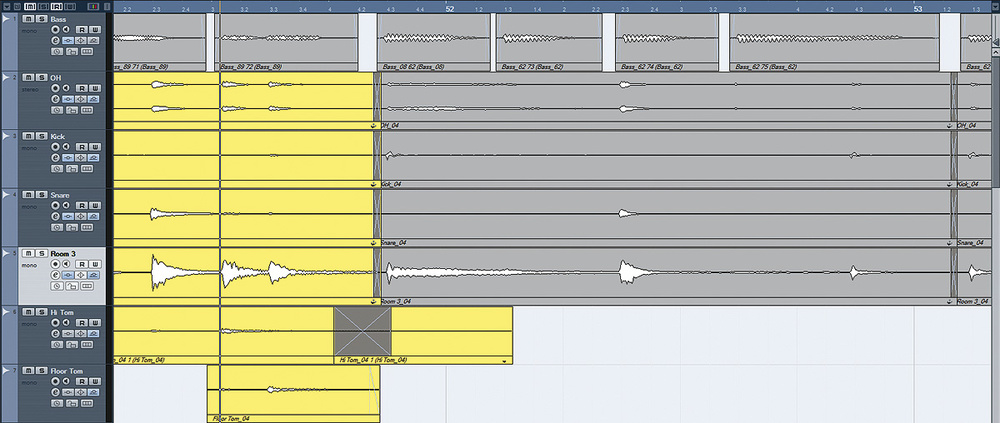
What is vital is that you locate your edits in the right place. When you look at the waveform display from a multitrack drum part, you'll find that the drum hits register slightly earlier on the close‑mic tracks than on the overheads or room mics, so it's usually better to identify edit points on the kick and snare tracks rather than on the room mics.
It's also crucial to be careful about how you fill the gaps created by moving regions. Let's suppose the drummer got a bit excited at one point and hit the snare ahead of the beat. You've cut out that snare beat across all the drum tracks and slid the regions to the right to put it in time. This, however, leaves a gap that will sound very obvious. Two ways of filling this gap are apparent. One is to drag the left‑hand edge of the errant snare region back in time. The other is to drag forward the right‑hand edge of the region from which it was cut. That region, however, still refers back to the original audio file, with its snare hit ahead of the beat — so taking the second path would end up reintroducing the problem you're trying to get rid of.
Timing Correction On Other Instruments
Sloppy timing is often more obvious on drums than it is on other instruments, but equally, drummers are often more precise in their timing than other musicians. Very often, then, you need to use your editing skills to put other people's performances in time with recorded drums. This can be a much more subtle and challenging process, even though you might be dealing only with a mono or stereo track rather than a full multi‑miked kit. (Again, though, if an instrument has been recorded with more than one mic, it is vital to apply the same edits to all the tracks simultaneously, to avoid phase problems.)
With drums, what you see is usually pretty much what you hear, because each drum hit has a very clear visual start point. Line these up with the grid, and your drums are in time (though you risk robbing them of whatever feel they once had!). Waveforms of other instruments are not always so helpful.
Bass guitar is one of the easier instruments on which to perform timing correction, because each note is usually visible as its own, distinct sausage‑shaped waveform. In fact, it's sometimes possible to save yourself some time by using your DAW's Strip Silence function to divide these sausages up into separate regions, assuming it allows you to detect very short sections of 'silence'. Here, I've used Pro Tools' Strip Silence function to automatically separate this synth bass part into one‑note regions, before manually aligning these with the kick drum.
Usually you'll want to use the drum tracks as a visual and audible reference when time‑correcting bass, so it pays to move the bass track temporarily to be adjacent to, perhaps between, the kick and snare tracks; alternatively, the overhead mic track might be a better choice where you have a lot of notes that don't fall exactly on the beat, as you'll be able to see intermediate hi‑hat and cymbal strikes more clearly. However, bear in mind that you don't necessarily want the start of each bass note to coincide exactly with the start of each drum hit. Very often, the 'pocket' that your bass player was searching for is found slightly behind the beat, or maybe even ahead of it. have been made into an Edit Group so that the same edits are applied to both, to avoid phase problems.") In this Pro Tools Session, I've tried to edit electric and acoustic guitars to improve their timing. As you can see, guitar strumming lacks the clear initial transients of drum hits or bass notes, and because notes fall inside the bar, edits are not just on the beat. Note that the two mics on the acoustic (bottom) have been made into an Edit Group so that the same edits are applied to both, to avoid phase problems. Far better, if possible, to locate a section of the song where the player got it right first time, and examine the relationship of bass to drums in that section before chopping up the less successful parts.
In this Pro Tools Session, I've tried to edit electric and acoustic guitars to improve their timing. As you can see, guitar strumming lacks the clear initial transients of drum hits or bass notes, and because notes fall inside the bar, edits are not just on the beat. Note that the two mics on the acoustic (bottom) have been made into an Edit Group so that the same edits are applied to both, to avoid phase problems. Far better, if possible, to locate a section of the song where the player got it right first time, and examine the relationship of bass to drums in that section before chopping up the less successful parts.
Other instruments can be much more difficult to correct, and it's important to note that the drums might not be the best timing reference for everything. Many grooves work by having the other instruments push or pull slightly against a solid drum beat, so it may be that the bass or rhythm guitar is the instrument that other parts need to lock to.
Depending on the sound and the part being played, the waveforms of acoustic and electric guitars vary from the reasonably helpful to the utterly useless as guides for timing correction. The nature of the instrument also makes precision much harder to achieve, except in simple monophonic solo parts. For instance, you'll probably be able to see a waveform peak each time the guitar is strummed hard, but unlike a drum transient, a strum of the plectrum across all six strings is not instantaneous — so do you correct to the start of the strum, and if not, where? And rhythm guitar parts are often much busier than bass lines, so you'll often find that by putting the first chord of the bar in time, you've made the rest of it worse. Even if you can identify all the other beats, by the time you've chopped them up, moved and crossfaded them, chances are you'll have expended an awful lot of effort without achieving miraculous results. The ideal timing 'pocket' for bass is not always directly on the beat! It's almost always better to look for another bar somewhere else in the song where the guitarist was closer to the mark, and copy it.
Timing correction can be even harder with instruments that have slow attack times and a lot of legato playing, such as strings, drones and some synth bass lines. Such material can require lengthy experiment and auditioning, as well as great attention to crossfades. If in doubt, it's often better to limit yourself to correcting only the worst timing errors, rather than attempting to place every note exactly on the beat. It may also be worth investigating technologies such as Elastic Audio in Pro Tools or Audio Warp in Cubase.
Whenever you're editing to improve timing, it's also worth remembering that the ear is easily deceived. When two events occur close together, there's a tendency to hear them as a single, smeared event, and it's easy to pick the wrong one as being out of time!
Creative Editing
When we want to create some 'ear candy', most of us reach for plug‑ins or sample libraries in the first instance, but imaginative use of editing tools can generate equally great results that are unique to the song in which they're used. We've already looked at reverse reverb, for instance, but your DAW's Reverse function has plenty of other uses. Where you want to create a build‑up in your mix, you could copy a cymbal or sustained guitar chord, reverse it and place it on a new track so that it forms a crescendo of noise, adding a lift at the end of your middle eight. Or you could create a sinister effect by taking a chunk of your vocal, reversing it and pitch‑shifting it downwards.
More extreme effects are likewise easy to achieve. For a rhythmic stuttering, activate snap to grid and cut out every other beat within an audio part. Better still, paste the beats you've cut out onto another track and apply different processing. Or how about making an electric guitar sound like a weird mutant banjo, by cutting out each note and applying a sharp fade‑out to remove the sustain? Try cutting up a single guitar chord or note into lots of fragments and applying progressively greater amounts of pitch‑shift to each fragment. Get it right and you can achieve a strange digital divebomb that really grabs the ear. Alternatively, switch on Shuffle mode in your DAW and apply increasing amounts of time‑stretch to each fragment ,to create an impossibly long chord that gradually degenerates into a mess of digital artifacts.
Just as some processes, such as compression, can tend to make drastic edits more obvious, it's worth remembering that other processes can help to disguise them. In particular, it's amazing what you can get away with if you then feed the results through an amp simulator or other distortion effect. The combination of creative editing and amp simulation can produce sounds that are recognisably guitar-like, yet completely fresh to the ear.
If you're feeling truly experimental, you can even use your DAW's audio editing tools to craft new sounds from almost anything — see the 'Editing For Sound Design' box for an introduction to these techniques. I hope this article has shown that the possibilities that are opened up by audio editing are endless, but at heart, they all rest on the same few basic concepts. Once you've internalised these ideas and learned a few basic DAW key commands, recorded audio becomes putty in your hands...
Editing Tips
- If you want to disguise a difficult edit, it's usually best to try to place the edit just prior to something like a loud kick or snare beat. This should have the effect of masking the transition.
. The edit in the lower screen will sound far more natural.") When editing basses and similar sounds, it's often worth sacrificing some timing accuracy for phase coherence. In the top screen, the fundamentals of the two regions are out of phase, which leads to obvious cancellation when they are crossfaded (centre). The edit in the lower screen will sound far more natural.
When editing basses and similar sounds, it's often worth sacrificing some timing accuracy for phase coherence. In the top screen, the fundamentals of the two regions are out of phase, which leads to obvious cancellation when they are crossfaded (centre). The edit in the lower screen will sound far more natural. - When you are crossfading between two similar sounds, phase problems can arise, especially where low frequencies are involved. It's worth zooming in to check that the peaks in the first region's waveform are lining up as best you can with those in the second, and nudging one of the regions sideways to get a good phase relationship. It's usually better to have them slightly out of time than have them out of phase.


. Then I've looped it (second track) to create a pitched buzz, and applied two separate fades (third and fourth tracks). Finally, I've applied Avid's Lo‑Fi plug‑in to just the tail of the resulting sample (bottom track). Now I have a punchy, slightly metallic synth bass that could be loaded into a sampler and played.") Using audio editing and offline processing to create a synth bass sound from a kick-drum sample. I have first cut out a single waveform cycle (topmost track). Then I've looped it (second track) to create a pitched buzz, and applied two separate fades (third and fourth tracks). Finally, I've applied Avid's Lo‑Fi plug‑in to just the tail of the resulting sample (bottom track). Now I have a punchy, slightly metallic synth bass that could be loaded into a sampler and played.
Using audio editing and offline processing to create a synth bass sound from a kick-drum sample. I have first cut out a single waveform cycle (topmost track). Then I've looped it (second track) to create a pitched buzz, and applied two separate fades (third and fourth tracks). Finally, I've applied Avid's Lo‑Fi plug‑in to just the tail of the resulting sample (bottom track). Now I have a punchy, slightly metallic synth bass that could be loaded into a sampler and played. - Many DAWs provide the ability to colour‑code regions. This is handy when you are attempting a complex 'comp' from multiple takes: use different colours to identify good and bad takes of each phrase.
- Your ears, not your eyes, should decide whether edits are needed, and whether they have been carried out successfully. It's too easy to get into the habit of editing things because they look out of time in the waveform display, without bothering to ask yourself how they sound.
- Audition edits in context. You might need to start playback a number of bars before an edit to properly judge whether it works or not.
- Bad edits, and especially clicks and pops, are often more obvious on headphones than on speakers.
- When you're trying to line things up visually, it's much easier when they are in the centre of your monitor screen. Editing at the edge of the screen means that you're viewing at an angle, and the results can be deceptive.
. The edit in the lower screen will sound far more natural.")


. Then I've looped it (second track) to create a pitched buzz, and applied two separate fades (third and fourth tracks). Finally, I've applied Avid's Lo‑Fi plug‑in to just the tail of the resulting sample (bottom track). Now I have a punchy, slightly metallic synth bass that could be loaded into a sampler and played.")
Editing For Sound Design
At the 2008 LIMS show, songwriter and occasional SOS author Jem Godfrey gave a presentation that won't be forgotten in a hurry by those who heard it. He first unveiled a polished piece of electro music, before explaining how every single sound in the track had started life as part of the same short spoken‑word sample. Using his Pro Tools editing skills, harnessed to a lot of imagination, he had created an entire sound world from a two‑second mono audio file. The same techniques have been part of the sound designer's toolbox for many years, and a masterclass on how to use them would merit an article in its own right, but hopefully there's space here for a taster.
Almost invariably, this sort of sound design involves both editing and the application of off‑line effects and processes. For instance, you've probably noticed that when large amounts of pitch‑shifting or time‑stretching are applied to a short sound, it begins to gain an entirely new character. So try pitch‑shifting your chosen sample repeatedly down by an octave, or stretching it to 16 times its original length. Then zoom in and chop out any interesting‑looking fragments, copy them to a new track, duplicate them 20 times, and apply a fade. Reverse the whole thing, wield a bit‑crusher, add strange reverbs, copy different sections of the file to either side of a stereo track — if you don't like the results, you can always hit Undo. As well as being great fun, this sort of experimentation can produce unique textural sounds that work very well for creating atmosphere in a mix. Particularly useful in this context are flexible off‑line pitch and time‑mangling plug‑ins like Sound Toys' Speed and Waves' Sound Shifter, which allow you to control the amount of shifting using a graphical curve.
Creating pitched sounds isn't that hard, either. Zoom in far enough and you'll be able to chop out individual waveform cycles. Even when taken from an unpitched source, a single waveform cycle will have a pitch when looped, so try duplicating it numerous times and then processing the results in any way you like.  This slightly dodgy bass edit is effectively masked because it coincides with the kick drum above it.
If you're feeling really radical, you could start with an empty audio region and use your DAW's pencil tool to simply draw in a new waveform. Using the pencil tool to copy a real‑world audio file such as a drum hit is an interesting exercise, and a surprisingly difficult one! might look similar to the real thing (top), but it certainly doesn't sound the same.") Spot the difference: the kick drum hit I've drawn with the pencil tool (above) might look similar to the real thing (top), but it certainly doesn't sound the same. Freehand drawing also lets you create waveforms that have no real‑world counterparts, from true square waves to kick drums with brutal transient spikes at the front. Whatever approach you take, when you find a sound you like, it's the work of moments to pop it into your chosen software sampler and use it in your latest track.
Spot the difference: the kick drum hit I've drawn with the pencil tool (above) might look similar to the real thing (top), but it certainly doesn't sound the same. Freehand drawing also lets you create waveforms that have no real‑world counterparts, from true square waves to kick drums with brutal transient spikes at the front. Whatever approach you take, when you find a sound you like, it's the work of moments to pop it into your chosen software sampler and use it in your latest track.