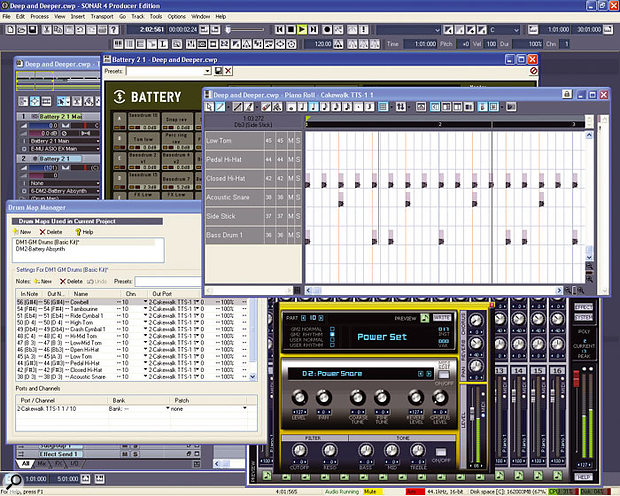
 Sonar's drum-programming features, centred around the Drum Grid (top right) and the Drum Map Manager (bottom left) are well worth investigating.
Producing great drum parts can be quicker, easier, and more fun with the dedicated facilities Sonar 4 provides. We explain.
I've always enjoyed using programs such as Reason, Fruity Loops, Hammerhead and so on, to create beats. But that was before Sonar added a Drum Grid, which brings the program's full power to bear on beat-creation. The Drum Grid is also an efficient view for creating any kind of drum part, looped or not, and an ideal environment in which to use Sonar 's 'paintbrush' feature for painting patterns of individual drums, or even entire parts. Yet I've always had the impression that the Drum Grid is one of the program's least appreciated features — so let's take care of that right now.
Drum Grid Basics
There are two main ways of generating looped beats in any MIDI + Audio host. One is to drag samples of individual drum sounds into digital audio tracks, position them as desired in the timeline, then mix them together to create the final loop. The other is to drive a drum 'tone module' (anything from the TTS1 included with Sonar to something like Native Instruments' Battery 2) with MIDI notes.
I prefer the latter method, for several reasons. It's easier to move MIDI notes around than digital audio, and many drum modules include processing (filtering, bit decimation and so on) that let you warp the drum sounds in interesting ways. On top of that, Sonar 's Drum Grid is optimised for this way of working.
 Where you'd normally see a key in the Piano Roll view, the Drum Grid shows a drum name and data about each drum. Note the controller strip below the main pane.
The Drum Grid is a pane in the standard Piano Roll view (see screen on right). However, where you would normally see a key representing a note (on the virtual vertical keyboard off to the left), you see data about the drum played by that note. Each line shows the drum name, the 'In' note (the MIDI note value represented on the grid), the 'Out' note (the note to which the In note is mapped, which actually defaults to the same note as the In note), a mute button and a solo button. (Soloing and muting of individual drum notes is not possible with a standard Piano Roll view.)
The reason for separate In and Out notes becomes clear if you've created a drum part for, say, a General MIDI drum machine, but then you decide to play it back with a different set of sounds that aren't GM compatible. The Out note allows you to simply map, for example, the original snare note to a different one that drives the new snare sound.
Drum Map Manager Basics
However, these In and Out notes, drum names and so on don't magically appear out of nowhere: you need to create a template in the Drum Map Manager (DMM for short), although Sonar 4 provides several drum maps that may do the job for you with only minor tweaking. This map specifies the parameter values you see in the drum grid, as well as providing control over other drum-note characteristics — channels, output ports, and so on. As a result of this flexibility, a single drum map can trigger a variety of notes over a variety of channels, as well as driving both internal soft synths and external drum machines connected to a MIDI hardware port.
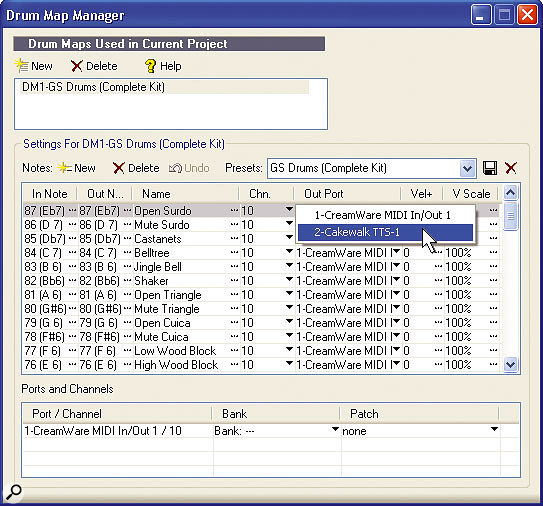
 The output is being set to the Cakewalk TTS1 synth. If you hold down Ctrl and Shift while you make this selection, all Out Port fields will be set to the same output.
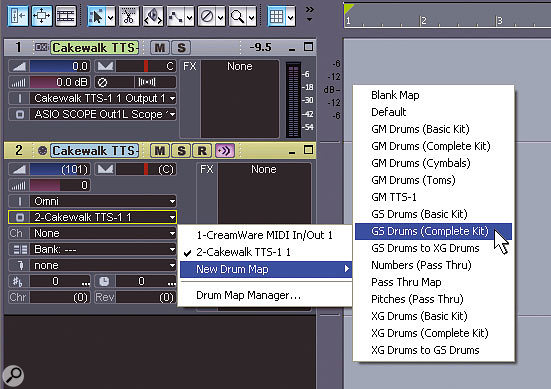
The Drum Map is truly a mapper. It accepts incoming notes ('in' notes) from the track, remaps them (thus creating 'out' notes), then sends them to an output. Because the Drum Map is providing an output signal to a track, it's perhaps not surprising that you select a Drum Map in a MIDI track's Output Field. For example, suppose you had inserted the Cakewalk TTS1 DXi synth and were using one of its drum kits. Where the MIDI Out field would normally show 'Cakewalk TTS1', you would instead select a Drum Map. There's no need to worry about channel, bank or patch assignments: the Drum Map handles all those chores (see screen below).
If you then put the focus on the MIDI track and play a few notes, odds are that you wouldn't hear anything. That's because the Drum Manager defaults to sending its outs to the MIDI device specified under Options / MIDI Devices, which will probably be a physical MIDI port. While this works OK if you're using a hardware drum machine connected to the physical MIDI out, in the case of a soft synth you'll need to change the output assignment so that it feeds the synth. This is easy to do with the DMM.
Working With The DMM
To edit DMM parameters, click on the track's MIDI Output field and select Drum Map Manager. It appears in its own window (see screen above).
You'll see lines with a variety of fields for each drum sound: In Note, Out Note, Name, Channel, Output Port, Velocity Offset and Velocity Scaling. You can change outputs one at a time, but that's tedious. A shortcut for changing output or MIDI channel is to hold down the Ctrl and Shift keys as you select the desired output or channel. This assigns all notes to your selection. All other parameters are set by double-clicking in the field and typing in the desired value, or using the +/- buttons or spinner bar for numericals (note that you cannot click and drag on the parameter to change values).
 A complete GS Drum Map is being selected, which drives a GS drum kit within the TTS1. The other maps are provided with Sonar 4.
The Velocity Offset parameter can be given a positive or negative value and can be very handy, used with In and Out notes, for 'evening out' differences between different sound sources. For example, you might replace a snare drum with one that's more dynamically responsive, so the new snare sounds weaker. Turn up the velocity offset to compensate.
Velocity Scaling is a terrific feature. Numbers below 100 percent compress the velocity curve. Like a conventional studio compressor, this reduces the difference between minimum and maximum velocities, and — also as with a conventional compressor — you'll need to add some make-up gain. For example, suppose you had a drum part whose velocities covered the full range from one to 127. You compress it by 50 percent so that the velocities range from one to 64. To bring the peaks back up to 127, you then use the velocity offset to add 63. Now the velocity range goes from 64 to 127. You've essentially compressed it with a ratio of 2:1.
Numbers above 100 percent add expansion. This is useful, too, because with high expansion values all the mid-to-high velocities are scaled up and the lower velocities disappear. It's almost like a noise-gate effect, where medium and high velocities come through at maximum and everything else falls by the wayside.
 This shows a typical use of the Drum Grid: developing a looped beat. Note the velocity tails on each note. Right-clicking on one of the notes has brought up the Note Properties menu, which allows 'micro editing' of the note's parameters.
There are two other important DMM functions. You can save edited maps by entering a name in the Presets field, then clicking on the floppy disk (save) button. You can additionally choose a preset from this field and click on the delete (X) button if you want to delete a map permanently. It's also possible to remove the map from the MIDI output field without deleting the map itself. In the upper left, under 'Drum Maps Used in Current Project', highlight the map you want to remove, then click on the associated Delete button. Also note that the DMM 'centralises' all Drum Maps used in all tracks. It's not necessary to go to a track and specify 'Drum Map Manager' in the MIDI Out field: you can call up any map that's in use at the Drum Map Manager window itself.
The lines in the DMM can be re-ordered: click anywhere in a line, and drag up or down, which would let you, say, group all the toms together, or all the hi-hat parts. You can also delete lines: just click on the line you want to delete (Shift- or Ctrl-click to select multiple lines), then click on the 'Notes — Delete' button. (Yes, it is confusing to have three Delete buttons in the DMM that all use the 'X' symbol. Just remember: the top one deletes maps from your Project, the one on the right deletes maps from disk, and the one on the left deletes any highlighted line or lines.)
It's good practice to delete any notes that aren't being used for drums, as this produces an easy-to-handle, compact list when you move over to the Drum Grid pane.
Creating Drum Maps From Scratch
If you're not using a setup covered by one of the Drum Map Manager's presets, it can be tedious to create a new map, and unfortunately there's currently no way to import drum names into the DMM. However, it's unlikely that you'll use all the drums in a given kit, which can save some time. One option is to call up a blank map and click on the 'Notes New' button for each drum you want to add. But I find it easier to call up the Pass Through map. This creates a list of all notes, expressed as MIDI Note Numbers and pitch. I then enter info for the drums that will be used. Eventually, after I'm sure I won't be adding any more drums, I delete the notes that don't have associated drums.
Also note that you can do quick edits within the Drum Grid, which we'll come to shortly. Any changes you make in the Grid are reflected in the DMM.
The Drum Grid
Newbie Sonar users often wonder how you call up the Drum Grid, because it's not represented in the View menu. Instead, you call up a track's Piano Roll view. If the track has a Drum Map selected for its MIDI output, the Drum Grid will show up (see screen below left).
 The Show Durations button affects all notes in the Drum Grid, so this screen is a collage: the drums on the left show durations, the ones on the right don't. The Show/Hide Velocity Tails button is two buttons over to the left.
The Drum Grid has much in common with the piano roll: the same horizontal and vertical zoom options, snap to grid, show grid lines, and so on. However, there are a few major differences, particularly with regard to how notes are displayed. One is that although you can show the Controller Strip, for velocity it's fairly useless because you'll often have several drum hits on the same beat. As a result, you can choose to show or hide 'velocity tails', whose height indicates velocity. If you point at one of these tails with the Draw tool, the cursor adds a series of lines that shows it's in velocity edit mode. Click on the tail and drag up to increase velocity, or down to decrease velocity. Zooming in vertically will show more resolution on the velocity tails. By the way, I do find the controller strip useful for setting velocity for multiple simultaneous drums — for example, to make the downbeat hit really hard. The controller strip is also invaluable for use with drum modules that allow you to affect sound parameter values with continuous controllers.
Another display option, Show Durations, lets you see notes either as individual hits or see their actual length. I generally switch over to actual length at some point and shorten the notes (most drum triggers are one-shots; you don't need to sustain a note to keep hearing the drum). Otherwise, I'll display hits, which are smaller and thus clean up the display.
As mentioned earlier, you can also edit the Drum Map from within the Drum Grid. Double-click on one of the lines that has a drum sound and a Map Properties window appears. Here you can edit the drum name, In and Out notes, velocity settings, and so on — just as in the Drum Map Manager. You can also click on the Map Properties' 'Map Mgr' button and call up the full DMM.
Paint Time!
Another interesting grid feature is the ability to 'paint' rhythms. You can also paint notes in the standard Piano Roll view, but the technique really comes into its own when doing drum parts. Click on the Paint Brush button's downward-pointing arrow and you'll find a library of rhythmic patterns, as well as some setup options. To paint a pattern, pick one from the library, click on the Drum Grid where you want the pattern to start, then drag for however long you want it to last. Sonar ships with a large number of rhythms you can 'paint' into the Drum Grid. You can also create your own rhythms.
I strongly suggest ticking 'Use Pattern Velocities', as any dynamics built into the pattern will then be preserved. The alternative is to click on Velocity and select a specific velocity value, which means that all notes will be painted at that velocity. If you select Pattern Velocities, Note Duration must be unticked. For simple patterns (a single clave part, say), leave 'Use Pattern Polyphony' unticked. Otherwise, the note pitches used will be the ones stored with the pattern, not the notes created when you click the mouse in a line of the drum grid.
You can also create your own Patterns. The process is slightly involved, because you basically have to create a string of patterns, separated by markers, in a single MIDI track. For example, the first pattern might start with a marker that says '8th Tamb', while the second has a marker that says '8+16 Tamb.' You then save the string of patterns as a .MID file (Tambourines.mid, for example) in the 'Pattern Brush Patterns' folder inside the Sonar 4 installation folder. The next time you open Sonar, there will be a 'Tambourines' entry in the Pattern Brush drop-down menu, with two side entries for 8th Tamb and 8+16 Tamb.
The main use I've found for the Brush Patterns is when I need some 'placemarker' patterns fast, such as a kick or shaker part. In conjunction with the Session Drummer MIDI plug-in, it's possible to use Brush Patterns to create pretty decent drum parts in minutes. Once you have your song fleshed out you can edit them or replace them with something else.
 Two patterns, separated by markers, have been created. Once this is saved as a Standard MIDI File into the Pattern Brush Patterns folder, you'll be able to paint the patterns into the Piano Roll or Drum Grid view.
You can also save complex patterns (for example, something with kick, snare, hats and so on) for later painting. The procedure for creating the pattern is the same, but when it's time for playback, tick 'Use Pattern Polyphony'. This will deposit all the notes into their original pitches and, assuming you're using the same Drum Map as the one you used to create the pattern, the pattern willl play back on the desired drum sounds. For this reason, it's probably best to make sure your 'polyphonic' patterns adhere to a standard Drum Map, such as GM. Otherwise, you never quite know what will play back when you paint in the pattern... although I suppose that could also lead to some happy accidents!
That concludes our tour into the world of Sonar Drum Maps and grids. If you like to put together beats, there's a lot of power waiting to be exploited, and once you become familiar with how the Drum Grid and Drum Map Manager work, I doubt you'll go back to using the Piano Roll view for entering and editing drum parts.
