Delay forms the basis for a wide range of effects that can transform your tracks from dull and pedestrian to polished and professional.
If I had to pick a single desert island effect, it would be delay. Why? Well, delay isn't only an effect in itself; it's also one of the basic building blocks for many other effects, including reverb, chorus and flanging — and that makes it massively versatile. The aim of this article is to focus on the practical applications of delays, by looking at some ways they're typically used on vocals, guitars and synths. I'll be writing primarily about the sound of different delay configurations, and to make things easier to follow, I've created an illustrative series of audio examples (see 'Audio Examples' box for details). Note that I've used exaggerated effects levels in the examples, to highlight the sound of the delay.
First, let's run through a quick overview to get any newbies up to speed. As the name suggests, the way in which delay processors work is quite simple: the programme material passes through a memory buffer and it is then recalled from the buffer a short time later. We refer to this time difference as the delay time. (In an analogue delay, you could think of the electronics or the tape loop performing the same function as the memory in a digital delay.) Multiple echoes or 'repeats' of the programme material are produced by feeding a percentage of the delayed material back from the output of the delay buffer into the input. We refer to this as feedback. You should be aware when adjusting the feedback parameter that high settings can result in the level of the processed signal increasing rapidly with each repeat, so if your monitoring levels are high, it pays to be careful!
 2. A simple delay with feedback.
As with reverb, delay is most often applied as a send effect, rather than as an insert. This approach not only conserves processing power when applying the same delay to multiple sources, but it allows you to treat the delayed part of the signal, separately from the original, with extra processing such as EQ or distortion and this allows you more creative freedom.
That's it in a nutshell, but the combination of those few parameters and the flexibility afforded by using delays as send effects open up a world of production effects and tricks. With the basics explained, let's work through some useful techniques.
Vocal Treatments
During the mix process, vocals are often treated with either reverb or delay, or possibly a combination of both, so in the following section I'll work through some typical vocal delay treatments. To get the most from these, call up a vocal part of your own in your DAW and use that as raw material. For my examples, I've taken a heavily 'tuned' vocal with a tempo of 130bpm (audio examples 1 and 1b).
1. Create a send from your vocal track and on the send, call up a delay plug-in. It doesn't need to be a sophisticated one; in fact, the simpler the plug-in is, the easier this will be to follow. I'm working in Logic Pro here, and I've used Logic's Tape Delay.
2. Set the delay time to a quarter note and the feedback to zero. If you're using a delay that doesn't have tempo-sync options, you can still get things in sync by remembering the following equation: ms = 60,000 ÷ bpm
Note that 'ms' is the quarter-note delay time in milliseconds, 60,000 is the number of milliseconds in a minute, and 'bpm' is the tempo in beats per minute. From there, you can divide the result as necessary to get eighth notes, sixteenth notes, and so on.
3. With the vocal playing, gradually raise the send amount and you'll hear a single quarter-note echo that, when set quietly, can add a useful sense of ambience to a vocal.
4. Next, gradually raise the amount of feedback until the delay fills up the gaps between the vocal phrases, but doesn't cloud over the original (audio example 2).
EQ'ed & Distorted Delay
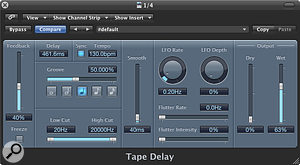 A simple quarter note delay in Logic Pro's Tape Delay plug-in.With the quarter-note delay in place, it's common to try to create a unique 'space' for the delay in the mix, and this can often be accomplished by applying EQ before or after the delay (it doesn't normally matter which, though there will be subtle differences in, for example, the response of a tape delay to a signal with the low end present and the low end filtered away). As Robert Orton, discussing his mix of Lady Gaga's 'Just Dance' in SOS March 2009 explained, what EQ settings you require will vary from mix to mix: "Sometimes you want quite a dark delay that's hidden behind the vocals just to give it more body; at other times [there's] a word that clearly repeats, in which case the delay has to sound up-front and clear”.
Many plug-in delays have in-built high- and low-pass filters, but don't worry if yours doesn't, because you can use a separate EQ — as in this example:
1. Find an EQ plug-in that includes high- and low-pass filters and place an instance of it after your delay.
2. Start by rolling off the high frequencies of the delayed sound, using a low-pass filter. This will soften any transients, and help to push the delay back in the mix behind the main vocal sound. When used at low levels, this creates a really subtle sense of ambience.
3. Now bypass the low-pass filter and try high-pass filtering the delay, to remove some of its bottom end. This can help to stop the delay clouding up the low end of your mix.
4. Finally, combine the high-and low-pass filters to create a 'telephone' EQ. This effect (see image 2) is much less obvious when used on the delay signal than on the source vocal track, and it's a tactic that can reduce the amount of space taken up by the delay, leaving space for other elements. It also helps to make the delay more distinct from the original vocal (audio example 3).
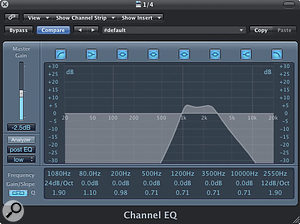 3. 'Telephone EQ' can be applied before or after the delay effect to differentiate the echo from the original vocal.You can find another example of this last effect in Peter Mokran's Mix of the Pussy Cat Dolls track 'Jai Ho!', where he inserted the telephonic EQ before the delay (for more details, see the interview in SOS August 2009's Inside Track feature, /sos/aug09/articles/it_0809.htm).
One reason for using a delay instead of a reverb for these treatments is that quarter- or eighth-note delays are heard distinctly from the original vocal, whereas with a reverb, the early reflections can easily combine with the original vocal part and thus change its perceived timbre. This means that, for example, adding a bright quarter-note delay doesn't brighten the original vocal in the way that adding a bright reverb might do.
Another way to make the delayed signal stand apart from the original vocal is to run the delay through an amp and/or speaker simulation plug-in. The plug-in will not only provide a unique equalisation curve, but the sound of the speaker and the distortion from the amp will add a compression effect that can help to even out the level between repeats. This adds a greater sense of sustain to the delayed signal, which you can hear in audio example 4. It's worth experimenting with different amp models and cabinets, as you'll find plenty of different timbres. There really are no hard and fast rules as to what works best here.
Repeat After Me...
 4. The comprehensive EQ and output modelling section in Sound Toys' EchoBoy allow the user to compare drastically different delays simply by changing presets.Now let's set up a second send, this time with a eighth-note delay. Again, there are plenty of plug-ins you could use, and I'm going to choose Soundtoys Echoboy, which is a really versatile plug-in. It has low- and high-pass filters and, in the Style Edit section, further equalisation and output-modelling options. This allows you to do all of the tonal shaping we've just discussed inside a single plug-in, and this means that you can quickly compare radically different delay, equalisation and distortion settings simply by changing presets. Echoboy also has a Decay EQ section, which is an EQ that's placed in the delay's feedback loop, and thus allows you to make each successive repeat duller or brighter, making the delay evolve in timbre with each repeat (audio example 5). In simpler terms, this feature controls how the tone of the echo changes over time.
There are plenty of other plug-ins that offer this sort of feature, and it's well worth having one in your mix toolkit, as it's often tricky setting up an EQ'ed feedback signal using separate delay and EQ plug-ins, partly because not all DAWs have sufficiently flexible routing.
Ducked Delay
With conventional delay setups, it can sometimes be difficult to find a constant send level that allows the delay to be sufficiently audible when the singer finishes a word, but doesn't cloud the vocal when he or she is singing. To counter this problem, you could use automation to ride either the send or return level of the delay on the offending passages (better to automate the send if you're sharing the delay with other sources). This has the advantage of giving you absolute control over the level of the delay, but it can be fiddly, particularly if you need to go back and change this automation as your mix evolves.
 5. The setup in Logic for creating a ducking delay. I've used Logic's Compressor plug-in to provide the ducking but I could just as easily have used the included Noise Gate or Ducker plug-ins, shown bypassed.A less fussy means of achieving a similar result is to set up a compressor to duck the delay when the vocal is present. To set this up, you'll need a compressor and DAW that allow you to use an external side-chain input. Here's how to do it:
1. Add the compressor after the delay — and any subsequent processors in the send chain — on your send channel (screen 5).
2. Next, go to the compressor's side-chain input and set it so that the compressor is triggered by the lead vocal track. How you do this varies from DAW to DAW, so if you're unsure, check the manual.
3. With the track playing, lower the threshold and raise the ratio to apply the appropriate amount of gain reduction to the delayed signal (audio examples 6 and 7).
This is a common but effective trick, which has been used on plenty of hit records. By way of example, Marcella Araica used this on Timbaland's 'The Way I Are': listen to that track, and you'll hear the delay become prominent after the last lines of the verses.
Delay Versus Reverb
When you're mixing, one of the advantages of using a simple quarter-note delay on a vocal is that, compared to reverb, it takes up such a small amount of space in a mix, and this is even more the case when you use a mono delay. By combining a single quarter-note mono delay with a lead vocal that's also mono, you can preserve the positional integrity of that source. This can be helpful in busy arrangements, where space is at a premium.
Mixing isn't always about saving space for other elements, though: in a spacious mix, you might actually want the vocal effects to take up more room, and in this scenario it's a good idea to look at creating a sound using both your delay and reverb plug-ins. Running a delay into a stereo reverb will spread the delay out across the stereo field, making it seem broader (audio example 8a). One trick that's well worth exploring is running your delay through an early-reflection patch from a reverb, as this will 'stereoize' the delay without it sounding so obviously effected (audio example 8e).
You can also use both your mono delay and stereo reverb to deliberately create contrast between song sections. For example, you could use a quarter-note delay on a mono verse vocal to add a sense of ambience while keeping things dead centre, but follow this in the chorus by moving to ultra-wide stereo vocals, with stereo delay and reverb effects. It's this sort of contrast that's so essential in keeping the listener's ear engaged. When processing a lead vocal, then, consider in all of the different song sections whether you want both the vocal track and its send delay and reverb effects to sound more mono or more stereo.
A delay can also be used to change the character of a reverb, by acting as an ultra-configurable pre-delay. If you listen to audio example 8c, you'll hear that the vocal is treated with a small amount of hall reverb. Then listen to example 8d, where I've taken the same reverb but inserted an eighth-note delay (with feedback set to zero) before the hall reverb: the delayed reverb seems louder and more obvious in the mix. Even though many reverb plug-ins have a pre-delay control, they're often not tempo-syncable, and that's why I prefer to use a dedicated delay plug-in to provide the pre-delay: most delay plug-ins offer tempo-sync'ed delay times at the click of a button. Thus, I'm able to quickly compare say a sixteenth-note or eighth-note pre-delay.
Ping-pong Delay
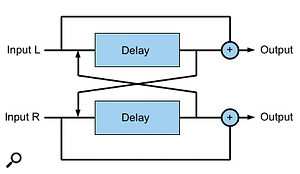 6. A ping-pong delay.Ping-pong delay is a type of dual delay where the first echo appears in the 'ping' channel (usually the left), delayed by the ping amount, and the second appears in the opposite 'pong' channel, delayed by the ping time plus the pong time. For example, if you set the ping to 200ms and the pong to 400ms, you'd first hear the ping 200ms after the programme material out of the left channel, and the Pong 600ms after the programme material out of the right channel. This process will then repeat, assuming the feedback values are higher than zero. In audio example 9, Echoboy is set to a ping-pong delay with the Transmitter output style, to give a telephonic effect.
On his mix of U2's 'No Line On The Horizon', Declan Gaffney used the SoundToys Echoboy plug-in to add a subtle amount of ambience to the lead vocal using a ping-pong setting: "The echo is just a kind of warm ping-pong sound. There's no reverb on the track, there's not even any feedback on the delay, it's all about the dry sound with a little bit of space on the side, provided by the delay… I'm not a huge fan of reverb anyway; it's better to do the same thing with delays.” (SOS June 2009, /sos/jun09/articles/itu2.htm). Audio example 9b uses a similar setting.
Slap Happy
I'm not sure if there's an official definition of 'slapback delay' as an artificial effect, but it is generally used to describe a single echo of 60-180ms that creates a sort of thickening effect. Famous fans of slapback on their voice include John Lennon and Elvis Presley. 'Slap delay' like this is also a standard treatment for hip-hop vocals because, as Jaycen Joshua put it in SOS August 2010, "reverb is the kiss of death on rap vocals” (/sos/aug10/articles/it-0810.htm). Audio example 10a demonstrates how slapback delay can be used to enliven a vocal part. The delay here is set to 80ms.
 Mix engineer Jaycen Joshua, who explains that "reverb is the kiss of death on rap vocals,” but still uses delay to enliven the sound.Slapback delays were originally created with tape machines, so you may want to try rolling off a little of the top end and adding a small amount of modulation of the delay time to approximate some of the inconsistencies of tape. It's also fun to try a stereo slapback delay using a dual delay with slightly different delay times for each side, as this will create a wider stereo image. Audio example 10b is a slapback delay with the left side set to 80ms and the right side set to 120ms: listen out for the extra stereo width this gives the vocal.
I'll mention one last slap-related trick before we move on: take a short slapback delay and then gradually increase the feedback. Because of the relatively short delay time, this will begin to sound reminiscent of a spring reverb, such as you often find in guitar amps.
Stereoising A Delay
The German scientist Helmut Haas wrote that when two identical signals, each played through a separate speaker, are delayed by anything from 1-30ms, a sense of a broadening of the primary sound source is heard, but without there being a perceptible echo. This effect, often referred to as the 'Haas effect', can be created using delay plug-ins or track offsets, and can be used to add stereo width to a vocal part. It also serves as a reasonable foundation for creating fake double-tracking effects.
Let's look at some settings. If you take a delay plug-in and increase the right channel's delay time to 10ms more than the left, you should notice that the delay creates a stereo effect rather than a perceptible echo: the delay simply broadens the vocal, adding stereo width (see audio examples 11a and 11b).
 Using a plug-in like Logic's Sample Delay can create extra stereo width, but often at the expense of mono compatibility.Jaycen Joshua used this type of processing to create a stereo effect for the crash cymbal on Justin Bieber's 'Baby': "There's a medium delay on the crash,” he remarks, "because it was originally a mono track, and I wanted it in stereo. So I set the delay to 21ms and mixed the original 100 percent to the left, and the delay to the right…. With 21ms, you get enough separation between left and right and it's a bit dramatic and not so phasey.... The sound becomes like a drummer hitting two cymbals, left and right, at the same time.”
Unfortunately, though, this approach can create problematic side-effects. First, simply delaying one side in relation to the other will result in unpleasant comb filtering when the left and right channels are summed to mono. Example 11c shows the effect of making the delayed vocal mono. Contrast that with example 11a and you'll hear why this sort of processing is risky if you want to ensure mono compatibility! A second problem with this treatment is that you can perceive that the undelayed side as louder than the delayed side, causing potential balance problems.
To take advantage of the widening effect that Haas delays offer, while deftly dodging the mono-compatibility trap, there are some useful tricks. One of the most common widening treatments is created using two short delays, with a small amount of pitch-shifting applied to either side. To achieve this effect yourself:
1. Set a mono delay to 11ms and with zero feedback, then pan it hard right.
2. Then, add a pitch-shift plug-in to take it up seven cents. Repeat this with a second delay, but this time pan it hard left, and pitch-shift it down by seven cents.
 7. The classic delay/pitch shifted widener: an incredibly useful effect, heard on many chart hits.For a demonstration of this effect, see audio examples 11d and 11e. To create these, I've used Logic's Delay Designer plug-in (screen 7), as it allows you to set up multiple delays and pitch-shifting all in the same plug-in, but it's easy enough to do by combining delays and pitch-shifters separately. If you want to hear the effect used in context, there are countless commercial tracks I could offer by way of example, one of which is the Arcade Fires album The Suburbs. Producer Craig Silvery explained in SOS November 2010 that he used "two short delays from an AMS with a little pitch-shift, one up and one down, which thickened the vocals like a doubler” (/sos/nov10/articles/it-1110.htm). There are also plenty of examples of this tactic being used to good effect in our regular Mix Rescue articles.
A nice variation on this effect is provided by Waves' Doubler plug-in, which provides the same widening effect but with a less obviously effected sound. In the words of Grammy-winning mix engineer Dave Pensado: "Doubler has four delays that also help to make the vocal sound bigger, wider and more powerful” (SOS Jan 2007, /sos/jan07/articles/insidetrack_0107.htm). Audio example 11f provides an example of this setting.
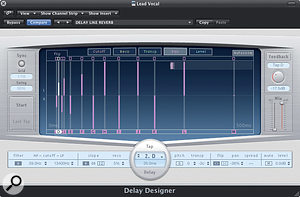 8. Consecutive delay taps panned left and then right to create an effect similar to reverb.Very short ping-pong delays can also make excellent wideners, as you can hear if you listen to audio example 11g, which shows a 30ms ping-pong delay built with NI Reaktor, where the output of the ping delay is polarity inverted before going into the pong delay. This technique is great for transparent widening and has excellent mono compatibility.
Multi-tap Delay
A multi-tap delay is a delay line where multiple 'taps' or outputs are taken from a delay buffer at different points, and the taps are then summed with the original. Multi-tap delays are great for creating rhythmic delay patterns, but they can also be used to create sound fields of such density that they start to take on some of the qualities we'd more usually associate with reverb. Favourite plug-ins for the job include Waves Supertap, PSP Audioware's PSP608 and Echoboy, using its Pattern mode, but there are many more available, and you might even have suitable toys bundled with your DAW (I often use Logic's Delay Designer, for example).
 9. In this screen, the delay taps are being increasingly high- and low-pass filtered the longer they get.It can be great fun using a multi-tap delay to design reverb-like effects that, while they might not compete with a proper reverb algorithm in terms of realism, can produce some wonderful, unique-sounding results. A simple method for creating a reverb-like setting is to take a multi-tap delay and create a series of delay taps starting at 30ms and increasing in time. With the preset shown in screen 8, I've gradually increased the delay tap times in Logic's Delay Designer at random up to the last taps, which are in time with the sequencer tempo, the last tap being a quarter-note delay. To build on this starting point, experiment with panning successive delay taps left and right, filtering the delay taps so that each tap becomes duller, and changing each tap's volume. In audio example 12, the taps swell in volume toward the middle of the delays and then fade out again in the later taps.
 10. Waves Supertap plug-in, a good example of a very tweakable multi-tap delay.Dave Pensado describes how he used the Waves Supertap plug-in on the lead vocal for the track 'Beep' by the Pussycat Dolls: "The delays on Supertap are all very short, and what it also allowed me to do is spread the vocal wide across the stereo spectrum. In other words, instead of occupying a small spot in the middle of the mix, I could fill the whole spectrum between the speakers. The 149, 298 and 587 ms are sixteenth, eighth and half-note delays, and they spread and get louder from left to right." If you have Supertap in your plug-in collection, you can find a similar setting to the one used for 'Beep' in the preset menu under Dave Pensado/Pensado Tap Vocal — and if not, you can still hear the effect in audio example 13.
Automation
Of course, you don't have to use just one delay effect on a sound. It's perfectly possible to set up a range of different delays on your aux send channels, and then experiment with automating different delays on different words. It's this level of sophistication you might need to reach for if you want to compete with contemporary pop tracks.
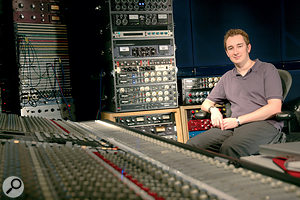 Robert Orton, who used extensive automation of delays on Lady Gaga's vocal for the smash hit 'Let's Dance'. For example, in SOS March 2009 (/sos/mar09/articles/it_0309.htm) Robert Orton described how he automated the delays on Lady Gaga's hit 'Just Dance': "When soloing the vocals, I added half-, quarter- and eighth-note delays, and I think there's also a dotted eighth-note delay, all using the Sound Toys Echoboy... The eighth-note delay is panned to the right, and comes in the choruses and some words in the verses. The send is automated. The half-note delay is panned to the left, and captures certain words; for instance, in the chorus each time the word 'dance' occurs at the end of a line. The quarter-note delay is also panned to the right, and is automated to happen on certain words. All the delays catch words differently, to keep it interesting. They're also set to different styles on the Echoboy — TubeTape, Analogue, etc — to get different textures.”
Axe Effects
All of the techniques from the vocal section can also be applied to other instruments, including the guitar. For example, quarter- and eighth-note delays can be used for ambience and delay/pitch wideners to add stereo width. But there are also plenty of effects that work particularly well on guitar.
 U2 guitarist The Edge forged his signature sound using delay, which you can hear on classic albums such as The Joshua Tree. Find out how to mimic this sound here!In this section, then, let's work through an example of using delay on guitar, to show how it can transform even the simplest of parts. We'll try to emulate one of the most famous and distinctive-sounding delayed guitar sounds: that of U2's The Edge, which you can hear on many records, including The Joshua Tree. The delay effect that's most often associated with the Edge has a delay time of three-sixteenths or a dotted eighth-note of the song tempo.
1. It pays to start with a really simple, repetitive guitar part, so for my audio examples I've created a simple eighth-note guitar line (audio example 14a).
2. Now, place a 3/16 note delay against this, to create a much more complex pattern (audio example 14b). For the example, I used a Korg SDD2000 hardware delay unit (from the same time period as The Joshua Tree), but you can get good results with a plug-in delay too.
3. Next, experiment with using a very slow LFO to modulate the delay time. Used subtly, this creates a pleasant amount of movement in the delay. Some plug-ins include an LFO, but if yours doesn't, you can create a similar effect by routing a separate MIDI LFO plug-in to control the delay-time parameter, or draw the modulation in using automation.
4. Finally, try experimenting with panning the delay into a different position from the dry signal. To demonstrate this, I created audio example 14c, in which I've left the guitar in the centre and panned the delay hard right. More interesting stereo delays can often be achieved by choosing two different delay timbres, with one panned hard left and the other hard right, and with slightly different modulation rates (see audio example 14d).
Synths
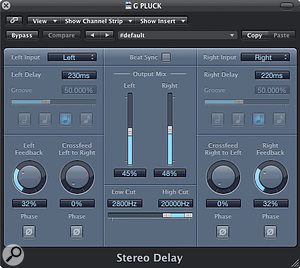 Heavily compressing a synth sound after the addition of delay and reverb can give the part an interesting sense of movement, as the effects are effectively ducked when the synth is played. Here, I've used Logic's own plug-ins to apply this effect to a simple plucked-string patch to create a much more complex, and richer-sounding result.
Up until now, we've looked mainly at using delays as send effects, but now let's consider an example of where you might use them as inserts. When using a synth, there are some advantages to processing the delayed signal along with the dry, and to understand why this is the case, let's work through another example:
1. Take a simple plucked synth and program a repetitive pattern based around eighth notes (audio example 15a).
2. Now add a stereo delay and slightly offset the right and left delay times to increase the stereo width of the effect (audio example 15b).
3. This sounds quite boring at the moment, so now let's make it more interesting. Add a small amount of a medium-sized reverb (audio example 15c).
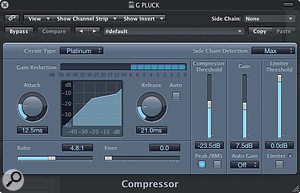
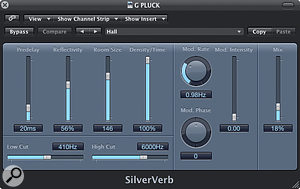 4. Next, insert a compressor after the delay and reverb. Set this so that it's applying about 10dB of gain reduction, and adjust the attack and release time so that the compressor clamps down on the original pluck and then releases from compression in time for the next delay.
Hopefully, what you can hear is a transformation from a boring, predictable patch to one with some movement. Notice that the delay and reverb elements are also brought forward in the mix (audio example 15d). Essentially, what's happening is that the compressor applies 10db of gain reduction to the whole effects chain whenever the plucked synth plays, effectively ducking the delay and reverb by 10dB every time the synth is played. This creates a really satisfying pumping effect and gives the part a wonderful sense of rhythmic movement that simply increasing the effect level couldn't match. There are ways to achieve this with sends, using side-chain compression (remember the ducked delay?) or sending both the source and delay tracks to a bus, but it's much simpler to use delay as an insert in this case!
 We don't need to stop here, though: we can create more rhythmic complexity in the same part by stealing ideas from the Edge, so adjust the left delay time of your stereo delay to 3/16th notes while keeping the right delay to 1/8th note (audio example 15e.) Again, listen to how the compressor effectively ducks the effect each time the synth plays.
Now we'll use delay to take the synth part to a climactic peak. When you turn up the feedback on a delay, it will begin to self oscillate, and the delay will get louder and louder. Dance musicians have managed to take advantage of the excitement this effect creates, but keep it under control, by using a limiter to pin down the delay's output level, so that high feedback amounts that would normally result in ear-bleeding pain are kept manageable.
1. Use the delay from the previous example and then insert a limiter at the end of the effects chain. Set the limiter so that the maximum output is something bearable (mine is set to -7.5dB), and set the threshold so that you can see a small amount of gain reduction on the meters under normal circumstances.
2. Now, slowly bring up the feedback of the delay. As the delay moves into self oscillation, you should find that the limiter pins the delay to a bearable level instead of allowing it to increase in volume like a crazed animal.
This article presents only a few ideas for using delay in your productions, and there are whole, beautiful worlds that are swamped in delay effects and waiting to be discovered. Have fun exploring them!
Audio Examples
Throughout this article, the author refers to audio examples that demonstrate the techniques and sounds he describes in the text. To listen to these, go to the web address below, where you can download them all and listen in your DAW. They're also available on the SOS Soundcloud page and in this month's new iPad App edition.
www.soundonsound.com/techniques/creating-using-custom-delay-effects-media


