 Screen 1: Tape-machine-style monitoring, along with several other monitoring options, can be enabled in Studio One preferences.
Give your musicians the right cue mixes in Studio One, and you’ll make a huge difference to their performances.
Monitoring can get surprisingly tricky when overdubbing or punching in. A musician obviously needs to hear herself while recording, but she also needs her own mix of the existing tracks to which she is adding. Not too complicated in principle, but when there is latency to contend with, the plot thickens.
There are three strategies for monitoring while overdubbing: monitoring through Studio One, monitoring through low-latency monitoring facilities in a PreSonus interface, and monitoring through low-latency facilities in an interface from another manufacturer. (In this column I’m not going to address the fourth strategy of monitoring through a stand-alone mixing console.)
Tape-style vs Standard Monitoring
Like many DAWs, Studio One offers what is called ‘tape-machine-style’ monitoring. In most implementations, the difference between tape-style and what is now considered standard monitoring lies in what you hear during playback: in tape-style monitoring you hear only track playback when the transport is in Play, while in ‘standard’ DAW monitoring, you hear the live input mixed with track playback. In both systems, only live input to record-enabled tracks is monitored when the transport is stopped or when it’s in Record. Tape-style monitoring can be selected for Studio One by ticking the ‘Audio track playback mutes monitoring (Tape Style)’ box on the Preferences / Advanced / Console tab (Screen 1 above).
Studio One implements tape-style monitoring by actually switching input monitoring on and off on the channel, which creates an issue if used alongside low-latency input monitoring: when the transport is put into Record, the DAW input is heard and combines with the low-latency input signal, usually in an ugly way.
Monitoring Through Studio One
The quickest way to get an overdub session going is for the musician to hear the same main mix that the engineer and producer do. That approach gets the session going faster because no time is spent setting up a separate cue mix, but it is obviously more limiting for everyone to listen to one mix. Still, I have done many successful sessions this way.
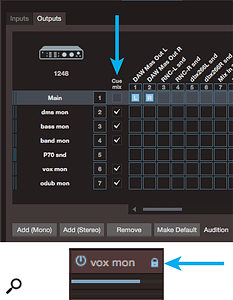
When monitoring the input strictly through software (without the benefit of hardware-based low-latency monitoring), buffer size is an issue. Smaller buffer sizes incur less delay on input monitoring but work the computer harder; larger buffer sizes mean more delay but less strain on the computer. Typically, when monitoring through software while recording, people use the smallest buffer size their computer can handle without creating clicks or other artifacts. You may find that a small buffer size used successfully for tracking is no longer viable at the overdub stage. This can be because somewhere between tracking and overdubbing, you added plug-ins and/or virtual instruments that add to the burden on the CPU. Screen 2: Ticking the Cue mix box for an output in the Audio IO dialogue (top) makes a cue-mix object (bottom) appear on each channel assigned to an interface output. While cue-mix objects are pre-fader, their level and panning are locked to that of the channel by default, but clicking the lock icon in the cue-mix object makes the cue level and pan independent of the channel controls.
Studio One’s cue outputs are designed to be used for headphone mixes, so set one up for each separate mix you want to feed the ‘phones. All you need do is:
- Create a stereo output in the Outputs tab of the Audio I/O Setup window,
- Tick the Cue mix box for the output.
- Route the Studio One virtual output to an interface output that feeds a headphone amp.
- A pre-fader cue send will appear on each channel in Studio One’s mixer that is assigned to an interface output. If a channel is assigned to a bus for submixing, for example, there will be no cue sends on the channel.
The number of usable cue mixes is usually set by the number of independent headphone amp channels available. If your interface has two ‘phones outputs, but both are fed the same output pair, you can only make use of one cue mix. On the whole, you’re better off using fewer cue mixes when you can, because, believe it or not, it usually takes even longer to set up four mixes for four musicians than to negotiate compromises between them on two mixes shared amongst everyone.
Low-latency Monitoring
Many audio interfaces include hardware-based low-latency monitoring, usually implemented through a mixer inside the interface. By monitoring through a mixer that’s not inside your computer, the issue of buffer size in the DAW is eliminated. Manufacturers who make both interfaces and a DAW, such as PreSonus, typically integrate their low-latency monitoring tightly with their software, making a number of functions transparent to the user and simplifying workflow.
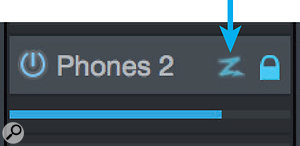
If you use one of the PreSonus Studio 192, AudioBox VSL or FireStudio interfaces with Studio One, life is easy. Just click the ‘Z’ button (Screen 3) on any channel for which you need low-latency mixing, and the channel input monitor button on the channel will use the interface’s low-latency monitoring and mixer. This means that when you punch in, all of the monitor switching is handled for you gracefully and invisibly. Screen 3: The Z button appears on cue-mix objects when using an appropriately equipped PreSonus interface with Studio One. Engaging the button causes the indicated mix to use the interface’s low-latency monitoring for the input.
Using an interface from another manufacturer introduces a few wrinkles and takes a little more setup, but is still eminently workable. I have MOTU AVB interfaces that provide on-board mixing and low-latency monitoring and use those regularly with Studio One. The biggest difference is that some manual routing is necessary: I need to route my input(s) to the interface’s on-board mixer in the interface’s control software, as well as routing tracks playing back from Studio One to the mixer.
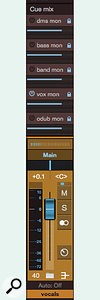
Generally, a musician wants to hear himself, loud, plus one or two other key instruments such as bass and drums. Other tracks may or may not be needed in the cue mix, depending on circumstances. Rather than sending a single stereo mix of all playback tracks from Studio One into the monitor mixer, I usually send a small number of cue submixes. Most often, I have three cue submixes from Studio One: drums, bass, and ‘band’ (that is, everything else). For vocal overdubs I also create a vocal submix. Alternatively, I might set up a cue submix for each band member’s instrument(s), plus one for vocals. Submixing this way trades some flexibility for speed: if there are only four or five mono or stereo faders in the monitor mixer, adjusting independent ‘phones mixes stays a relatively sane operation. Screen 4: This song uses five cue submixes. Note that the vocal cue submix is the only active cue submix for this vocal submaster channel. The ‘odub mon’ mix is for returning existing material for punch-ins.
Avoid combining low-latency input monitoring with monitoring through Studio One, because latency through Studio One combines destructively with the low-latency signal, even at a low buffer setting. Since the input is always heard through the low-latency mixer in the interface, the solution comes down to preventing input monitoring through Studio One. When using PreSonus interfaces with Studio One, this issue is handled automatically, but with my MOTU interfaces I deal with this issue by disabling input monitoring on the input channel and using standard monitoring. That means I can hear track playback if I’m punching in, but when the track goes to record I will not hear a delayed signal monitored through Studio One.
Adding Effects
It is common to want to add effects to your cue mixes. When monitoring through Studio One, just set up a reverb or effect on an FX or bus channel, as you usually would while mixing, then dial the return into the cue mix send. Many interfaces with hardware-based, low-latency monitoring also include at least basic effects on board. If those effects are acceptable for the purpose, they provide a fast and simple way to give performers reverb, delay and so on in cue mixes. However, onboard effects are often not as flexible or as good as plug-ins or dedicated outboard devices.
If you decide to set up an effects plug-in on a send, you’ll need to return the effects through one of your submixes (or set one up just for the effects) to get it into the cue mixes. But since we disabled input monitoring on the channel, how does signal get sent from the channel to the effects plug-in? There are, of course, multiple ways to do it, but I usually create another audio track fed by the same input, add a reverb or effects plug-in set to an ‘all wet’ signal, then dial that in to a cue submix.
A Fly In The Ointment
Cue mixes should be entirely independent of the control-room mix, one reason being that that an engineer can solo up a mic and listen without disturbing the musician’s mix. Currently, Studio One cannot do this; soloing affects all outputs. It’s a significant problem. Studio One Expert came up with a somewhat involved workaround, which you can find here: www.studio-one.expert/studio-one-blog//create-a-solo-safe-cue-buss-workaround-in-studio-one.
On Cue
Setting up monitoring and cue mixes can get surprisingly tricky and be labour-intensive, but a good cue mix can make a tremendous difference to a musician’s performance. Studio One has considerable resources for cue mixing, so taking some time to think through your monitoring needs and working them out in advance of your session will usually mean you find one — or more — ways to meet your needs.
