 A tried and tested method of rearranging breakbeats is to simply chop them up and reassemble them in the timeline.
There’s more than one way to slice your beats in Studio One!
Looking to chop up bits of audio to rework them into some other groove? Studio One offers a number of ways to approach this. You have two sample‑based instruments, Impact XT and Sample One, which love nothing more than to chew on chunks of samples and spit them out in a different order. You can achieve similar results with both, but they each have their strengths and weaknesses. In this workshop, we’ll look at these instruments and rummage around in their breakbeat‑chopping processes.
First, though, I wanted to look at the old‑fashioned way of chopping up loops and rearranging them by hand on the timeline, which should introduce us to a few tools and processes that are always useful to know about.
Sampling The Goods
Studio One has all sorts of clever technology to ensure that loops brought into your project will automatically fit with your chosen tempo. The included content, and loops from the integrated Splice library, have tempo information baked in, and will stretch to fit your project. This is often true of audio loops wherever you get them from.
But what if you wanted to sample from a piece of vinyl straight into Studio One, or you had recordings or tracks on your computer that had no stated tempo? The fundamental bedrock of looping, chopping, slicing and breakbeating in a DAW is the ability to work to a grid, and for that you need tempo information. The answer is really easy: right‑click your sample or piece of recorded audio, go to Audio and then click Detect Tempo. Job done.
Now, Studio One will probably be cleverer than you want it to be and will automatically time‑stretch your sample to fit your project tempo. You may want that, but you might want to work with the tempo of the music you sampled. The time‑stretch information can be found in the Inspector on the left of the arrange page. Click the ‘i’ at the top of the track list to open it. Alongside the Tempo field are options for Timestretch, Follow and Don’t Follow. Timestretch will slow down or speed up your sample to match the project tempo; Follow will leave the sample unchanged but will ensure the start point of an event is in line with any tempo changes; and Don’t Follow just leaves the sample alone.
What’s important in terms of chopping breakbeats is that our sample fits on the grid. So you can either leave it time‑stretched to the project tempo, or set the project tempo to match the detected tempo of your sample. You’ll find the sample tempo under the channel strip at the bottom of the Inspector. If it’s in red, then it’s waiting for you to approve it. You can also see the tempo on the right‑click menu. All you need to do is stick the tempo into the transport bar and you’re good to go.
Chop Chop
With the tempo set, you now need to find the loop you’re interested in from your recorded audio or pulled‑in sample. I find the easiest way of doing this is to drag it about in a one‑bar loop until it sounds right. With snap‑to‑grid on, set up a one‑bar loop in the timeline. Then turn the snap off and drag your sample through the loop until you hit on what you’re after, or at least the first bar of it. By looking at the transient peaks of the audio file and using your ears you should have no trouble finding your loop. And once the start is right, you can extend the loop to as many bars as you want. Cut away the excess around the loop by using the scalpel Split tool, and you’ll just be left with your loop.
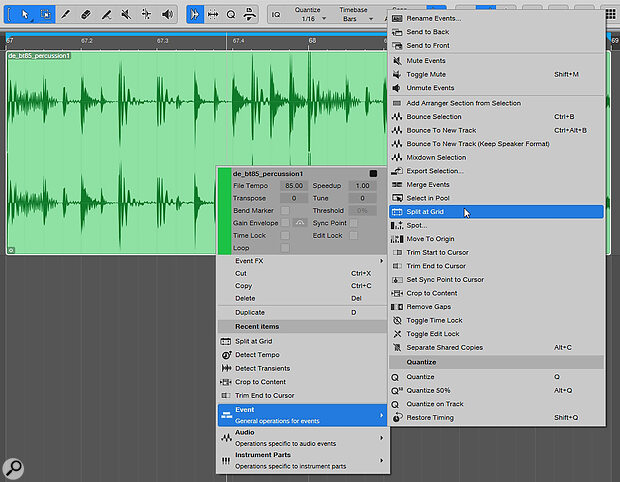
The basic idea is to take the Split tool, slice your sample up, and then rearrange sample chunks into a new beat. If you want a shortcut, try the Split At Grid action under the right‑click Event menu to chop everything up to your grid resolution. Sixteenths is a good grid resolution for capturing most events. Once split, you can set the grid to 64ths and easily create repeats and ratchets just by holding Alt (PC) or Option (Mac) and dragging copies of a slice to each new grid line.
 Once you’ve identified a one‑bar section of your sample, you can use the Split At Grid command to split it up into equal measures, according to your grid’s resolution.
Another tip is to use clip gain to achieve accents and ramp‑ups, and to increase intensity over rolls and ratchets. From the right‑click menu, you can transpose events to give pitch changes, too, and you’ll find other processes like Reverse under the Audio menu.
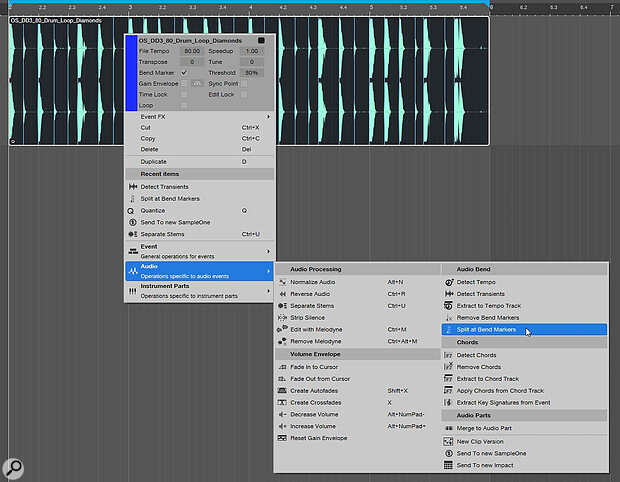
What if your sample has a bit of swing or is not landing nicely on the grid? Well, in that case you can use the transients to set bend markers and use those as the split points. To do this, right‑click the sample, go to Audio and Detect Transients. If it’s a drum loop, Studio One should have no problem identifying the leading edges of all those hits without you having to mess around with threshold settings. Then simply right‑click, go to Audio and click Split At Bend Markers.
 If your sample has a bit too much swing, or isn’t conforming to your grid, you can have Studio One identify transients and place bend markers, which you can then use to split your loops.
Sample One
Once you’ve exhausted yourself messing around with chopped samples in the timeline, let’s use something that makes this a whole lot easier.
Get yourself a nice drum loop. Right‑click it, go to Audio and Detect Transients. This time, we will concern ourselves with the threshold. Double‑click the sample to open the sample editor. On the toolbar, click on the first of the second set of tools. It’s called Audio Bend, and looks like a tipped‑over chess piece. This reveals the bend marker settings. Use the Threshold slider to set the level at which a transient is detected and a bend marker placed. It sort of works in reverse; as you reduce the threshold, fewer hits register, and as you increase it more and more ticks in the sample are marked as individual hits. This is a great way of isolating the important hits, rather than creating a slice on every single hi‑hat and ghost note.
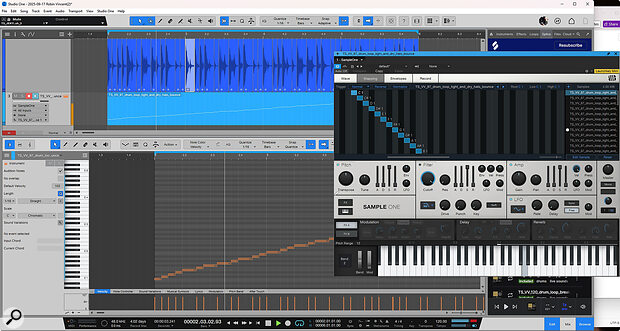
 Once you’ve sliced your loop, you can automatically send it to a new instance of Sample One, where you can play the individual slices as MIDI notes. The Insert Matched Instrument Part command will even place MIDI notes to give you the original loop as a starting point.
Once you’re happy with the sorts of transients that are being detected, head over to the Action section on the right of the Audio Bend settings. Set it to Slice and hit Apply. There are a couple of settings here that make this a better way to slice your audio than using the Split At Bend Markers command as we did before. The first is Autofades. This adds a small fade to the trailing end of each slice to remove the possibility of clicks and artefacts. The second is Quantise. This will automatically pull the slices onto the grid, which is something you may or may not want. Quantise can result in little gaps appearing; you can use Autofill to add some decay and crossfading to the slices so that it doesn’t feel choppy. Merge will put everything back into an audio file once the process is done, but that’s not what we’re looking to do here. Once you are happy with your slices, right‑click, go to Audio and then Send To New Sample One.
Studio One will load up a new instance of Sample One for you, create an instrument track and map all those slices across your keyboard, starting at C1. You now have one heck of a drum kit with several octaves of slices taken from your loop. You can use it as a kit, although Impact XT is probably better at that and we’ll come to that in a minute. Sample One is better at using MIDI to reorder your slices.
If you click on the Mapping tab in Sample One and then right‑click in the mapping window, you’ll see an option to Insert Matched Instrument Part. This will throw a cascade of MIDI notes onto the track that, by default, will play all those slices back in the original order. You can now go in and edit those notes to completely rework the flow of that loop. You can copy, paste, overdub from your keyboard, write in velocity ramps and even apply pitch‑bend to hits.
Impact XT
To slice using Impact XT, start by doing all the same things you did earlier in the Sample Editor until you’re happy with your slices. Then right‑click, go to Audio and select Send To New Impact.
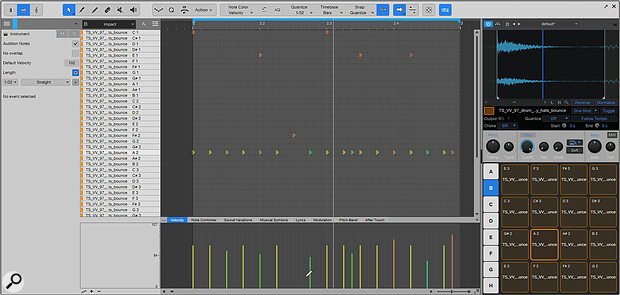
 You can also send your sliced breakbeats to Impact XT, which by default offers a drum editor view.
Studio One generates an Impact XT and an instrument track, but this time presents you with a MIDI drum editor page. The slices are thrown across the keyboard exactly as they were in Sample One, but the intention is much more about creating new beats from the samples you now have at your fingertips. You could turn on the metronome and find the pads that really work for you, or you could turn it into a pattern and get into probability, repeats and delay parameters that could shift you a million miles from the original loop.
What’s great about this process of slicing and importing, and this is true for Sample One as well, is that Impact sees each slice within the context of the whole loop. So rather than each sample on each pad (or note in Sample One) being an individual sample of defined proportions, you can edit the start and end points to make adjustments and capture exactly what you’re after.
You can take this further and use Impact as the sole editor of your loop or sample. Rather than chop it all up on the timeline, you can pull the whole sample into a pad and then set start and end points in the Impact waveform window. Copy and paste the sample to other pads and go in to isolate the other hits you want to use. This can get laborious for drum loops, but for more melodic samples it’s a quick and easy way to get the sounds you want on the pads for MPC‑style remixing.
Impact has some other useful features such as Choke Groups. If you put your slices into the same Choke Group then that selection of samples becomes monophonic, and none of them will play over the top of each other. You can also set different bus outputs so you can mix and apply effects to different sets of slices. Impact also works really well if you prefer to chop your samples manually but then want to manipulate them using MIDI. Simply drop each slice onto a pad and off you go.
The ease with which Impact XT lets you be creative with hits and loops is hard to beat.
What Works For You?
I have a soft spot for manual timeline slicing. It’s mostly about the visual aspect of seeing the loop and edits in action, and actively placing samples and hits where I want them to be. But the ease with which Impact XT lets you be creative with hits and loops is hard to beat. Sample One feels a lot like ReCycle and using REX files in your project, where every slice has a key and is asking to be reordered. I’d also recommend throwing a Note FX Arpeggiator onto your Sample One or Impact XT track just to see what kind of mess you can make of your grooves.
