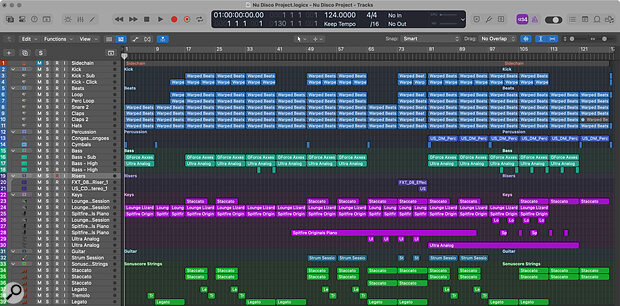
 An overview of the whole project, showing how much layering of samples and instruments was used to flesh out the original track.
Remember the nu‑disco tune we wrote last month, using the loops and instruments in SOS For Artists? Now it’s time to flesh it out, mix it and master it...
Last month, we used SOS For Artists (SOSFA) tools to write a track in the nu‑disco style, with some smatterings of acid jazz thrown in. Now, it’s time to finish it, by building on the beat, and mixing and mastering the track. If you’re starting out and haven’t yet chosen your DAW, SOSFA includes Lite versions of both Steinberg Cubase and Ableton Live DAWs, and these are more than up to the job of mixing a track like this. But most existing SOS readers will already have a preferred DAW, and we chose to mix this track in Apple Logic Pro. Below, we’ll tell you how we did that, using a combination of Logic’s stock plug‑ins — of the sort you’ll find in any DAW — and some of the tasty third‑party plug‑ins included in the SOSFA subscription.
The Groove
In Part 1, we pulled a few loops and one‑shots from the sample library, and quickly dropped them onto the DAW timeline so we could stay in a creative frame of mind and get the track written quickly. But the beat still needed a lot of work — it wasn’t quite locking in with the bassline. And because the four‑on‑the‑floor pulse is one of the main driving factors of nu‑disco, it seemed logical to start addressing this by focusing on the kick drum.
Bass doesn’t have to be mono or centred, but treating it like that ensures its energy is distributed equally across the speakers.
Since the two kick sounds that we’d selected previously worked well together, we routed them to their own subgroup, where we could shape the composite sound with Logic’s stock EQ. One sample focused on the sub frequencies, while the other offered more by way of low mids — a combination that should help to ensure the driving beat remains audible, even on the worst and smallest of speakers. A compressor was also inserted on the bus, with a fairly fast attack but just enough gain reduction (a few dB) to ‘glue’ the sounds together. And we looked to Logic’s Direction Mixer to keep everything centred too. Technically speaking, bass doesn’t have to be mono or centred, but treating it like that ensures its energy is distributed equally across the speakers (something that allows you to get more level in your mix, and ensures a consistent bass level in multi‑speaker environments such as clubs).
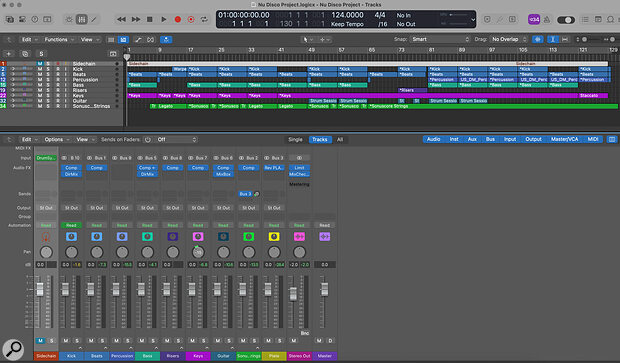 All those tracks were brought down to a handful of groups when mixing, so composite layered sounds could be treated as one.
Again, the other drum sounds were already working pretty well, but the samples didn’t gel perfectly and we could hear some beats ‘flapping around’. To tighten things up, we used Logic’s quantise tools; you’ll find similar tools in pretty much every DAW. A few clashing frequencies were tackled using EQ, notably by removing of a lot of sources’ lower frequencies, to ensure that the kicks and bass had plenty of room in which to do their thing without affecting the rest of the mix balance. That tactic might not work for every genre, but for this one, it’s just the ticket! The snare and claps were kept fairly central, but we applied some light stereo spread to the hats and loops, just to make the mix feel a bit more ‘open’. And we looked to Audified’s U78 plug‑in to add a touch of saturation to one of the percussion ‘toppers’, just to give it a little extra edge.
There’s a percussion loop that appears near the end of the mix, and because all the parts are playing together by that stage of the track, there’s not much space to work with. As well as compressing this part a bit, to help it sit it in the mix, we used low‑frequency EQ cuts to address clashes with the kick and bass. To give the rhythm a bit more impact and avoid it getting too repetitive, we took a splash and a crash cymbal from the SOSFA library, and dropped them onto the track at certain points. These were kept relatively low in level, and we tamed some harshness with EQ (mainly parametric bell cuts) and compression, until we were happy they did the job.
Finally, the kick part seemed to drop out in certain places so, since everything in this track was tightly aligned to the grid, we created a second kick track that wasn’t routed to the master bus, but had a consistent level, so it could be used as a side‑chain source to duck the bass at the start of every beat, just to ensure the sound remained consistent.
While we’re on the subject of the bass sound, you might recall that we used the Gforce Axxess plug‑in to deliver the sub frequencies, and AAS Ultra Analog to give us more energy in the mids, to make sure that the bass line would deliver the goods at the bottom end but also higher up when the mix got more crowded, and when listening on smaller speakers. Once again, we panned this right in the centre, before balancing it by ear against the kick, looking to make it really drive the groove. Compression and EQ were used to shape each sound a touch, and some broader bass‑bus compression, triggered from the side‑chain kick, not only kept the part from masking the kick but also brought a bit of cohesion to the sound.
Other Instruments
The Sonuscore Elements string parts carried the main part of the melody, so we decided to place these centrally too, but these sat much higher up in terms of frequencies, where there was more space. They were kept firmly in that place by rolling off some lower frequencies that didn’t seem important to the overall mix. Sonuscore’s built‑in reverb is decent, but it didn’t deliver quite what we wanted here, so we disabled it and reached for a more subtle and elegant plate reverb, from Arturia’s REV Plate‑140. We set that up on its own track as a send effect.
The string part worked well musically and the sound was decent in isolation too, but it wasn’t cutting through the mix quite enough. To address that, you might look to EQ or processing, but it’s often more effective to consider the instrumentation first. In this case, we doubled the staccato line, to give us both a centralised dry version and a wet version, and widened the latter slightly for more stereo. To help sustain the listener’s attention, we introduced a touch of echo from IK Multimedia’s MixBox in the mid‑section, and repeated this trick in the outro. All of which was great, but the part still wasn’t quite cutting through enough so, finally, we duplicated the MIDI part again, this time to trigger an AAS Lounge Lizard electric piano (EP) patch. This brought a little extra attack, punch and presence to proceedings, which did the trick.
Originally, we’d written the main keyboard part using Lounge Lizard too. But, early in the writing process, we duplicated this with Spitfire Originals Intimate Grand Piano, to fill out the sound. We panned the EP slightly left, and the piano slightly right, and used light, fast‑attack compression and some parametric EQ cut to clean up some mud in the mid frequencies, before dialling in a touch of tremolo in Lounge Lizard, for a nice retro vibe. To add more presence, we again switched off the internal reverbs of both the piano and the EP, and used the REV Plate‑140 send we’d set up earlier to put the parts in the same ‘space’. We turned off the Noise setting in Lounge Lizard too, and added a little extra bite by tweaking the Fork settings, to balance this part better against the attack of the piano. We recorded the incidental piano and electric piano parts onto their own tracks, and added a touch of delay to the EP in place of the tremolo, to lend it a more spacious feel.
Since the guitar part had been generated by AAS Strum Session (rather than recording a guitar ourselves), we didn’t want to lean on it too hard, so only used it in a couple of sections. But even this really enhances the groove. Initially, it sounded a little too ‘clinical’ for this track, but some processing soon solved that: subtle treatment with AudioThing’s Valves plug‑in, followed by more audible distortion from MixBox, gave it a more suitable character, after which we turned to a graphic EQ (again in the MixBox rack) to quickly pull down some frequencies that had started protruding that bit too much.
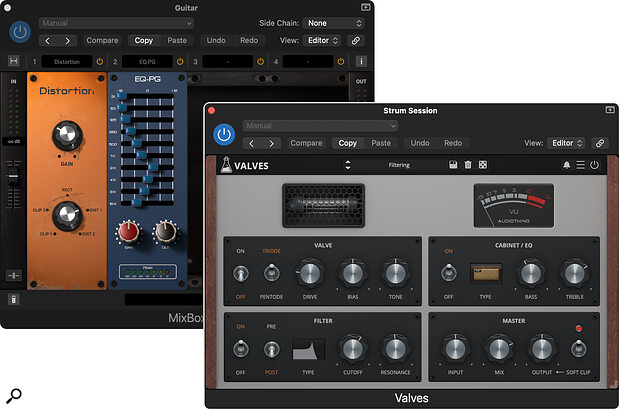 The processing used to adapt our clean‑and‑clinical virtual guitar part, to better suit the vibe of the track.
For the outro, we duplicated the AAS Ultra Analog synth part, hard‑panning each version so they sat opposite each other. Using slightly different sounds on each track helped to prevent phasing issues and tonal changes on mono playback systems, but we were also careful to match the ADSR settings — this ensures that the parts remain consistently balanced across the stereo field. For similar reasons, we panned the short riff in the mid section to the left: this helped to balance the guitar part playing on the right.
Before we finally turned our attention to level automation, we added in some fills and drops. The two risers needed minimal processing, with just slight EQ being applied to pull down unneeded high and low frequencies. We sent the white‑noise sound to the plate reverb and stereo spread plug‑ins, while we kept the bass riser fairly central. To stop things from becoming overly repetitive — always a risk when working with lots of loops — as well as to enhance the impact of each main drop, we also edited out some of the drum elements that preceded them. And with all the elements positioned, shaped and coming in and out of focus as we wanted, it was time to bounce things down...
Bouncing & Mastering
For reasons that we’ve explained in previous workshops, we wanted to bounce both a master stereo mix and some stems. There are no set rules in terms of format, but since standard WAV files aren’t good for carrying metadata, it’s generally best to export as AIFF or Broadcast WAV (we used AIFF). 16‑bit, 44.1kHz files might have been the norm for CD but that’s arguably an obsolete format, and since we intend this track and its stems to be uploaded to sync platforms, it made sense to use the 24‑bit, 48kHz standard of the film and TV industry (even if the mix doesn’t use all those bits!).
When you’re bouncing your mix, if you haven’t done so already, it’s often also a good time to bounce in place your source tracks for archival purposes. The idea is to future‑proof your project: otherwise, if you ever need to revisit the track in the future for remixes, alt mixes or additional stems, you risk being hampered by virtual instruments or effects that have become unavailable or unsupported by operating systems.
We opted to master only the stereo mix rather than work with the stems; a lot of work had already gone into getting the track balanced, but in any case we had the option of reopening the mix, should more detailed work be required.
Working in Logic on a fresh template, we set up our stereo bounce, alongside two reference tracks. Aiming high, the chosen reference tracks were ‘Must Be The Music’ by Dave Lee and Jamiroquai’s ‘Canned Heat’, mixed by Mick Guzauski — two incredibly clean mixes from engineers at the top of their game. Our track was routed to a bus with Logic’s stock EQ, Baby Audio’s TAIP and the LANDR mastering plug‑in inserted. The EQ was simply there to catch any stray, unwanted low‑end frequencies that we might have overlooked, while TAIP added a touch of air and a lovely retro warmth that nudged the track more toward the desired ball park.
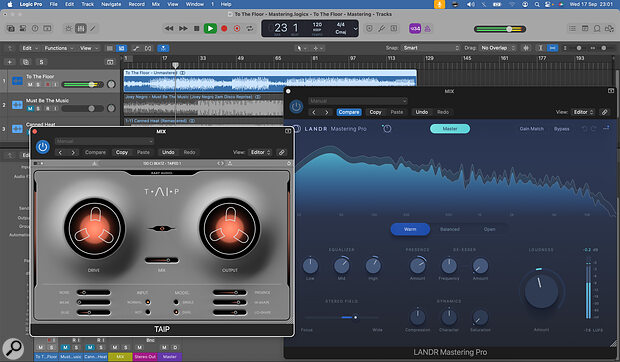 Before using the LANDR Mastering Pro plug‑in, we processed the mix with Baby Audio TAIP — nudging things in the right direction can help you to achieve better results with the LANDR plug‑in.
The LANDR Mastering Pro plug‑in, our third and final step, analyses your track and, rather than reference specific genres, it tries to find tracks across different genres that share similar characteristics, before deciding on what processing it should apply. As we’ve suggested when reviewing this, it’s not going to compete with professional mastering and if you have the skills and experience yourself you might prefer to use more traditional mastering tools. But it’s a pretty effective option when you need to achieve decent results quickly, and those with a particularly high output (for example if you make lots of library music), or who need to get material out on their social channels quickly and can’t afford to wait, might find it particularly useful. In any case, we wanted to see what it could do for this track...
With the default settings, the LANDR plug‑in delivered an impressive overall loudness. It didn’t sound bad, either, although we felt the need to pull things back slightly to bring the loudness and dynamics closer to those of our reference tracks. We also tried switching the plug‑in to its Warm setting, and preferred this — it gave the track a little more body and, yes, a warmer overall tonality. Finally, we used the plug‑in’s additional controls to open up the stereo width a little, and dial in yet more ‘air’ to taste.
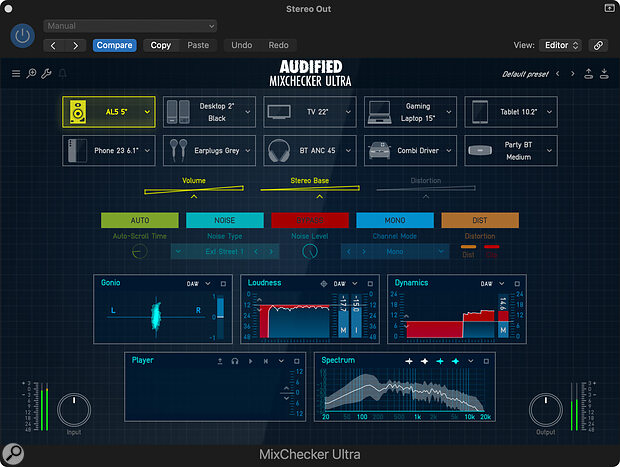 Audified’s MixChecker Ultra: a handy tool for checking mix translation, especially if you’re working on headphones.
As a last check, we inserted Logic’s EQ and Audified’s MixChecker Ultra on the monitoring path. The EQ was just used for its frequency analyser, to compare the overall balance of the three tracks, while MixChecker helped us to ensure that everything remained audible and well balanced on different systems. It’s a fun little plug‑in that really does seem to capture the vibe of the spaces that it’s emulating, and the binaural processing can often have you reaching to remove your headphones to check the source of the sound! For anyone mixing primarily on headphones in a home studio, it can be a really valuable tool.
Putting It Out There!
With our track now ready for release, we’ll turn our attention next month to the process of adding metadata, creating artwork and promotional materials, and uploading everything to SOS For Artists for release. We’ll also consider how you might go about promoting it, with the sort of budget that’s realistic for independent musicians!
EQ & Compression?
In the main text, we’ve mentioned compressors and EQs quite a bit in passing. Along with your faders, pan pots, reverbs and delays, these can be thought of as your main ‘bread‑and‑butter’ mixing tools. This isn’t a detailed mixing tutorial, so we’ve not dwelled on the precise settings too much, but if you need to brush up on your EQ and compression skills, check out the articles listed below. They’re all free to read on the SOS website!
Compression Made Easy: sosm.ag/compression-made-easy
Drum Compression: sosm.ag/drum-compression
How To Achieve Better Separation In Your Mixes: sosm.ag/mixing-for-better-separation
Audio Examples
Nu Disco Project - UNMASTERED MIX.mp3
A single stereo mix of the track.
Nu Disco Project - MASTERED MIX.mp3
A single stereo mix of the track with mastering applied, using EQ, Baby Audio TAIP and the LANDR Mastering plug-in.

