

You are here

Studio One: Note FX

PreSonus Studio One: Tips & Techniques By Robin Vincent
Published February 2026

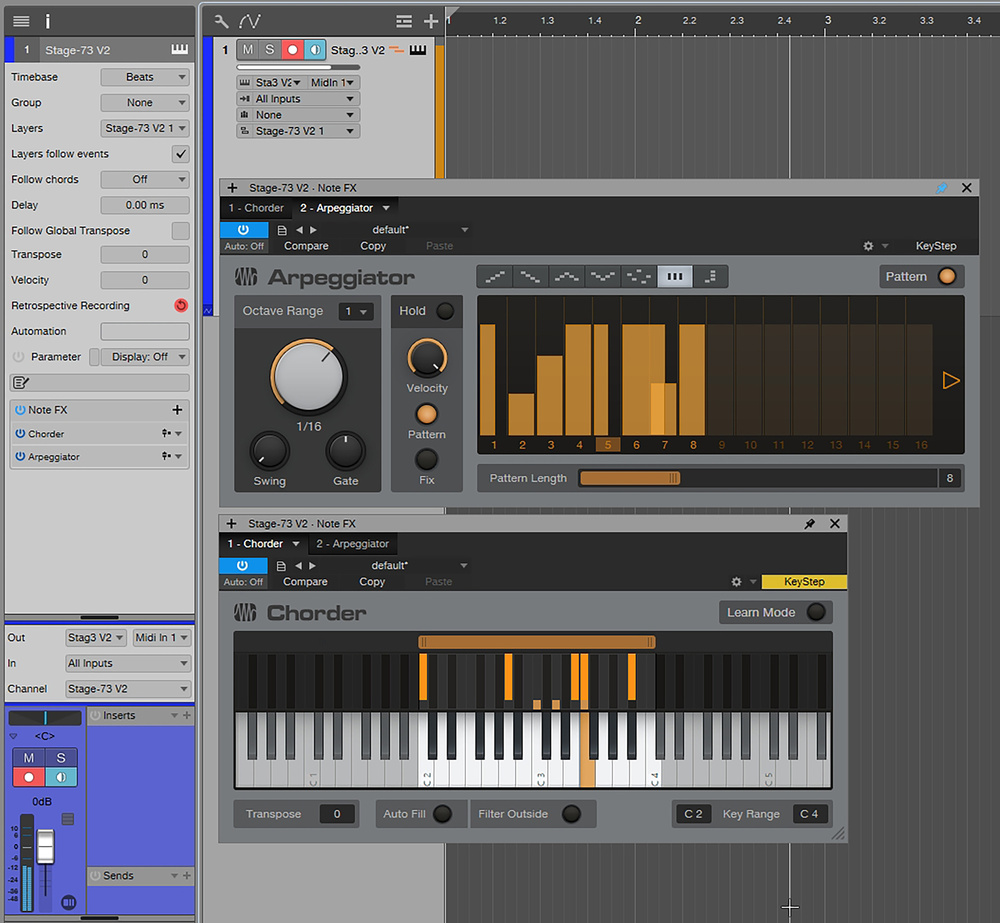
The Arpeggiator and Chorder Note FX are powerful on their own, but can also be put to work together to create arpeggiations from the automatically generated chords.The Arpeggiator and Chorder Note FX are powerful on their own, but can also be put to work together to create arpeggiations from the automatically generated chords.

Spice up your MIDI data with Studio One’s Note FX.

There comes a time in every musician’s life when they get sick and tired of what they’re playing. The creative juices are simply not flowing, and you’re stuck in a loop of the same worn‑out chords and hackneyed melodies. Or, maybe, you’re not that accomplished and need just a little something to elevate your one‑finger meanderings to another level. Perhaps what you need is a little pick‑me‑up: a sweet line of possibilities that will make your head spin and return your sense of self to its rightful place at the top of the heap? What you need is Note FX.

Note FX have always been there, and in many ways, they’re Studio One’s secret weapons against banality. In this workshop, we’re going to remind ourselves of their awesomeness and start making the most of their largely forgotten set of very particular skills.

Take Note

Note FX are real‑time effects processors that act on MIDI notes, so not in an audio effect way of messing with signals, but in a way that reinterprets incoming note data from your MIDI controller keyboard or instrument track. All the action happens before the notes reach your virtual or external MIDI instrument, which makes them recordable, manipulable and reworkable.

Studio One 7.2 currently has four Note FX: Arpeggiator, Chorder, Repeater and Input Filter. Each one brings something interesting to the table, and they can also have a lot of fun working together. You’ll find them towards the top of the Instrument Browser, where you can drag them directly onto a track. Alternatively, you’ll find they have their own section in the Inspector where we can load them and have some control over how they work. Let’s dig in.

Arpeggiator

Everyone loves a good arpeggiator, and this is a great one that starts off very familiar and then gets increasingly funky as you get into it. The idea is that it takes any number of held notes and turns them into a run or pattern of single notes. So you could hold a chord and have the arpeggiator play the notes in series, either running up, running down, up and then down, down and then up, in the order your played them, or completely randomly.

 When you load it up, the default preset is precisely as you’d expect. It’s set to 16th notes over one octave, running up and down. The basic controls are on the left. You can push it up to four octaves and change the rate with the large knob, to anything from a 64th triplet to a bar and a half per note. You can introduce a bit of swing to give the arpeggiations some lilt, and change the gate length from short and sharp to sustained and overlapping.

Along the top, you have the choice of note flow modes previously mentioned. The last one is a chord mode, which plays the notes you’re holding as a chord in the rhythm of the arpeggiator. If you’ve set a larger octave range, it will play the same chord in different octaves.

The Hold button is very useful. It lets you take your hands off the keyboard by holding the notes for you so the arpeggiations keep playing. The Velocity knob enables you to set a velocity for the notes. It’s set to Input by default so the notes are arpeggiated at the velocity you played them, but if you switch it to Fix you can have them all played the same.

Those are the basics, and it’s pretty fun just like that. But there’s another side to the arpeggiator called Pattern. Click the button at the top right and see what happens. The middle display lights up with bars of orange. If you run your mouse over them, you’ll notice that you can resize the height and the width of the bars. The bars set the velocity and gate length of each note along a set pattern duration, turning the arpeggiator into something approaching a pattern sequencer. I find this particularly effective in Play Order mode, where I put it in Hold and grab two handfuls of my keyboard in a chord of around eight notes. I tend to move the Pattern Length up to at least 16; you can switch to another page and up to 32 notes if you wish, but I prefer to focus on a single page. And then just experiment with the velocity and gate on each note. You can even turn notes off completely by clicking their number.

If you have a look in the preset drop‑down menu, you’ll find some interesting examples of pattern sequences. You might also notice that you can pull the gate across other notes to create overlaps of up to 200 percent if you want, which gives it an interestingly polyphonic feel. Don’t forget to save your own presets of patterns that you make.

A quick tip: many of the basic controls are available as simple menus in the Inspector, so you don’t even have to open the GUI. Another tip is that a quick way to bring up the GUI is to click the tiny little icon, like two piano‑roll notes, that’s appeared next to the track name, before the Instrument Editor button.

Chorder

The basic idea behind the Chorder is that you ask it to memorise one chord, and then you can play that same chord with one finger, transposed to whatever key you press. If you load up the Chorder, that’s exactly what the default preset does. If you’d like to change the chord, click on Learn Mode, then click on Clear All so that it has no chords in its memory. Play your chord, and you’ll see it appear in the top half of the keyboard. You can add more notes, either with key presses or with your mouse. When you’re happy, turn off Learn Mode, and you can play your chord on every note.

However, playing the same chord transposed on different notes only has so many uses, and the Chorder would like to be more useful than that. If you turn off the Auto Fill button, you’ll find that you can only play your chord on the original note it was set to. What this means is that if you go back into Learn Mode, you can actually set a different chord on every single note. Chorder becomes a super‑powerful place for chord progressions.

If you dig around in the presets, you’ll find all sorts of chord progressions for you to play with, and you can set your own up and save them as presets for later use.

Other things of note are that you can set a key range in which the chords are active. With the Filter Outside button off you can play single regular notes outside the range; with it on, nothing plays outside the range. The great thing about that is that you can play one‑finger chord progressions with one hand and then a bass or lead part outside the range with the other.

The Arpeggiator and the Chorder work brilliantly together. You can build your chords in the Chorder and then turn them into arpeggiations or sequences in the Arpeggiator.

The Arpeggiator and the Chorder work brilliantly together. You can build your chords in the Chorder and then turn them into arpeggiations or sequences in the Arpeggiator. You can load as many instances of any of the Note FX plug‑ins as you like onto the same track, although I’m not sure how helpful that would be. However, if you put the Arpeggiator under the Chorder you have quite a fabulous combination going on.

Repeater

The Repeater, also known as a ratchet, simply repeats the note played for a set number of times and at a set timing and resolution. The default is eight times in 16ths. It can be quite a weird effect, a bit like a delay or echo, but one that feels somehow unnatural because the repeats don’t fade away. Well, we can fix that, and in fact, Repeater is much more interesting than an echo effect.

The Repeater can work like a simple ratchet effect... or you can use the Scale controls to generate mutating repeats.The Repeater can work like a simple ratchet effect... or you can use the Scale controls to generate mutating repeats.

You have a large knob to set the resolution or timing of the repeats, and next to that you’ll find a Sync button. With Sync enabled, the knob sets time divisions based on the tempo of your project. With sync disabled, you can set any timing you want based on frequency. The Steps knob can increase the number of repeats up to 32. Then we get to the interesting stuff. There are Scale knobs for gate, velocity and pitch. If you turn these knobs, you’ll see the display scaling the steps in interesting ways. The gate’s Scale knob gets that more natural fade going on.

Pitch is slightly different because it throws in pitch changes to each step, which quickly turns it into anything other than a simple echo. The pitch is set to semitones, and if you click the Pitch button at the top right next to Individual you can set the pitch change of every step by itself. The Repeater becomes a fascinating sequence of events that’s triggered by a single note press. It could be melody or bass lines that transpose with the notes you play, or it could be something very experimental. Check out the presets for some great examples.

Recording Input Or Output?

One question remains when making music with the Note FX. Should you record the notes you are playing, or the ones generated by the effect? It depends largely on whether you’ve finished fiddling with the Note FX parameters, or if you’d prefer to start editing the result.

By default, Studio One will record your MIDI notes as played, so that when you play back a recording, the Note FX will process your notes again in real time. However, you can record the output from the Note FX by changing the input mode.By default, Studio One will record your MIDI notes as played, so that when you play back a recording, the Note FX will process your notes again in real time. However, you can record the output from the Note FX by changing the input mode.

By default, when you go into Record and start playing, Studio One will record the notes from your keyboard. These are then routed to the Note FX for processing, and you hear the effect. When you play back the track the same thing happens, and you can change the Note FX settings to your heart’s content. However, there’s a tiny little icon in the Inspector alongside the loaded Note FX that sets the input mode. If you enable it, the Note FX are rerouted before the track rather than after it. Now, when you start recording the track, it captures the output of the Note FX.

The Note FX are a lot of fun and can be used in all sorts of surprisingly creative ways beyond what you’d normally expect from arps, auto‑chorders or ratchets.

Input Filter

This one isn’t quite as impressive as the others, but it’s a useful utility. It lets you set a keyboard and velocity range for any incoming MIDI. Yes, that’s it.