Being a mix engineer isn't only about mixing, as we show when revamping Bobby Nobody's track, 'Stitch Up'.
 For the vocal on this track, Mike used a dual‑compressor processing chain which, in hardware form, is also favoured by top engineers such as Steve Churchyard and Tom Elmhirst: a Fairchild 670 valve limiter followed by Universal Audio's FET 1176LN.
Unlike many that are sent in for Mix Rescue, this month's track already ticked a lot of the right boxes. Good clean recordings? Tick. Decent song construction? Tick. Tight, musical performances? Tick. Little wonder, then, that the mix that the band Bobby Nobody delivered was already pretty reasonable. They felt dissatisfied with the overall sonics, though, and hoped that I'd be able to take the mix a bit further.
Double Compression For Vocals

Upon auditioning the multitrack files from frontman Sam Brox in Reaper, it was immediately apparent that I wouldn't need huge amounts of processing to make the balance work, so I decided to keep things fairly minimal in this regard, and focus instead primarily on multing and fader automation to cope with changes in the arrangement. As usual, I started by building up a basic balance for the main chorus section, starting with the most important instruments. A straight rock track would have put most emphasis on the power of the rhythm section, but I felt that this song needed to be driven more by the lead vocal, so I pulled that fader up first.
I spent a little time experimenting with different compressor combinations to see what might complement Sam's voice, and settled on a combination of two UAD2 emulations of compressors that have been recommended by top engineers such as Steve Churchyard and Tom Elmhirst: the Fairchild 670 and the Universal Audio 1176LN. I drove both compressors a moderate amount, to get the gain‑reduction meters hovering around the 6dB mark most of the time, and this gave a nice overall thickening and enhancement to the sound that really suited Sam's voice, as well as usefully reducing the dynamic range.
I set all of the compression time‑constants pretty fast, to dredge up lots of the little details that bring a vocal really close to the listener, but this had the side‑effect of over‑emphasising the sibilance, which I pulled back into line with Digital Fishphones' Spitfish de‑esser. An instance of Universal Audio's modelled Neve 1073 EQ provided high‑pass filtering at 80Hz, as well as adding a little extra warmth with a decibel or two of low shelving boost from 110Hz. Later on, I multed the vocal so that I could add a further couple of decibels of peaking boost at 1.6kHz during the song's middle section, but that was all the EQ the vocal really needed, because the raw recording was already in good shape.
Drum Balance & Polish
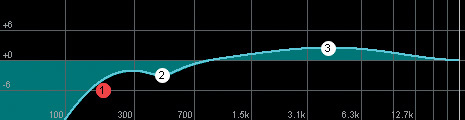
 Universal Audio's recent emulation of SSL's famous quad compressor, the 4k Buss Compressor, was used both for parallel compression of the drum sound and as a master-bus insert. Here you can see Mike's settings for the former application.
The drums had been well captured too, with double‑miked kick and snare, individual high‑tom and low‑tom mics, and stereo overhead and ambience tracks. The relative polarity of the two snare mics hadn't been matched during recording, but it was a simple matter to sort this out by inverting one of them, thereby achieving better low‑mid power on the backbeat. An overprominent low resonance at around 230Hz emerged at the same time, though, and this had to be rebalanced by bussing both mics to a single channel and then notching out 8dB at that frequency, with a very narrow peaking filter from Reaper's ReaEQ.
Building a workable balance then required very little tweaking, other than narrowing the overheads a little with Voxengo's MSED, and high‑pass filtering the ambience to allow for the kind of tight kick sound that seemed to be in keeping with the band's intentions. The tom tracks had already been gated, so those didn't really affect the overall kit sound outside the middle section and the odd fill, and because the overheads and room mics were already picking up a fairly decent balance of toms, I only really needed the higher frequencies of the close mics to increase definition.
Beyond the basic balance, there wasn't really much more to sorting out the drum sound: a bit of parallel compression for the overhead and ambience tracks, to maintain their fullness as other band instruments began to be added to the mix; some additional brightness on the snare, using 2dB boosts from Universal Audio's lovely Harrison EQ at both 2kHz and 8kHz; and a very small amount of short chamber reverb from Lexicon's Pantheon II plug‑in, to blend the overhead, snare, and tom mics. The latter was again high‑pass filtered to keep the kick region clear, and while I was at it I also took about 6dB of high end out of the ambience mics above 8kHz, because the top end of the ride cymbal seemed to be splashing about a bit too much during the two intro sections (0:02 and 1:20 respectively).
Bass Multing & Bus Compression
 Layering a couple of very simple synth patches alongside the chorus guitar parts enabled Mike to make the guitar more tuneful, despite too much overdrive on the raw recordings.
While the drums almost seemed to mix themselves, the bass part took a little more work, but mostly on account of the amp sound changing for different sections of the song. The band had supplied both DI and amp tracks, and I decided to anchor the low end of the sound using the DI, compressing it by about 6dB with the UAD Teletronix LA2A emulation, which is great for vice-free gain‑reduction tasks, especially on bass. A 3dB boost at 1.6kHz with another Neve 1073 plug‑in brought the instrument more to the front of the mix, given its role as a second melody for a lot of this song.
The mid‑range character of the bass sound was then provided by the cab mic, which I high‑pass filtered to avoid any conflicts with the low end of the DI, and then multed to different tracks to allow specialised processing for each song section. The verses were simply compressed very lightly with another Teletronix LA2A plug‑in: the amp/cab combination was already reducing the dynamic range, so I didn't require more than a couple of decibels of compression. The chorus sound was similar, although once I'd added in the guitars I found that it needed less low-mid range than during the verse, and pulled a couple of decibels out at 270Hz with ReaEQ.
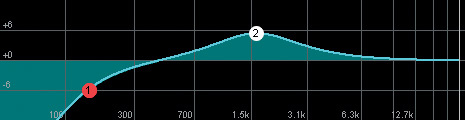
 Here you can see the EQ curves used for three different electric guitar parts. The similarities between them suggest that a rethink of mic choice or placement when recording would be sensible in order to get closer to the required sound at source.The two intro sections used a much more distorted sound, which seemed very thin on the original mix, so I dialled in one of my favourite tonal toys, Stillwell Audio's Vibe EQ, and threw caution to the wind in search of something that might work better. After a fair bit of knob‑twiddling and rebalancing, I settled on using a couple of hefty peaking boosts (6dB at 400Hz and 10dB at 2.5kHz) which gave more weight and character, albeit at the expense of some excess low‑mid girth, which I subsequently tackled with a 4dB low shelving cut at 220Hz in ReaEQ.
The final bass‑cab snippet to sort out was the middle section, which had a sort of 'reverse‑envelope synth' effect printed on it. I was in two minds about this, because it felt rather half‑hearted in the context of an otherwise fairly straightforward indie‑band line‑up. As I see it, there are two main choices in situations like this: either you tone the unusual element down, to make it more 'in keeping' with the track, or you emphasise its unique character to make it proudly lead the track in a different direction. In a lot of cases I'm inclined to take the latter route, but this time I plumped for the more reserved option, since making more of a feature of the synth‑style element seemed to take things too far into left field. Inserting an instance of Schwa's Oligarc Drive distortion plug‑in did the trick, not only making the sound fuzzier and more akin to the other bass cab sounds, but also reducing the audibility of the reverse‑envelope effect and giving more of a simple off‑beat rhythmic feel.
 Since the rhythm section was now fitting together nicely, I decided to insert some master‑bus compression, for that hint of level 'bounce' that often suits rock‑style tracks. After you've got bass and drums sorted is usually a sensible time to apply this, as these signals typically hit the bus compressor hardest, and you can only really judge the balance of the remaining tracks once the bus compression is active. I chose another 4K Buss Compressor plug‑in for the purpose, because I was fairly confident from past experience of the SSL hardware that its lowest ratio (2:1) and fastest release time (100ms) would give me the kind of dynamic response I wanted.
My method of setting up the other controls is first to turn down the Threshold so that the compressor is working more than I actually want, and then to choose the shortest attack time that doesn't unduly compromise the weight of the kick drum: it's surprising how much a fast bus-compressor can rob you of low end in this department. Once the attack time is to my liking, I ease up on the threshold to achieve the amount of gain reduction that seems most suitable (which turned out to be 2‑3dB at most in this case), although this setting usually needs to be refined a number of times as I'm building up the rest of the mix.
Sleight Of Synth
Thus far, the mix hadn't really presented any real difficulties from an engineering standpoint. In fact, my life would be a lot easier if all the vocal, drum and bass parts I had to mix were on a par with these! However, when I began adding in the guitar parts the time had come to properly roll my sleeves up. The first problem was that the main double‑tracked rhythm guitar parts in the chorus had been driven a bit too hard during recording. Although this meant that their dynamics were very well controlled (so I needed no compression at all), the pitched elements, which were worth hearing, were fighting for audibility against the noise‑like distortion harmonics. For simple parts, you can sometimes remedy this problem with extremely narrow EQ boosts designed to draw out a few important pitched harmonics, but although I had a stab at this approach in a couple of spots, it didn't yield much in the way of useful results.
If my guitar‑playing skills extended beyond holding down a power chord, I might have doubled the part with a cleaner sound, but failing that, I decided to see if I could pull off a similar stunt with a synth instead. My reasoning was that the chorus‑section guitar chords were already fairly solid blocks of sound, and that a fairly clean polysynth patch should be able to blend in with them without giving the game away. Because I wasn't after anything characterful at all, I just called up Reaper's little internal ReaSynth plug‑in and doubled the pitches of the two main guitar lines on a MIDI keyboard. Once the notes were sorted, I adjusted the mix of ReaSynth's pulse, saw and triangle waves while the guitar/synth mix was playing, and then bracketed the result into the mid‑range using ReaEQ filters at 550Hz and 5.5kHz.
 Here you can see some of Mike's automation data for the drum parts, specifically some detailed fader moves on the snare close mics to adjust the feel of a fill, and a momentary push of the overhead and ambience mics to emphasise an important crash‑cymbal hit.The result was a significant extra tunefulness to the guitar chords, so this is definitely something to consider if you find yourself facing a similar problem in your own mix projects. If you do plan to try this trick for yourself, though, there's no point in simply replicating the exact setup I used here, because it was a response to this particular song's unique arrangement. What's important is just to keep fiddling with controls until you can get enough of an increase in the pitched component of the guitar chords, while at the same time avoiding the synth becoming audible as an instrument in its own right.
The other main problem with Bobby Nobody's guitars was that they were strangely soft‑sounding, with a fair amount of woolly low end, which meant that the story with most of them was pretty similar: they needed a good dose of high‑pass filtering combined with fairly broad peaking boosts of up to 6dB in the 1‑4kHz region. Initially I suspected that the mic choice might have been inappropriate (some large‑diaphragm condensers, for example, can sound fairly soft by comparison with common dynamic choices), but it turned out that they'd used a Shure SM57, which isn't very bassy and is usually pretty focused‑sounding. Most likely, then, it was a very close mic position making the low end more problematic through proximity‑effect bass boost: just moving the mic back a foot or so can make an enormous difference in this department.
Pulling It All Together: Effects & Automation
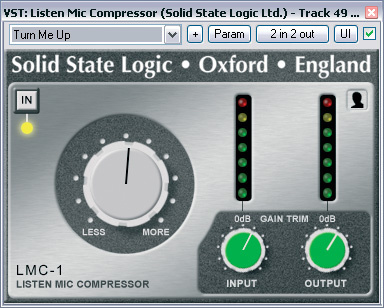
 One of the main additions Mike made to the arrangement was a piano part from 4Front's Truepianos, dirtied up by driving it hard into SSL's Listen Mic Compressor.
Up to this point I'd only used one send effect (the short drum reverb), but the sound was already working pretty well and, while I see no point in adding effects beyond that point just for the sake of it, there were a few additional subtle treatments that still seemed beneficial. Some of the guitars (including the synth 'guitar' layers) and backing vocals felt a little too stark and forward, so I created an ambience reverb patch, again in Lexicon's Pantheon II, just to blend these in a touch more. A little bit of stereo tempo‑sync'ed delay warmed up some of the bridge guitars and the backing vocals, and by swapping the left and right outputs of this effect in Reaper's routing window I was also able to use it to generate some ping‑pong‑style stereo interest on the guitars during the middle section.
Normally I'd use a bit of feedback on stereo tempo‑sync'ed delays, to give two or three audible repeats, but in this case the arrangement was already fairly full‑sounding, so I decided to remove the feedback loop from the delay completely, to prevent things stodging up, and to remove a good deal of low end from the effect return. A final effect was my usual pitch‑shift/delay stereo widener for the lead and background vocals. This was especially useful on the lead, which was otherwise completely free of effects: an extremely up-front sound worked really well for me in this song, but it did feel a bit narrow alongside the drums and all the opposition‑panned guitar layers.
 As you can probably tell, there wasn't a tremendous amount of processing involved in this mix overall, partly because of the quality of the musicianship and recording, but also because automation played an important role. I've talked about using automation on a number of occasions in the past, and much of the work I did here was very similar to what I did for Al James' 'Schoolboy Fascination' back in SOS August 2009, so rather than repeating myself too much, I'll just mention some things that made a particular difference on this occasion.
Although I used automation on almost all the tracks to pull out interesting details, I paid special attention to the levels of the overhead and room mics, teasing out the cymbal crashes and open hi‑hats to give them more impact in the mix compared with the closed hi‑hat and ride hits. This is a technique that producer and mixer Andy Wallace has mentioned in the past, and while it can be a little bit fiddly in some cases, it's surprisingly effective. Perhaps because the ear doesn't expect these kinds of fader rides to be happening, you can often get away with rides of 6dB or more if necessary.
Because the drum performance was already musical, and there was space in the track for that to be appreciated, I'd deliberately avoided compressing the kick, snare or toms, so that I could retain more of the player's natural dynamics. However, there was the odd occasion where a drum was a little under‑ or over‑hit, so I used automation to deal with that, as well as ensuring that the dynamics of the snare fills felt as appropriate as possible within the context of the arrangement. Sometimes, if fill hits on less important beat sub-divisions are too heavy, they begin to make the groove feel like it's plodding.
Good News & Bad News
 Krakli's EZ‑poly was brought into the mix to build on the synth‑like feel of the reverse‑envelope bass line during the middle section. An instance of Schwa's Oligarc Chorus helped diffuse the sound to avoid it taking too much of a foreground role.
A few hours of automation later, I felt I had a mix which presented the band's material with a significantly clearer and fuller sound. But of course the mix engineer isn't the one who decides what's right for the music: that's the artist's job! With that in mind, I sent off my draft mix to Sam to canvass the band's opinions.
The good news was that they really liked where I'd taken the overall sound, so in that respect I could relax. However, the bad news was that they still weren't completely happy with the result: with the mix problems out of the way, they'd realised that the arrangement itself didn't provide enough variety, so they asked me to work with them further to spice up the arrangement and help create a more contemporary overall production. They freely admitted that they weren't really sure what they were looking for, having lived with their original version of the song for far longer than I had, so we agreed that they'd give me a free rein to try out whatever ideas I thought might work, subject to their final approval. For their part, I asked them to provide a few extra guitar and vocal parts.
My first port of call in this kind of situation is to flex my mute buttons (or, to be more exact, my audio editing tools), and see whether attention can be better drawn to certain vocal phrases or instrumental licks by getting rid of less interesting competing parts. This approach has the added advantage that your brain often 'zones out' more background parts to concentrate on other things, so if you drop one of them out for a small section, they seem fresher to the listener when they're reintroduced. Bass and drum parts are usually my first choices for this kind of editing, because they often have a repetitive quality, which makes them more likely to be side‑lined by vocals and lead instruments — and it didn't take too long to find some good opportunities for dropping the bass and/or drums in both of the verses and at the end of the middle section.
Similar drops in the guitar parts were handy, to thin them out where they were doubling the bass in the first introduction and verse, thereby introducing a bit of light and shade between the little sub‑riffs (rifflets? Riffules? I don't know...) from which most of the guitar parts were constructed. But although this editing varied the sound to some extent, it was still proving difficult to achieve much contrast between the different guitar and bass sounds, so I took the decision to expand the sound palette and give myself a few more options.
Expanding The Instrumentation

The two sounds I chose were clavinet (courtesy of Big Tick's freeware Ticky Clav) and piano (from the Emerald module in 4Front's Truepianos), with the latter driven hard into SSL's freeware Listen Mic Compressor to make it small and crunchy‑sounding. However, I didn't just slather these over the top, because that wouldn't have achieved any more variety at all, just a more cluttered mix. Instead I targeted some little melodic fragments in the bass and guitar parts and doubled them, using the new sounds like a kind of audio highlighter pen to draw them to the listener's attention. You can hear this technique most clearly in the two intro sections and in the lead‑out of the verse. The piano also helped fill out the bridges, emphasising their contrasting sustained texture using an alternating octaves figuration doubling the bass line.
Now that the keyboards had made their entrance, I felt that there might be scope to combine them with some edits to invigorate the choruses as well. I'd already used a more obvious tempo delay on the backing vocals as a special effect, and I began to wonder if I could find a way to zero back in on the main vocal for its response lines. My first thought was to chop a hole in the massed rhythm guitars to clear some space at the start of the phrase, and while this really helped the vocal pop out, the edit came across as somehow unintentional, so I made some obvious alterations to the drum pattern to give kind of 'advanced warning', and that seemed to make more sense of it. The cuts still felt too stark, but a simple piano part fleshed things out and led back into the backing vocal phrases.
Now that I'd wreaked significant havoc, I sent a new version to the band for further feedback. Fortunately, they liked where I was heading and had in the meantime pulled together some nice extra parts for me to weave in. These included a couple of additional guitar lead lines and several tracks of raw vocal harmonies and ad libs, that I used to garnish the second verse. While I was chopping vocals around, I also found that the backing vocal hook from the end of the song happened to work in the intro, so slotted a little of it in there: it's never a bad thing to have the hook line in your introduction, after all. Copying the lead vocal between the two bridge sections to conjure up a double track also worked a treat, complementing the more expansive sound of those sections rather neatly.
Only the middle section now remained untouched, and given the increased timbral range of the new arrangement, it turned out that the original trancey reverse‑synth bass idea now felt a lot less incongruous, so I decided to take it and run with it. To this end, I used Krakli's freeware EZ‑Poly synth to double the bass line, setting its amp ADSR controls to mimic the bass envelope, and then feeding it to Schwa's Oligarc Chorus to soften and diffuse the combined pulse/saw sound. A 3/16th‑note panning tempo‑delay on the guitars and lead vocal provided a finishing touch, enhancing the section's new trippier sound.
All's Well That Ends Well
After a bit of to‑ing and fro‑ing to refine all these changes, I ended up with a final version of the mix that the band were much happier with — so even though I'd had to do almost as much arranging as mix engineering, the results were well worth the extra effort. The bottom line is that when musicians hand their work over to be mixed, they expect to come away with something that sounds like a finished record, and as long as you can achieve that end for them, no‑one's likely to question the means.
Mix Rescue On-line!
You can hear before and after audio files to accompany this month's Mix Rescue at /sos/nov09/articles/mixrescueaudio.htm
Rescued This Month
 Bobby Nobody, the subject of this month's Mix Rescue.
Bobby Nobody are a four-piece band based in Denmark and fronted by Sam Brox, formerly guitarist with the UK band the Dust Junkys. The rest of the band comprises Karsten Krauw on drums, Jacob Klitgaard on bass, and Nicolai Holst on lead guitar, and they built their own studio for recording purposes a couple of years ago. This month's song is called 'Stitch Up', and was recorded into Apple Logic 8 via a Mackie mixer and an Alesis Multimix 16 firewire audio interface, using the band's own collection of Shure, Rode and SE Electronics mics.
Remix Reactions
 Mix Rescuee Sam Brox.
Sam Brox: "Mike is a legend. Right from his first draft, he took the song away from sounding like a demo, and that was possibly the most eye-opening part for me. To do that without using any special effects taught me a lot about what I was doing wrong when mixing. It's completely altered my way of working; now I'm not so eager to reach for the modulation effects before everything is sounding right together. Seems like a no-brainer, looking back…
"As for the edits and extra instruments he's used, I think they complement the song perfectly and help to take it further away from sounding like it was recorded in our rehearsal room. It's given the song more life, more space, and yet more focus. I'm ecstatic with the results, and even more so with the blueprint it's given me for my future mixes, which will all be held up against this one. Cheers Mike!”