This month, as well as revealing a few unusual tricks, our mix engineer demonstrates how to achieve power and clarity by focusing on the contrast between the sounds of different instruments.
When SOS reader Tom Adams contacted Mix Rescue for advice, his band's first EP had already netted them BBC airplay and some high-profile gigs. However, they'd become concerned that their quirky alternative-rock/electronica production values were alienating the increasing number of listeners they'd begun picking up from outside that market niche. In response to this, the band had already been developing a more polished live sound, and had come to the conclusion that a more commercial-sounding and radio-friendly recorded production would also be desirable. So they sent me over the multitracks of their song 'Mallory', to see if I could point them more in that direction.
Piano Polish
![]() This month's Mix Rescuees: The Mountaineering Club.
This month's Mix Rescuees: The Mountaineering Club.
Once I'd imported the multitracks into my Cockos Reaper mixing system, I immediately made a bee-line for the piano recordings, because I felt they were an obvious problem area in the original mix version, so it stood to reason that the greatest potential for filling out the sound would probably come from that quarter. The auspices were certainly good: Neumann U87s had been used on a Steinway grand to generate three separate passes (one for the main chordal backing part and two for the riff, doubling at the octave), each pass captured by two stereo mic pairs (one close and one more distant).
As always with multi-miked recordings, my initial impulse was to check for the best polarity/phase match, and I discovered that both stereo pairs took on an unappealing, boxy flavour in mono. Adjusting the relative phase of the distant array's right channel using Audiocation's Phase plug-in seemed to help to a degree, but no such process bailed out the close mics much, and adjusting the phase relationship between the two mic pairs bore little fruit either. So in the end I decided to EQ the Middle component of the stereo piano bus, to try to improve the mono presentation. There are now a number of equalisers with built-in M/S functions, but I turned to one of my old favourites, DDMF's LP10, which swiftly delivered the goods via two broad, single-decibel peaking filters: a cut at 255Hz and a boost at 1.6Hz.
Giving my monitor controller's Mono button a good exercise revealed that the instrument's wide spread in the close mics was rather distracting, especially at the low end. GVST's simple freeware GStereo multi-band stereo width adjustment plug-in dealt with this nicely, collapsing the sub-150Hz zone to mono and reducing the rest of the spectrum to 75 percent of its former width. On the plus side, this seemed to give a more natural impression of the instrument being surrounded by its wider reverb (coming from the distant mic array), but it also meant that the subjective bass sound in stereo became considerably cooler on account of left-right phase cancellation, so I patched in Universal Audio's Pultec EQP1A emulation to deliver an extra dose of low end.
Tonal EQ & Special Sauce
 The multi-miked piano sound became rather boxy-sounding when heard in mono, so Mike used DDMF's LP10 equaliser operating in M/S mode to provide a precisely targeted fix.
I reached for this plug-in because the hardware it's based on is revered for its ability to make smooth, natural-sounding bass adjustments. If you're new to its control set, the provision of separate low-frequency Boost and 'Atten' (attenuation) knobs can initially seem odd, until you realise that they don't exactly cancel each other out, which means that applying them simultaneously tends to recess the lower mid-range. This well-known operational idiosyncrasy proved to be very handy in this event: increasing the Atten level reduced some woolliness otherwise imparted by the gentle Boost curve.
I also applied a good lick of 12kHz with the Pultec's switchable mid-band peaking boost, to add sparkle to the subjective piano tone, but found that this also added an unpleasant hardness to the instrument's hammers. My first thought was to try using some kind of limiter or transient processor to round that off again, but neither proved very effective for this in practice, so I opted instead for Reaper's ReaXcomp multi-band dynamics plug-in, compressing above 3.5kHz with a low ratio and fast attack to emphasise the brightness without excessive spikes. Once the transients had been softened, though, the brightened hall sound from the distant mic rig felt overstated, so I used Reaper's ReaEQ to roll off its high end progressively above 2-3kHz, as well as dipping a couple more decibels around the muddiness 'danger zone' of 200-400Hz.
This general processing recipe was then replicated across all three recording passes, but I couldn't resist including a few little extras on the riff tracks, to try to give the melodic hook a more chiming and resonant quality. Gutsy 4:1 compression from Stillwell Audio's The Rocket operating at 4:1 fattened up the sustain tails (though I was careful to allow a little unprocessed signal to break through via the plug-in's own wet/dry mix control, so that the compression wouldn't completely throttle the note onsets), but the real 'special sauce' here turned out to be Schwa's fantastic Tin Man resonator plug-in — I only seem to be able to get away with using it once in a blue moon, but it knocks me out every time I do! The only down side of its design for me is that you need to set up several instances if you want to target a specific set of note pitches, and normally I can't be bothered, so I just use a few high-resonance EQ peaks earlier in the plug-in chain to chivvy its automatic resonance detection in the most appropriate directions — in this case, 4dB at 690Hz and 7dB at 906Hz to emphasise the 'F' and 'Bb' notes respectively.
Bass & Lead Vocals
 In narrowing the low-frequency width of the piano close mics with GVST's useful little freeware GStereo plug-in, the instrument's subjective tone thinned out, due to phase-cancellation between the left and right channels. A low-frequency boost with Universal Audio's Pultec EQP1A plug-in helped to redress this, as well as adding some brightness at around 12kHz.
The reward for all that tweaking and listening was a much fuller and more emotionally engaging piano sound. In light of this, I decided to relegate the rather pedestrian bass guitar primarily to the low end of the spectrum, in order to take fullest advantage of the piano's more characterful timbre in that region. Stacking two low-pass filters to clear away everything above 500Hz isn't a ReaEQ setting I often apply to bass parts, I can tell you, because usually you want the instrument's mid-range to help delineate the melodic lines, but in this instance it was just what the doctor ordered! All that remained was to even out some rather erratic signal levels with a generous helping of 8:1 limiting from Universal Audio's CPU-light 1176SE plug-in, and the bass now it slotted in nicely, supplementing the piano without upstaging it.
Over these foundations, I was now confident that I could realistically begin to mould the lead vocal sound to its context. It had also been tracked through a U87, and the rich but neutral raw sound was certainly nothing to complain about — smooth and well-defined, with well-moderated sibilance. However, I've always felt that both the strength and the weakness of the U87 is that it doesn't have a clear 'voice' of its own. On the plus side, it'll reliably give a good account of practically anything you point it at; but on the minus side, its understated personality won't supply the kind of overt flattery that many engineers seek when recording lead vocals — as in this case.
That said, as mixing challenges go, you shouldn't really have to break a sweat addressing this if you've got any kind of analogue-modelling software on hand, and in this case I was quickly able to banish any hint of blandness with a chain of Universal Audio's vintage emulations: 6-10dB of compression from an LA3A, a 5dB boost at 1.6kHz from a Neve 1073, and a glistening 5dB high-frequency shelving boost at the upper spectral extreme from an SSL E-Series Channel Strip.
Wet & Dry
 Schwa's distinctly left-field Tin Man plug-in provided some artificial resonance enhancement for the piano's main melodic riff, with a little encouragement from a couple of high-Q ReaEQ peaking boosts.
The real key to this specific vocal treatment, though, was its send effects. The nub of the issue was that although the original mix clearly indicated that a heavy delay/reverb effect tail was crucial to the overall artistic vision, at the same time the band were also ostensibly searching for the kind of clear and upfront vocal sound that tends to transmit well over the airwaves.
I used several effects tricks to try to resolve these two apparently contradictory wishes. The biggest of these was to use a delay-reverb chain to create the tail, rather than separate delay and reverb effects. This meant that the reverb was then only being fed from the delay's return, so its onset was effectively pre-delayed by around 150ms, thereby reducing its ability to pull the dry vocal back into the mix. (The psychoacoustic implication of such a pre-delay, after all, is that the first reflection of the singer's direct sound has to travel about 40m further than the direct sound; in other words that the listener and the singer are standing next to each other and well away from the room boundaries.) Also, by the same token, because the reverb effect itself incorporated no pre-delay, the delay repeats to which it was applied were pulled more strongly away from the listener, subjectively speaking.
 This unusual EQ curve was applied in the final remix to avoid the upper frequencies of a fairly uninteresting bass part from obscuring the more interesting inner details of the piano sound.The unnatural characteristics of the two specific effects I used also gave few of the real-life acoustic cues that are most likely to affect the front-back position of the dry sound. For the delay, I turned to GSI's WatKat, an emulation of the vintage Watkins Copycat tape-loop unit, using all three delay heads for complexity and then applying a little Sustain to lengthen the decay a touch. The reverb was an impulse response taken from the Lexicon 480L's 'Large Plate' patch, running in Christian Knufinke's SIR2 convolution plug-in. One of the appeals of real analogue plate reverb is the way it can add sustain without suggesting any specific acoustic space, and that old Lexicon's algorithmically simulated plate is even less natural-sounding, which made it perfect for my purposes here. A number of further tweaks kept these effects clear of the vocal, increasing the separation of the dry and wet sounds. Firstly, I equalised both returns extensively, aggressively high-pass filtering below about 400Hz and dipping 5dB from the mid-range around 1.5kHz. In addition, heavy de-essing of both sends, using Tone Boosters' TB_Deesser, kept sibilance from bouncing around too prominently.
 The main vocal send-effect chain comprised GSI's WatKat tape-delay model followed by a plate emulation from Lexicon's 480L hardware reverb processor — the latter supplied via an impulse response running in Christian Knufinke's SIR2 convolution plug-in. Notice, in particular, how the reverb's impulse response has been truncated using SIR2's envelope controls.
 Despite the vocal's increased dry/wet separation, though, both effects were still cluttering the mix when faded up to an appropriately prominent level. The delay was undermining the intelligibility of the lyrics, for example, which led me to duck the effect return by 4-6dB whenever the dry signal was present. I did this using a side-chain triggered compressor (Reaper's ReaComp), but could just as well have done it with fader automation, and it meant that I could make the most of the delay tails between notes, but without blurring important words. I liked the density and slow decay of the plate treatment, but not the messy reverberant build-up caused by its 3.5s tail. Fortunately, it was fairly simple to ameliorate with SIR2's built-in level envelope feature, which allowed me to effectively truncate the impulse response after a second or so. That way, I still had the rich reverb onset, but without the unwanted mix ballast.
Guitar Differentiation
, and a chain of Reaper's ReaPitch (shifting the signal up an octave) and DaSample's GlaceVerb.") Three plug-ins Mike used to differentiate the guitar layers: Stillwell Audio's Vibe EQ (adding a 7dB boost at 640Hz), and a chain of Reaper's ReaPitch (shifting the signal up an octave) and DaSample's GlaceVerb.
Three plug-ins Mike used to differentiate the guitar layers: Stillwell Audio's Vibe EQ (adding a 7dB boost at 640Hz), and a chain of Reaper's ReaPitch (shifting the signal up an octave) and DaSample's GlaceVerb.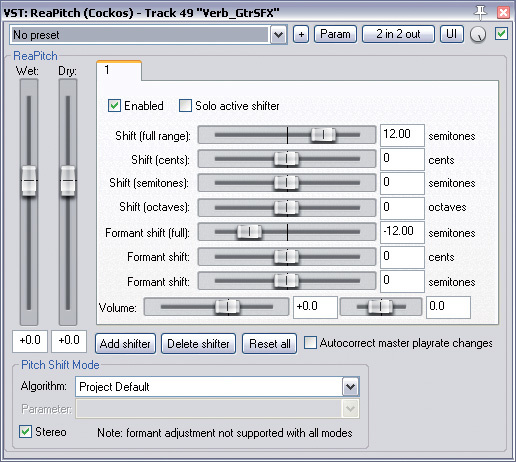

The guitars caused some difficulties to start with, mostly on account of a decision to adopt a dual-miking strategy across the board. The phase relationships between the two mic signals on some of the track pairs didn't seem to stay consistent through the song, because the band had been experimenting with lots of different miking setups during the recording process, which made the practical challenges of creating a stable tone considerable. Furthermore, despite the multi-miking, there didn't actually seem to be a huge amount of contrast between the different sounds that had been captured, such that mixing together all 10 parts during the track's final freak-out section just resulted in a mush — everything was somehow competing harshly with everything else, nothing really felt clear, and other sounds in the mix were getting completely submerged.
I therefore made an early decision to ditch one of each pair of guitar mics, selecting the mic that I thought would give each guitar part a sound most unlike all the others. This did seem to help the mix clarity a bit straight away, but I also took further steps to differentiate the tones, in search of a fuller and more engaging ensemble texture: Stillwell Audio's gutsy-sounding Vibe EQ supplied a big 640Hz push on one of the main rhythm parts, while a crystalline, octave-shifted reverb from DaSample's classic freeware GlaceVerb plug-in directed more energy from the main soaring lead melody into a clearer frequency bracket further up the spectrum. However, in a more general sense, I tried to use my per-channel EQs to focus each guitar part into specific frequency regions so that each could shine more clearly, albeit within a more limited compass.
Reining in the harshness was a delicate balancing act, as I didn't want to lose too much of the brightness and edge that was clearly a big feature of the original mix. Part of the recipe was several moderate cuts in the 2-4kHz region, but as much of the harshness was concentrated in the picking 'crunch' of each strum in many cases, I also found myself reaching for fast full-band limiting (from Universal Audio's 1176SE with medium-fast Attack and Release settings) and even split-band high-frequency limiting (from Reaper's general-purpose ReaXcomp plug-in) on several occasions.
Drums In Last
 The attack 'crunch' of some of the guitar parts was sounding rather harsh, so this facet of the sound was rounded off on the relevant tracks using either Universal Audio's 1176SE or Reaper's ReaXcomp.
I know that some engineers start a mixdown with the drum tracks pretty much by default, but I've always felt that the order you introduce the instruments in a mix makes too much of an impact on the final result to be approached in such a rigid manner. This mix turned out to be a case in point, as I only brought in the drums after I'd already mixed everything else. The main reason behind my decision was that they simply didn't feel that important to the sound of the song — or, to put it more precisely, I felt that almost everything else deserved more room in the mix than they did, so I was content to squeeze them in wherever they would fit around the other parts.
The nature of the sounds themselves played into my hands, of course, because most of the samples were so short and spiky that they could cut through the whole texture effortlessly, even at a modest level in the balance. It was also convenient that such synthetic and electronic sounds in general are far more forgiving of drastic processing than more natural timbres, simply because listeners tend to have a less concrete expectation of how they 'ought' to sound. As as result, I didn't worry unduly about playing fast and loose with my equalisation settings on those tracks, bracketing sounds severely with filters and dipping out big 6-8dB chunks where a sound seemed to overshadow the bass guitar's powerful low mid-range or the vocal's vital presence or 'air' frequencies, for instance. Likewise, driving one of the hats into GVST's freeware GClip clipper proved to be a perfectly acceptable way to round off its spike and give it a fraction more harmonic complexity, while some serious abuse of one of the kick drums with Reaper's ReaXcomp and Christian Budde's freeware Lightweight Limiter was by no means off limits either.
As for the specific settings I used, there's not a tremendous amount to say about them, given that most were more a question of personal taste than technical necessity. However, there are some parallels to be drawn with my approach to the guitars: in general I tried to emphasise the contrast between the sounds to try to draw the listener's attention more clearly.
Finishing Touches & Bus Processing
 These screenshots show the bus-processing scheme Mike used for this track: a main mix channel with full-band compression/EQ from URS Console Strip Pro; a parallel channel with heavy five-band dynamics from Reaper's ReaEQ; and a 'bypass' channel filtered with Brainworx bx_cleansweep to feed some of the kick-drum's low end past Console Strip Pro to the master outputs.
Having now reached a reasonable static balance for the tracks throughout the time-line, the remainder of the work in pulling the remix together mostly involved a sprinkling of tempo-sync'ed delay and global hall reverb (the latter from the 'Big Bright Hall' patch in Universal Audio RealVerb Pro, with some low-cut EQ and a dash of additional pre-delay) and a good deal of automation: most of the parts had a few little fader rides, while the lead vocal, guitar melodies and piano all benefited from more extensive real-time adjustment. A few tracks also required some EQ automation, most notably the lead vocal, where Tom's more breathy phrases wouldn't poke out of the mix enough without some assistance from a couple of extra decibels of 1kHz. Finessing the climactic guitar ensemble's tone was made easier by a couple of automated EQ cuts too, and the low end of the piano was dipped during that final section, to avoid a slightly muddy frequency pile-up with all the other instrument layers.
Although, for most chart-oriented work, I'm normally content with just full-band compression and a high-quality EQ over my master bus (both typically from URS's Console Strip Pro plug-in), in this remix I felt that some refinements to the basic approach were called for. For a start, I definitely wanted the mix to be hitting the full-band compressor fairly hard during the outro section, but when I found a setting I liked for its mix-gluing and gain-pumping characteristics, it was also weakening the low end of the main kick-drum sample. Using Reaper's flexible signal routing to feed some low-pass-filtered kick signal directly to the main mix outputs, thereby bypassing the buss compressor, offered the quickest fix for that.
In addition, however, I wanted to bring out the lushness of the mix effects, but not just by fading up the return levels — that would have unduly obscured some important internal details of the direct sounds, in my view. Instead I chose to create a parallel five-band compression channel, fed from the output of the main master-bus compressor, driving that quite hard (around 7-10dB reduction in each band) with fairly fast time constants, so that it pulled up low-level signals right across the spectrum. Although this is the kind of setting I'd never dream of applying directly to a full mix — it sounded fairly well pulverised — mixing this signal at a low level with the main mix outputs was extremely effective in bringing all the sounds closer, and was in no danger of compromising the transient definition of the final remix file, because the transients were bypassing the multi-band processing.
Conclusion
Although there were some aspects of this remix that were out of the ordinary (the Tin Man resonance processing, the late introduction of the drums, the bus-processing strategy), many of the principles I've discussed in this article are useful in most mixes to some extent. In particular, it's important to ensure enough contrast between your instrument sounds if you want to create a powerful and clear-sounding mix which will keep the attention of your audience — almost regardless of the musical style you're working in.
Audio Examples
It's much easier to learn about the techniques Mike used in this remix if you go to the SOS web site and download the original and remixed tracks, along with some before and after versions of individual elements in the mix. All the files are annotated with detailed captions.
Rescued This Month
The Mountaineering Club are an unsigned London/Bristol-based band comprising SOS reader Tom Adams (vocals, piano, guitars, synths) and Leo Plunkett (beats, electronics), with additional on-stage assistance from Dan Jeffries (guitars) and Richard Blake (trumpet, synths). On this song, additional backing vocals and production were supplied by Jamil Samad. The band aim to create 'widescreen' music, mixing the epic sounds of post-rock and dream-pop with ambient soundscapes and electronics, to create a sound that is both fragile and huge. In Tom's own words: "If you've been to the top of the world and looked down at the hills and countryside around you and been lost for words then perhaps we share something... We aim to write the soundtrack to that view.” Their debut EP, 'This Coldest Winter', has had airplay on the BBC, securing them a series of high-profile gigs, including a set at the 'End Of The Road' festival.
Remix Reaction
Tom Adams: "A big thumbs-up from us — the track now sounds fantastic! Mike has done a great job, creating a mix that still has the alternative rock and electronica feel of the band whilst bringing a more polished and accessible pop sensibility to the sound. This remix really complements the band's live sound, and is much more representative of the direction we're heading in musically.
"We particularly like what Mike's done with the piano, bringing the character of the instrument much closer to the kinds of sounds we admire in bands such as Sigur Ros. He's also got the guitar balance right, which was really important for us, given the central role of the guitar sound in alternative rock styles like ours — the guitars now function to add colour to the mix rather than dominating it. The 'anthemic' bit at the end works much better than before too, and I like the little 'fill' (for want of a better word) just before it arrives. Good work!
"Thanks for the great mix and all the tips. As we work on our first album, we'll be taking what we've learnt from the Mix Rescue process and applying it to our new recordings.”