The loudness wars might be over, but peak levels in Pro Tools are still important.
The ways in which our music is delivered to consumers have changed radically over the last 15 years or so. A lot of music is now being listened to on streaming services, which has consequences for the way in which we mix and master our content.
Since the introduction of compact discs, mastering and delivery has been about getting the audio levels as close to the digital ‘ceiling’ as possible. At first, this meant using level normalisation to get peaks close to 0dBFS; and then, when that wasn’t enough, the loudness wars broke out, and compression techniques were adapted to try and make new CD releases louder than everyone else’s.
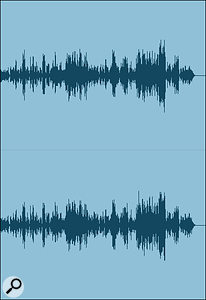
 Screen 1A: a typical waveform from a mixed but unmastered track.When streaming services first came along, they were building playlists from different sources, and quickly found out that the perceived volume was going up and down from track to track. Consumers were continually having to adjust the volume, and they complained. Consequently, most streaming services have adopted some means of ensuring that the tracks within a playlist are adjusted to play out at a consistent level — which actually means that some of the techniques we’re used to employing to maximise the loudness of our tracks have become unnecessary or even counter-productive.
Goes To Eleven
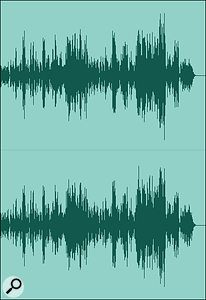
Normally, with a track that has been mixed and is ready for mastering, the peaks won’t go all the way up to 0dB. There is some headroom to play with, as in the blue waveform in Screen 1A. Simple normalisation increases the level so the highest peak is just under 0dBFS, as in Screen 1B, but does not change the shape of the waveform in any way. The gain change in this example increases the perceived loudness by 4.5 Loudness Units, with 1LU equivalent to 1dB. Screen 1C: the same waveform with some limiting applied to the loudest peaks.
  Screen 1B: the same waveform normalised to 0dBFS.
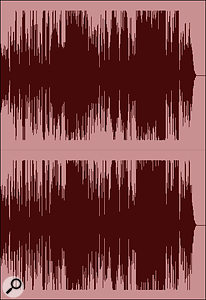
Peak limiting can increase the average signal level, but changes the shape of the waveform, reducing the relative amplitude of the loudest peaks as in Screen 1C. This subtle limiting increases the loudness by a further 2LU. The only way we can make the track sound even louder is to apply more drastic audio compression techniques, which further compromise the dynamic range in the track: the ‘light and shade’. Screen 1D shows a very heavily compressed version of the same track: and you can see how the quieter parts have been brought up in level. This version is another 5LU louder than the gently processed version. Screen 1E: the same heavily compressed waveform after it has been ‘turned down’ by a loudness normalisation algorithm.
  Screen 1D: a loudness-maximised version of the same track, with heavy compression and limiting applied.
Playing The Averages
Today, however, more and more music streaming services, including iTunes Radio and Spotify, are normalising tracks to an average loudness figure on playback, rather than eliminating as much headroom as possible. This means there is no point using compression techniques to make a track sound louder, if that track is to be played back on one of these services. A heavily compressed track will simply get turned down so that the average loudness matches the target loudness. This means that its peaks will no longer be anywhere near digital full scale; all we end up with is a quieter, but still heavily compressed track with loads of wasted headroom. The better thing to do is use the lightly processed track, which, in this case, actually hardly needs any adjustment to match the -16LUFS target that a lot of music streaming services use.
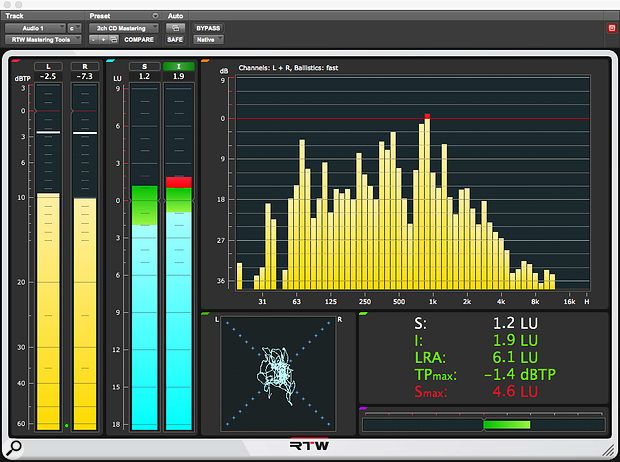
 There are now quite a few metering plug-ins that will display Short Term and Integrated Loudness measurements, as well as True Peak values, including this one, Mastering The Mix Levels, and others shown below.
Numerous plug-in and hardware manufacturers are now producing tools aimed at music mastering using loudness figures based on the BS1770 standard, which is already in common usage in broadcasting. Metering for this kind of application and workflow needs to display the following information.
 Waves WLM Loudness Meter.Loudness Meter: The BS1770 worldwide standard has been developed to produce a meter that responses like our ears do to loudness. The standard provides for three measurements, but the two that are most important in this application are Short Term, which averages the loudness over the last three seconds, and Integrated, which provides a single measurement that is the average loudness for the whole track. There also needs to be a Reset button, so you can restart the integrated averaging as necessary. Best practice is to mix your tracks to be around -16LUFS (Loudness Units Full Scale) so that the streaming services do not have to turn it up or down to normalise to their preferred target loudness (usually also -16LUFS).
- Peak To Loudness Ratio: This is a useful measurement that isn’t in the original BS1770 standard but is very helpful in mixing and mastering contexts. In effect, it illustrates the amount of dynamic range a track has. Most meters change colour, showing green for good, through amber for OK, to red, warning that you are probably overdoing the processing.
- True Peak Meter: A true peak meter measures peaks in the reconstructed signal, making sure you are not going over digital headroom. When we mastered for CD manufacture, the whole delivery process was lossless, usually 16-bit at a 44.1kHz sample rate. However, most online delivery systems use lossy codecs (typically MP3, or AAC for iTunes) to create smaller audio files, thus reducing the file size or bandwidth needed. Unfortunately, these codecs do not handle inter-sample peaks too well, so we need to be able to control what is going on near 0dBFS with precision. Otherwise your music heard by your consumers could end up being distorted.
 Nugen Audio VisLM-H.
To explain, digital audio is made up of a series of snapshots, or samples. Traditionally, we have measured the peak level of the audio with a digital peak meter that is actually reading the samples, typically 44,100 per second, but what this doesn’t tell us is what is going on between the snapshots or samples. When this stream of samples is converted back into an analogue waveform, it’s possible for the signal between samples to peak up to 6dB higher than the level that can be measured in this way. As we are working very close to the digital headroom ceiling and processing audio with codecs that are not very good at handling audio close to 0dBFS, we need both metering and limiters that work to something called 'true peak'.
True peak meters will display what is likely to happen between the samples when the audio is converted back into an analogue waveform, allowing us to adjust levels so we can be confident that we will not overload the lossy codecs and thus end up with distorted tracks being delivered to the consumer. This is achieved using a technique called oversampling, which enables us to measure what is going on between the peaks, and so make sure that we do not try and exceed digital full scale between the samples.
As well as having a meter that can display true peak values, it is also very important that your mastering limiter can work to true peaks. Most hardware and software limters do not, so it’s probably best to assume that yours doesn’t unless the manufacturer shouts its true peak credentials from the rooftops! (Two that do are the Avid Pro Limiter and Nugen Audio’s ISL 2st.) Although there is no reason why you shouldn’t carry on using your favourite dynamics processors in the production process, when it comes to the final mastering stage, a reliable and accurate true peak limiter is essential. Before tracks are converted using a lossy codec like MP3 or AAC, you should use a true peak limiter to protect the codec stage. For example, if you know that your audio is going to be converted to MP3 you should set the ceiling to -3dBFS, and although you can go higher with AAC codecs, I still tend to work around -3dBFS to be safe.

