 When you insert Multiband Splitter onto a track, Pro Tools will automatically create a new bus for each frequency range.
Multiband Splitter opens up a whole new world of processing options.
Amazingly, the Avid Pro Series of plug‑ins that come bundled with Pro Tools is over 10 years old. They still feel fresh, and despite having some top‑flight alternatives, I use them in every session. But there are some which I’m sure get overlooked by most people. The AudioSuite Pro Limiter Loudness Analyser, for example, makes an excellent partner with Pro Limiter and offers offline loudness analysis, while Pro Multiband Dynamics also has a close relative, Multiband Splitter. This simple plug‑in presents a set of crossover filters, which split the full frequency input into up to four bands at customisable crossover frequencies. These can then be routed via dedicated buses out to other destinations in the Pro Tools mixer.
Perhaps because it presents a blank canvas, it would benefit from some suggested uses. After all, plug‑ins have to solve real‑world problems!
The manual doesn’t provide specific details about the filters used in Splitter, but Pro Multiband Dynamics employs eighth‑order Linkwitz‑Riley crossovers, so it’s safe to assume that Splitter uses the same. These steep 48dB/octave filters have great band separation, and both Multiband Dynamics and Splitter report zero latency, confirming that they are not phase‑linear. The Pro Multiband Dynamics plug‑in actually offers the same facility for outputting each band via automatically created buses, so you could use Pro Multiband Dynamics to split and route audio without engaging the dynamics processing, and the results would be identical.
When The Split Goes Down
To set up Splitter, simply instantiate it on the track you want to split. In this case I’ll use it across a whole mix, though it can be useful on groups or individual tracks. Once it’s loaded you can access the automatically created buses, which can output each band separately, from the Plug‑in category in the input selector of a track of the corresponding width. To create a four‑band split across the whole of a mix you’ll need to be routing to a mix bus which is then routed to a Master Fader (in the way most people do as a matter of course). Load Multiband Splitter on the mix bus aux input and create four new aux inputs next to it; you could create these in a Basic Folder to help with session organisation. Next, select the four new aux inputs and set the inputs for these to the Multiband Splitter Plug‑in buses. You can set them all at once using the Cascade feature: select the four aux inputs, hold Command+Option+Shift (Control+Alt+Shift on Windows) and select the Low Band bus in the first selected aux. The inputs will be set to the next available bus for each consecutive track.
I don’t recommend this splitter for parallel processing, so I’d always route the mix bus on which Splitter is instantiated to a dead‑end output, so its contribution can’t be heard as well. With this all set up, it’s a good idea to save it as a Track Preset for use in other sessions.
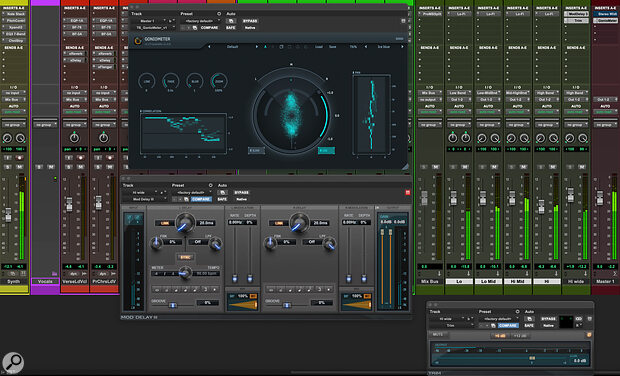
 Combine Multiband Splitter with a short delay on the high‑frequency band, with one side polarity‑inverted, for some mono‑friendly stereo widening.
Splitting Image
In this example I’m using all four bands, but in most real‑world cases I find I’ll often use a few as two bands depending on the application. Bands can be disabled using the four buttons in the lower left of the plug‑in UI. The three crossover points are freely adjustable between 40Hz and 10kHz, and with these two sets of controls, it’s easy to set up whatever you need.
So once you have your splitter set up in your session, what can it help you to achieve? The most obvious application is multiband dynamics, but that is already comprehensively covered by the Pro Multiband Dynamics plug‑in, so unless you want to experiment with different compression styles on different bands that’s probably beyond the scope of this article.
One of the things you can achieve very easily is manipulating the width of the stereo image across the frequency spectrum. On stereo tracks Pro Tools uses stereo pan controls as opposed to balance controls, so it is possible to narrow, widen and even invert the stereo field. For example, it’s very straightforward to narrow the width at the bottom end using these controls, though because of the steep filters, I’d avoid dramatic moves from hard right and left to mono; this could sound peculiar if a part moves across this crossover band during the performance.
Pan controls only allow the stereo image to be narrowed. If you want to widen the top end, as so often is desired, you can use your usual Mid‑Sides techniques on the high band. An alternative way of achieving this is to duplicate the top band and insert Mod Delay on the copy. Set delay to a 100‑percent wet, short (under 30ms) single repeat (no feedback). Follow this with a Multi‑Mono Trim plug‑in with the master Link button unlinked and one of the two channels polarity inverted. This introduces a slightly delayed, out‑of‑phase version of the top band, which adds width — very neat!
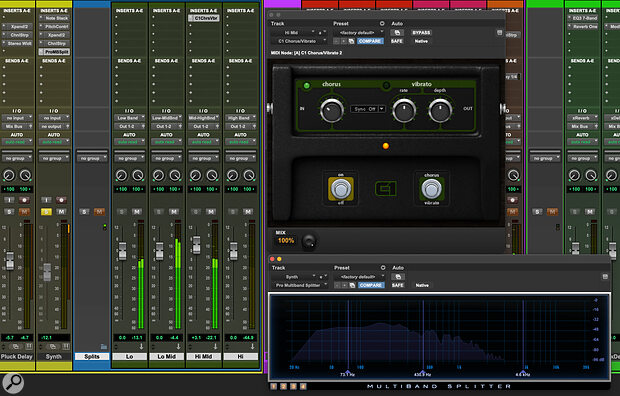
 Chorus effects can be a bit much across the full bandwidth of a signal, but applied only to a select frequency band, the results can be much subtler.
Saturation
One great use for Pro Multiband Splitter is saturation effects. Saturation and distortion introduce additional harmonic content to the input signal, and the specific blend of new harmonics created by the process is responsible for all the different timbres available. Using filters to split the input signal before introducing independent saturation processes on each band is a powerful tone‑shaping tool, and considering I first experimented with it back in Cubase VST with Steinberg’s Quadrafuzz plug‑in, I’m surprised this technique isn’t more common. FabFilter’s excellent Saturn plug‑in uses this technique to great effect, but you can create some very usable effects by splitting the signal, placing a LoFi plug‑in on each band and experimenting.
Using filters to split the input signal before introducing independent saturation processes on each band is a powerful tone‑shaping tool...
My preferred option is to use the distortion control in very small amounts (less than 1.0) and then tweak the amount for each band — and, importantly, to adjust the crossover frequency to best suit the material. It’s possible to produce unique results; for example, driving the low band moderately hard creates a different sound from low‑pass filtering a saturated full‑range band in parallel with a clean version.
Individual Tracks
Subtle widening or harmonic enhancement is probably as far as you’d want to go when processing the entire mix, but in single‑instrument applications the creative possibilities increase. Instead of using LoFi to add a little colour, try the venerable PSA‑1 Sansamp plug‑in for some multiband sonic mangling. Adding four instances across the Splitter outputs can be achieved in a single operation using Option+Shift (Alt+Shift on Windows) to instantiate a plug‑in on all selected tracks. Use Option+Shift+Command (Alt+Shift+Control on Windows) when clicking one of the plug‑ins to bypass them across all of the selected splits to make sure you haven’t gone too far.
I’ve never been much of a fan of chorus as I find it can easily make things sound too unstable, but if the effect is applied only to the overtones of a pitched sound, leaving the fundamental unaffected, then the rather queasy feeling which can result from too much chorus can be easily avoided. This is an ideal candidate for the multiband treatment. A single band of chorus on the most appropriate area might be all you need, but if you want to experiment with multiple choruses with individually tweaked settings for each band, you absolutely can.
Ambience
In a typical mix you might use two or three reverbs and maybe a couple of delays shared across the session using sends and returns, but there will be occasions where you want a special effect on a single instrument too, from a specific snare reverb to a shimmer reverb on a guitar. One area that rewards experimentation is of course delay, and I’ve had great success splitting delay treatments across a multiband split. Be aware, though, that using different delay times on different bands can get confusing. As an alternative to filtered repeats, try using the same delay time on all bands while varying the feedback. For example, you might have more feedback on the high bands than on the lower bands. This creates an effect that is similar in nature to having a high‑pass filter in the delay’s feedback path, but is a useful alternative, as it offers more control and the option for different processing in each band.
However you use Multiband Splitter, it’s an intriguing plug‑in and you probably already have it. Since time spent setting up a complex effects chain can be recalled as a Track Preset or from an old session using Import Session Data, it is never time wasted.
