 The upper track in this screenshot is frozen: note the greyed-out insert slots and the ‘hatched’ waveform background.
We explore the ins and outs of the new Track Freeze function in Pro Tools 12.4.
In our tour of the new features in Pro Tools 12, we arrive at Track Freeze. Introduced by Avid in Pro Tools 12.4, this new feature enables the ability to render any track and its processing to an audio file at a click. With another click on the same ‘snowflake’ button, you can simply un-freeze the track at any time and return it to its original state. Compared with Track Commit, which we’ve already covered in these pages, Track Freeze is an even simpler way to render out a track to free up system and DSP resources. Unlike Track Commit, though, there’s very little you can do by way of editing to the rendered track.
Let It Go
There are three ways to initiate a track freeze or un-freeze: from the Tracks menu, by right-clicking on the track name in the Edit window, or by clicking on the new ‘snowflake’ button in the Edit window track header. Once the track is frozen, its waveform will be displayed in a semi-transparent state with an angled pattern overlay. You can select multiple tracks and freeze them in one go, and if you have a group selection made, Track Freeze will be applied to all tracks in the group.
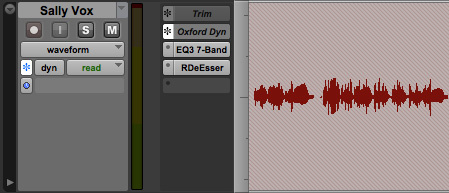
 As with Track Commit, it’s possible to freeze only part of a plug-in chain.
As with Track Commit, you can choose to freeze a track up to a particular insert. To do this, right-click on the last insert you want to be frozen and select Freeze Up To This Insert in the drop-down menu. The track will then be rendered up to and including that insert, with plug-ins in inserts after it being left accessible and editable. You can tell if an insert is frozen, as its name will be greyed-out and the snowflake button will appear by the insert name. To un-freeze a partially frozen track, right-click on the frozen insert and select Unfreeze, or just click on the track’s snowflake icon.
Auxiliary input tracks can be frozen as well, using all the same commands that you would use for an audio track. Most of the time, aux tracks don’t display a waveform, but when you freeze an aux track you will see a ‘frozen’ waveform with the angled pattern overlay. As with frozen audio tracks, frozen aux tracks cannot be edited, but you can adjust volume and pan.
External hardware inserts cannot be frozen using the Freeze feature: the option shows itself as available on the track, but as Freeze uses an offline bounce process, it simply freezes silence, because Pro Tools cannot process audio through external hardware faster than in real time! If you want to print the sound of the external hardware you’ll need to use Bounce in real time.
Iced Gems
Instrument tracks can be frozen in all the same ways as audio and aux tracks. With frozen instrument tracks, Pro Tools will display both the audio waveform and the MIDI notes in a semi-transparent state, but neither can be edited while the track is frozen
. Frozen instrument tracks display both the MIDI data and the audio waveform, though neither is editable.
There is a slightly different workflow when working with multi-output virtual instruments. You can choose to freeze all the processing on the relevant tracks, or just the virtual instrument’s outputs, leaving the subsequent plug-in processing enabled for further adjustment. Right-clicking on the virtual instrument plug-in lets you choose the Freeze Up To This Insert option to freeze just the virtual instrument. When you do so, Pro Tools will present a dialogue box offering you the option to freeze all the auxiliary outputs from the virtual instrument, or to leave the auxiliary outputs un-frozen and just freeze the virtual instrument. If you choose to freeze all the outputs as well as the instrument, the frozen instrument track will display both the audio waveform and the MIDI notes in a semi-transparent state with the angled pattern overlay, whereas the auxiliary outputs will just display the relevant audio waveform.

Freeze Or Commit?
It may seem that there is a lot of overlap in the way Avid have implemented Track Commit and Track Freeze, but both have their specific uses. If you want to send your tracks to anyone else, the safest option is to use Track Commit, in effect making audio stems. These tracks then do not rely on the other person having the same version of Pro Tools or all the same plug-ins as you.
Avid have designed Track Freeze to be a simple and effective way to free up CPU power in Pro Tools. For instance, if you need to record a vocal on a session where the buffer size is set very high to allow 80 tracks of virtual instruments to play back, you can freeze all tracks and set the buffer down to 32 samples to record at low latency. When you are done with the vocal track, you can simply un-freeze the tracks to continue with the session. You could even freeze tracks as you build a session and then have almost ‘unlimited’ CPU power depending on your computer.
Going Back
When a session containing frozen tracks is opened in a version of Pro Tools prior to 12.4, those tracks will return to their active state, so on an earlier system, it will appear as though the tracks had never been frozen. This is an important consideration when looking at collaborating or sharing your session with Pro Tools users not running 12.4.
Track Freeze In Detail
What gets frozen?
- Plug-in settings and automation (except for any plug-ins remaining active when using Freeze to Insert).
- Clip Gain.
- HEAT, if set to pre-insert (HD systems only).
- Elastic Audio.
What can you do to a frozen track?
The following track controls are still available on frozen tracks: volume, volume trim, mute, pan, send level, send level trim, send mute, plug-in automation (for plug-ins that are not frozen when using Freeze to Insert). However, the following editing functions on frozen tracks are disallowed:
- Editing clips or clip contents.
- Elastic Audio editing.
- AudioSuite rendering is not possible on frozen tracks.
- Tempo changes, Song Start changes, and enabling or disabling the Conductor track are not possible when there are frozen tracks in the session.
- Insert and Cut Time operations are not available in a session if there are frozen tracks.
- HEAT is unavailable for frozen auxiliary input and instrument tracks (HD systems only).
- Instrument tracks are removed from the MIDI Editor window while frozen and MIDI parameters including Real Time Quantize settings cannot be adjusted until the track is un-frozen.
- Clips used on a source playlist for a frozen track cannot be removed from the session until the track is un-frozen.
A limited number of editing actions is supported on frozen tracks:
- Editing and writing of all basic track automation parameters including sends, but not frozen plug-ins.
- Editing and writing of automation on un-frozen plug-ins, as well as addition and removal of plug-ins on un-frozen inserts (when using the Freeze Up to This Insert option).
- Changing the track output path.