 Here, a snare top and bottom mic sample are being bounced together via a bus, so that the final sample contains the complete snare sound.
There are many great virtual drum instruments around, but sometimes it’s best to create your own!
There are many ways to finesse a drum recording at the mix stage, from manual editing to audio quantisation tools like Elastic Audio and Beat Detective. And as virtual drum instruments have evolved, many producers now prioritise the control and flexibility of MIDI‑triggered drums over traditional audio‑based editing. However, replacing or augmenting real drum performances with third‑party samples from a virtual instrument can compromise the individuality of the drummer’s sound. A hybrid approach, using samples derived from the original drum recording, offers the best of both worlds: the control that virtual instruments offer, without changing the core drum sound itself. That’s what we’re looking at in this workshop.
The advantages of this are threefold. It retains the character of the original performance, it avoids the potential for sonic mismatches between the original and replacement drum sounds, and it provides the kind of forensic control over timing and dynamics that users of drum virtual instruments are accustomed to. So how do you do it?
Sample Recording
Creating a library of drum samples can be time‑consuming if you’re doing it properly. There’s a lot of editing and file management involved. If you only need to fix a couple of snare hits this might be overkill. But if you want full control while staying faithful to the sound of the original performance, here are some tips to get you started.
Firstly, while it is possible to create a library from a performance, if you anticipate wanting to go deep into sampling, it’s well worth putting some time aside for capturing some clean samples at the tracking stage. In the same way that a film crew’s sound recordist captures clean ‘room tone’ to help with edits later on, spend some time with the drummer capturing a variety of clean hits at varying velocities and with all the articulations you anticipate needing.
Often this isn’t possible, but identifying clean hits from the performance can usually still give perfectly usable results — you just might not have the luxury of clean tails, and so may need to edit the samples a little tighter. You’ll need several alternative hits at each velocity, and while you might think that getting a lot of variety in your hits will add life and authenticity, in my experience, the most consistent hits give the best results. Hits that sound identical inevitably aren’t, but if you use only a single sample, you’ll immediately hear the artificial ‘machine‑gunning’ effect of the same sample being repeated too close together.
Top & Tail
Editing hits relies on familiar tools like Tab to Transients, Strip Silence and Separate at Transients, which speed up the process significantly. To ensure consistency, drag alternative samples onto the timeline with Timeline Drop Order set to Top to Bottom and trim them to equal lengths. Once on the timeline, check that sample starts are all tight with the transient, then select across all of the samples and use ‘S’ to trim them to length. Use Option+Shift+3 to consolidate clips, and right‑click them in the Clips List to reveal in Finder for subsequent file management.
If you are simply capturing individual close mics as samples, then things are reasonably straightforward. However, if you have multiple mics on a kit piece — for example, a top and bottom mic on a snare — then you’ll need to pre‑mix those samples. To do this, make an Edit Selection across the hit, soloing the channels you need, right‑click on your drum bus, and select Bounce to create a complete snare sample. This includes any plug‑in processing on the bus if desired, and you can incorporate overheads or room mics too if you like.
Care should be taken to check edits and apply fades to keep samples clean. Once complete, you should choose a naming convention and stick to it. I use the following: Project, Kit Piece, Articulation (if necessary), Velocity, Sample Number. For example: “ADB snare rimshot hard 1”. Finally, create a sample folder and keep things organised!
Go Big
How detailed your sampling needs to be depends on your project. I visited a friend’s studio recently where they had spent many hours preparing a fully playable library of TCI files using Slate Trigger 2 for a project. It had multiple velocity layers, with each having multiple round robins of well‑matched samples. (A round robin is a set of multiple alternative samples within a single velocity zone, set up such that a different sample plays each time that zone is triggered.) It was a lot of work.
At the other end of the spectrum, I often record my band’s rehearsals using very minimal miking on the drums — usually a single overhead and a mic on kick and snare. I’ll augment this at the mixing stage with some tom samples, which I’ll capture by temporarily moving the overhead mic onto each tom to record some clean hits. This is preferable to using a third‑party sample because it matches the tom sound in the overhead. Both use the same techniques, but the scope of the libraries is very different.
Tools For The Job
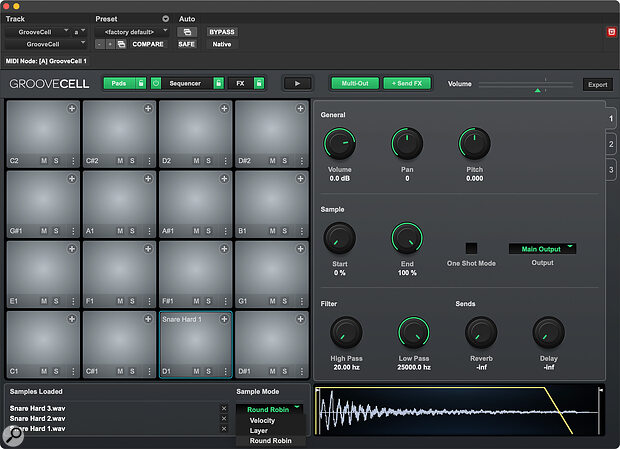
While Pro Tools’ built‑in samplers have limitations — such as GrooveCell’s inability to combine round robins with velocity layers, which you would ideally use at the same time — there are still ways to get useful results. For simpler tasks, GrooveCell is a quick and effective option. For more detailed work, premium sampling products like Kontakt offer the deeper functionality necessary for really in‑depth library creation.
 GrooveCell is great for quick sampling jobs, but has its limitations. For example, you can’t implement both velocity layering and round robin playback at the same time.
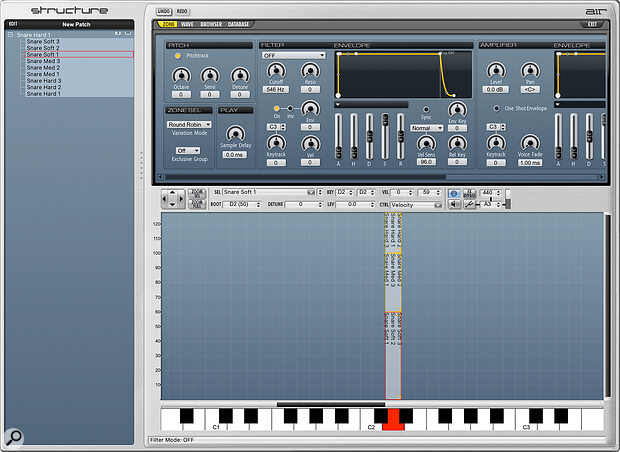
AIR’s ageing Structure Free is too limited for complex sampling, but I’ve been a user of the full version for many years, and it’s still ideal for this kind of work. Pro Tools 2024.10 introduced a partnership with Native Instruments, and users with an update plan or subscription get access to some curated content for Kontakt 8 Player. Kontakt Player itself is free, and while you can sample into it, this is restricted to creating custom Leap presets. This is a great feature for looping, but for detailed sampling like this, you’ll need the full version. A few years ago, Avid partnered with UVI and bundled Falcon with subscriptions and update plans. Falcon is a synthesizer and also a very capable sampler, but is no longer included with Pro Tools.
 AIR’s Structure may be dated, but offers all the tools you need to create a fully featured drum library.
Whatever software sampler you favour, the good news is that with the 2024.10 release, a long‑missed function of Pro Tools returned: drag and drop of clips from the timeline into sampler plug‑ins. The workflow of editing clips on the timeline and dropping them straight into the sampler is super‑fast, especially for simple sampling jobs.
Trigger Warning
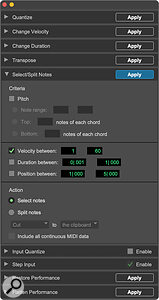
 If you want to trigger your samples from an existing audio performance, the Event Operations window can help to clean up the trigger signal.Samples loaded into a plug‑in can be triggered either using MIDI notes, or directly from the audio on a drum track using third‑party tools such as Slate Trigger 2, WaveMachine Labs Drumagog and Toontrack Superior Drummer’s Tracker feature. If you’re taking the former route, the Audio to MIDI function in Pro Tools does a great job if you have clear audio to generate triggers from. If you find your preferred mic placement on a particular kit piece suffers from spill, use a gate on a duplicate track (not routed anywhere you’ll hear it) so you can use extreme gating settings without affecting the mix. You can also use the Select / Split Notes feature in the Event Operations window to quickly remove low‑level false MIDI triggers caused by spill.
Once you have a set of MIDI triggers and suitable samples in a sampler, the benefits of all this work come to the fore. With MIDI controlling the performance, it’s easy to alter the drums subtly or dramatically. Mismatches in tone and tuning between the original drums and third‑party replacements can be an issue when using drum libraries, and using your own samples avoids this. The friend I mentioned earlier had a good example: they wanted to use only the room mics in a section of the song, which would have made the use of third‑party samples very obvious. However, because he was using his own custom samples, it sounded consistent with the original recording.
A common challenge when using custom samples from the original kit is phase cancellation. Since the samples are closely related to the original drum tracks, they may interfere sonically. Using a phase alignment plug‑in is advisable, but at the very least, check polarity to ensure that the real drums and samples are reinforcing each other in the mix.
By combining the flexibility of MIDI with the unique character of your artist’s live drum performance, this approach offers a powerful alternative to traditional editing or sample replacement.
By combining the flexibility of MIDI with the unique character of your artist’s live drum performance, rolling your own samples offers a powerful alternative to traditional editing or sample replacement. Whether you’re subtly reinforcing a live kit or creating a fully MIDI‑controlled drum track, taking the time to capture and curate your own drum samples ensures that the final result stays true to the original performance while gaining the benefits of modern production tools.
