If you want the impact of heavily compressed drums but don't want to sacrifice your dynamics, parallel compression is the way to go. This month we explore the best ways to achieve this effect in Reason.
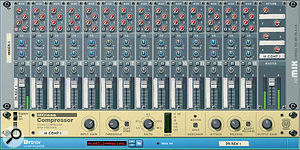
 A Spider splitter being used to create a separate dry and compressed version of a drum loop.
Parallel compression is a tried and tested mixing trick for achieving loud, punchy drums. The idea is simple: blend a heavily compressed version of your drum mix with the uncompressed original, as shown in the diagram below. The result is often more pleasing than simply compressing your drum submix, as it preserves the original dynamics and decay tails, while adding harder-hitting and punchier transients. This month we'll look at this classic production technique, discuss some considerations when patching effects devices in Reason, and build a new Combinator effect.
Simple Beginnings
Applying parallel compression in Reason raises a number of interesting questions about Reason's mixer and signal flow, but before we get drawn off on any tangents, let's look at a simple example.
We'll start with a rack containing a 14:2 Mixer, a Dr:REX loop player, and an MClass Compressor. We need to patch these so that we hear both a dry version and a compressed version of our drum loop. There are several ways to approach this — the screen above shows what is probably the best option (we'll discuss why shortly). This configuration uses a Spider audio splitter to split the loop player's output. A direct, unprocessed, connection is made to Channel 1 of the mixer, while another connection goes to the compressor. The output of the compressor is fed to Channel 2 on the mixer. This routing scheme gives you control of the balance of dry and compressed drums using the mixer faders.
Typically, heavy compression is used in this technique, as you can see from the Compressor front-panel settings in the screen opposite. Try setting up the example shown in your Reason rack, and soloing the compressed drums. The drums will sound thoroughly flattened and pumping, which you wouldn't normally want. However, blend in the original drums and you'll get larger‑than‑life drums that still manage to sound natural.
Drum Bussing
 Although conventionally used as a serial insert, a compressor in a parallel configuration can be useful for a 'best of both worlds' approach.
Parallel compression is usually applied to a submix of a song's drums, rather than its individual components. This is not the most straightforward thing to do in Reason, and is sometimes unnecessary anyway — for instance, when the drums are from a single submixed source, such as a Redrum, an NNXT sampler, or a Dr:REX loop. However, you may be using a mixture of a sampler and a REX loop, for example, and Reason's mixer offers none of the mod cons of most mixing consoles, such as internal buses or submix groups, but you can configure the same signal routing using multiple mixers.
The screen above shows how a number of drum elements can be connected to a dedicated drum mixer. The master output of this mixer is then connected to the main mixer, where the whole drum mix can be controlled from a single channel. Should you now wish to apply the parallel compression technique, simply split the master output of the drum mixer, and send a copy through a compressor and into another channel on the main mixer.
Routing Schemes
 Multiple drum sources can be submixed in a separate mixer, allowing the complete drum mix to be processed as a whole.
Why, I hear you ask, don't we use the aux sends and returns on the 14:2 Mixer device instead of all this manual patching? The sends and returns are, after all, designed for blending a wet and dry version of a track into the mix. Firstly, the sends are post fader (by default), so if you were to configure the compressor in a send/return loop via the mixer, the level going into the compressor would change as you moved the drum channel's fader. This would vary the compressor's response. To fix this, you could use Aux 4, which can be switched to pre‑fader mode. Now the compressed signal will remain consistent, but the level of the compressed signal will not change if you adjust the original. This is not an insurmountable problem, as you can use the Aux 4 return pot to control the level of the compressed signal. All in all, this is a perfectly workable method (and tidy, as you can see from the screen at the bottom of the page), but it is a bit fiddly to blend the levels, and it uses up the mixer's only pre‑fader aux bus.
Dealing With Delay
 An alternative parallel compression configuration, using the Reason Mixer's pre‑fader aux send.
Seasoned digital mixer users will probably be raising an eyebrow about some of the routings described here, due to the potential pitfall of digital signal latency. Routing a signal to the mix via two different paths is asking for trouble, because if there is a short delay in one of the paths, they will suffer phase-cancellation problems (comb filtering) when recombined. When the dry and wet signals are very different (such as with a reverb or delay effect), there is no problem, but with compression, the signal remains very similar, albeit with different dynamics.
Many digital mixing platforms get around this issue by employing Automatic Delay Compensation, which actively equalises delays to ensure that sources maintain their phase coherency as they travel through various signal pathways. Now, I don't know if Reason uses delay compensation for the signals in the rack, but there are no audible phase problems when going through the compressor and recombining the output with the original signal. This means that either there is some compensation happening, or the compressor's processing latency is very small. I have tried stacking large numbers of the MC Class effects in series to see what happens, and eventually you do hear some delay effects, but for real‑world use, there's no issue.
Having said that, there are a couple of situations that can cause problems. Firstly, if you use an aux send to route to an effect, it's sometimes tempting to connect the return signal directly to a mixer channel, instead of the mixer's aux return inputs. This is exactly what you'd want to do in this month's example, so that you can control the wet and dry levels with the faders. However, there appears to be a delay compensation scheme that operates between the main mixer channels and the aux send and return paths. If you break the standard wiring convention and return directly to the mixer, you get nasty phasing. So, er, don't.
The second thing to look out for is when using the Scream distortion unit. This is ripe for experimentation as a parallel process, because it has a nice tape compression algorithm and is generally great for crunching up drums. However, it inverts the phase of signals going through it (a bug?), which can cause the original signal and the effected signal to cancel each other out. A workaround is to pass the original signal through another Scream, but turn all the effects off or right down.
Pre‑fab
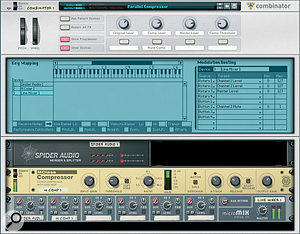
 A custom Combinator design for applying parallel compression.
The business of signal splitting and manual routing is not something you want to get into every time you sit down to write or mix a track, so consider packing this month's patch into a Combinator. Here's the basic idea: the Combinator lets you group together a patch of multiple rack devices into a 'black box' with a single set of controls and audio connections. This composite device can then be saved, for easy recall in future projects.
The screen below shows the front view of our parallel-compressor Combinator. The idea is simple: as before, the signal from our drums is split using a Spider splitter device, with one of the two resulting signals going to an MClass Compressor. Both the compressed and original signals are connected to a 6:2 Line Mixer device. Front‑panel knobs on the Combinator are assigned to the Line Mixer, allowing you to control the balance of dry and compressed signals. A master level control has also been added, as well as a knob to adjust the threshold of the Compressor.
 The rear of the parallel-compression Combi, with a loop player to show the cable routing.In the screen above, you can see that the new Combinator is connected in the same way as any of Reason's ready‑made effects devices. The Combinator is connected in‑line between the drums — in this case a REX player — and the mixer. You only need one connection to the mixer, as the Combi is taking care of blending the dry and compressed signals.
Once you've built the basic device shown here, you can experiment with your own customisations. For example, instead of separate level controls for dry and compressed signals, you could try creating a single crossfade control — see /sos/feb07/articles/reasontech_0207.htm for a description of how to do this. More fun is to be had by adding some other processing to the effects chain. If you want to explore the idea of building your own Combinator effects further, be sure to check out the July 2005 Reason workshop on the Sound On Sound web site (/sos/jul05/articles/reasontech.htm) for detailed instructions.
