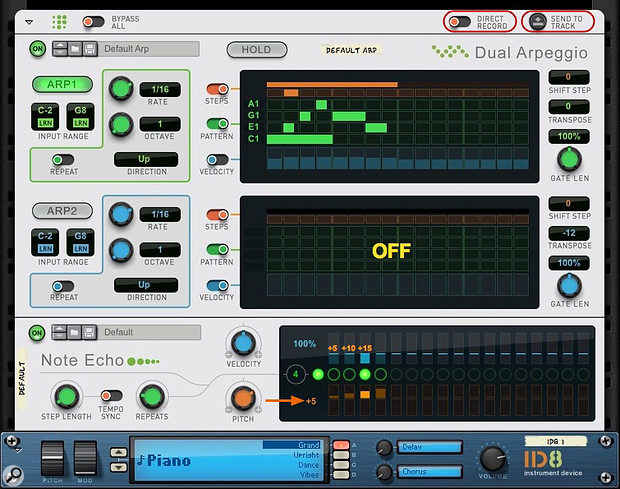
 Screen 1: The Dual Arpeggio Player (top) in Pattern mode changes an incoming chord into the step-sequence pattern. Note Echo then repeats each note in the pattern 15 semitones higher.
We show you how to integrate Reason’s new Player modules with Live.
In light of all the buzz about the new Players in Reason 9, it’s worth a look at using them with Live. We’ll begin by looking at how to set them up and then move on to combining them with Live’s MIDI effects.
Love The Player
Reason’s three Players are Dual Arpeggio, a pair of arpeggiators that work in parallel; Note Echo, a MIDI multi-step repeater with optional pitch-shift; and Scales & Chords, a fairly straightforward scale corrector and chord maker. You can use any number of these in any order to produce a dizzying array effects. For example, follow Dual Arpeggio with Note Echo to repeat each note in an arpeggio and have each repeat transposed by a fixed interval, or follow Note Echo by Scales and Chords to turn a single note into a chord sequence. You’ll find full details on each of the Players in our Reason 9 review, and in the Reason Technique columns of the September 2016 and December 2016 issues of SOS.
The main difference between Players and other Reason MIDI devices is that Players attach themselves directly to Reason instruments and Combinators; no cables are needed and no inlets or outlets are provided. All MIDI input to the instrument or Combinator is then first processed by the Players. One way to get to grips with Players is to insert Reason’s simplest instrument, the ID8, in an empty rack and then start dragging Players in above it. When you get a Players setup that knocks you out, drag a Combinator overtop of the ID8 to replace it and then use the Combinator’s Browse Patch button to try Reason’s huge library of Combinator sounds with your creation.
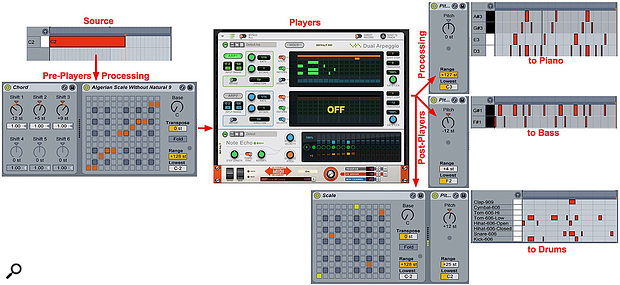
 Screen 2: A single note is converted to a chord and then scale-corrected before being sent to a Dual Arpeggio Player, followed by Note Echo. The Players’ output is then returned to Live where it is split into separate ranges for piano, bass and drum tracks. The notes to the drum track are scale-corrected to the desired kit pieces.
Going Live
You can use Reason’s Players with Live in several ways. When you want to use a Reason instrument with attached Players in a Live Set, the easiest way is to run Reason as a Rewire slave and use Live’s External Instrument to route MIDI to and audio from the Reason instrument. The same setup works when using MIDI clips in Reason to play the instrument, and in both cases you can then use the Live Set without Reason by Freezing the External Instrument track. Be aware that Dual Arpeggio might sometimes drop or delay notes when processing MIDI from Live. When that happens, simply export the Live clip as a MIDI file and use that on the Reason MIDI track. To then Freeze the Live External Instrument track, use an empty MIDI clip of the appropriate length on the External Instrument track.
When you want to use Reason’s Players to play Live instruments, you need to transfer the Players’ MIDI output to Live. The easiest way to do that is to attach the Players to Reason’s External MIDI Instrument (EMI) and route the EMI output to your Live track. You may need to use Live’s Track Delay control to compensate for a few milliseconds delay in the EMI transfer (you’ll find the details in the November 2014 Live Workshop). Alternatively, you can record the EMI output in Live, select all the notes in the recorded clip and nudge the whole sequence to the proper starting point. Dual Arp might also start one step late in some cases, and manual adjustment is the way to fix that.
Another option is to generate MIDI clips in Reason from the output of the Players and then export them to Live. You can do that by using either the Direct Record switch or the Send To Track button in the Players’ header panel. Direct Record records the output of the Players in a clip lane on the Reason instrument’s track; the MIDI source can be a real-time input, a MIDI clip played from Live or, if the Players are inside a Combinator, from a MIDI clip on the Combinator track. (As mentioned, when the source is a Live MIDI clip, the Dual Arpeggio output might start a step late.) Send To Track is deactivated when Reason is running as a Rewire slave, but it provides the most reliable solution. To use it, first create the source MIDI clip in Reason or create it in Live and export it as a MIDI file. Launch Reason by itself, insert the source MIDI clip on the track of the instrument attached to the Players and then click the Send To Track button. A new lane will be created for the clip generated by the Players and the source clip will be muted. Use the Export MIDI File feature on Reason’s File menu to export the clip as a MIDI file and then use that MIDI file in Live.
Winning Combination
Live has its own complement of note-processing MIDI effects (see the August 2015 Live column), but they differ enough from Reason’s Players to justify using them together. For example, Live’s Arpeggiator has more direction options (Styles) than Reason’s, but nothing resembling Dual Arpeggio’s Pattern mode. Using Arpeggiator’s Transpose section makes it behave something like Note Echo, but you can’t mute individual echo steps. Reason’s Scales & Chords gives you quick access to a handful of scale-corrected chords along with inversions and added notes, but Live’s Chord effect lets you dial in any conceivable seven-tone chord. Although you must configure it manually, Live’s Scale effect provides many more scale-configuring options than Scales & Chords. (For more information on using Live’s Scale effect, check out the box below.) One way or another, Live and Reason MIDI effects have you covered.
Scale: The Details
 Screen 3: Four ways to use Live’s Scale MIDI effect: scale filtering (1), scale-correction (2), Base-adjusted scale-correction (3) and chromatic scale inversion (4).Live’s Scale MIDI effect is an essential tool for many MIDI processes, but it takes a little getting used to. Its scale map is laid out as a 12-column by 13-row matrix of light and dark squares representing the white and black keys on a piano keyboard. Orange squares indicate the note mapping, columns represent incoming notes and rows represent outgoing notes. Here are some pointers to get you started:
- The default Scale Effect has orange squares on the main diagonal (bottom-left to top-right). That maps each note to itself. Click an orange square to block its note. Click a different square in the same column to map the column to a different outgoing note. In Screen 3 (1), notes outside the C Major scale (the black keys) are blocked, whereas in Screen 3 (2), they are mapped to the white key just below (Db to C, Eb to E and so on).
- Once you’ve created a mapping, you could change its key by simply moving each of the orange squares the same number of steps up and to the right, wrapping notes around as necessary, but Screen 3 (3) shows an easier way: use the Base knob to rotate the matrix down and to the left. Notice that this only rotates to the bottom 12 rows — the 13th row is always a copy of the first row an octave higher (convenient for raising notes to the scale root raised an octave).
- The Transpose control affects Scale’s output without changing the matrix or the mapping. For example, in Screen 3 (3) you are restricted to the Db Major scale, whereas leaving the Base at C and setting Transpose to +1 would let you play the Db Major scale using the notes in the C Major scale.
- The Fold button limits the distance between the input and output note to six semitones — larger distances are transposed up or down by an octave as needed to stay within that range.
- The Range and Lowest controls determine what notes are processed; notes outside that range pass through. Use Live’s Pitch MIDI effect before Scale to block those notes instead.
One of many novel things you can do with Scale is invert your MIDI keyboard (a process made famous by Joe Zawinul in the 1970s using an ARP 2600). Screen 3 (4) shows the first step: using Scale’s alternate diagonal to map C to itself, C# to B, D to Bb and so on. To complete the task, you need to use a MIDI Effect Rack with a separate Pitch effect for each octave you want to invert. Place the Scale effect after that Rack and set each Pitch effect’s Pitch knob to the appropriate multiple of 24 to make the remapping continue up and down the keyboard.
